Recommended Sites


Search results
Everyone just stay calm… and build a model…
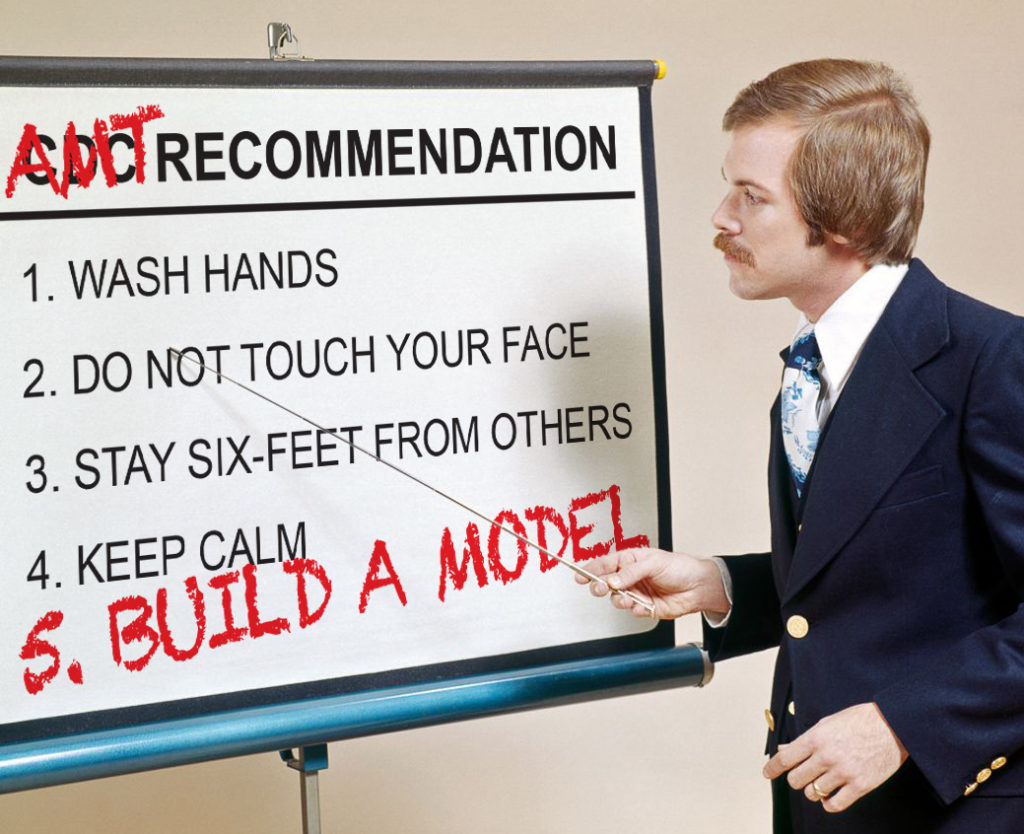
The world is a crazy place these days, but if you have to stay home… why not dig out that kit you’ve been meaning to get to…? Jump over to our Facebook page and show us what’s on your bench right now.
Round 2 wishes the best for modelers everywhere in the unprecedented situation we find ourselves in. Take care everyone!
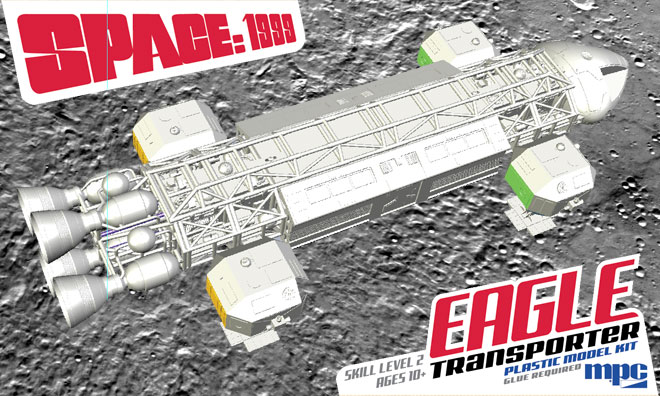
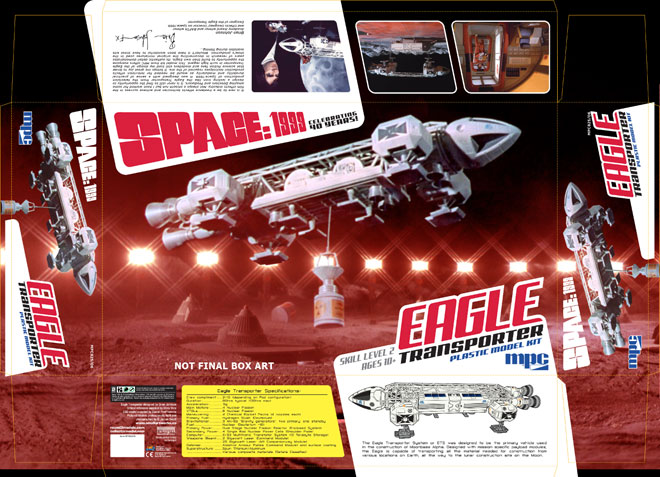
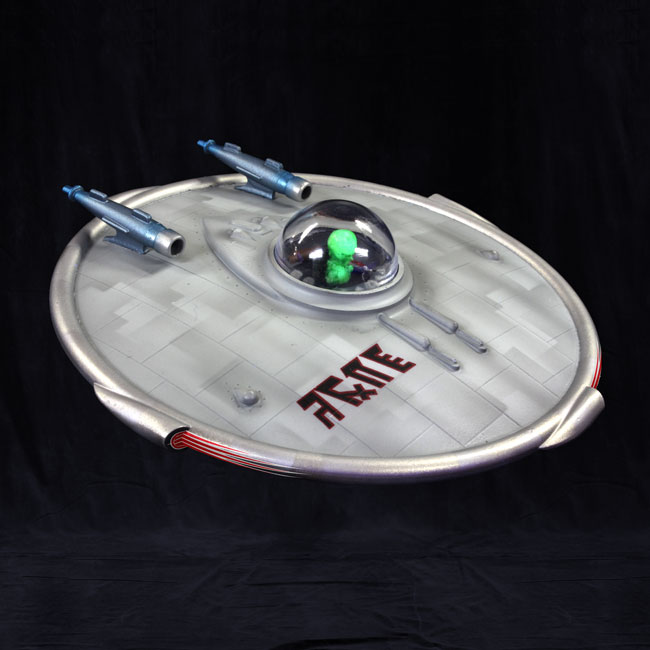
Space 1999 Model kits: MPC Eagle with Cargo Pod packaging part 1
I may have mentioned a couple years ago when I wrote about our first 22” Space:1999 Eagle Transporter model kit packaging that one of the biggest challenges deciding whether to showcase the ship in ways that have never been seen before by presenting an angle or environment never pictured on-screen OR to play up to the familiarity of nostalgia and try and do a close representation of one of the many memorable scenes ingrained in the memories long-time fans hold onto. That was the first mountain I had to conquer when it came to designing the packaging for our new kit of the Eagle with Cargo Pod that will be winging its way to modelers’ workbenches this summer. My approach on the first 22″ Eagle package was to come with a new, unfamiliar angle of the ship. Though some fans would have liked to see a different approach, most have come to accept that kit’s packaging as part of the identity of the product if not the ship itself.
As I worked on the new kit’s development, one particular shot kind of inspired me, but a close representation of the scene wouldn’t have delivered what I needed as it only showed a portion of the Eagle, and what we could see of the cargo pod was crowded in darkness.
Besides picking an angle of the ship, I had two other things to keep in mind. 1) Focus on what is different in this kit, the cental pod. I had to make sure it can be seen clearly. 2) As a point of branding the two 22” kits, use the same basic layout, logo size and placement used on the first kit. That meant finding something to work within the slanted trapezoidal space present in the first kit. An idea started to form in my mind that would basically show what would happen in the few moments after that one particular frame. If done just right, it would check all the boxes.
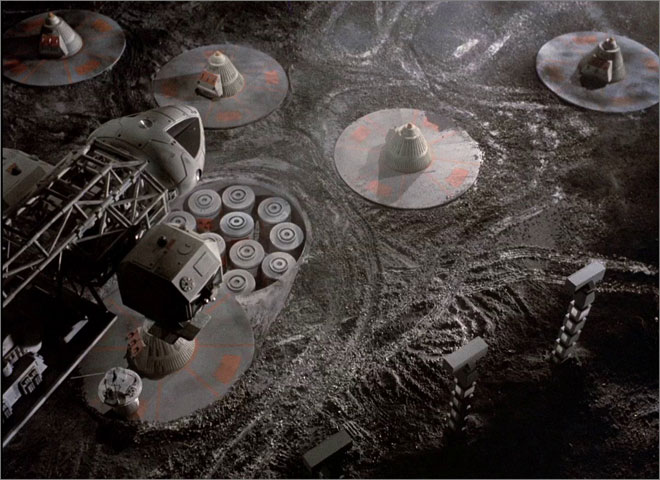
I knew I was capable of painting the illustration, but I’d need a little help to pull it off if I wanted to show all of the props on the moon surface. So as usual, I contacted Jim Small to run my idea by him. Offering opinions comes easy to him and I knew if I was way off base, he would tell me. Now, I’ll let you in on a couple secrets. 1) I am extremely selfish when it comes to being able to paint box illustrations. Once I form an idea, I get anxious to start in right away to see if I can achieve my initial vision. And 2) In a similar fashion, Jim is selfish when it comes to building and photographing his models. He sees that illustration has its place, but he thinks a photo of the actual product serves the purpose better. That, and he wants to showcase the hard work he puts into his… work… So when I say, “Hey, Jim, I’ve been thinking about what I want to do for the cargo Eagle packaging.” (as soon as I finish that sentence), he comes back with “Oh yeah. You need to show a photo of the ship like this!”
To which I say “no no. I want to do something more like this.”
A discussion ensured to figure out exactly what we should do. It didn’t take long for Jim to realize that the idea I came up with was a reasonable approach. I asked him if he could do some really loose mockups to use as placeholders for the nuke cones and lamp stands. I wasn’t looking for anything authentically detailed or fancy, just something that could represent the props size-wise in relation to the Eagle buildup when he did the photography of the buildup that I would use for reference. I would be able to draw in everything including the details if he could just provide some indicators. He said that wouldn’t be a problem.
Now, I am totally onboard with showing plenty of photos of the model on the packaging. We do full color box bottoms for that exact reason. Other than knowing I needed to show some feature photos on the box bottom and sides, I hadn’t thought through the specifics for those photos. Over the course of our discussion, we looked at a few other screencaps of the cargo-equipped Eagle.
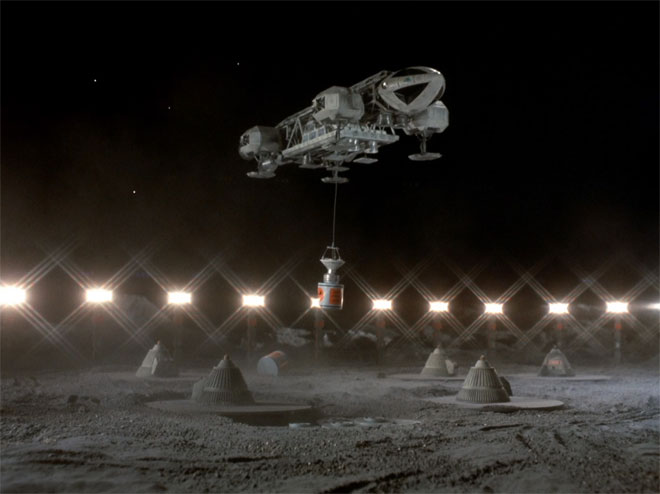
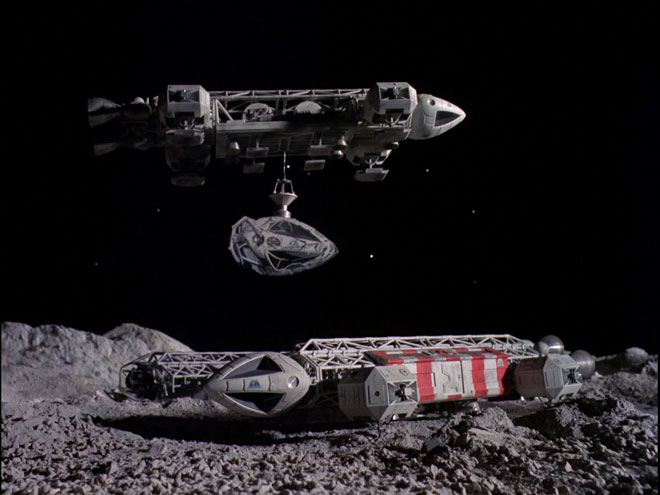
I said “You know, I DO want to show photos of the model in a familiar context like we did on the box bottom of the first kit. I know you like to scratch build stuff too. What if we did a close representation of the scene where the cargo Eagle carries away the damaged nose cone? We could composite everything so you really only need the one Eagle model if you want to scratch build the damaged nose cone from some parts I could send you.” Jim was intrigued with the opportunity and jumped in with both feet.
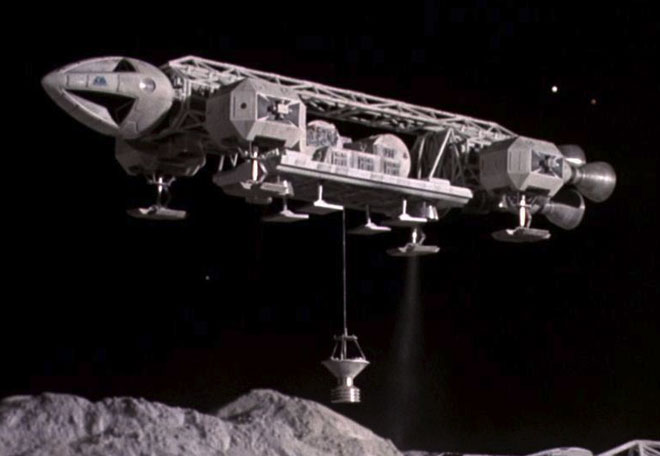
Getting back to the box illustration, I was starting to formulate an idea for the color scheme as well. Carrying over the design elements from the first package established the branding well enough, and I wanted to shift the color scheme from the first so that they wouldn’t be confused on the store shelf when viewed from a difference. For whatever reason, I always liked this shot of the Eagle (even though it is the 22″ model), and one of the reasons for that might be the mysterious red glow coming from within the storage elevator.
A white-ish ship over a gray moon doesn’t allow for much in the way of color. The show did a masterful job with lighting the ships to allow them to pop dramatically enough. But my purpose here was to imbue the image with enough color to make the kit jump off the shelf, and hopefully become as memorable as the first kit. I decided to explore a “RED ALERT” motif.
While we were still waiting on test shots to build for the photography, the need arose for box mockups to display at a couple early trade shows. Knowing that I couldn’t show with any accuracy what I intended for the final package look, I cobbled this together to at least portray the subject, setting and color scheme. It serve its purpose, but the future would hold greater things…
Next time we’ll have a special blog post from Jim Small to provide his side of the story and showcase the handmade miniatures he did that went way, WAY above and beyond what was originally asked for. After that, I’ll be back to show off the process of the box illustration before finally revealing a look at the new MPC Cargo Eagle model kit packaging!
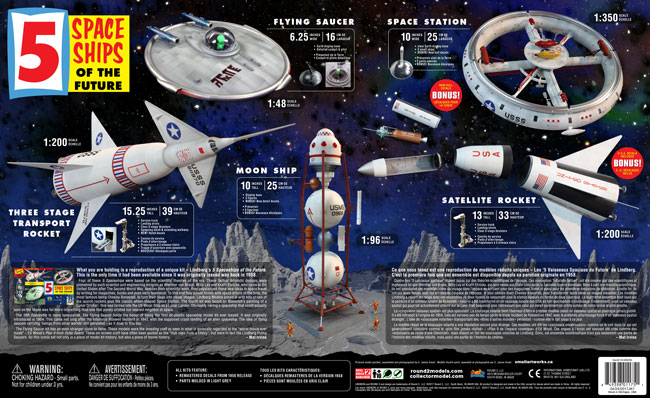
Lindberg Model kits: 5 Space Ship of The Future! Back from the Past
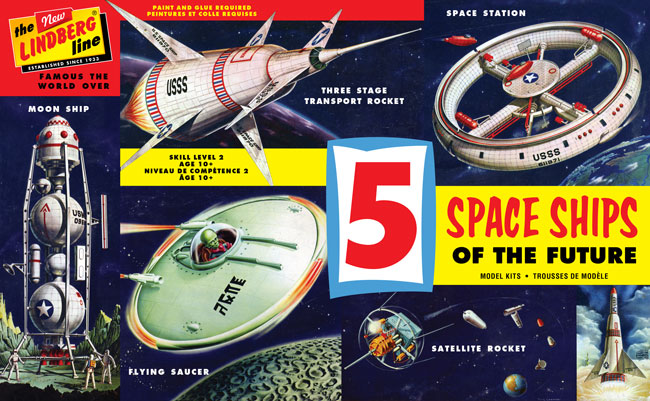
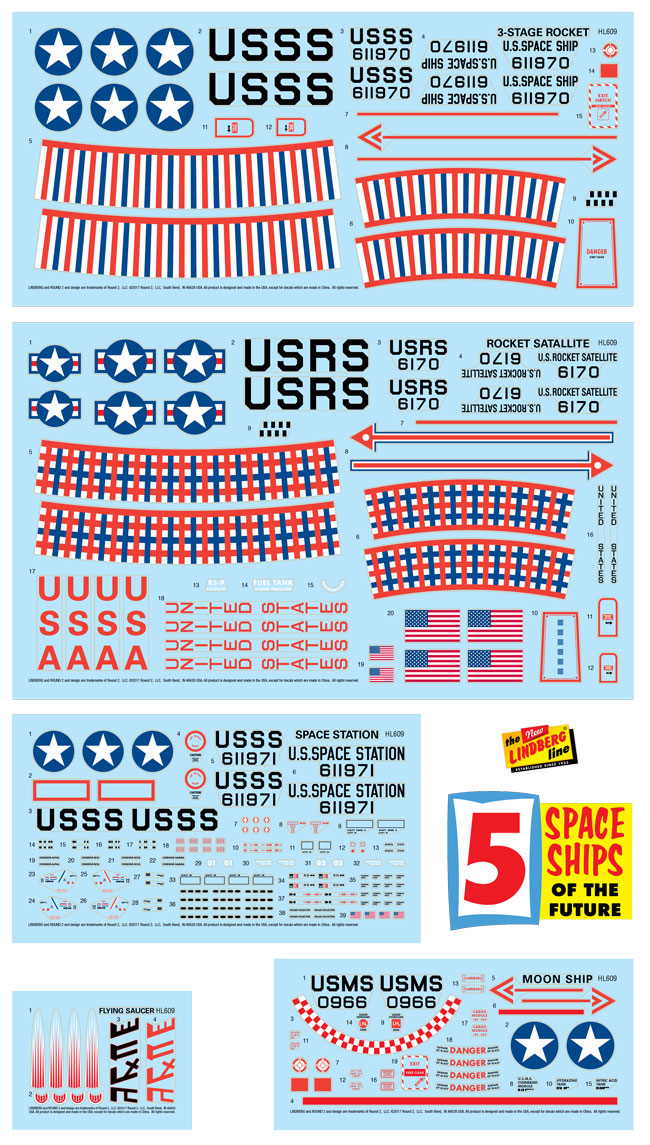
Blasting from the past is Lindberg’s 5 Space Ships of the Future. Considered to be Lindberg’s most iconic and sought after kit, the futuristic 5-pack will finally be available for the first time since its originally release way back in 1958. Along with 5 complete model kits, the release will features vintage boxart, retro-inspired decals, and a few new twists. The 5 decal sheets are remastered from the 1958 versions but with a better fit and details, and include all new decal options inspired by the kits rich histories. Also for the first time ever parts are injected in a spaceship grey.
The all new full color tray features amazing models painted, assembled and photographed by E. James Small. Check out more of his work at smallartworks.ca.
Kat Chat: Behind the scenes with John Mueller and the SUPER BOSS!
OK modelers, we’ve got a real treat for you this week! It’s an inside look back at the development of one of the most anticipated kits that we announced this year… Tyrone Malone’s AMT Super Boss Kenworth Drag Truck! You don’t get to go behind the scenes like this too often! And who would be better to tell this amazing story than the man who did the development of the kit itself! That’s right, it’s a veteran AMT Kat and talented designer… John Mueller! John played an integral role in more ways than one, but allow us to step aside and let John tell it like it was…
The Tyrone Malone Super Boss kit was one of my most memorable projects, perhaps even my favorite. Either way it was due to meeting and knowing for a while, Jerry “Tyrone” Malone. He was a real character – a “wild and crazy guy!”
I think it was spring or early summer of 1977 when AMT’s president (“CEO’s” hadn’t been invented yet) said to me, “There’s a guy who calls himself Tyrone Malone who drag races a customized semi-truck. He says we should make a model of it. He’s going to be at a truck show in Cincinnati; go down there and see what he’s all about.”
The CB radio/trucker show was held in an older convention or sports arena. Malone’s display booth was close to the parking lot entrance so he wasn’t hard to find. After our introductions, he began his story of getting started in promotional operations, beginning with “Little Irvy the frozen whale”, the “Boss Truck of America” custom Kenworth, and the “Super Boss racing truck”.
Then, while I was explaining model kit design & development, tool costs, etc., to Malone, who should walk up to us, dressed in “Viva Las Vegas” white buckskins, but none other than Evel Kneivel!
Well, the brag-fest started immediately and was more fun than watching an ape eating ice cream! They bragged about who had the best “show”- sponsors, displays, haulers, etc. And then a photographer showed up and took pictures of the two of them doing mock “face-off challenges.”
After Knievel moved on, Malone says, “c’mon, let’s go outside an’ I’ll show you what I do… you got a camera”? We went out to the parking lot where the Super Boss truck was parked on display; he warmed up the engine and told me to station myself with the camera about 40-50 yards down the center aisle of the lot. Mind you, there’s a lot of cars and trucks parked in this lot. Then Tyrone Malone commences to do burn-outs & hole-shots right down the middle of it all!
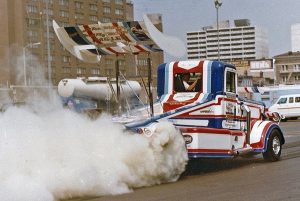
Tyrone Malone doing one of his trademark burnouts in Cincinnati, 1977
J.W. Mueller photo
That evening over dinner, Malone told me how it all got started by his having dinner in a California restaurant that had a live shark in an aquarium; the owner said his business doubled after he got the shark. Malone decided he just needed a bigger fish – like a whale! Well, technically a whale is not a fish, but that shark gave him the idea for “Little Irvy” the frozen whale- that he could haul around the country and people would pay to see it. Do an internet search for “Tyrone Malone” and you’ll probably find the story.
Anyway, when I got back to AMT and told management about Malone and showed them my photos, I said a Super Boss kit would be a refreshing addition to our truck kit line. Plus, I thought Jerry Malone was such a good promoter he just might be our best salesman. But then came the inevitable, dreaded cost vs return question: “It’s a one-trick pony- what else could we do with the tooling”? With that, the meeting adjourned.
Malone called and wrote several times after that, asking if anything was happening on the model kit idea. Regretfully, I had to say no, the execs were not convinced it was a good idea. Finally he says, “I think I need to come up there and show them my trucks”. I said, “OK, I’ll back you all the way, but there’s no guarantee that they’ll say yes.”
I think it was mid-to-late July when Jerry Malone showed up at 1225 East Maple – for the first time.
One of our security guards called saying, “There’s a guy down here, says his name is Tyrone Malone asking for you and he’s got some kind of custom truck on a trailer.” When I got to the parking lot and saw that it was indeed “Tyrone” I called our president and VP of operations and asked them to come out to meet the “Daredevil Diesel Driver.”
Introductions were made and while Jerry was giving everyone the 50 cent tour, a local TV station news truck pulled into the visitor’s parking lot. What we didn’t know was that Malone had already contacted the TV station, giving them a quick run-down on himself and advising what was going to happen that afternoon would be newsworthy. Turned out he was right!
The main entry driveway for AMT was on the west side of the building and ran north from East Maple (15 mile road) to the rear of the plant about 350 or 400 feet, where shipping/receiving was located. Malone unloaded and warmed up the Super Boss, told the TV news crew to get ready, and then did a brake-lock burn-out and speed run up the driveway alongside the AMT plant!
Then he turned around and did the same thing on a return run toward the front of the plant.
Just as Malone was racing back toward the street entrance, a UPS truck pulled in to make a delivery. Needless to say, there was a heavy application of brakes on two trucks – one brown and the other red, white & blue! I think the UPS driver might have made an unexpected delivery that day!
By that time, there was already an audience of AMT employees who got away from their duties. Our president, recognizing that a major PR bomb had just exploded in front of him, shouted to his secretary, “Get me a contract, get me a contract!” The Super Boss model kit was a go project, right now.
We were to start the project as soon as arrangements could be made for Malone to bring the Super Boss back for photography & measurements – he was in the area at this time for sponsor commitments – canny devil, eh? I would do the reference photography, measuring and design drawings myself, and leave the other designers to work on already scheduled projects.
Malone brought the Super Boss back to AMT sometime in August, and he and his wife stayed in their motorhome on the AMT property – you could say we were definitely “plugged in.” And as I recall, I think they were suitably entertained at our president’s home in Birmingham during their stay.
I still remember that day he drove the Super Boss inside the plant so I could photo & measure the underside. He had installed an air horn from a GM Diesel locomotive; when he parked the truck inside the plant he let off a “Casey Jones” blast on the horn. To say that Tyrone made a startling appearance would be an understatement. More than a few bathroom breaks ensued for the assembly line ladies!
With the exception of the tires, which were drawn later by another designer, I created all of the part design drawings, starting around September of 1977, thru mid ’78. So, for better or worse, I’m the guy to blame for any design flaws.
During this time, Lesney-USA negotiated the purchase of AMT. In August/September of ’78, manufacturing moved to Baltimore, Maryland. A reduced AMT office staff remained in Troy. The next time I saw Jerry Malone was in Baltimore, when the first Super Boss model kits ran down the final assembly lines. A few of us got autographed, “first editions” and we all celebrated the event.
Back in ’77 the question had been, “what else can we do with this tooling?” Thanks to “Tyrone” Malone’s promotional drive (and Kenworth connection), he followed up the Super Boss truck with the “Bandag Bandit.”
Through regular communication regarding radical changes, we were able to economically produce the “Bandag Bandit” from the Super Boss tooling. And then came the “Papa Truck” & “Hideout” hauler truck models from new Kenworth Aerodyne COE kit tooling. As I said previously, I thought Tyrone Malone would do as much good for AMT as AMT would do for him.
I think the last time I saw Jerry “Tyrone” Malone was at the fairgrounds in Minneapolis/St. Paul in August 1978, when I photographed the Bandag Bandit truck, along with the rest of his “100 million dollar truck show.”
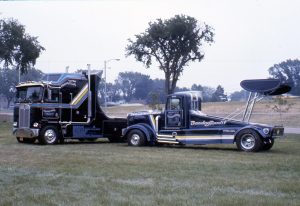
Bandag Bandit & Hideout truck Minneapolis, MN, Aug. 1978
J.W. Mueller photo
I don’t think I’ve ever had a more enjoyable, slightly crazy working relationship with a vehicle owner during all my years as a model kit/die cast product designer. Had it not been for the short-lived Lesney ownership of the AMT brand and lack of follow-up by ERTL, there might have been more model Malone vehicle replicas for those interested, to enjoy.
So there’s my Tyrone Malone story. Now I’ll just recall sitting across the table from Jerry Malone a couple of times, hearing great stories, joking and laughing. What a hoot!
J.W. Mueller
5/25/16
… and there you have it folks! We are extremely grateful that John took the time to tell us this awesome tale from the glory days of model kit manufacturing. Thanks again John!
We’re also excited to say that the reissue of the Super Boss Kenworth, after a thirty year absence, turned out great and will be available at select retailers real soon!
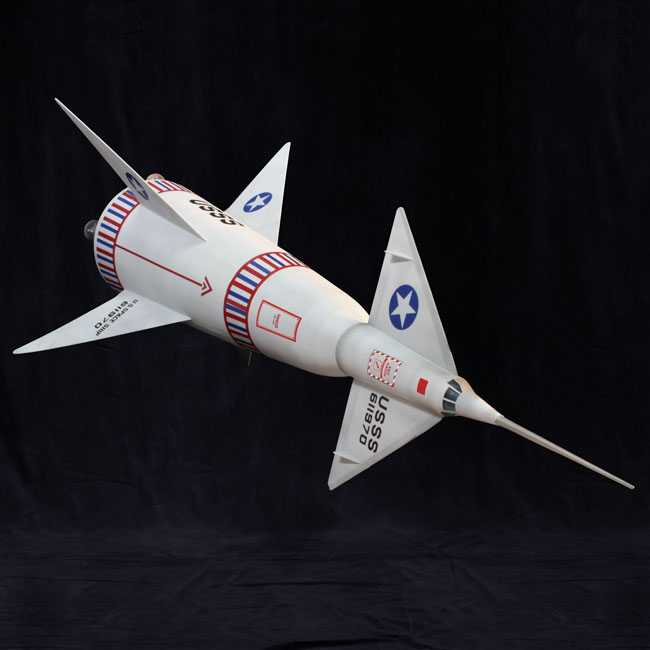
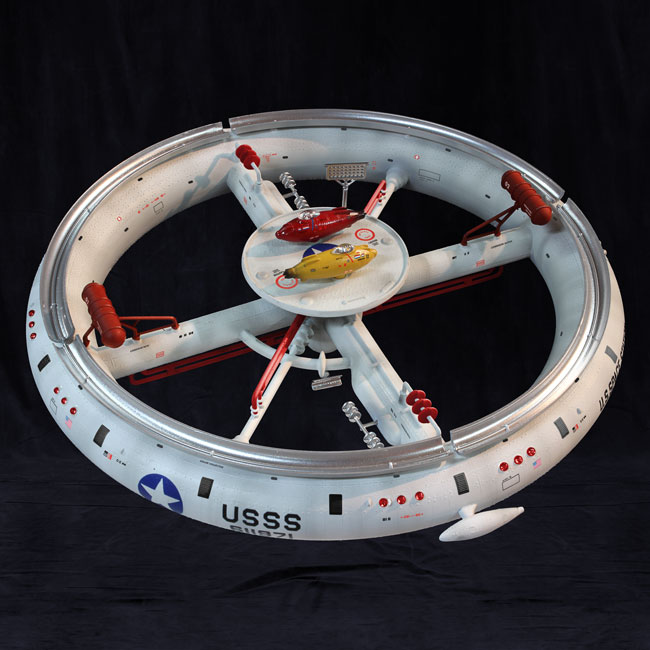
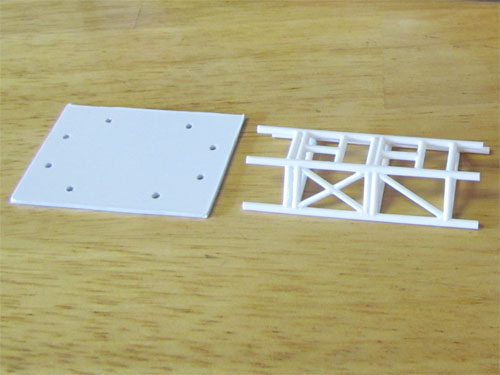
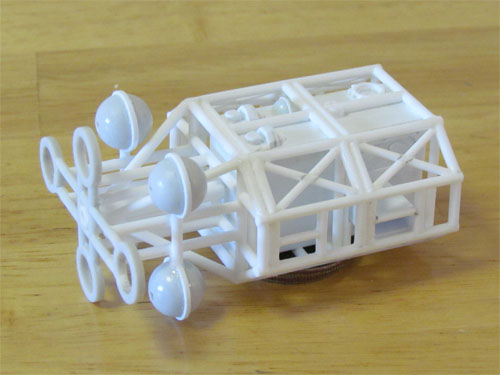
Transforming the Classic MPC Eagle Kit – Part 1
As promised, here is the first in a series of articles by Michael Scarola showing the steps he has taken to accurize a 12″ MPC Eagle.
Transforming the Classic MPC Eagle Kit – Part 1
After all these years I finally got around to building a Space 1999 Eagle. The Eagle is a unique ship that actually looks like it could work as intended. I love its organic yet utilitarian design. For this build I started with an MPC Eagle and decided to make some modifications of the existing kit parts and also do some scratch building along the way. The MPC Eagle 1 kit is a classic that has been around since the TV show began and represents an Eagle nicely but does have some simplified sections and details that I felt I could improve upon. I wanted to use as much of the original kit parts as possible while attempting to make it accurate to the original Eagle 44” studio model.
The build…
I used a WARP kit I have and access to a friend’s set of Daniel Prud’Homme Eagle blueprints as reference. I decided to start by scratch building the front and rear cage sections. I made a jig…
…out of a couple of pieces of 1.5 mm styrene sheet that helped keep everything straight and aligned. Using a round file I ‘fish mouthed’ the ends of the styrene rods so it would all fit together the same as the studio model. 2 mm styrene rods were used for the larger main rods and 1.6 mm rods for the smaller ones. This image shows one of the cage sections after removal from the jig.
The MPC kit’s spine was shortened and narrowed and a flat file was used to re-shape the tubing since they are flat on the backsides. I replaced the inner supports with 2 mm and 1.6 mm styrene rods.
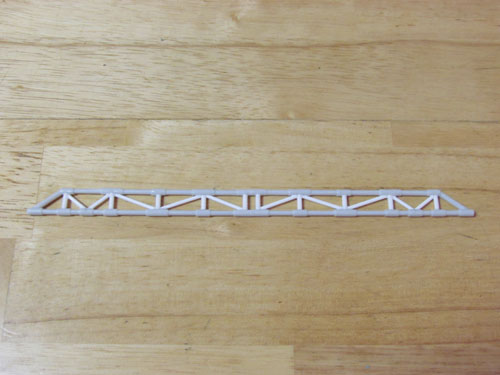
The corridors inside the spine were scratch built using 1.5 mm sheet styrene with channels made for attaching the shoulder pods. The doors at the ends of each corridor are pieces of .5 mm styrene layered to create the recesses.
The original 44” studio model’s corridor doors were drawn on but these doors match the ones on the passenger pod and look more realistic so I went with this approach.
The details on the sides and tops of the corridors…
…were made from scaled down measurements taken from Daniel Prud’Homme’s Eagle 1 blueprints. I used .4 mm sheet styrene layered and other various sizes to create the side details that were actually kit tank parts on the original studio model. All the grill details are made from open grate platforms from Tichy Train Group. The details on top were a bit more challenging. On the studio model most of these consisted of model parts from Saturn V and Gemini kits. I layered .4 mm styrene for the ‘Saturn V’ end details and shaped the ends of sprues taken from a Polar Lights 1/1000 TOS Enterprise kit for the round ‘Gemini’ details. The Polar Lights 1/1000 TOS Enterprise kit has some nice large diameter sprues that I’ve used to scratch build parts on a few models I’ve worked on. That kit keeps on giving.
Now that the cages and corridors were completed I put them together using 2 mm diameter styrene rods that now completed the sections.
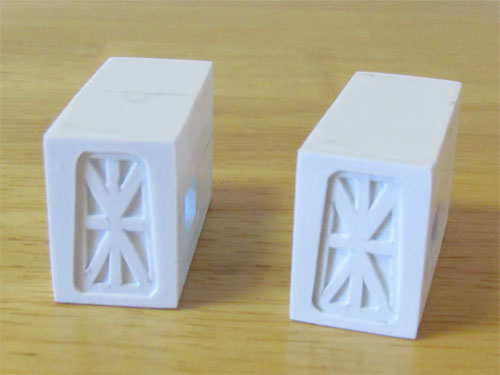
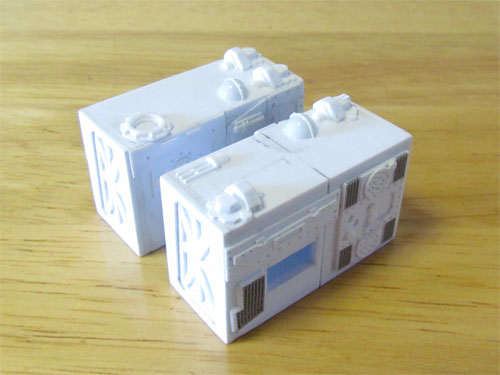
It was now time to move on to the rear of the Eagle’s frame. 2 mm styrene rods were used to make the framework that the cross section frame is attached to.
I used all 4 of the engine bottles and ‘balls’…
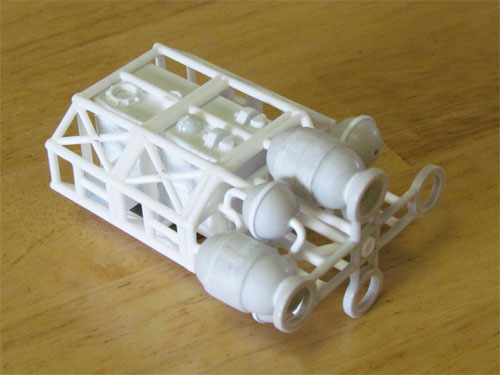
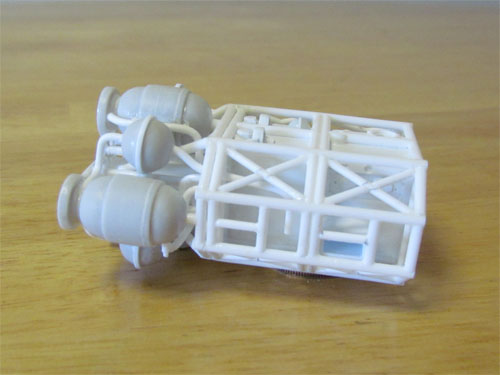
…as well as the rear cross frame from the MPC kit. I modified these parts a bit to more closely match the studio model. The bottles were shortened and new raised detail glued in between the ball halves. The piping, matched to the blueprints, was added to tie it all together.
In the next installment I’ll cover the building of the shoulder pods, landing gear, command module, passenger pod and the cargo pod…
Michael Scarola
Lindberg Table Top Navy: HMS King George V and HMS Dorsetshire
First, for those of you I haven’t met my name is Chris Purvis. Last year I manned the booth at Wonderfest with Jamie. I work primarily on the Lindberg/Hawk line doing the military and historical kits (airplanes, naval boats, sailing ships, tanks, etc.). The occasional car or oddball kit will also end up on my desk. Before switching over to Lindberg in 2014, I worked on the Forever Fun line. Next month I will be celebrating 3 years with Round2. Also, I am a big nerd for movies and vintage sci fi, so if you want to get off topic in your comments go that direction. -ChrisP
Available soon will be the 3rd 2-pack in the Lindberg Table Top Navy Series, the HMS King George V & the HMS Dorsetshire. The kit features two World War II British Battleships in 1:1200 scale. Like the previous ships in the series, they can be displayed as Full Hull or Waterline models.

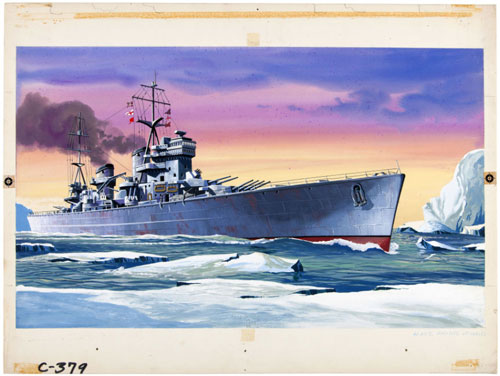
Recently we’ve been able to acquire some of the original box art paintings used on old Pyro and Lindberg kits. The King George V box art is from a new scan of the 1959 painting. It is amazing to see some of the original detail and brush work put into these pieces of art.
For the Dorsetshire I scanned the 1959 packaging. From my research I could not find any references to the ship ever have the depicted camouflage pattern. I altered the image to show this known hull scheme.
Before….
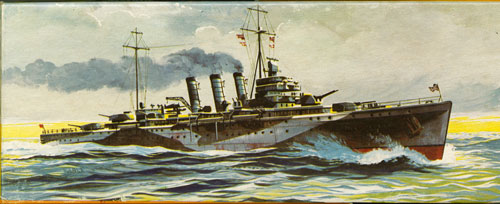

After…
The kit will include that hull scheme for the HMS Dorsetshire as a decal, along with a dazzle camo option for the HMS King George V.
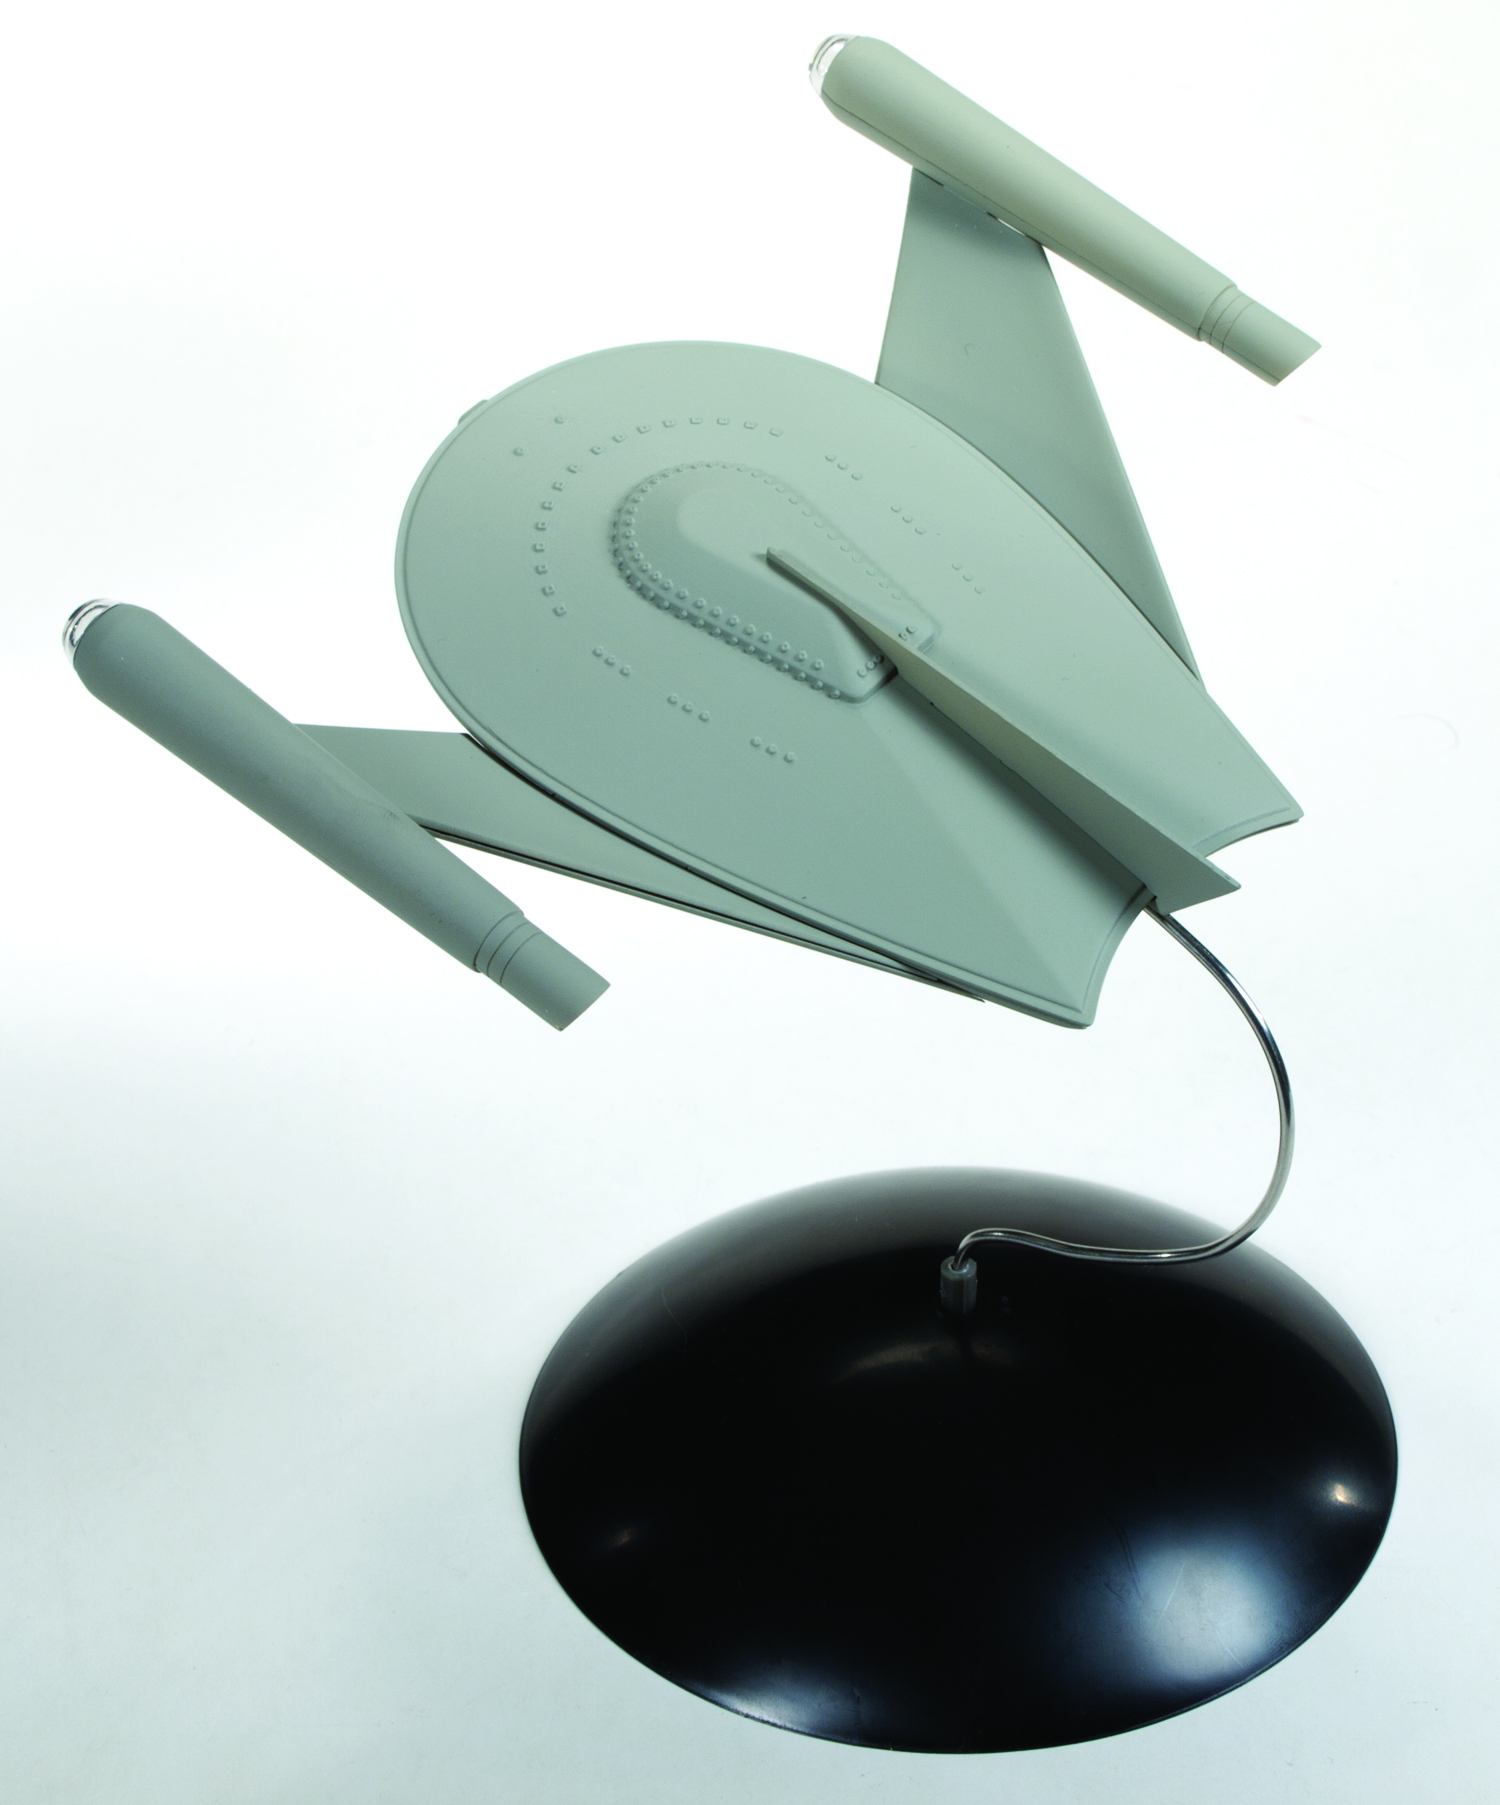
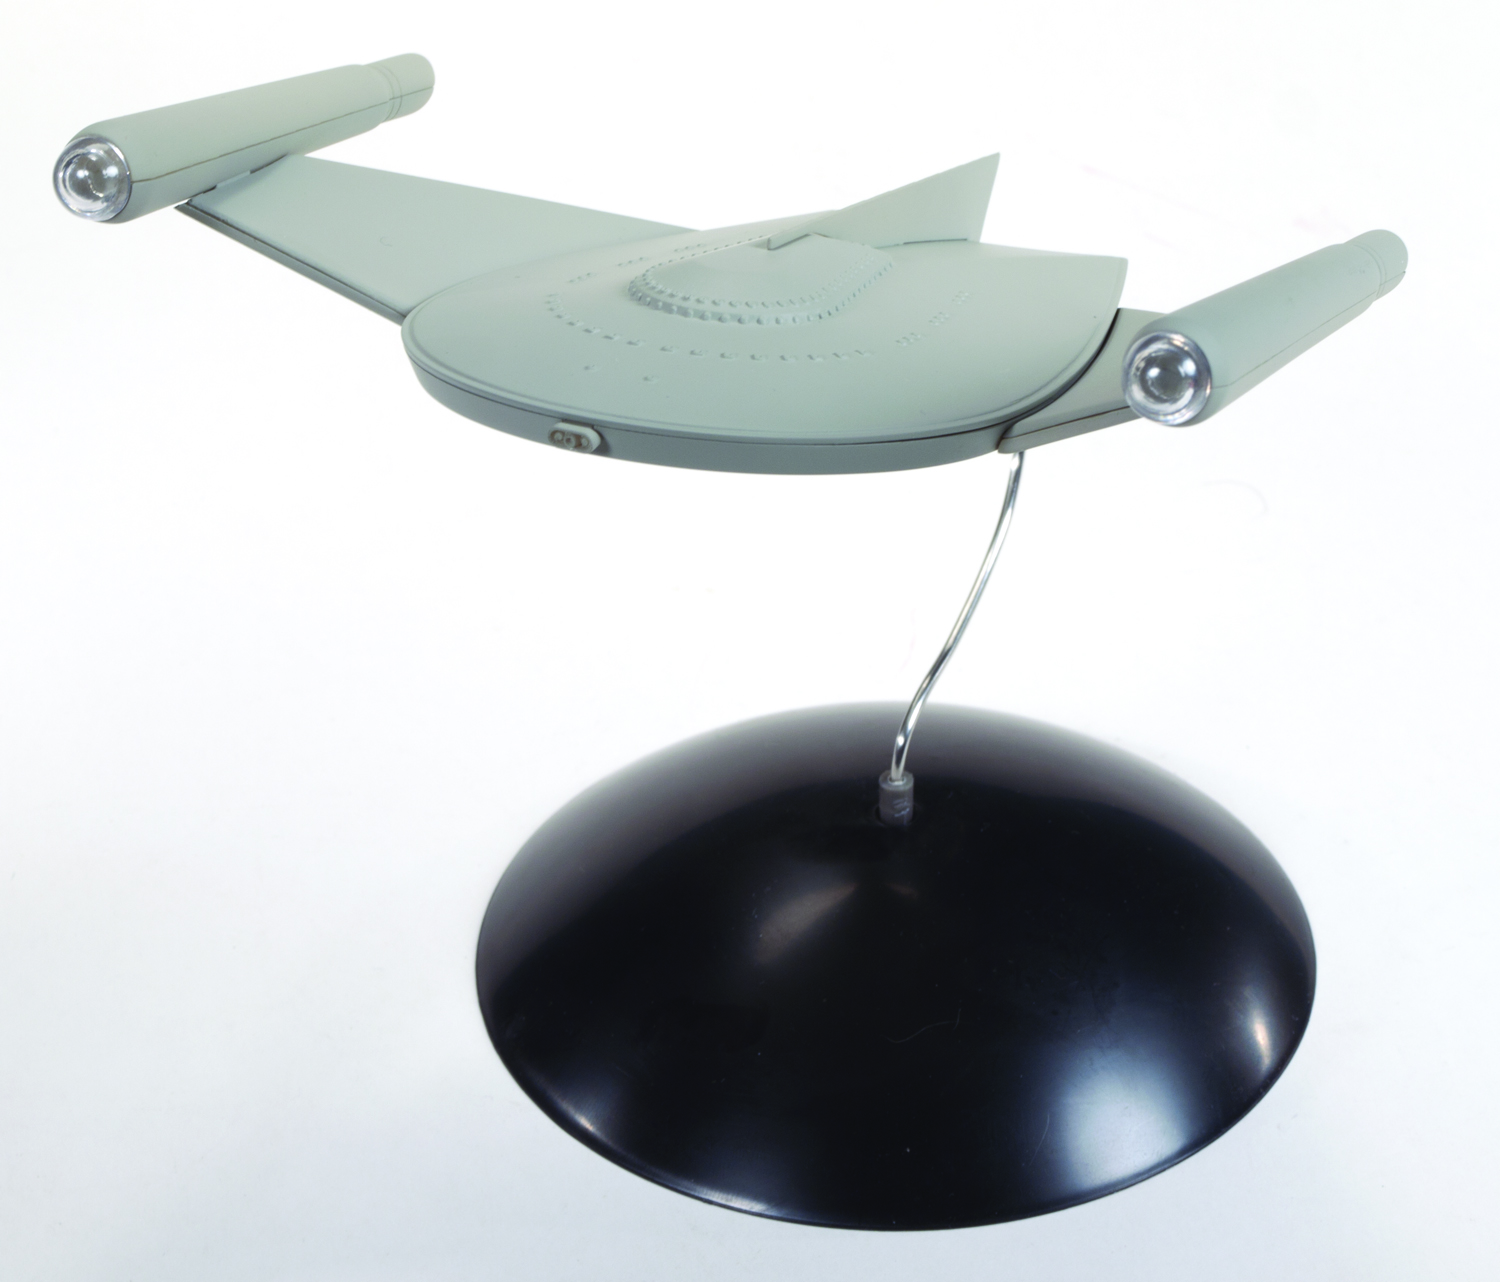
Polar Lights model kits: Romulan Bird-of-Prey progress
We announced that we would be bringing out a new Polar Lights model kit of the STAR TREK: TOS Romulan Bird-of-Prey back at Wonderfest in May. We’ve shown around some of the preliminary 3D work, but we recently received the mockup of the kit. here is a first look.
Some may have noted that we showed an earlier version at iHobby in October. In many ways it was not up to our expectations, but this version is about ready to go. Some may be disappointed that we were not able to reproduce the saucer front/side windows due to tooling restrictions. I’m sure enterprising modelers will find a way to introduce that detail back into the model. Overall, the kit looks great though.
3D work was done once again by Angelo Bastianelli based on reference by Gary Kerr and Petri Blomqvist. Petri is a lifelong fan of this particular ship and the shape and proportions were painstakingly determined by building his wireframe over screen caps of the original filming miniature.
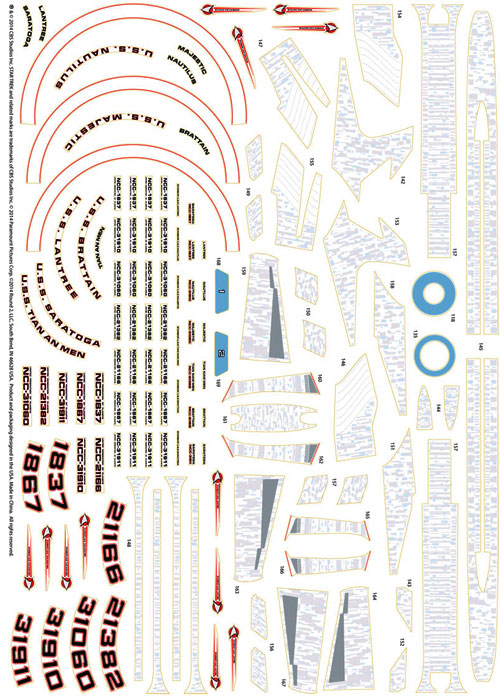
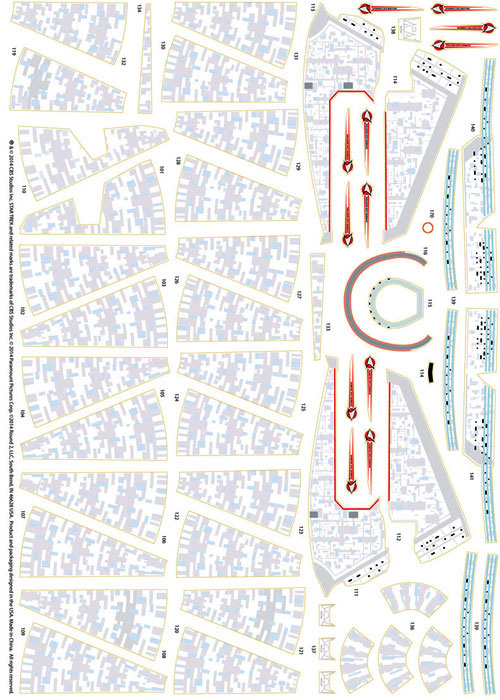
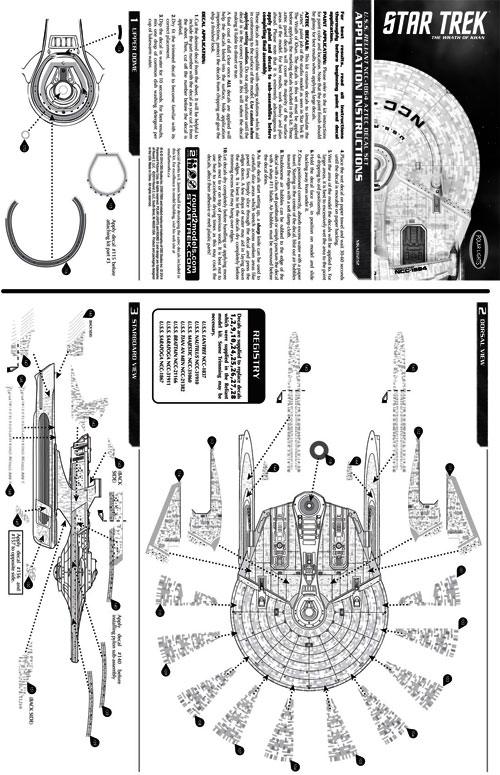
Polar Lights Model Kits: U.S.S. Reliant Aztec decals
Hi guys-
I promised this post a while back. I know we are running behind on getting the U.S.S. Reliant decals out to market, but they should be here by the end of August.
The images below show you what to expect so you can plan ahead so you can start building while waiting for the decals. as expected, it s a our usual aztec wrap and we’ve added in several alternative names and registries as well. A preview of the instructions gives you a better idea of how they are broken up and placed on the model. I’ve pumped up the contrast of everything I am previewing here so you can see it at the relatively low resolution that our blog system restricts me to.
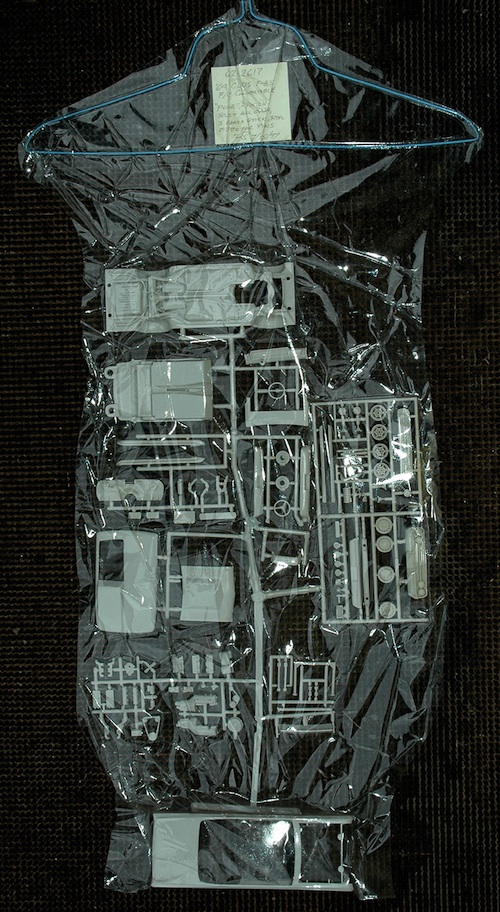
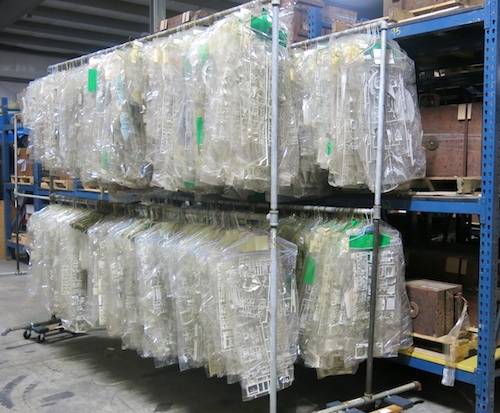
What’s a hanger shot?
In the late 1990s, Ertl began a tool sampling program. This was prior to the buyout by Racing Champions (RC2). The goal was to set up every model kit tool, one by one and create test shots of the parts. Then, a physical system was to be devised so that the test shots could be easily viewed and referenced. It did not matter if it was a large, primary body tool (which very often contains everything except clear parts and tires) or a smaller window or taillight tool, or even a tire tool. Sample shots were to be produced.
As many of the tools had been used to create alternate or updated versions of the respective kits over the decades, in some cases there were parts blocked off. Efforts were made to unblock the closed gates to allow all the parts cavities currently in the tool to be injected with plastic.
In the end, not all the tools got sampled. When RC2 bought Ertl the program was cancelled and tools started getting shipped overseas. However, an impressive number of tools did get checked and sampled and the shots thereof have proven to be a big help in finding and putting some old kit tooling back together!
The method that was developed to catalog and display the hanger shots was to sandwich them between two clear sheets of mylar, with a metal clothes hanger at the top. Now they could easily be hung up and viewed. Racks were built to hang them all on and they were set up in a dedicated portion of a warehouse room. The first time I visited that room, it was an overwhelming sight. Many of the shots represented kits that had been reissued in recent years, but many others were exciting models that have not been reissued in decades. For an example, one of those shots was the MPC Daytona Transport Truck. As most of you know, we were able to reissue this kit back in 2012 already! Seeing that hanger shot definitely help put things in motion.
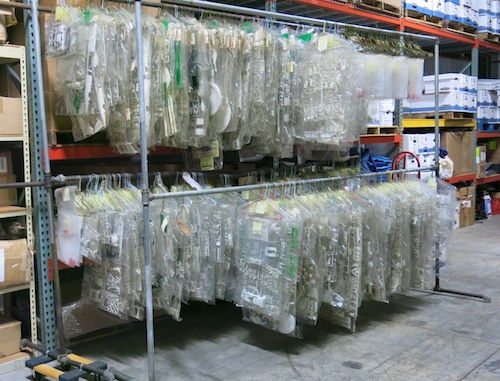
With Round 2’s purchase of all the AMT, MPC and Polar Lights tooling, all the existing hanger shots were acquired. I’m happy to say we finally have these set up in Round 2’s warehouse and wanted to share a couple photos with you, to give you an inside look at a system that will help us to continue bringing you as many sought after kits as possible!
Polar Lights Model Kits: Superhero Modeling Favorites
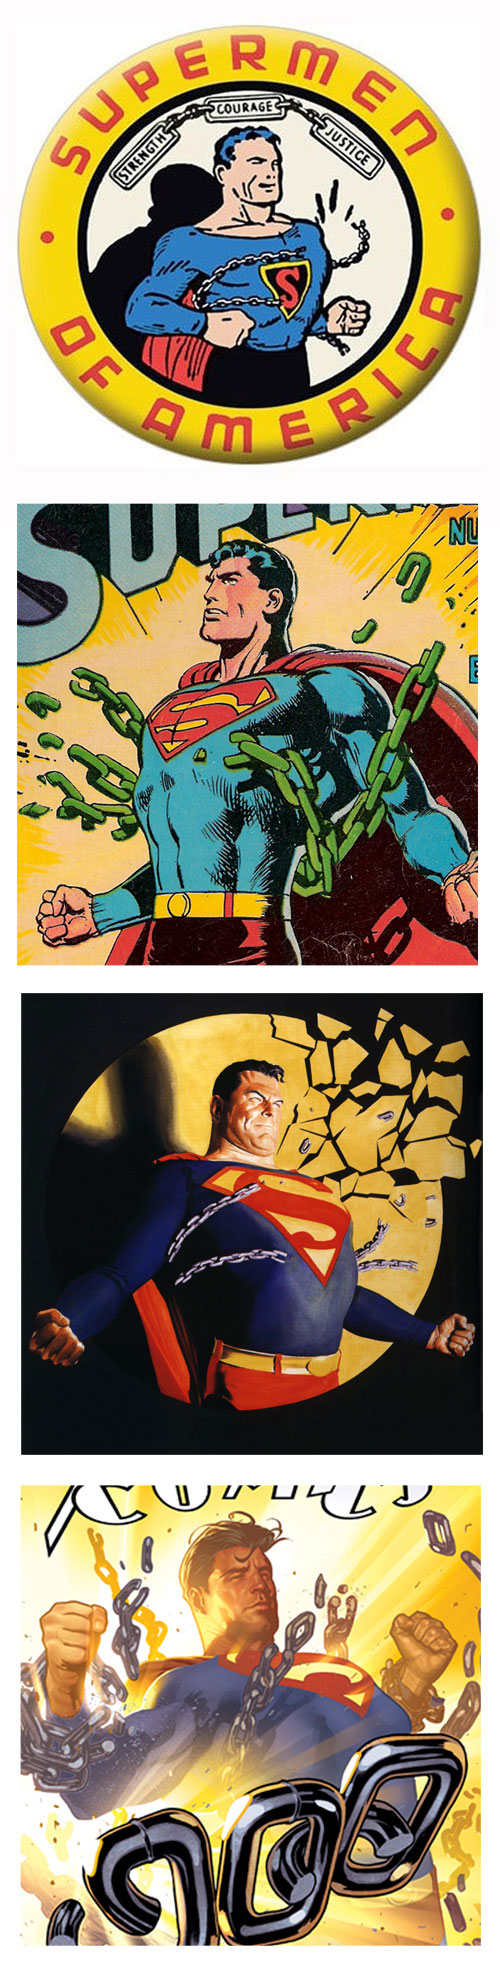 The popularity of mainstay pop-culture characters can be tracked back to the earliest instances of licensed merchandise. Superman debuted in the comics in 1938 and less than a year later, the first merchandise was offered to the burgeoning crowd of fans. The Supermen of America Club supplied members with a button and official membership card. Supermen of America rings were offered to new members in 1940 and over time have become one of the most sought-after collectibles ever. In the early years, trading cards were introduced. They were followed by nearly anything that could have a Superman logo applied to it from lunchboxes to puzzles, books and records, action figures and of course… today’s Superman model kit.
Characters like Superman change with the times, but still resonate with every generation. As sensibilities evolve so do the characters and the various 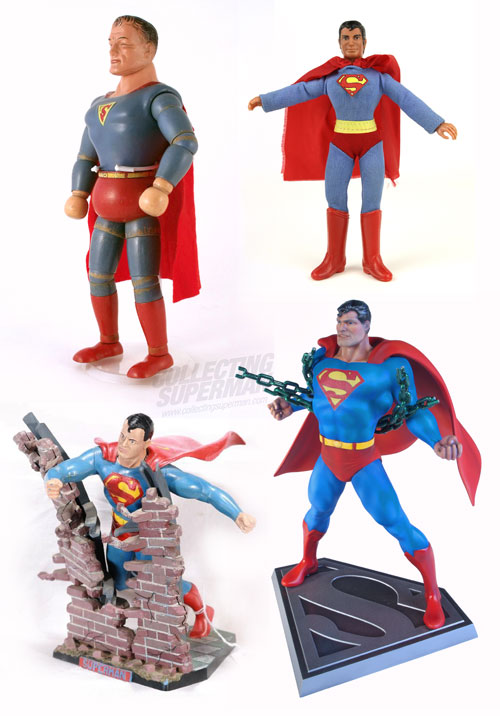 interpretations of them. Technology allows our look at the characters to become more defined. In the comics, the original interpretations offered on pulpy page stock by his creators Joe Seigel and Jerry Shuster gave way to the visions of Mort Wiesinger and Curt Swan (among many others) to the more contemporary renderings by Neal Adams and John Byrne to the version offered on today’s glossy page stock or the subtle glow of a tablet. The big and small screen offered a range of interpretations from the shorts created by the famous Fleischer Studios which put still images into stunning motion in a series of cartoons to the live-action serials starring Kirk Alyn to the TV series starring George Reeves to the most fondly remembered depiction supplied by Christopher Reeve in four films to last summer’s blockbuster film.
Every time we see a character depicted in a new way, we are biased (whole-heartedly or in part) by the previous interpretations of him. Some people are die-hard fans of the old stuff, the stuff they grew up with as kids and have loved ever since. Some people are coming to the party late and they latch on to the version being offered at that time. Some are into it for a while and eventually let it go. Others are life-long fans.
For sci-fi and pop culture modelers, I’m not telling you anything you don’t already know. You know if you like Star Trek better than Star Wars. You know if you like STAR TREK: The Original Series better than STAR TREK: The Next Generation. You know if you like the Curt Swan interpretation of Superman better than Jim Lee’s. Classic TV show Batmobile or the Tim Burton version?
Our recent Superman and Wolverine super-hero kits were created with the mindset of appealing to the widest audience possible. The Wolverine kit offers optional heads to appeal to guys that want something a step closer to the recent movie versions. We chose the costume to depict his iconic early appearance, but it was engineered to allow easy modification to create other later versions. Superman depicts one of his most iconic comic book covers, but with a little adapting he can look more like any of his various incarnations.
So, my question to you, the modeling public, is what do you like? (Please don’t misinterpret the question as “what do you want?”) Did you like the Man of Steel movie? Did you like The Wolverine? Do you like what Marvel Comics is doing right now or do you like DC better? Are you into the Arrow TV show or are you more excited about STAR TREK: TNG being remastered to be released on bluray? While you are at it, let us know what you think of our recent figural model kit releases. Feel free to let us know by responding here on the blog or on our Facebook repost.