Recommended Sites


Archive for the ‘Polar Lights’ Category
STAR TREK Modeling: A Brief History of the Shuttlecraft Galileo Pt. 5
Thank for returning for this final chapter in Round 2 consultant, Gary Kerr’s, history on the Galileo shuttle.
A Brief History of the Shuttlecraft Galileo Pt. 5 By Gary Kerr
Rescue and Rebirth
The whereabouts of the Galileo were unknown, and fans despaired that it had been scrapped, but the plucky shuttlecraft resurfaced in 2012, when Kiko Auctioneers held an 11-day online auction. The auction price was holding at around $20,000, but on June 28, 2012, the bidding came to a head when three bidders jumped in during the last 90 seconds of the auction. Adam Schneider, a collector of numerous Star Trek studio miniatures, placed the winning bid of $70,150.00, and the Galileo became by far the largest spaceship model in his collection.
Since the Galileo was far too large to display at Adam’s home in New Jersey, Adam’s goal was to completely restore the rotting prop and donate it to a museum for public display. Gene Winfield, who had originally built the Galileo, suggested that a builder of wooden boats might be best suited for the job, and Adam selected Master Shipwrights Design and Restoration, which specialized in restoring antique and classic boats, to do the restoration. The Galileo was trucked to Master Shipwrights in Atlantic Highlands, NJ, but six days later, on October 29, 2012, disaster struck, as Hurricane Sandy slammed into the East Coast. In anticipation of a storm surge, the mock-up’s nacelles were placed in a high and dry location, while the mock-up, itself, sat on 12” blocks. Sandy’s storm surge flooded Master Shipwrights’ shop with four feet of water, but the Galileo survived. As Adam said, the mock-up was already such a hunk of junk that the floodwater couldn’t hurt it any further.
Over the next two months, the shop’s employees de-salted the shop and the mock-up, and then they went to work on the Galileo.
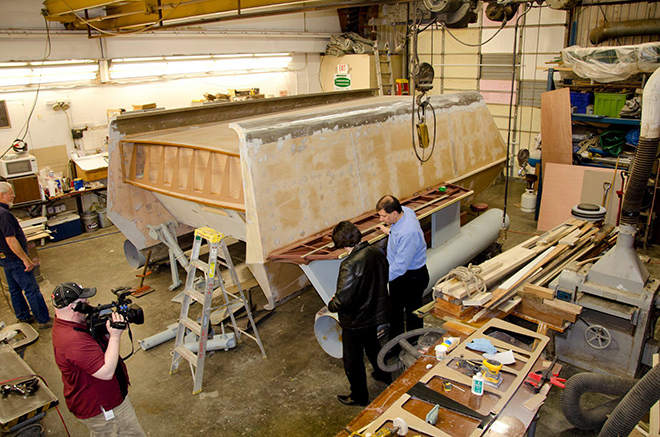
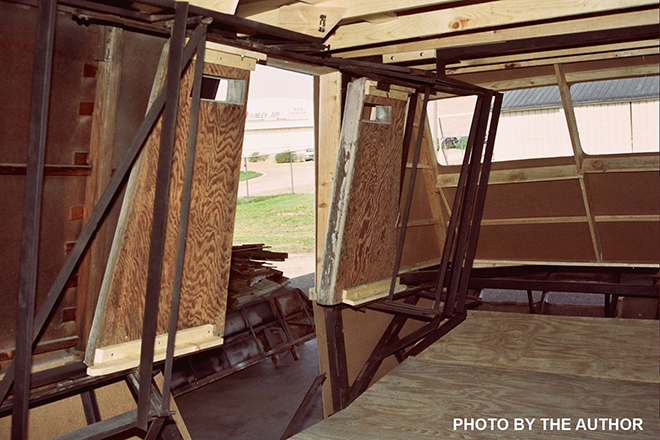
After they straightened and repaired the ship’s internal metal skeleton, they replaced the rotted framing with all-new wood. Lift points were added so the heavy mock-up could be moved safely. Sturdy Marine-grade plywood replaced the flimsy Masonite, and the finished shuttle was painted with marine-grade paint. I supplied artwork for the external markings, plus additional information, and Will Smith built a replacement “busy box”, a collection of gizmos hidden behind a fold-down panel on the aft end of the shuttle, which Spock and Scotty would work on every time the shuttle got stranded on an alien world.
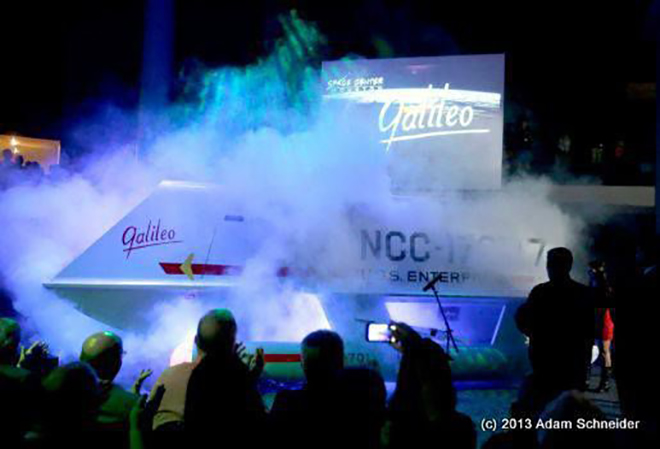
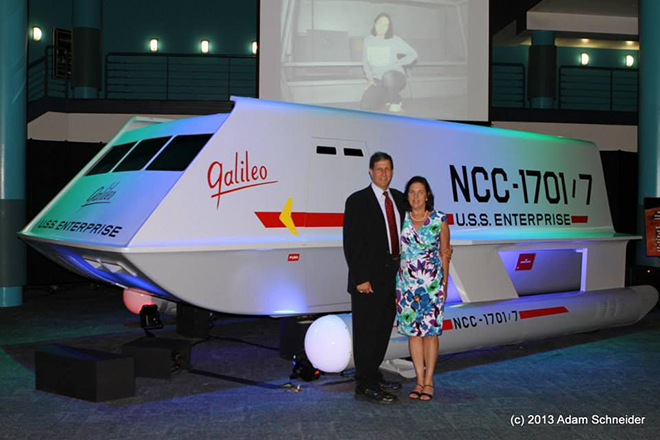
Once the Galileo was fully restored, Adam set about finding a suitable museum to house the ship. Display space, especially for an artifact as large as the Galileo, is at a premium in most museums, and after contacting over a dozen museums, Adam settled on NASA‘s Space Center Houston, which is part of the Johnson Space Center. The Galileo was unveiled, amid much ceremony, on July 31, 2013.
In 2016, the Galileo was loaned to the Intrepid Sea, Air & Space Museum in New York City, and upon its return to Houston, the shuttle was ignominiously displayed in a corner of the museum’s cafeteria.
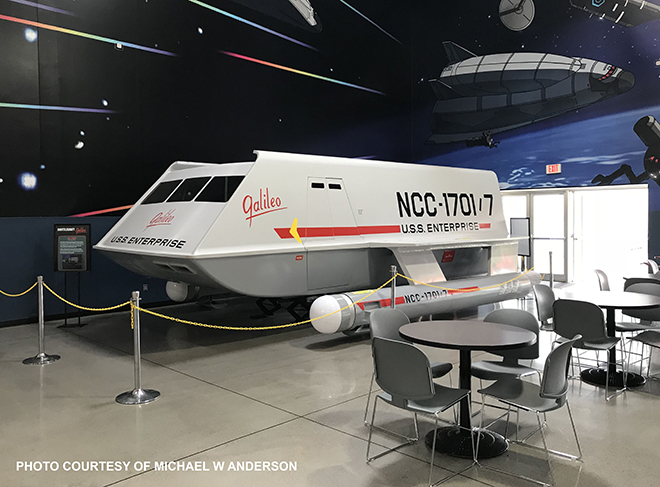
The current management team at the museum is apparently not a fan of Star Trek. The Galileo has been removed from public display and put into storage because it does not fit into management’s “vision” for the museum.
The Filming Miniature
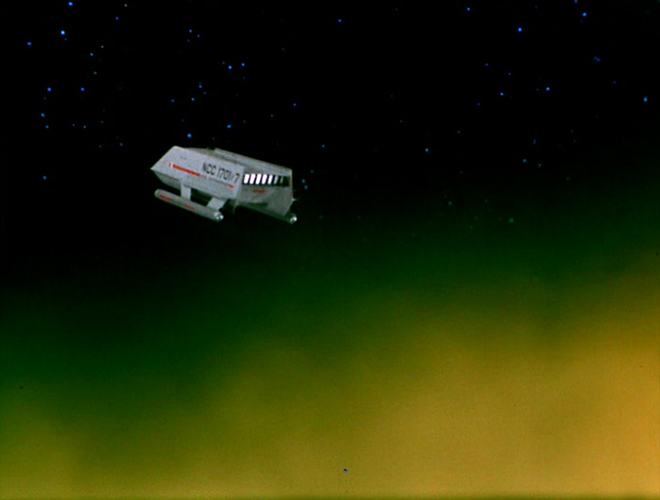
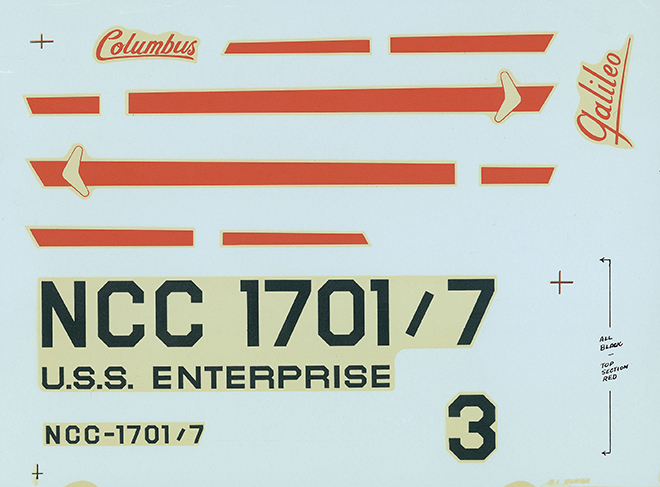
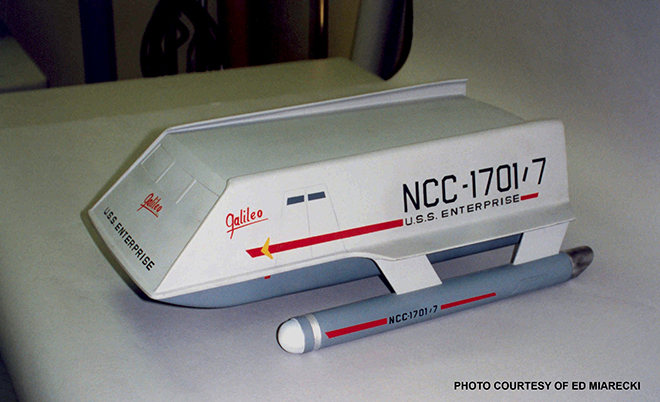
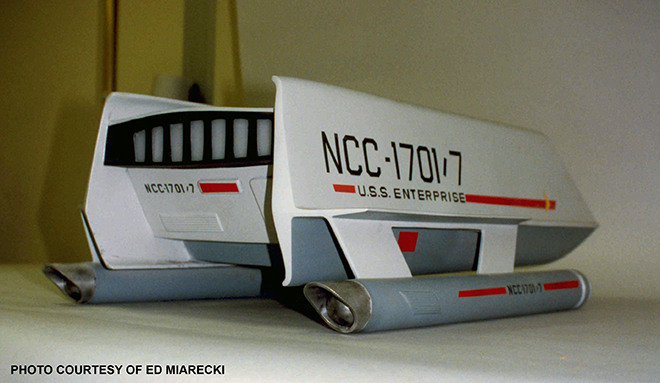
In contrast to its widely-traveled big brother, the 22-inch Galileo miniature was a relative shut-in and remained in the Los Angeles area for most of its existence. The model, constructed mainly from wood and plastic, was designed to be filmed either suspended from wires, or mounted on a post inserted into the model’s belly. The studio model also had internal lighting for its impulse deck and front windows. Richard Datin had decal sheets with markings for both the Galileo and Columbus, but only the Galileo markings were ever applied to the model.
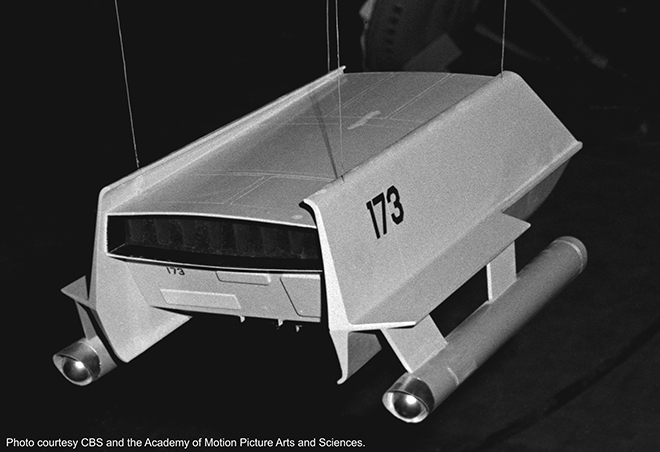
One of the model’s features has been overlooked until recently. In 2019, Star Trek authority, Doug Drexler, and aerospace historian and writer, Glen Swanson, had been sleuthing through the archives at UCLA and AMPAS (Academy of Motion Picture Arts and Sciences). Doug and Glen hit pay dirt, we were able to use Doug’s Academy Award winner discount to get 600 dpi scans of previously unreleased photographs (not grainy film clips) of the studio model of the Enterprise, plus shots of the newly built Galileo miniature before it was fully detailed. The model, suspended from overhead wires, had a glossy, 2-tone paint scheme, and apparently to serve as Commodore Mendez’s shuttle in “The Menagerie, Pt 1”, somebody had plastered “173” in large letters on the model’s side. Richard Datin worked on the model for several hours on October 31, 1966, and this may have been when the Galileo’s official markings were applied.
The most important discovery lay on the model’s wooden roof: the existence of scribed panels. They were very similar to the panels on the concept illustration that Thomas Kellogg had drawn for Gene Winfield and Matt Jefferies in 1966, when an affordable version of the Galileo was first being designed.
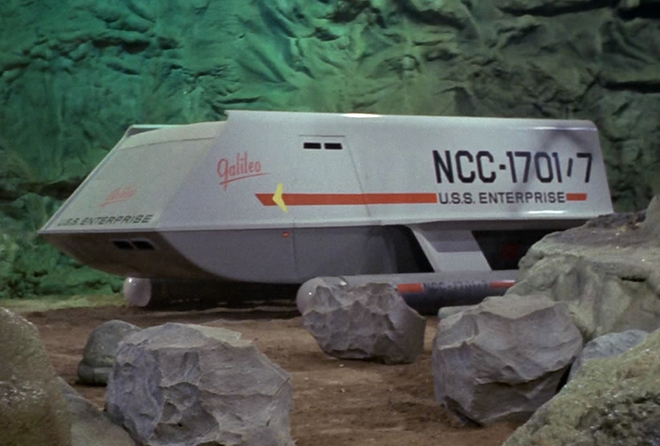
The 22-foot mock-up did not possess corresponding roof panels, which makes financial sense. Because the roof of the mock-up was seen only one time in the series, in a wide establishing shot in “The Galileo Seven”, it seems reasonable did not want to waste their budget dollars on full-size panels.
The model vanished after the series ended, and was presumed to be lost, stolen, or destroyed during a cleanup at Paramount in 1973. In 1987, though, the Galileo model unexpectedly reappeared. As long-time scenic art supervisor and Trek historian, Michael Okuda, explained, Set Decorator John Dwyer found the shuttlecraft miniature in storage at Paramount. He brought it up to the Art Department, plopped it onto Mike’s desk, and asked, “Do you know what this is?”
The Galileo was in pretty poor shape. The entire front bulkhead (the panel with the windows) was missing, and overall surface was cracked pretty badly. The nacelles, themselves, were broken off, and the corrugated cowlings on the ends of the nacelles were missing.
Dwyer took the model down to the effects shop to have it refurbished. They did a decent job, considering that they were undoubtedly rushed, and probably didn’t have any reference to work from, except the prop itself. The most significant error that they made was that the front panel, instead of being replaced with a new solid piece with three windows, was replaced with a single piece of dark Plexiglas “window”. The model also lost its 2-tone paint scheme.
Dwyer used the model as set dressing in Riker’s quarters in the 7th episode of the first season of Star Trek: The Next Generation, “Lonely Among Us“, which was filmed from August 26-September 3, 1987.
Early the following year, master model maker Greg Jein, who had begun to refurbish the model, loaned it to the local “Equicon ’88 Science Fiction Convention“, where it was on display from April 1-3, 1988.
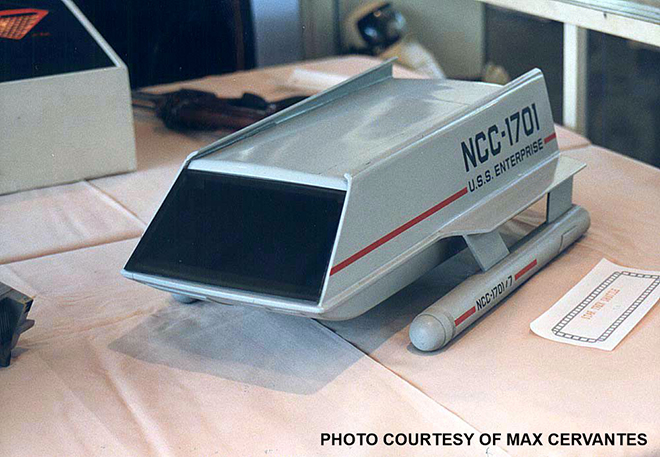
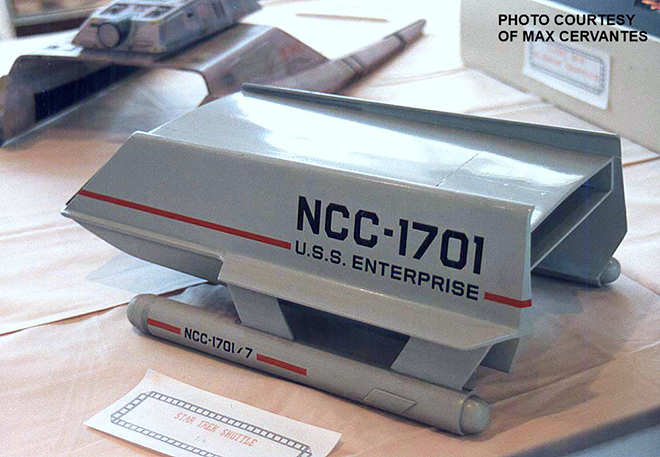
Afterwards, Greg Jein finished restoring the model to its original appearance, sans landing gear. Greg noted that before he restored the model, you could see straight through it, from front to back. During the restoration, Greg gave the model something that it had never had, a dash between the large “NCC” and “1701” on the side of the ship. The dash had accidentally been omitted from the 1966 decal sheet, and a quarter-century later, that oversight was remedied.
In 1992, Paramount loaned the Galileo model to the Smithsonian for their 1992-93 Star Trek exhibition.
The model’s last public appearance was in 1993-94 at an exhibition at the Hayden Planetarium in New York City.
Epilog
Against all odds, both of the original Galileos have survived over 50 years of rain, sun, floods, crushing, and neglect. With any luck, they’ll be around for many more years to come.
Thank you, Gary, for all of the work you put into this special blog series. Until next time, live long and prosper!
All images courtesy of CBS, except where noted.
TM & (C) 2020 CBS Studios Inc. ARR.
STAR TREK Modeling: A Brief History of the Shuttlecraft Galileo Pt. 4
The story of the Galileo shuttle by Round 2 consultant, Gary Kerr, continues…
A Brief History of the Shuttlecraft Galileo Pt. 4 By Gary Kerr
Turning Back the Clock
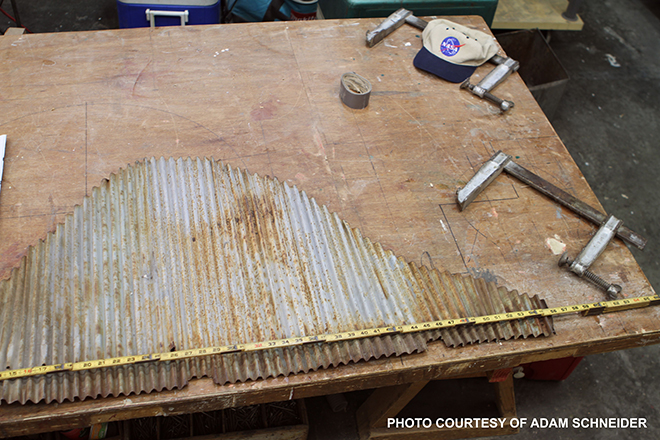
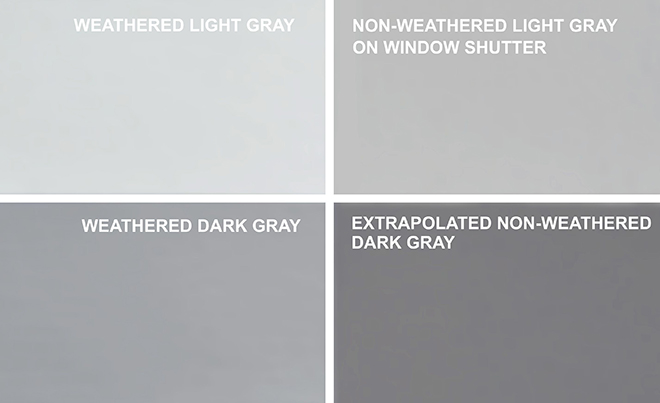
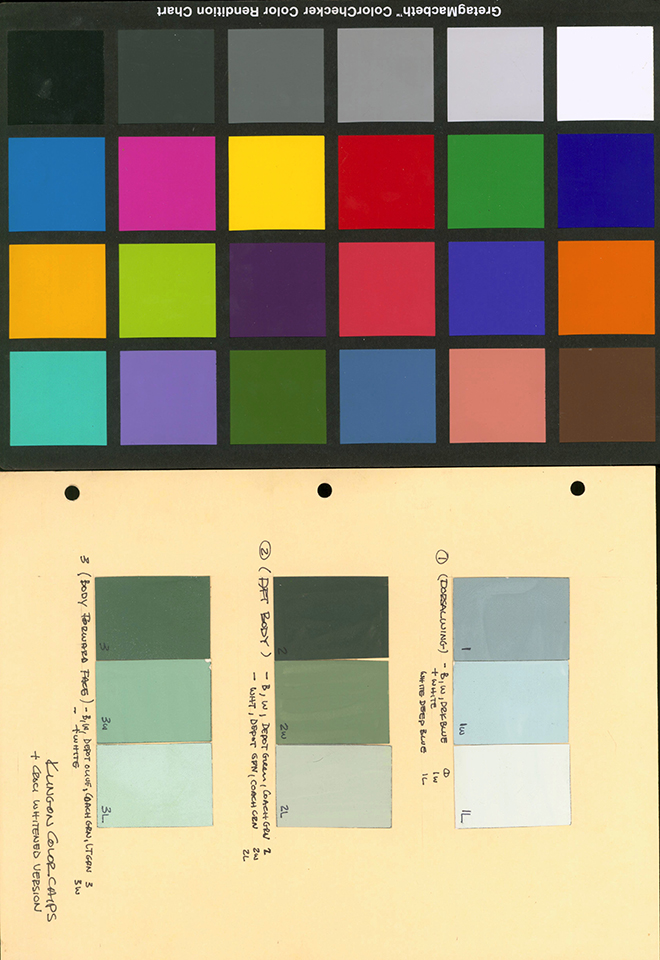
The Galileo mock-up sported a glossy, 2-tone exterior color scheme – lighter gray above and darker gray below – but the exact shades of gray were thought to be lost to time since the original paint had faded after decades of exposure to the elements. In 2015, I’d made a color match for the weathered light gray paint that was on a fragment of the Galileo owned by Adam Schneider (more on him later). I also had a sample of the weathered darker gray from the lower half of the mock-up. I now had samples of the original light and dark gray paint, but I had no way of knowing how much the original paints had faded.
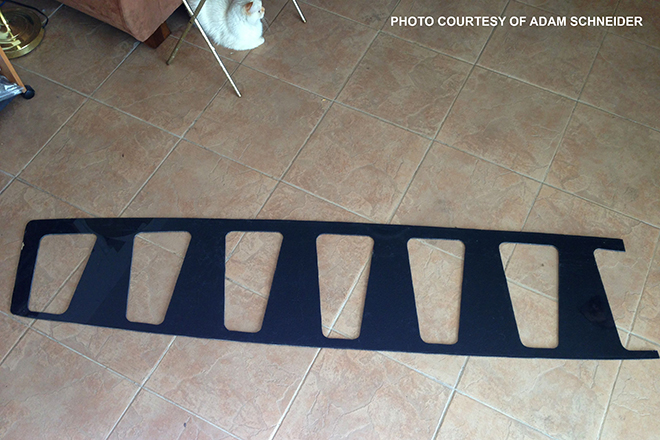
The situation changed when I acquired the original window shutter for the Galileo’s “driver’s side” front window. The shutter is a low-tech affair: a beat-up piece of Masonite with a wooden frame in back.
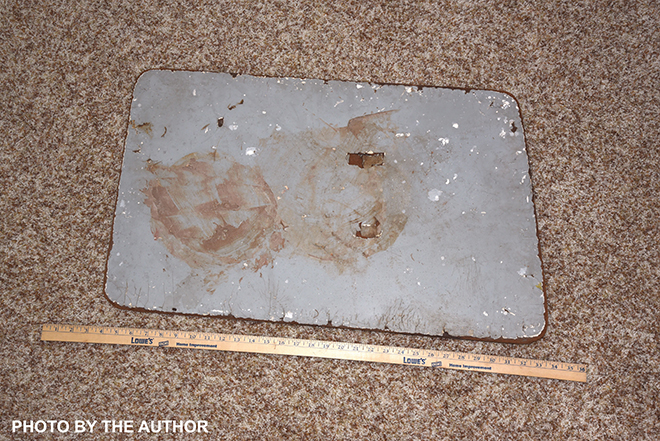
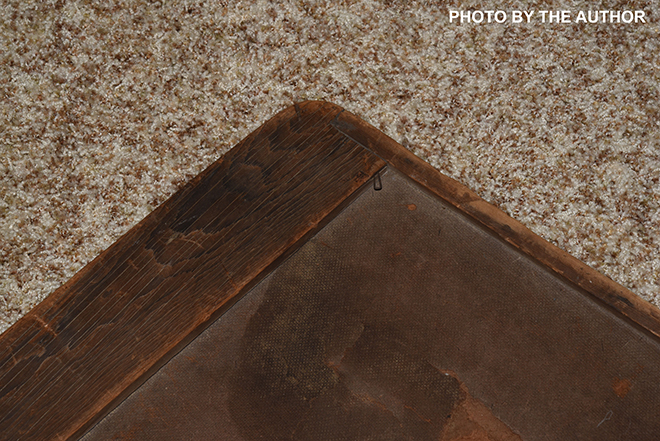
The shutter did not slide up and down, but was simply placed into the window opening on the shuttle. There were a number of spots where three layers of paint were exposed: a white primer base coat, a light gray middle layer, and a darker gray top coat. The top coat had almost certainly been applied by Trek fans during a restoration, but the middle layer was an exact match for the weathered light gray that I had examined in 2015. I wanted to expose more of the light gray middle layer, so I began to carefully chip away the brittle top layer of paint with an X-Acto blade. To my surprise, the freshly exposed paint, which had been protected from the sun by the fan-applied paint, was a couple shades darker than Adam Schneider’s sample. The paint was a good match for Pratt & Lambert’s “Half-tone”, which the Smithsonian’s paint expert, Dave Wilson, had identified in 2016 as the color of the gray trim under the front ends of the nacelles on the 11-foot original Enterprise model. Very interesting…
I now had samples of the weathered light and dark gray paints, plus the relatively unweathered light gray paint from the shutter. If the original light gray paint had faded by X amount over the years, could I arrive at an approximation of the original dark gray paint by darkening my faded dark gray sample by X amount?
I had the paint store do a color match on my weathered dark gray sample, and then darken the paint by a couple shades. My recreation of the unweathered dark gray was a good match for Pratt & Lambert’s “Gettysburg”, which the Smithsonian’s Dave Wilson, had matched to the color of the impulse deck and inboard nacelle trenches on the 11-foot Enterprise. My conclusion: it appears that that Matt Jefferies had selected two shades of gray trim from the Enterprise for use on the Galileo’s outer hull.
The Galileo mock-up first appeared before the cameras for “The Galileo Seven” on September 27, 1966. Two weeks later, October 12, 1966, the Galileo portrayed an anonymous shuttlecraft from Starbase 11 in “The Menagerie, Part 1”. Even though “The Galileo Seven” was filmed first, the episode was delayed, presumably by the wait for the hangar bay miniature to be built and filmed, and wasn’t aired until January 5, 1967. Thus, the Galileo’s first onscreen appearance occurred on November 17, 1966, in “The Menagerie, Part 1”.
During the run of the series, the full-size exterior and/or interior props also made appearances in “Metamorphosis”, “The Doomsday Machine“, “Journey to Babel“, and “The Immunity Syndrome“, with its farewell performance in “The Way to Eden”.
Life After Star Trek
After the original series ended, the Galileo began a years-long, cross-country odyssey. Paramount donated the 22-foot Galileo mock-up to The Braille Institute in Los Angeles. The Masonite, plywood, and metal prop was not designed to withstand the elements, and once outdoors, it began to deteriorate. Because of safety concerns, the institute sold the prop to Roger Hiseman of Palos Verdes, who displayed the decomposing shuttlecraft, a photo op for young Trek fans, in his front yard. Following complaints from his neighbors, the Galileo was moved to an open storage area in Redondo Beach.
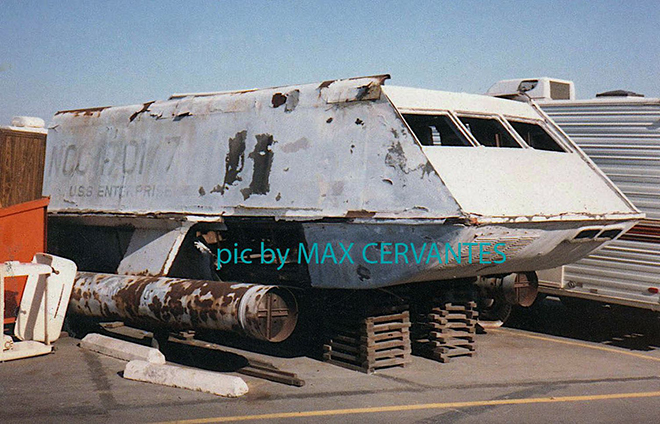
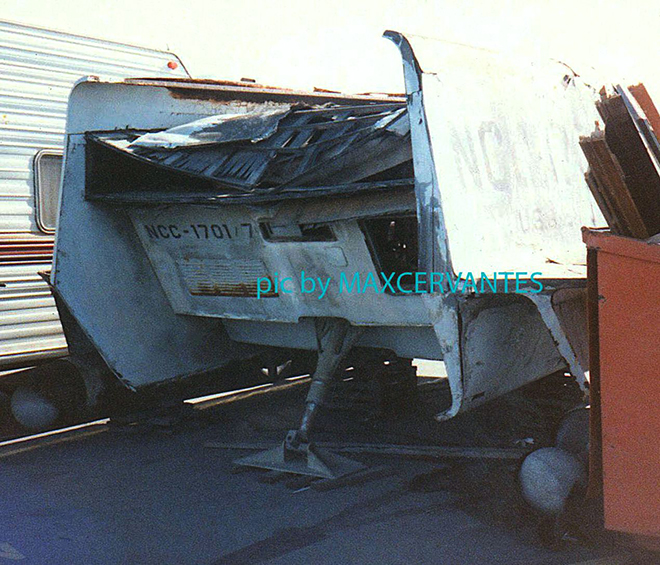
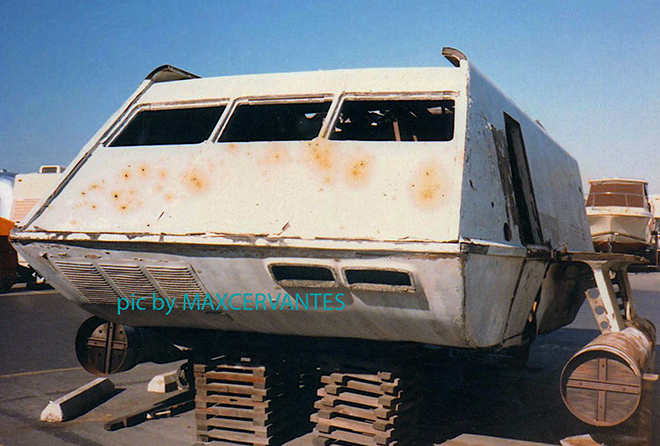
By this time, the mock-up was looking MUCH worse for the wear, and the roof over the impulse deck had collapsed. The Galileo changed hands again in 1985 and ended up further south, to another open storage area near San Diego, where the mock-up’s owner attempted a restoration. Following an appearance at a 1986 Star Trek convention in Anaheim, the mock-up was moved to yet another open storage area, this time near Palm Springs, and the semi-restored mock-up continued to deteriorate.
In 1989, a Star Trek fan in Ohio, Lynne Miller, purchased the mock-up for $3,000 and had it shipped over to the Canton/Akron airport in April 1991. After many years, the mock-up finally had a roof over its head. Yet another restoration was begun, and the Galileo was displayed at a Trek convention near Cleveland the following November.
As mentioned previously, in April 1992, on the way home from visiting the hugely popular Star Trek: The Exhibit at the National Air and Space Museum in Washington DC, a couple friends and I rendezvoused with Lynne Miller at the Canton/Akron airport and spent several hours documenting the mock-up. I took home a couple souvenirs, including an 8 ft roof truss, from a pile of rotting wood that had been removed from the mock-up.
The restoration stopped in 1993, following a dispute between Ms Miller and those doing the restoration. The Galileo had to be moved yet again when the airport property was sold and the hangar was demolished, and it ended up in open storage at an industrial site near Akron. The mock-up dropped out of sight when the property was sold and cleaned up in 2008.
What a shocking turn of events! The Galileo straight up disappeared! Find out what happened next in the Earth-shattering conclusion to Gary’s story.
All images courtesy of CBS, except where noted.
TM & (C) 2020 CBS Studios Inc. ARR.
STAR TREK Modeling: A Brief History of the Shuttlecraft Galileo Pt. 3
Welcome back for our continuing series of Galileo articles by Round 2 consultant Gary Kerr.
A Brief History of the Shuttlecraft Galileo Pt.3 By Gary Kerr
The Inside Job
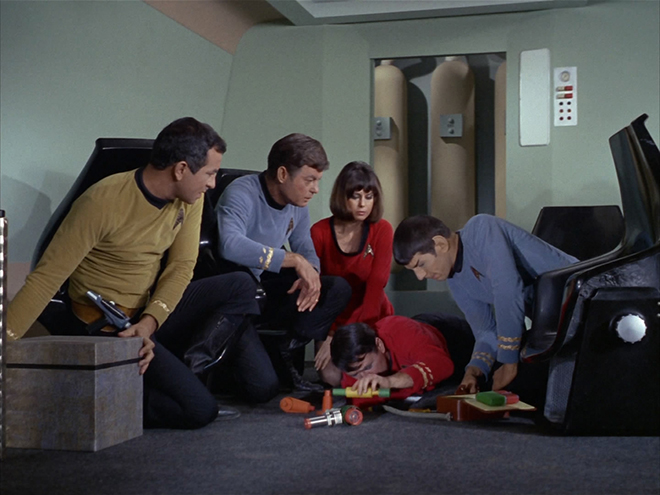
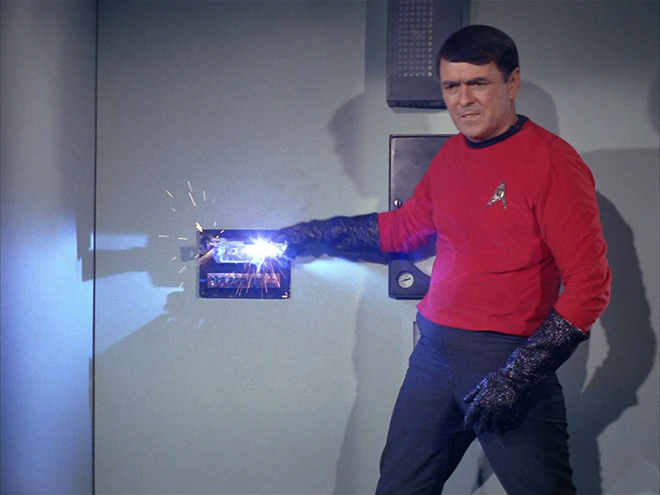
The set representing the Galileo’s interior was constructed simultaneously with the exterior mock-up. To facilitate filming with the large, bulky movie cameras, the walls and front bulkhead were ‘wild’; that is, they could be rolled out of the way, as required, for filming various camera angles. In a major deviation from an interior that would actually fit inside the shuttlecraft, the ceiling was raised so the actors could stand erect without bumping their heads on the ceiling. An overhead light panel ran the length of the passenger compartment, and the plastic grid inside the panel’s frame could be removed to allow the use of overhead studio lights.
The flight controls and computers were rudimentary, and were primarily designed to give the impression of high-tech instrumentation, with actors being the center of attention. To save money, the “computer” props were reused as set dressing in other episodes of the show. I’m quite sure that nobody involved in the production had the foggiest idea that anybody would be examining their work, frame-by-frame and in high def over a half century later.
The aft compartment was something else altogether, since it changed size and shape in every scene. For example, in “The Galileo Seven”, there’s a dramatic close-up as the crew members watch Scotty drain a phaser to recharge the ship’s power. The yellowish tanks in the aft compartment are artfully framed just inside the rear doorway. But when Scotty goes in back to shock the ape monsters that are threatening them, the aft compartment has at least quadrupled in size, and the yellow tanks are nowhere in sight.
The audience didn’t realize it at the time, but we got a sneak-peek at the tanks before they were installed in the Galileo when they were turned upside-down to serve as phaser coolant tanks in “Balance of Terror”.


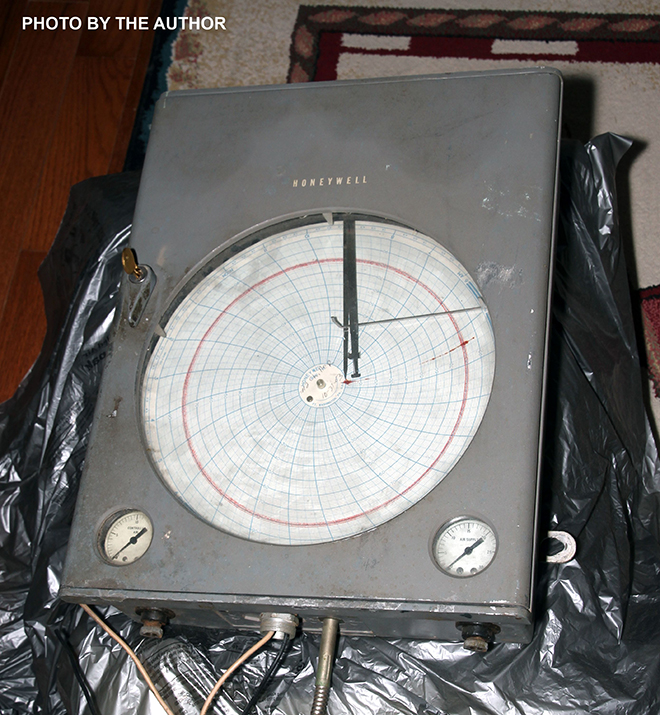
The starboard wall had several gizmos affixed to it, including an instrument that looks somewhat like a wall clock. In real life, it was a repurposed Honeywell chart recorder, with the name “Honeywell” covered over.
It appears that there was no port wall, wild or otherwise, in the aft compartment. In fact, if you carefully examine the scene in “The Galileo Seven” in which the camera shakes while the monsters attack the shuttle, you can actually see the soundstage for a split-second where the left wall should be.
On August 15, 1966, Jefferies flew out to the Phoenix shop for a quick, one-day inspection, leaving LA on Continental Airlines flight #68, and returning on Western Airlines flight #624. Total cost: $54.29. Those were the days!
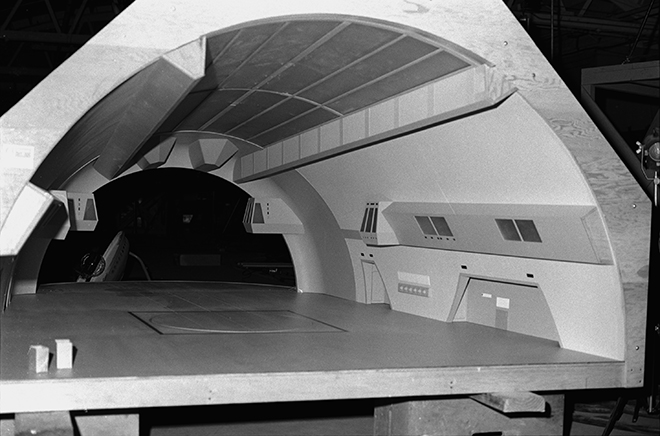
With the mock-up and miniature Galileo under construction, the production needed a hangar bay to park the shuttle in. Richard Datin, who had built the 3 ft Enterprise model and supervised construction of the 11-footer, built the miniature hangar bay set in his garage workshop at 4146 Klump Ave, in North Hollywood, near Studio City, California. Datin began construction on Sept 14, 1966, and completed the project on Oct 25, 1966. Constructed with pine framing, Masonite floor & walls, and Plexiglas ceiling & windows, the 1/12 scale model was 122” long. The forward end of the model was 76” wide and 38” high, while the aft end was 60” wide and 29” high. Total cost of the model: $2138.00.
Once Winfield’s shop had finished their part of building the interior & exterior props, along with the 22” miniature, the unfinished components were trucked to the studio in LA, where union craftsmen did the final painting and detailing, and added electronics to the interior set.
Next time, Gary takes a look at the filming miniature and paint colors. See you then!
All images courtesy of CBS, except where noted.
TM & (C) 2020 CBS Studios Inc. ARR.
STAR TREK Modeling: A Brief History of the Shuttlecraft Galileo Pt.2
In part 2 of Gary Kerr’s article on the background of the Galileo shuttle, he explores the construction of the miniature and set mockups. Let’s dig in…
A Brief History of the Shuttlecraft Galileo Pt.2 By Gary Kerr
The 22-Footer Takes Shape
Once the Galileo’s final design had been hashed out, construction began in earnest at Gene Winfield’s shop in Phoenix. The target date for completion of the interior set was September 6, 1966, with a target date of September 12 for the exterior prop.
The Galileo mock-up was essentially a sturdy metal skeleton sheathed in wood. The lower half of the prop’s skeleton was made from welded 2” square steel tubing, while the upper half was framed in wood.
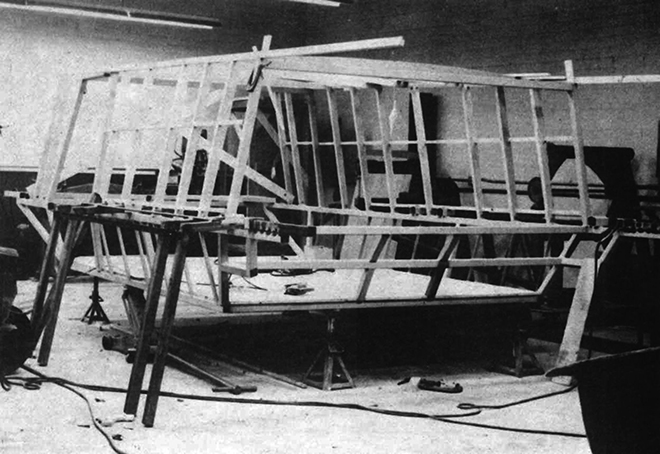
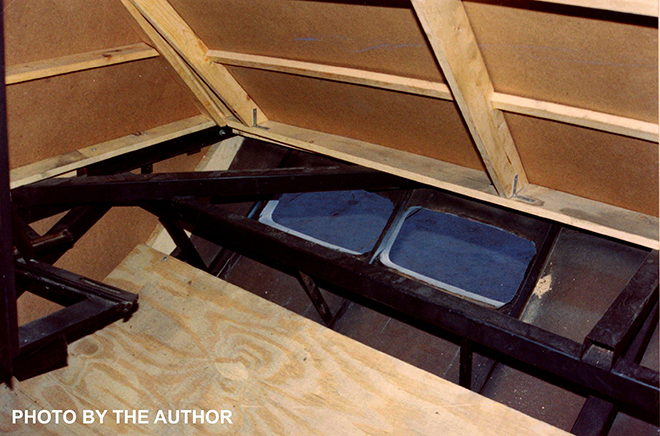
A Masonite skin was applied over the skeleton, and fiberglass cloth covered the Masonite. The internal floor was made from a sheet of plywood. To avoid unwelcome reflections in the front windows, they had no glass. Instead, simulated window shutters, consisting of a sheet of Masonite backed by a wooden frame, were inset into the window openings. Curved fins along the upper and lower edges of the hull were made from sheet metal. A bulky metal framework inside the shuttle allowed a technician to operate the 3-piece side door.
The warp nacelle/wing assemblies were designed so they could be removed for transportation or storage. The nacelles, themselves, were made from 18” diameter steel casings made for oil wells, with square steel tubing providing internal strength for the pylons, wings, and connectors that plugged into the hull.
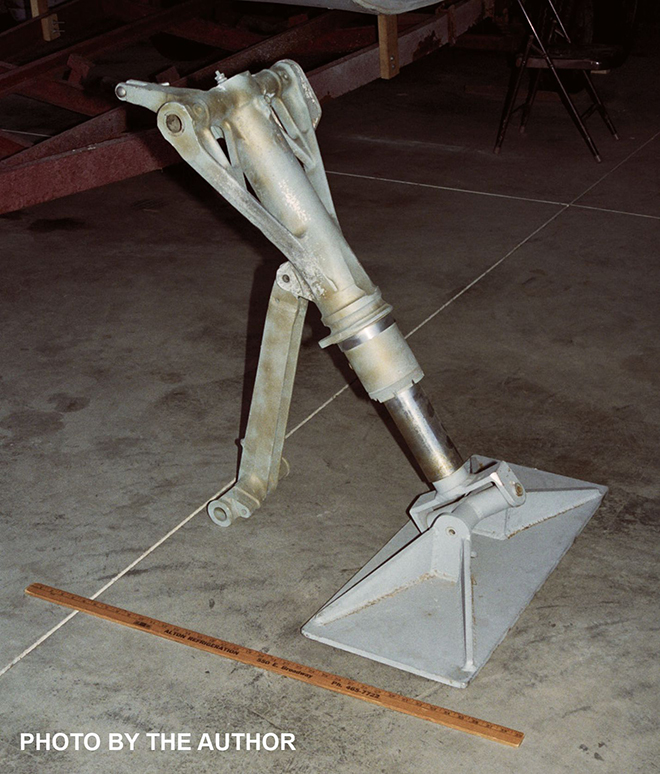
The aft landing strut was salvaged from the landing gear of a scrapped aircraft. The identity of this aircraft has remained a mystery for years. We have the serial number that’s stamped on the landing gear, but this is of limited help since most of the aircraft companies’ old records have been disposed of. The leading contender for the mystery aircraft thus far is the F-106 Delta Dart.
Details, Details…
The intended purpose of a pair of 5.75” by 13”openings, located at the shuttlecraft’s bow, just under the chine, has been a mystery for years. They’ve usually been portrayed as vents in toys and in blueprints drawn by fans, but in every hi-res photo from the 1960s that I examined, they appeared to be nothing more than open holes in the bow. While I was designing Polar Lights’ Galileo kit in 2013, I decided to get the answer straight from the horse’s mouth, so I telephoned Gene Winfield at his shop in Mojave, in the desert north of Los Angeles. Gene explained that the openings were intended for the shuttlecraft’s landing lights, and that the openings would be covered by a pane of glass to make the lights more aerodynamic. He further explained that he had wired the nacelle domes for lighting. The actual lighting would have been installed by union workers at the studio, per the agreement regarding outside vendors, but it appears that budgetary concerns nixed that plan.
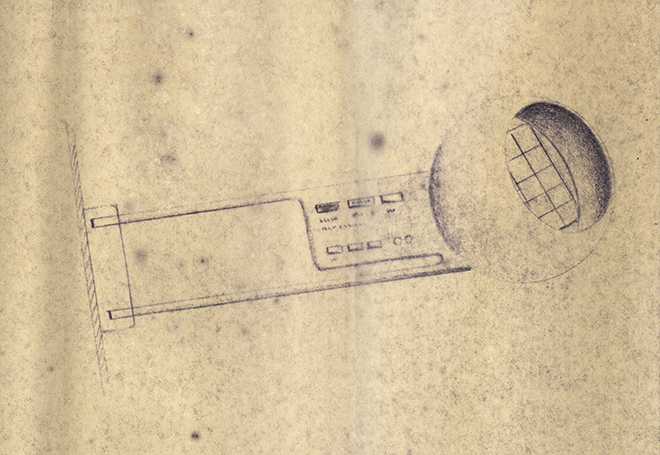
Similarly, the impulse deck consisted of a pair of Plexiglas grilles, with the mock-up’s interior being visible through the vents in the grille. During filming, one or more sheets of white material was propped up inside the mock-up to block the view.
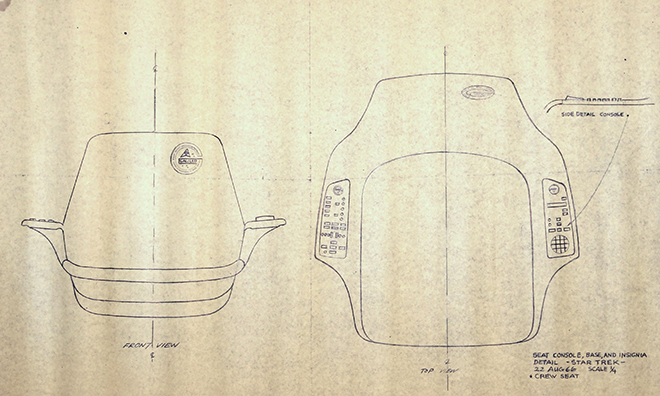
Over a series of phone calls and emails, Mr Winfield explained that most of his papers were still boxed up, following the move to his current location in Mojave. He still had the molds for the Galileo’s fiberglass chairs somewhere, but wasn’t sure where they were stored. He did say that he had a couple old rolls of blueprints laying around, and asked if I’d like to see them. Of course, I said “YES”, and within a week or two, they arrived at my house.
The original plans were extremely yellowed and fragile, and they showed something unexpected: details that Matt Jefferies had designed for the interior set, but which, like the exterior lighting, had never been installed. Included were instrument panels for the swing arms of the two globe-shaped viewers, a Galileo logo for the chairs, and instrument panels for the arms of the chairs (presumably the pilot’s and co-pilot’s).
Next time Gary explores the interior set.
All images courtesy of CBS, except where noted.
TM & (C) 2020 CBS Studios Inc. ARR.
STAR TREK Modeling: A Brief History of the Shuttlecraft Galileo Pt. 1
As the lead developer for our line of sci-fi kits, I can’t be an expert in everything so it is good to know people that “knows people.” One of Round 2’s “go-to” consultants is STAR TREK expert Gary Kerr. If he doesn’t have the answer to any given question he knows who does. He has a lifetime of “side adventures” that have given him close contact with many of the Star Trek filming models and in some cases, our kits are based solely on his exhaustively documented plans of some of the ships he has encountered. Most recently, his plans were used to develop our 1:32 scale Galileo Shuttle model kit. Along the way, he was given the opportunity to write up an article about the Galileo for STAR TREK Magazine published by Titan Publishing. As he wrote, he found that his information overflowed his allotted word count. Neither of us wanted that effort to go to waste so we invited him to publish the overflow on our blog. We’ve chosen to break it up into a series that will be rolled out over the coming weeks. So without further ado. Here is part 1…
A Brief History of the Shuttlecraft Galileo Pt. 1 By Gary Kerr
Poor Lieutenant Sulu… slowly freezing to death after a malfunctioning transporter strands him and the rest of the landing party on the increasingly frigid planet Alpha 177. The glitchy transporter beams down heaters, but they are non-functional, and the landing party seems doomed unless Scotty can repair the transporter in time.
Modern viewers of “The Enemy Within” might be forgiven for wondering why the ship simply didn’t send down a shuttlecraft to pick up the landing party. The truth is that even though the Starship Enterprise sported a pair of clamshell hangar bay doors at the end of its engineering hull, it didn’t yet have any shuttlecraft or a hangar to house them in.
This article will examine the history of both the “full-size” Galileo mock-up and the filming miniature. To begin, we should backtrack and examine the origins of Star Trek’s first shuttlecraft.
In the Beginning
As the final design of the Starship Enterprise began to gel in 1964, it became apparent that a starship would probably carry an assortment of smaller craft. Art Director Matt Jefferies added a hangar bay and a pair of clamshell doors to aft end of the ship, but deciding what kind of craft would be housed in the hangar bay was not an easy matter.
One of Jefferies’ initial concepts called for a small, aerodynamic pod that would be light enough to be lowered from the studio ceiling on wires to simulate a landing. This ambitious concept was abandoned as being too costly. Desilu continued to give the construction of shuttlecraft a thumbs-down, which is one of the reasons for Lt Sulu’s predicament in “The Enemy Within.”
All seemed lost regarding the shuttlecraft situation until August 1, 1966, when Associate Producer Bob Justman informed Gene Roddenberry that Desilu attorney Ed Perlstein had concluded a mutually beneficial deal with the AMT Corporation.
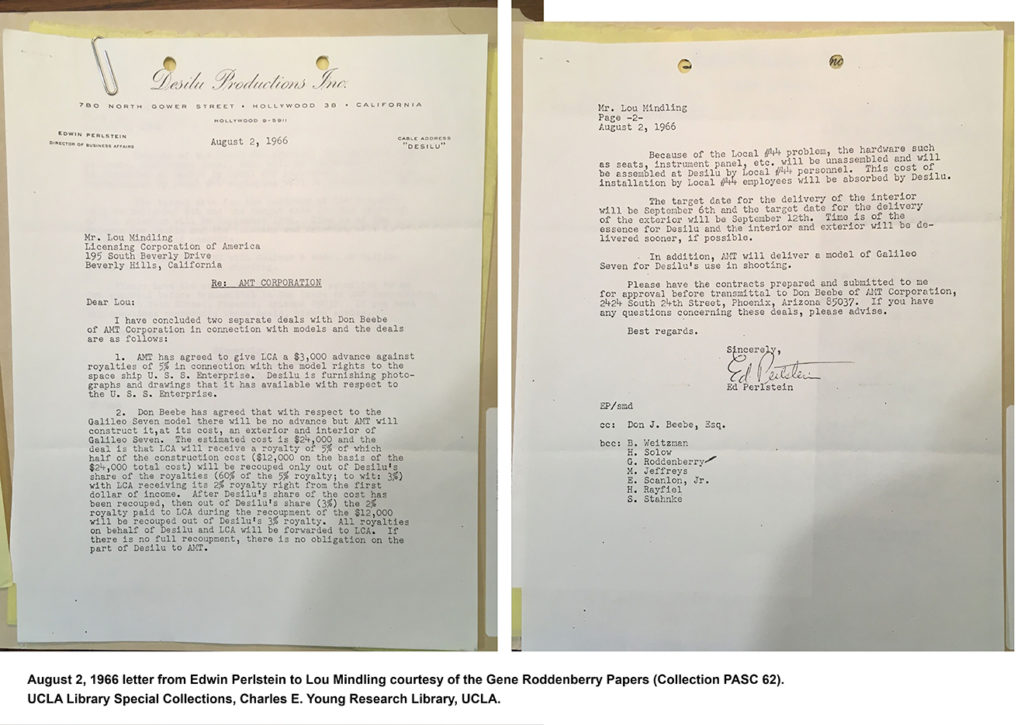
In exchange for rights to produce a plastic kit of the USS Enterprise, AMT agreed to construct both an interior set and exterior mock-up of a shuttlecraft for an estimated $24,000, plus an additional $650 to build a miniature shuttle. The work would be done at AMT’s Speed and Custom Division Shop, in Phoenix, Arizona. Gene Winfield, who was serving as a consultant style designer for AMT’s auto kits, served as production manager.
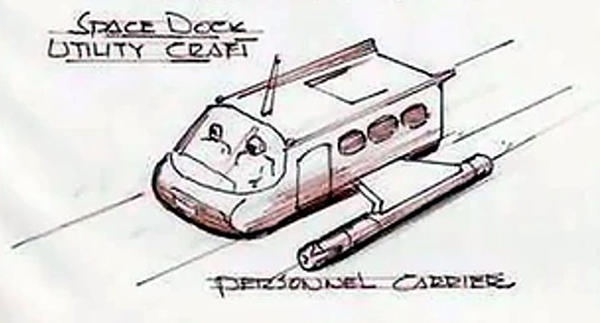
At this point, nailing down the design of the shuttlecraft moved into high gear. Although Matt Jefferies favored a rounded, aerodynamic design for the shuttlecraft, he became the first, but not the last, Star Trek art director to learn that compound curves were a no-no on a television budget and time schedule, and that a shuttlecraft had to be built from sheets or plywood and Masonite. Winfield and Jefferies set about designing a flat-sided shuttle that could be built in the allotted 30 days. The inspiration for the preliminary design seems to have been Jefferies’ 1964 sketch of “Space Dock Utility Craft Personnel Carrier”.
Jefferies and Winfield passed a preliminary design to Thomas Kellogg for further development. Kellogg was an industrial designer, working at the Raymond Loewy Associates design studio in San Francisco. Kellogg worked in some design elements of the studio’s renowned design of the 1963 Studebaker “Avanti” car and created a color rendering of the revamped shuttlecraft.
Jefferies added a pair of warp nacelles to Kellogg’s design, and Winfield’s shop was ready to begin construction of a 22’ prop and a 22” miniature shuttle. Union Local 44 is a professional association of craft persons having specialized skills and talents at Paramount, and the studio’s practice of having outside, probably non-union, vendors supplying props for a TV production would almost certainly cause friction with the union. To avoid problems arising from the studio’s use of outside vendors, the studio and the union arrived at an agreement under which vendors would supply props in an unfinished state, and union craft people would perform the final painting, detailing, and installation of lighting.
Even though the filming miniature and the full-size prop were supposed to represent the same ship, they are not identical. The most obvious difference involves the shape of the hull, with the sides of the 22” miniature being parallel, while the aft end of the 22 ft prop (including the nacelles) flares out slightly wider in back.
Why the difference? To find the answer, we need to jump to the spring of 1992, when I met with Lynne Miller, the owner at the time of the large Galileo prop. The Galileo was located at the Akron-Canton Airport in Ohio, and I spent several hours documenting the shuttle, which was slowly undergoing a restoration.
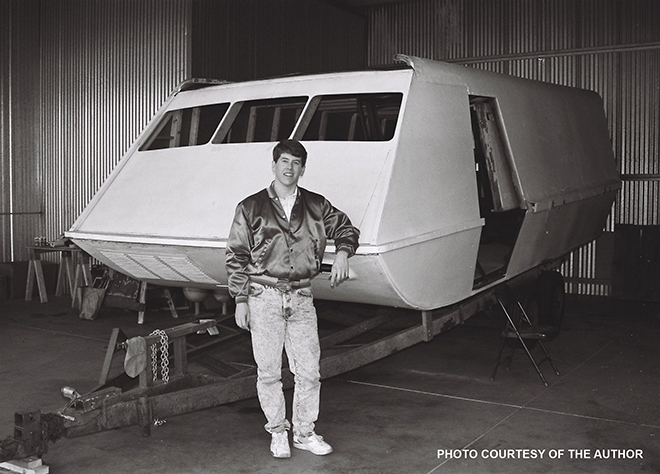
Lynne revealed that Matt Jefferies had told her that the Galileo was only three-quarter scale. This made perfect sense after I’d climbed inside the shuttle. Being inside the mock-up was akin to crouching inside a very wide minivan. It was certainly a far cry from what we saw on TV! Making “full-size” props at somewhat less than full scale is a common practice in Hollywood. I didn’t realize it at the time, but Matt Jefferies’ brother, John, wrote in his biography of Matt, Beyond the Clouds, that Matt often utilized “illusionary perspective” to create the illusion of distance and makes things appear larger than they actually were. Looking back and seeing that many scenes involving the Galileo were shot at the rear of the prop, I am now convinced that when Jefferies made the rear portion of the 22-footer flare out wider, he was using illusionary perspective to make the three-quarter sized shuttlecraft appear larger.
The use of an undersized prop makes perfect sense: construction costs were less, the prop could be moved more easily around the soundstage, and it took up less precious storage space.
Come back next time as Gary dives into the construction of the miniature and the set pieces.
All images courtesy of CBS, except where noted.
TM & (C) 2020 CBS Studios Inc. ARR.
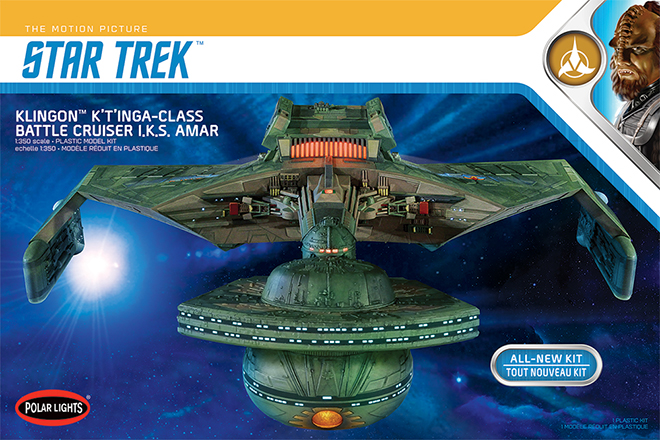
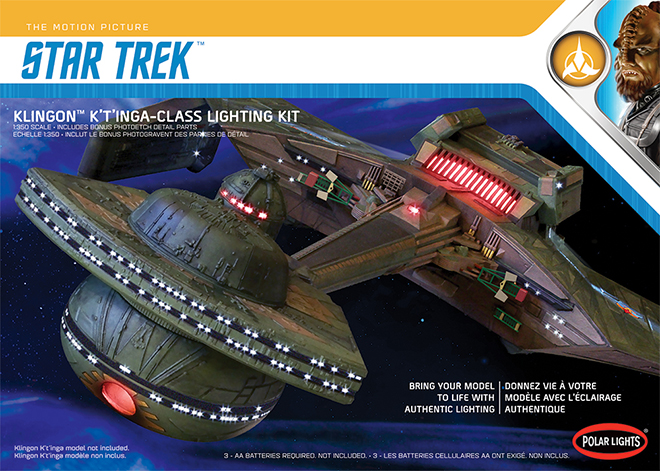
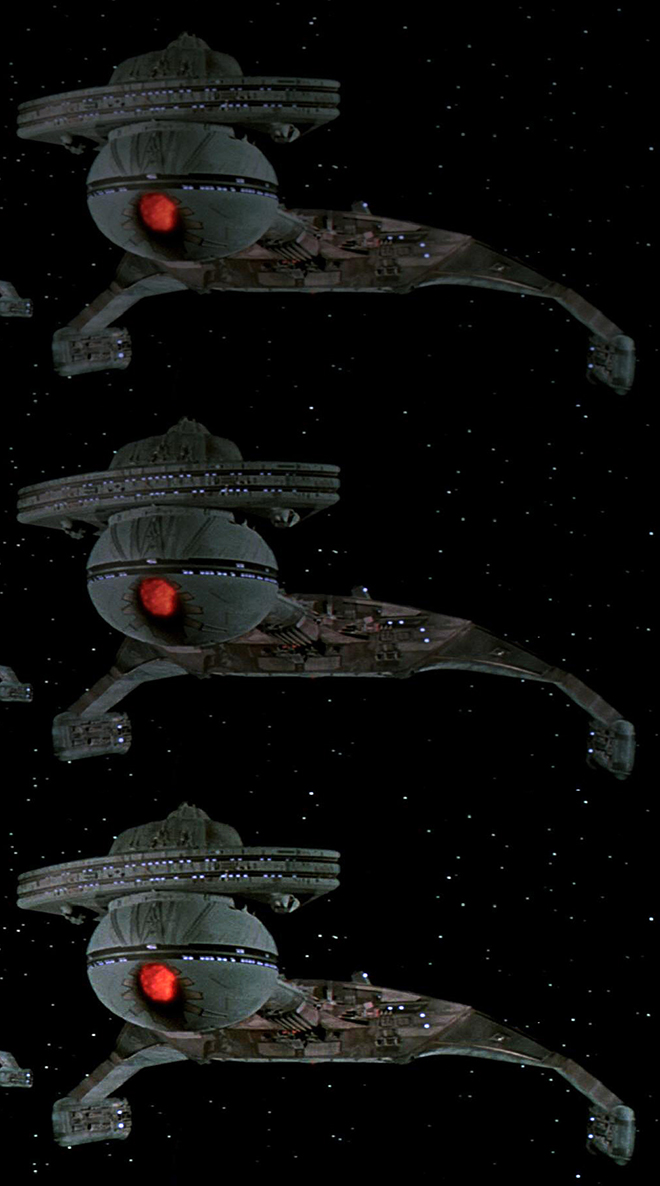
Polar Lights Model Kits: 1:350 scale Klingon K’t’inga update
UPDATE [11/8/2018] Klignon K’t’inga kits (and light sets) landed at our warehouse on Monday 11/5. It usually takes 1-2 weeks for kits to make it to retail once we receive them. So look for kits in just a matter of days!
Hi All. We just wanted to mention a few quick things about our all-new 1:350 scale Klingon K’t’inga model kit, and we won’t bury the lead. THE KIT IS ON THE WATER! That means it is currently on its way across the ocean to our warehouse. It should arrive there before the end of the month and reach retailers the first week of November. So, get your Halloween costume finished. By the time you finish your trick-or-treat candy, the kit will be here.
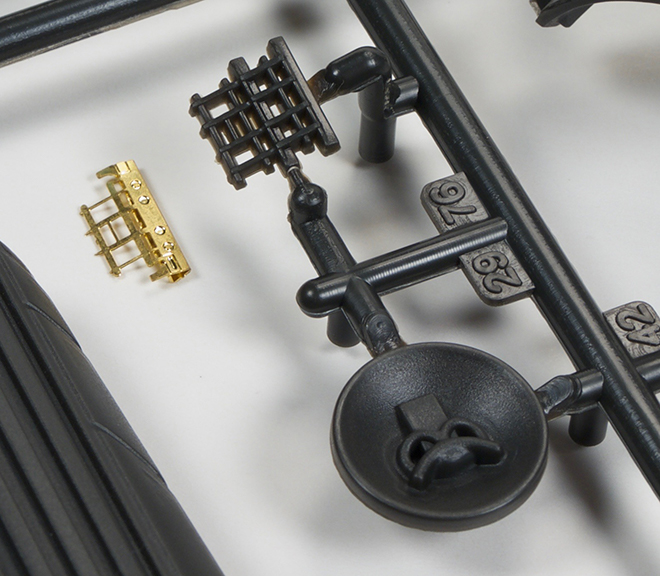
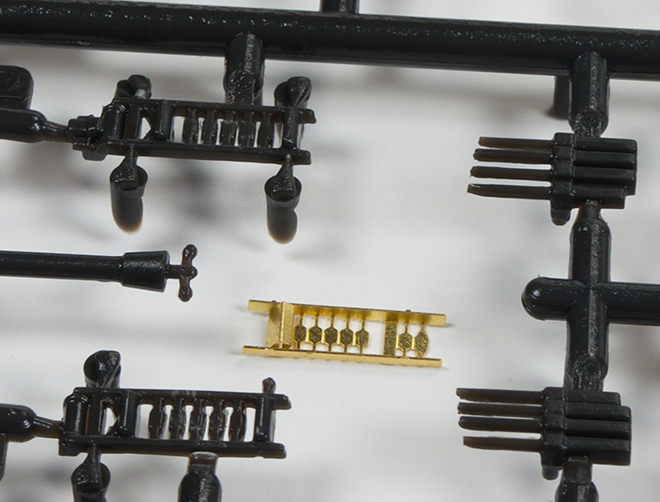
It has come to our attention that we haven’t really given much detail on one of the aspects of the K’t’inga’s Lighting Set. That is the photo-etch sheet that we have included in it. Many have asked what is included in that and why it would be needed. Well, there are several factors at play here.
Some of the details on the studio model were too slight to properly replicate with injected styrene. We did the best we could with those parts in the kit, but the photoetch sheet allows us to offer parts closer to the original model. There were additional parts we wish we could have included, but they didn’t lend themselves to PE. In those cases, there is no better answer than to scratch build replacements. Modelers that are that particular will no doubt have the capacity to figure out how to do that.
Two copies of this piece get stacked to create a more authentic replacement for part #76.
In a few cases, we didn’t have exact copies of kitbashed parts to copy when we started developing the kit. In those cases we worked form photographs and got as close as we could. Once copies of the real parts were found for reference, it was too late to change the part and stick to our release schedule. So the PE parts represent the real parts more closely.
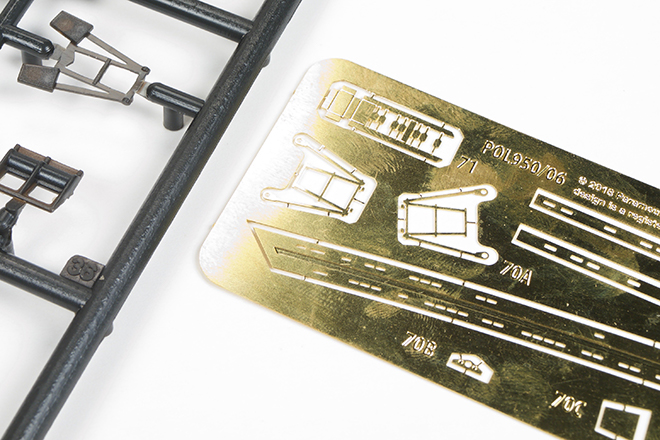
Another significant part of the sheet are window frames for the battle head. At 1:350 scale, (or 1/2 studio scale if you prefer) the windows on the cobra head and the bulb became very small. In fact, they are so small it is hard to inject them completely clean of flash. tool drafting also make them somewhat mis-formed in some places. We don’t mean to make it sound worse than they really are because the plastic parts aren’t terrible in this regard. They just aren’t as perfect as some will want. Now even the photoetch isn’t a perfect answer for the problem we wanted to address either because it WILL impact the accuracy of the model. The window frame strips are to be glued to the surface of the model which means they will protrude slightly unlike the studio model. So there isn’t a “perfect” answer, but we want to provide as many solutions as we can and let modelers decide which way they want to address it. Keep in mind that dealing with photoetch can be tricky for the uninitiated. It is intended to be used by experienced modelers.
lastly, we just want to mention that there is a an advance preview build going on that is hosted on the allscaletrek.com website.
You can find the threads for that here for the K’t’inga model kit.
and here for the Lighting Set.
They have also reviewed our recent release of the 1:1000 U.S.S. Grissom and Klingon Bird-of-Prey.
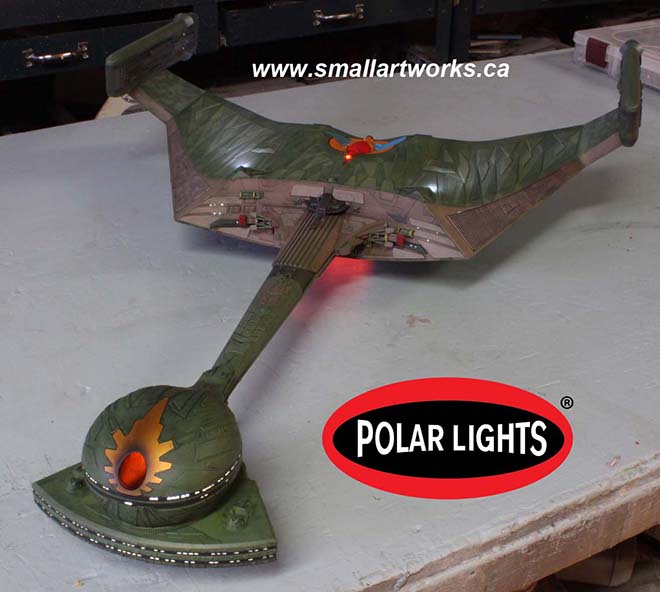
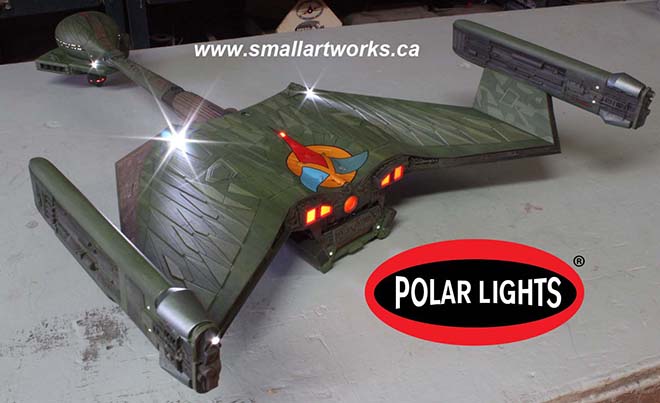
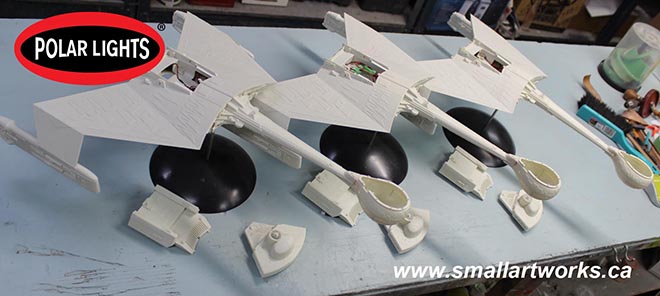
Polar Lights Models: Klingon K’t’inga buildup process Pt.7
Continuing our series of guest blogs covering our brand-new STAR TREK: The Motion Picture 1:350 Klingon K’t’inga model kit…
Finishing, The Final Frontier.
James Small, www.smallartworks.ca
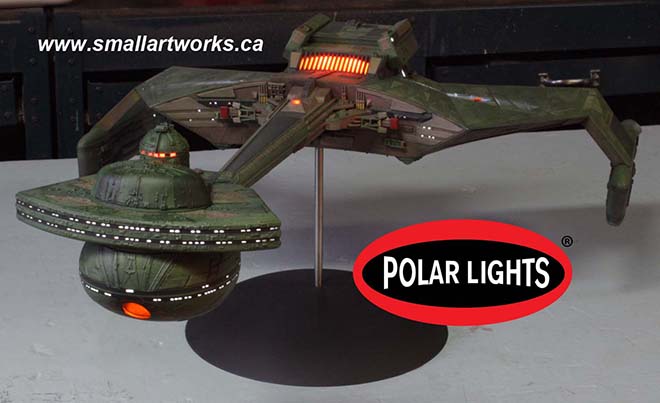
Not really much to tell on this post, the last of the series on building the K’Tinga from Polar Lights, Round 2. The pictures pretty much speak for themselves. After all the main colour coats were done, it was time to weather the model, doing so with a dark green wash to tie the colours together, some airbrushing with a tiny hint of black scorching and streaks of zinc chromate. Then the decals were applied. Normally one would say you should apply the decals BEFORE weathering but in this case the decals are small and I didn’t want them to be obscured, lest the low lighting conditions used for the photography would lose the markings altogether.
The decals were test prints sent to me by Jamie in slightly past the “nick of time” we would have liked, but they worked out really well. The only challenging decals to apply are the set of four that make up the big Klingon symbol on the bottom of the ship. When you do this as you finish your kit, make sure you take your time planning them out, and they will need a lot of coaxing and setting solution. The front “splash” surrounding the torpedo tube had not been printed at that time, so I had to spray that one on from scratch by first masking off the area, spraying on some gold and then following up with a touch of clear orange to match the colour seen on the Klingon symbols.
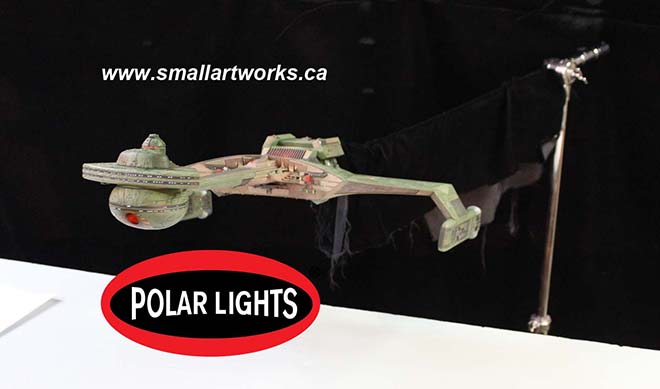
After all this was done, the model was finally finished and I began what would end up being one of the most challenging photo shoots I’d yet done for a model. It took me a full day to figure out the right balances of exposure, aperture for depth of field and lighting so it would all look wonderful on the box art. We also wanted to try to match the ominous look of the ship as seen in the film itself yet see all the details and retain proper colour balance. I had multiple light set-ups, bouncing light off the ceiling, walls, floor, some direct and some indirect, lights on stands, some attached to the ceiling, some on the floor across the room… it was a lot more complex than one might imagine for such a shoot and required a lot of time to figure out to get just the right look. Then I spent another day or two actually taking the shots. I took many dozens of shots testing it all before I could get it to look right. Because the model is so dark and required such long exposures at high resolution, microvibrations in the floor (even though concrete), in the air, whatever, maybe in the camera itself for all I know, made the camera move JUST enough to blur the image slightly. I also discovered that really long time exposures make a digital camera’s dead pixels (all digital cameras get them after even a short time of use, it’s a disease like tooth decay) really stand out like a klaxon! To account for the blurring, I had to do faster exposures with a wider aperture, and then stack shots so they could be stitched together by Jamie in Photoshop to cheat the depth of field. These challenges were exacerbated by the fact that I don’t really have professional photographic equipment, namely a more expensive camera (the Canon Rebel I have is a good camera but is after all, consumer grade) and a good solid tripod. Really good tripods that eliminate the slightest vibrations can cost a lot of money. Also, Jamie had very specific angles in mind for each shot, so it would follow his box art layout, and that took considerable time in some cases to set up and line up as well.
The build took far too long to do (I still have to paint the other two but I’m taking a short break from them to do something else for a while as I’m all K’Tinga’d out right now), the pix were done, the box art under way. I therefore present to you here and now the very first look (no, these are NOT the pictures used for the box art!) at the completed new 24” long K’Tinga kit which is right up there with the most comprehensive, most accurate sci-fi model kits on the market today!
We’ve tangled with solvents, paint and plastic. Now… it’s Chardonnay time. Cheers!
And as a special bonus, here is a look at the box faces for both the kit and the light kit!
Polar Lights Models: Klingon K’t’inga buildup process Pt.6
Continuing our series of guest blogs covering our brand-new STAR TREK: The Motion Picture 1:350 Klingon K’t’inga model kit…
Painting in Klingonese. The Grueling (But Still Fun) Part.
James Small, www.smallartworks.ca
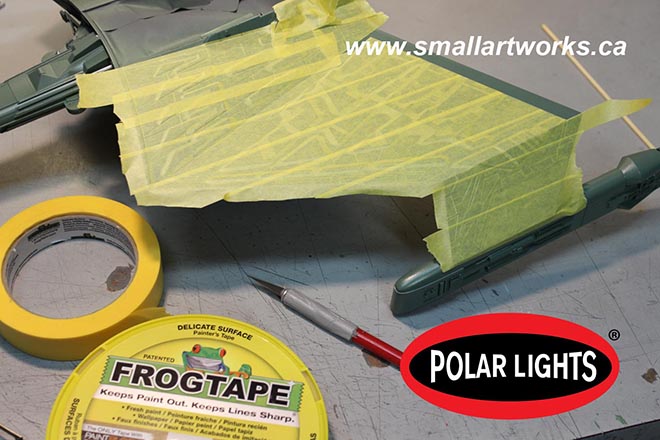
“The Making of Jaws” pocket book printed back in the mid 1970’s has a funny line placed as a caption beneath one of the photos of the crew preparing to shoot a scene. The line has always stuck with me. I quote it a lot because I think it’s clever and is true of many things besides just film making. It reads, “It’s not the time it takes to take the takes, it’s the time it takes between the takes that take the time to take.” I was trying to find a way to adapt that to how you paint a model like this and fell short by a wide margin. The closest I could come up with is “It’s not the time it takes to paint the model, it’s the time it takes to prepare and mask the model that takes the time to paint.” Yeah. Really lame, I know. I’m not much of a meme generator. Hopefully I’m a much better model builder than a writer or I’ll have to go get a job at Wal-Mart.
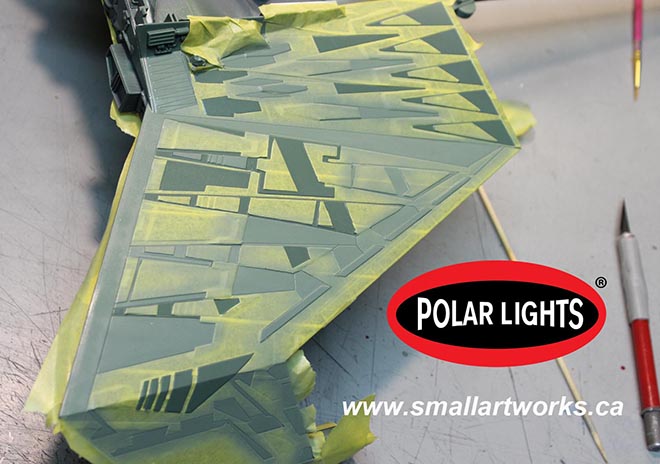
Anyway, the following shows what I consider by far to be the most grueling part of building this kit. It requires tremendous patience and even more masking tape. The tape itself is important. Make sure you don’t use some cheap-o no-name bargain tape. Use something that really works. I like to use “Frog Tape” which is readily available even here in the backwater town of Truro, Nova Scotia. It’s twice the price of standard painter’s tape but is better for preventing paint seepage under it than generic tape, but still a hell of a lot cheaper than the hobby tapes like Tamiya and so on, especially when you need to use a lot of it like on this model. It comes in two types. Regular (green) and the yellow stuff made for delicate surfaces. I used both as you will see. There are advantages and disadvantages to both. The green has a more aggressive adhesive, but the yellow type is semi-translucent and is less likely to peel off the paint you are masking over when you remove it. The hobby tapes are a lot thinner (meaning less wide) and people see that as a massive advantage. It’s easy to adapt the Frog Tape to do the same thing though. Simply lay a strip down onto a CLEAN, dry piece of glass and use a ruler and X-acto knife to cut strips to whatever width you like. Then just peel the tape off the glass when you’re ready to use it and put it in place.
But with the green paneling that covers the bottom and top surfaces of the main body and “wings” of the K’Tinga, I opted to simply cover the whole thing in tape and then use a pointed bamboo Kebab skewer, (but toothpicks could work too) to push the tape down into the nooks and crannies and then cut out the sections that will be sprayed onto. Just make sure the edges are pressed firmly into place. Because there are three different green colours, it gets a little complicated and confusing, and is really hard to describe here so I’ll let the pictures do most of the talking.
The yellow Frog Tape is laid down onto the darkest green painted surface. Normally you’d want to paint the lighter colours first and then cover that with the darker colours, but in this case the darker green is the main colour so it was put down first over the primed and light-blocked hull (the production kit will be molded in black so light blocking will not be much of a problem!).
The long and tedious task of cutting out the panels to be sprayed first, the “medium” green colour, begins.
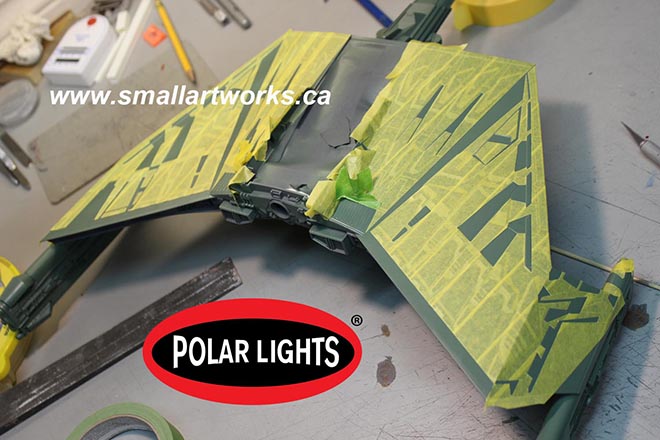
Same for the bottom.
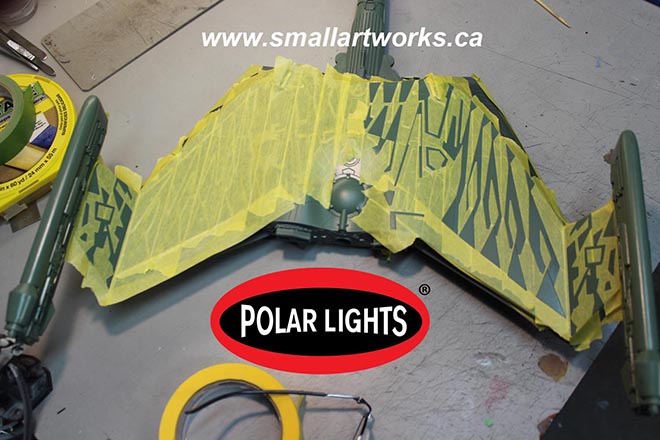
Spraying the medium colour with an airbrush is done and then the tape is cut out and removed for the next (lightest) colour of green to be applied. All the colours were mixed by decanting various rattle can paints into a mixing cup in previously determined proportions to match the colour chips that Jamie gave me to follow. How those colours were determined was covered extensively in Jamie’s previous blogs posted or linked to on this page.
With the medium colour done and dry, it’s covered up again and then the panels that will receive the lightest green colour are cut out and sprayed.

The green colours all applied, all the masking is removed. This procedure took me several days as the alkyd paint needed to be fully dry for 24 hrs or more before the next colour could be applied, and the masking alone took many hours. All the paint was applied with an airbrush, done by decanting the paint from the rattle cans into cups, mixed to match the colour chips Jamie provided me with and sprayed onto the primed surfaces.
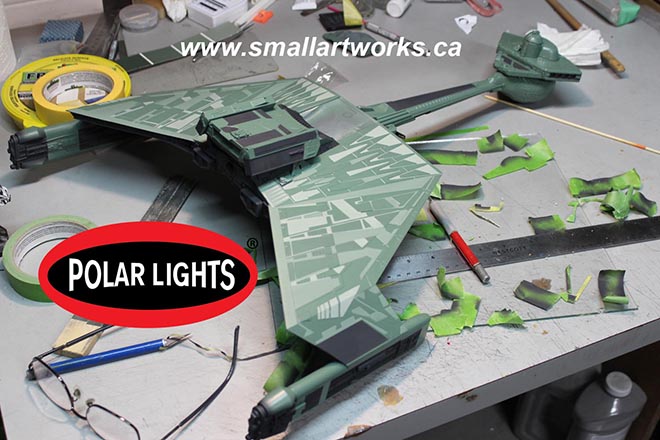
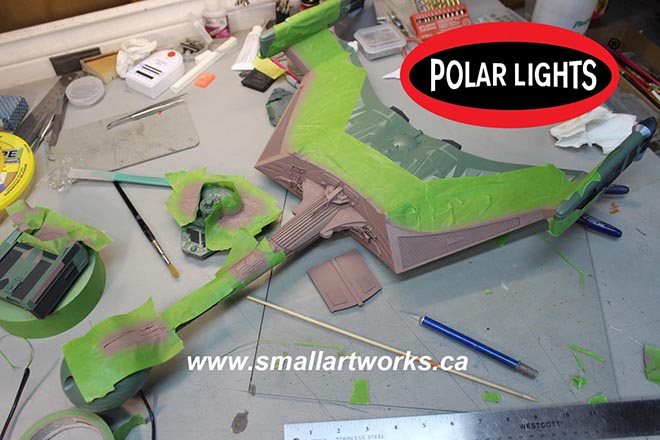
With the three layers of green out of the way, it was time to start laying down the other colours. This part was actually a lot more fun, as it was a lot easier, less time consuming and really started to flesh out the final look of the ship! This picture shows the model with the “light black” sprayed on. For this, I used 10 parts black Krylon primer (which is not true black to begin with but actually an extremely dark gray bordering on black.. difficult to describe!) mixed with 1 part white primer, and it seems to have the right effect. The nice thing about using primers is that it dries quickly, is less likely to react with the paints underneath and provides a nice silky matte finish.
The indescribable brown/tan/pink/oxide/mauve/taupe style colour… (I’m convinced that the VFX people said to themselves “Let’s see if someone forty years from now will be able to figure THAT one out when they try to build replicas of this ship!”) was painted on after the black, so all the green and black were masked off as one should expect and the pinkish stuff was sprayed on. Since there was also a lighter colour of pink to spray on, the same was done for it as was done for the green for various panels. I cheated in some areas and simply brush painted a few of them.
Starting to look the part, eh?
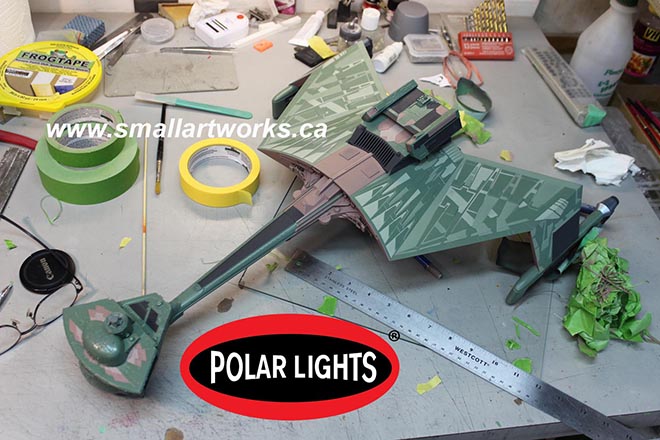
Now some of the smaller details are decorated using the old tried and true brush painting method using the small jars of easy to use hobby paints. There are some errors as seen here which will be touched up before proper photography.
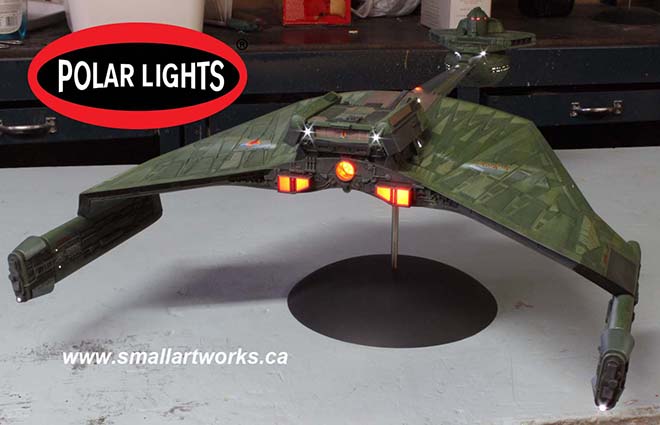
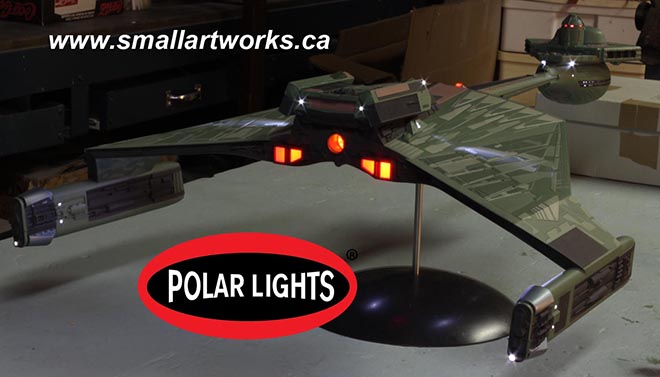
The model is nearing completion. Lighting is tested and paint work evaluated. At this point I did some photography of the model in this state for some of the painting instructions that will be included with the kit. Jamie will work his Photoshop magic as required to perfect the shots as needed to make sure the model is accurately depicted.
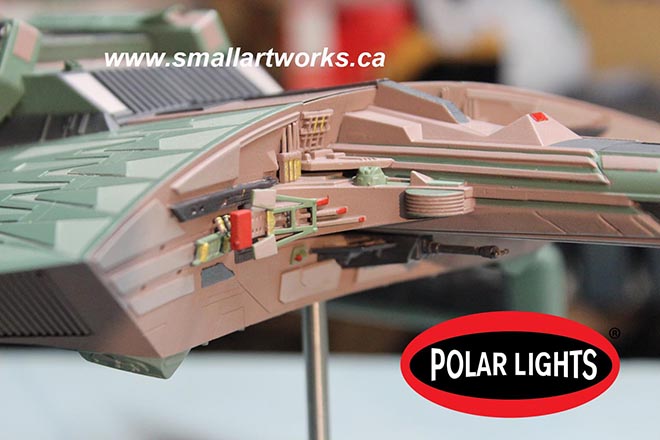
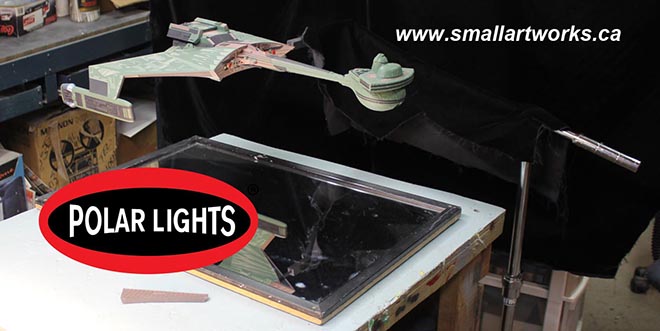
The mounting point modifications I made for this particular one can be seen here used as designed. In this case, the left grille, normally held in place with a magnet and seen here below the Polar Lights logo, is removed and the model mounted to a C-stand in front of a black velvet backdrop over a mirror to bounce light up onto the underside surface to give it a flat-lit appearance. It was shot using a 300mm lens from about 25 feet away, making the photos appear mostly orthographic so as to best show off the paint work in a blueprint-like format. The removable grille and other hatches designed into the modified kit as described previously allows the stand to be mounted into the model away from camera so as not to be in the way of any other parts of the it when photographed. This technique has become a staple for much of the photography I do for Round 2’s box art that Jamie uses to show how to decorate the kit for you, the builder. This makes finishing as clear as possible using actual photographs of the finished model in full colour instead of the usual crude grayscale diagrams that used to be done by kit makers in the past. Similar setups will be used after the model is completely finished with decals and weathering and dramatically lit for some VFX shots for the main box art photography.

Now you can see why I made all those modifications!
One more blog post to follow when the model is completely finished.
Jim did an excellent job matching the paint swatches I sent him, but everything turned out lighter in real life than I had guessed. I would never ask him to remask and repaint this ship. Luckily, we have the weathering stage to darken it up and the magic of Photoshop to get the look we want on the packaging. But did you see the light!?! Holy cow!!! -JH
Polar Lights Model Kits: K’t’inga… the colors, man… the colors… (Pt. 1)
Not to get confused with our buildup series from Jim Small, Jamie Hood has returned to share his research into the paint colors of the Klingon K’t’inga filming miniature featured in STAR TREK: The Motion Picture. Here is the first of three parts…
Who remembers this from a few years back…?
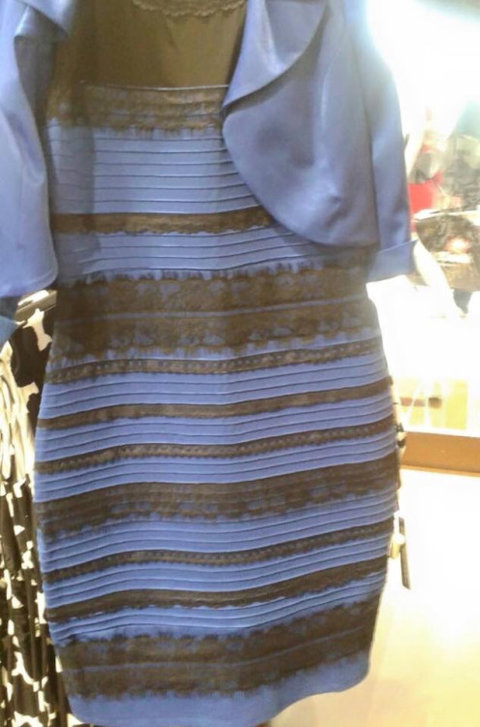
The world cracked in half trying to decipher the real color of this dress. Was it blue and black or white and gold…? (I guessed wrong, but who cares?) I have spent the better part of the last six months studying a similar conundrum in the paint guide for our upcoming 1:350 scale STAR TREK Klingon K’t’inga model kit. The goal is to supply a paint guide that would represent the look of the filming miniature on its first day on set. Why do we have to get that specific? Well, because changes were made to the miniature immediately before, during and after filming. Therefore, the way it looked the day it was first filmed is most likely the way it was intended to be. This story is a long and winding one, but I’ve learned too much not to share. Besides, I fear that without giving this complete explanation we will get letters about how we got it wrong. The truth is we can’t know exactly what it looked like that day AND no one says a modeler HAS to paint his model to match. You do you. Paint it however you want, but the decoration notes in the kit will be our best advice to this end. I’ve looked at this thing every which way, and though I am confident on the direction we will supply, I just changed my mind about some of these colors again yesterday. Besides determining the design of the small clump of detail that sits on top of the bridge dome, figuring out this color situation has been one of the biggest time sinks of this whole project for me. I’ve spent days (weeks) on both…
Let’s start with what we have to work with. Some of it you may be well aware of, some bits have just been revealed as our team has offered their best evidence for the paint colors that were actually used on the model. I’ll start with what we’ve been aware of for the longest time.
STAR TREK : The Motion Picture – The advent of HD makes it easier than ever to get a decent look at the ship in its appearances on screen although the color of the model was very washed out in some of its appearances. It isn’t the best we have, but it will become apparent how much it offers as I go. Photoshop helps too. It can punch up colors, adjust contrast and even sharpen images. It can actually pull hidden details out of shadows in some cases.
Cinefex 1 & 2 – These classic issues featured behind the scenes info on the effects process that shed a little light on how the model was handled.
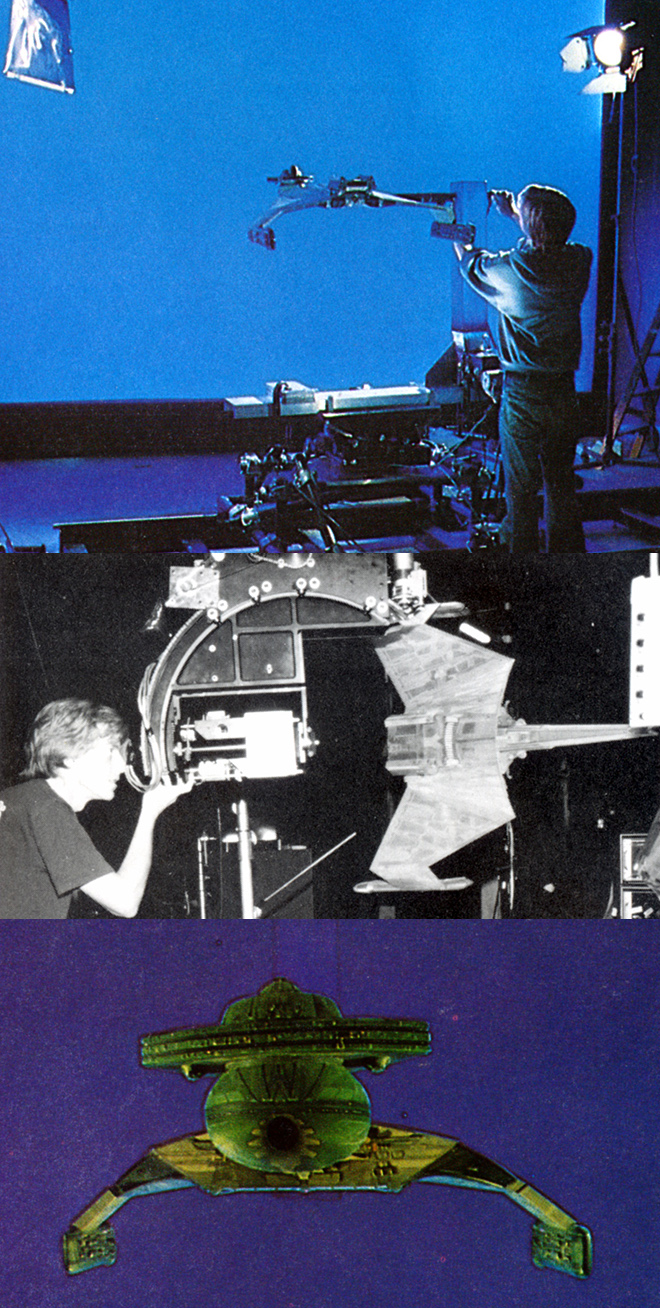
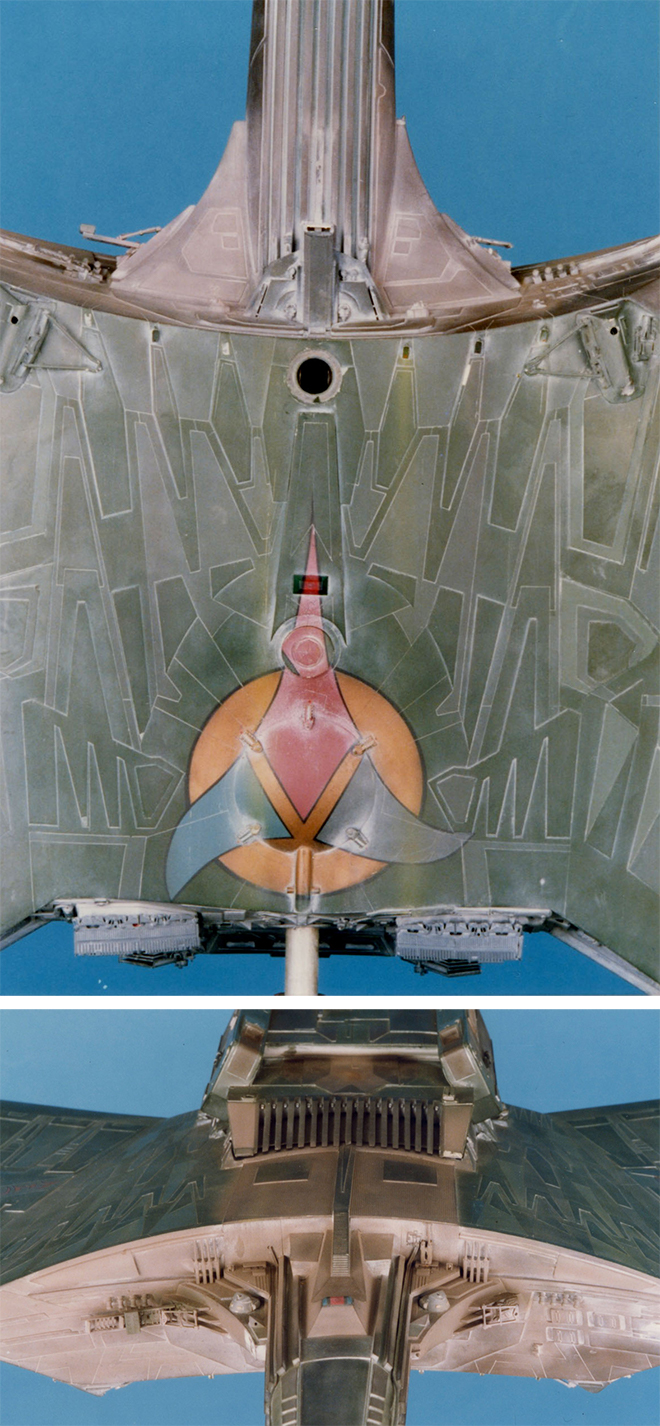
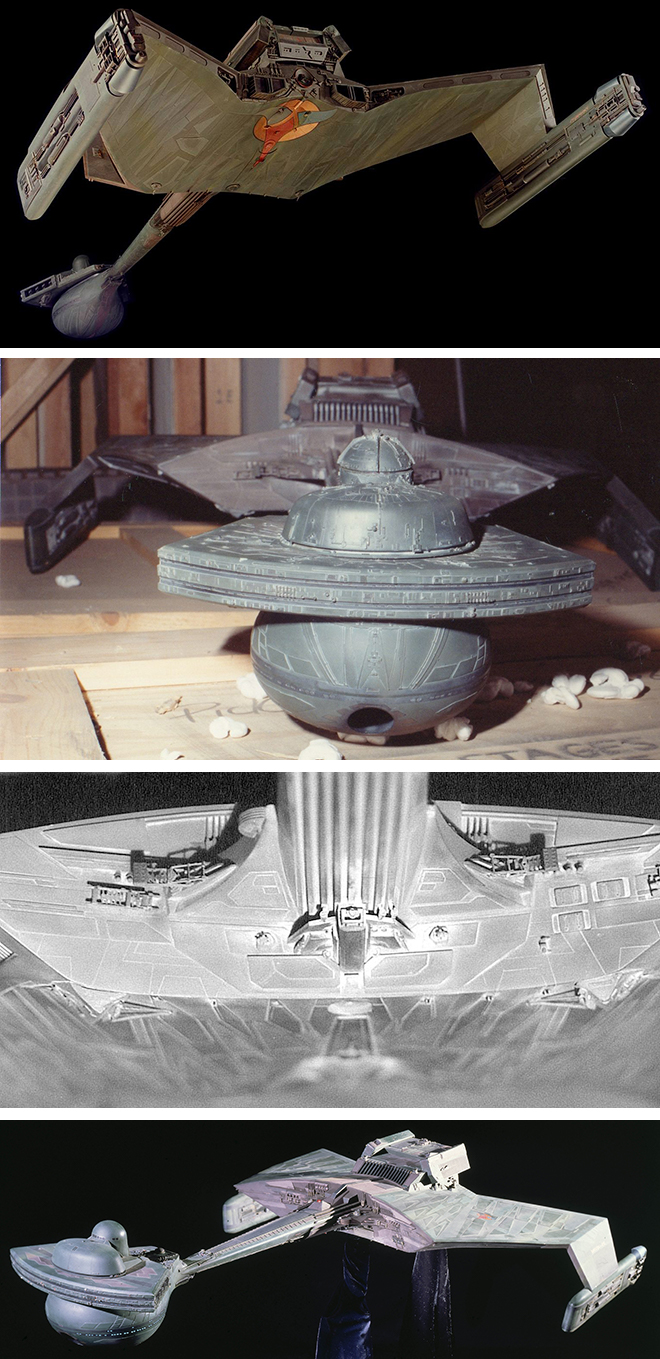
Bill George Photo Survey – A few years back FX production artist, Bill George, posted the series of photos he took of the miniature when it was uncrated for the ST6 redressing. I have had a chance to get further info directly from Bill as I’ve been studying the model. He did a great job IMO of photographing the model, but he stated they weren’t taken under the most ideal of situations. Shooting in tight quarters made the color wash out in some images. He said the color temperature of the images matches his recollection of the real model and this statement stood up when I took the step of checking the color balance in Adobe Photoshop. One mystery remains about the model as we see it in his photos though. You will notice a white substance that clings to the panel lines and other details on the model. Some might think it is dust that settled in from storage, but dust wouldn’t have settled just as much into the bottom of the model as it would to the top. This white substance is evenly distributed over the model. Bill said that it wasn’t powdery, but would come off when touched. The best theory we have about this was that it probably had to do with some of the “lightning” effects shown when the ships were destroyed by V’Ger. We have all stared at these great photos for so long, we are used to it and we see it as weathering. It really ties the whole ship together. But if it was used for special effects, was it there the first day of shooting? My working conclusion is “no”.
Michael Middleton Photo Survey – This set of pics was taken outdoors and in one case has an Apogee logo on them. (As I understand it, Magicam built the model and Apogee filmed it.) It is immediately apparent that the model was modified by Apogee after this survey, because details were added to the bridge dome including lights. The greater mystery was what more was modified after this set of photos was taken? Some of these pics have been floating around for a while, but they were low res and the color temperature seemed significantly different than the Bill George series. Trek Production Designer, John Eaves, recently shared high res versions of these images and more. However, they all had the same color temperature problem as the low res versions. These higher res images were released pretty late in the game relative to developing the kit. I wish we had them earlier, but they helped check our work and they also helped determine our color research once the color balance was corrected.

Various other photos of the miniature – These range from a lower rear shot that had been shared online by one of the guys that helped design the ship, Andy Probert. We also found an uncredited photo of the ship literally sitting on its crate after being taken out of storage. There is also a survey of black and white photos. They are relatively low res and they hold little value in determining color. I have been shown a few images that couldn’t be shared (Hey, this is sci-fi modeling… These things happen), but I think I can work around them and still make my point.
“Real” paint swatches – This is the latest and greatest! This was shared by Gene Kozicki who was working with Virgil Moreno’s estate. This is a scan Gene took from the original swatch card. Although it does not show every color used on the ship, it provides notes on a few specific model paints that were used. This lined up with additional information from Paul Newitt that Russ Simpson had brought his own full rack of Floquil paints to use on the miniature. In addition to this, Bill George received a couple paint matches from John Goodson who had run paint scans through the Smithsonian Institution’s database like they did on the ST:TOS U.S.S. Enterprise restoration. Although those results were a bit head-scratching, I think I know how and where they were used. More on these as we go.

In the beginning of my study, I had to consider the possibility that the model may have been completely repainted at some point because the color in the oldest photos looked nothing like the color in the newest photos. But none of the reference photos we have were native digital files or even scans from slides or negatives, but scans of prints. In some cases, old-school photograph color integrity degrades. The original photos (or negatives even) could have color shifted significantly in some cases. So, was it repainted or was it just bad color balance in the reference? “Real” paint swatches helped, but they didn’t solve all the mysteries…
More to come…
Polar Lights Models: Klingon K’t’inga buildup process Pt.4
Continuing our series of guest blogs covering our brand-new STAR TREK: The Motion Picture 1:350 Klingon K’t’inga model kit…
K’tinga Build Part T’ree, Ready for Paint…
James Small, www.smallartworks.ca
This is the last step in the main building of the various sub-assemblies and main assemblies, rounding the bend now, getting ready for the really grueling part, the massive paint job. Not a lot to cover here but I do want to point out a few things, and it was my “overthinking” of a lot of it that put me so far behind. The biggest problem I thought I would encounter was the fact that the main body section of the ship has to be all sealed up after lighting is installed, so I wanted to make sure I didn’t make any mistakes before sealing up the top and bottom main sections. The way the kit is designed I thought would be … “unfriendly” at this point because I usually like to be able to install or at least be able to access a lot of the lighting gear even after main sections are glued together. For example, I wanted to be able to install the engines AFTER the main body was assembled so as to make clean up easier. That’s why on two of the kits I cut large sections out of the insides of the battery box tub so that wires could be reached with tweezers etc, to pull them back in if they slipped out and went back inside the body after I had it all assembled. This is STILL a good idea but it turns out my concerns were unfounded. I spent far too many hours thinking this through and it turned out to be unnecessary for the most part. However a lot of other time was spent thinking through the special requirements for the modified photo model too (which still took too long!).
Note: The rest of this mostly applies to the stock kit, not the one I made with the modifications for photography.
You assemble the engines with the lighting installed and the wires hanging out the top of the nacelles. Then you glue the finished engines to the bottom of the lower hull section pylons. You glue in the “wing radiators” at this time as well. With lighting firmly installed in place (AND TESTED!!!!) as shown, you can then glue on the top body section you see there, making sure to feed the wires in through the bottom hole in the battery tub. Once it’s all glued together, and if you are careful (remember that gluing hints article I referenced in a previous post) cleanup is really easy, no putty needed. With patience, it all goes together remarkably smoothly, everything lined up perfectly. Yes, it’s a bit of a chore to get all those locator pins to line up and all fall into place, but once you do, you just run a little liquid plastic cement along the seam allowing capillary action to do its thing. (I actually use a concoction of my own, a half-and-half mixture of lacquer thinner and acetone which is a lot cheaper and works better for me than the overpriced hobby glues and even dries quicker, but only works for joints where capillary action is used.) Press together, let the melted plastic ooze out between the joints and hold or clamp ‘til set. When dry, just use your knife to trim off the bead and you have a nice clean joint, no putty required.
Yes, I know the plastic is translucent. Light blocking will be done by first coating the model (after careful masking) with Krylon gray primer which is effectively opaque. The colour coats will be applied over that. Also, some lighting elements are not yet installed. Those can be done after all the paint work is done.
Next I glued the neck in place and held it to the body using elastic bands (modified model shown here but principle is the same for stock kit). Like joining the body together, just push it in place (everything lines up perfectly) then apply the thin glue along the edges and let it set. Once dry, I removed the elastics and was able to put on all the little greeblies that get attached to the bulkhead. I also installed the thin rear panels that go in between the wings at this time as well.
All three models’ sub-assemblies are finished (for the most part) and ready to begin the massive job of masking and painting. A few parts not shown here such as the top bridge dome will not be added until painting is finished.
Due to time constraints to get the photography model done in time for Jamie to use for his box art and publicity material, I will now concentrate on just getting the modified model done first and will finish up the other two after the first one is all finished and photographed. Most of the time delay was my fault because I was overthinking so much of it.
Building this model is the easy part. Painting it will present some wonderful challenges… Hint: Most of the colours that were heavily researched by Jamie ended up being quite a bit different than I was expecting or appears to be in most photos! More on that as this build continues.