Recommended Sites


Archive for the ‘Eagle Transporter’ Category
Space: 1999 Models: New 1/72 scale Eagle kit Pt. 7
This post finishes up the preview look at our new 1/72 Eagle kit. As things stand now, we have gone through three rounds of test shot refinement, the box art is done and production will begin soon. The kits are on track to be in the market in November.
Paint: The Final Frontier
Oops! Wrong show. Carry on.
By E. James Small
First, I apologize to readers for finishing this up so late. Life and other jobs took priority so I just couldn’t put it to mind until those chores were done. Anyway, we continue with where we left off.
After all sub assemblies are done it is time to paint the model.
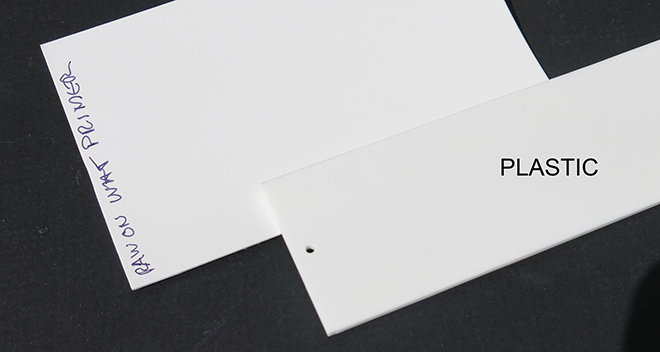
I first used gray primer to paint all parts, straight from the
rattle-can. Then when the gray primer was dry I primed it again with
white. Why two primer coats? First, the gray primer is much more opaque
than white primer is. And primer is much less physically thick than the colour
coat. By priming it first with gray to knock back the translucency of the
plastic and then putting white (which covers better than colour coat) over
that, it makes it possible to use a lot less of the main white colour coat.
The off-white colour coat was then sprayed over the white primer. I like to use
automotive lacquer when I can because it dries very fast, is very tough, and
goes on less thick and less likely to run than enamels or most acrylics or
alkyds. When lacquer dries, most of the carrier evaporates and the paint
pigment hugs the details very well.
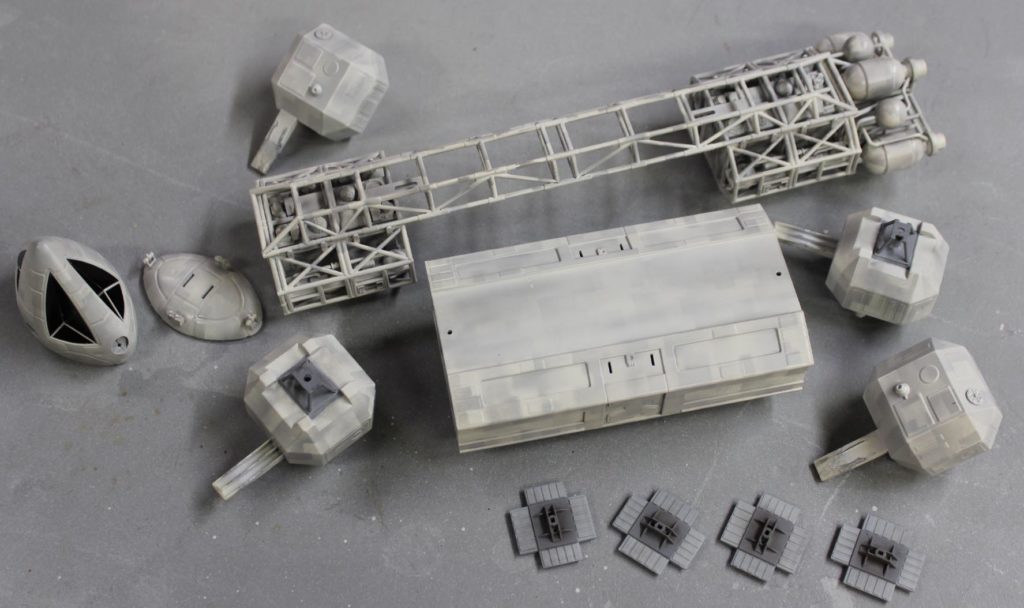
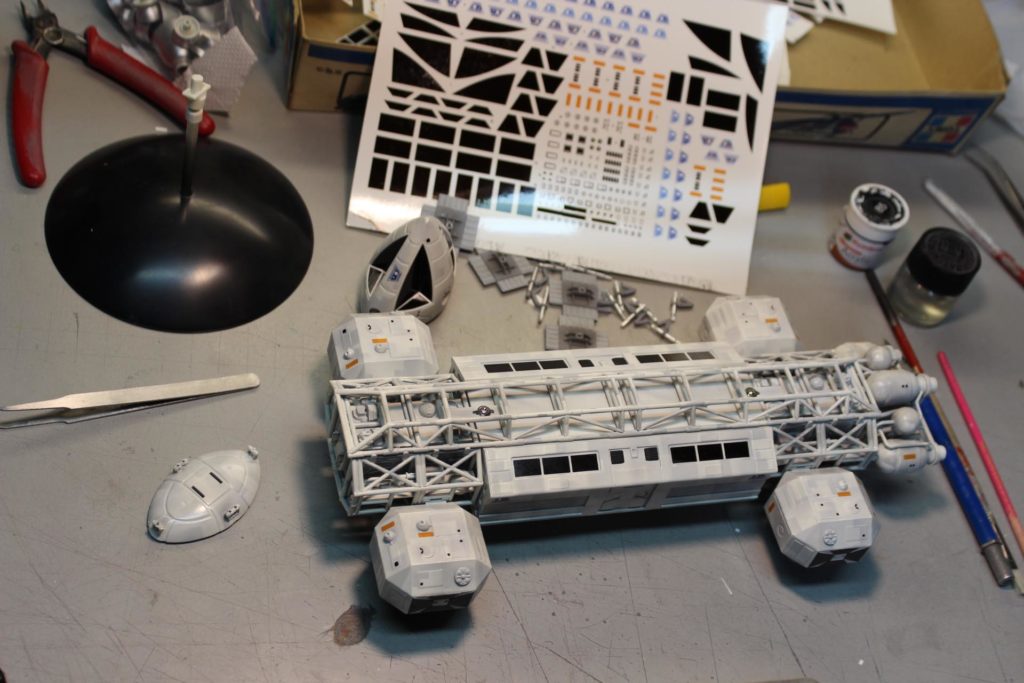
Details were either left in primer gray or sprayed black and silver as shown.
Weathering was done by first cutting chunks from an old business card and using it as a soft mask to airbrush light gray paneling effects over the entire model. This method is very fast, easy and looks authentic because they often used this technique on the original studio miniatures as well.
Further weathering was done by dusting some black powder paint over the model then wiping or blowing off the excess. Black powder paint is gray unless you add water to it. This allows the details to pop a little more.
Now it’s time to paint the details and add decals.
The landing gear oleos’ silver struts were just hand painted.
Those of you who need more attention to detail and more time to spare would do
well to cover those struts with Bare Metal Foil for an even better appearance.
The landing feet “toes” were dusted with a lighter gray. Since the actual kit
decals had not been done yet, I printed a set myself by using scaled down ones
from the previously released 22” Eagle also available from MPC/Round 2. I find
that using “Future” floor coating applied to the model just before the decal is
applied gets rid of a lot of silvering and saves having to spray the entire
model with a gloss coat, as decals never work well over matte surfaces. The
Future blends the decals into the surface. Just apply the Future to the surface
a few seconds before you apply the decals.
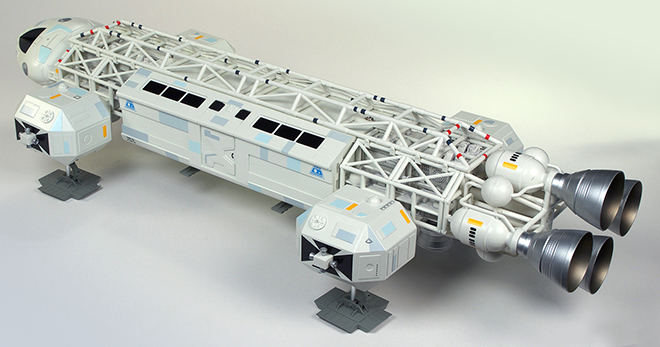
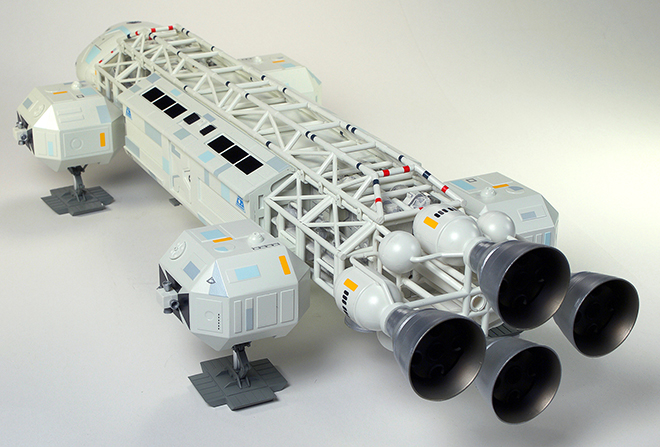
Finally the entire model, minus the silver bits, was sprayed with dull coat.
Here are all the painting products I used to finish the model.
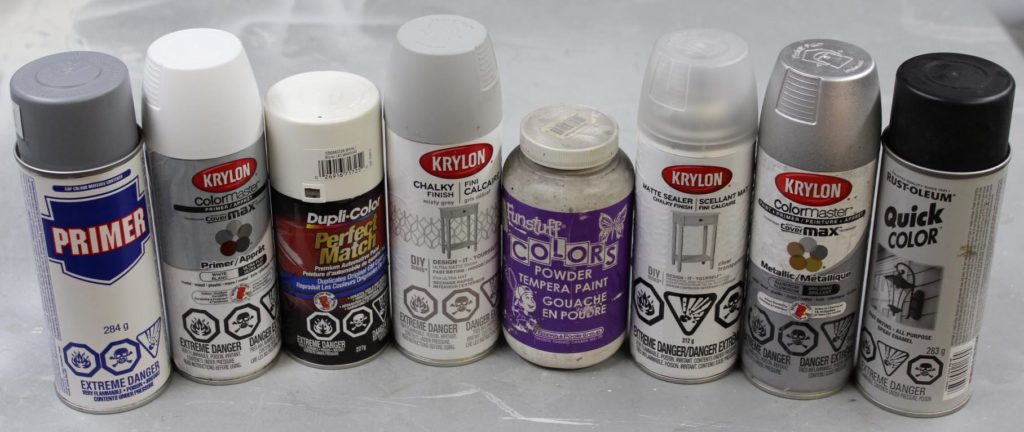
Left to right: Generic Canadian Tire gray primer, Krylon white primer, Dupli-Color off-white automotive lacquer, Krylon Chalky Finish Misty Grey (for the airbrushed weathering), black powder paint for weathering, Krylon Chalky Finish Matte Sealer for the overall finishing dull coat, Krylon silver for the engines and finally Rust-Oleum Quick Color flat black for airbrushing inside the engine bells.
Why use spray cans instead of hobby paints, you ask? Because of the expense, mainly, and convenience. There are no hobby shops near me and spray cans like these are readily available at local hardware stores. Also you get a lot more paint for the money with spray cans and at the rate I go through paint it would cost me a fortune in hobby paints for my work. I do have a stash of hobby paints that I have collected over the last few decades (usually Tamiya, with some Testors and others) used mostly for small detail brush work.
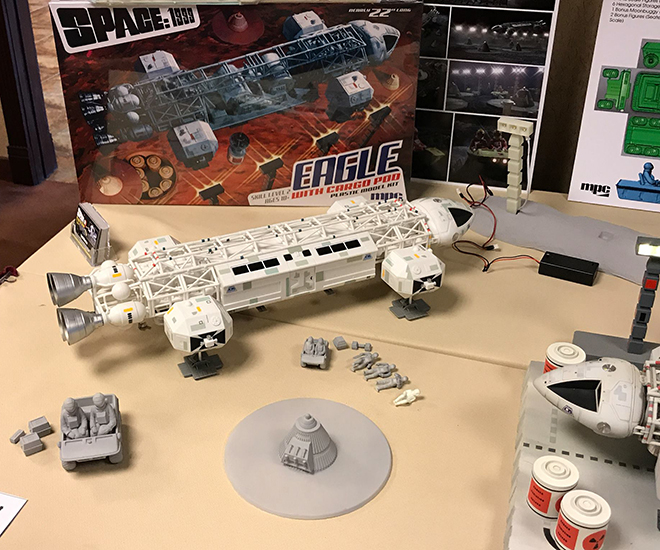
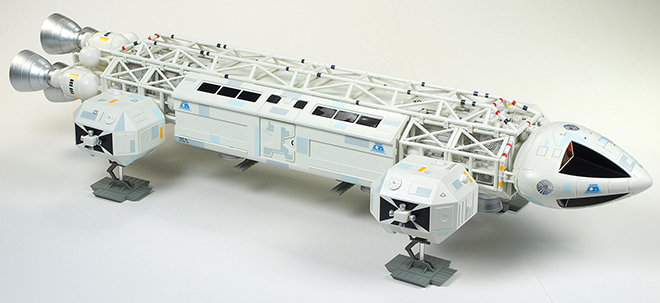
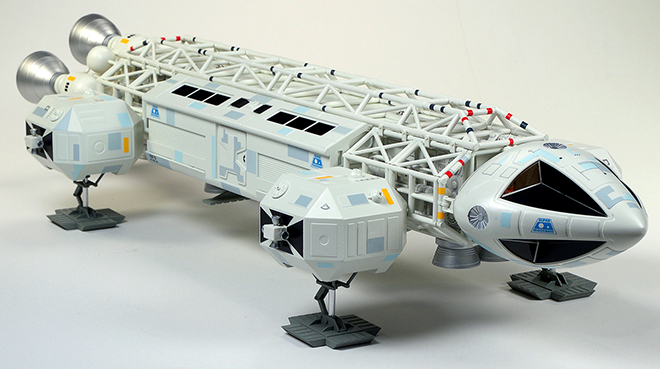
Then came the photography of the model for the box art once the painting was all done. Jamie Hood did a GORGEOUS painting (Wait ‘til you see it!) for the main box art but we needed pictures of the model for the rest of the box and tray. Most of it was all just standard stuff shot against a black velvet backdrop but I wanted a “hero” type shot showing an environment for the main box tray picture. Jamie picked out a shot from the show itself that had the angle he wanted, so I just more-or-less copied that shot using the 14” model in place of the original 44” VFX miniature. I painted up a quick and dirty partial launch pad to scale from an old board I had laying around for the model to sit on so that shadows cast onto it would look natural. That was better than just Photoshopping the model onto a digital background. Besides, even though this was to be a manipulated shot and a composite, I wanted to use real physical elements wherever possible. Real objects always look better than computer generated ones. Knowing the angles necessary I didn’t need very much of the pad to show, that’s why it’s mostly unfinished and all chopped up. Took just a few minutes with a couple of spray cans to make.
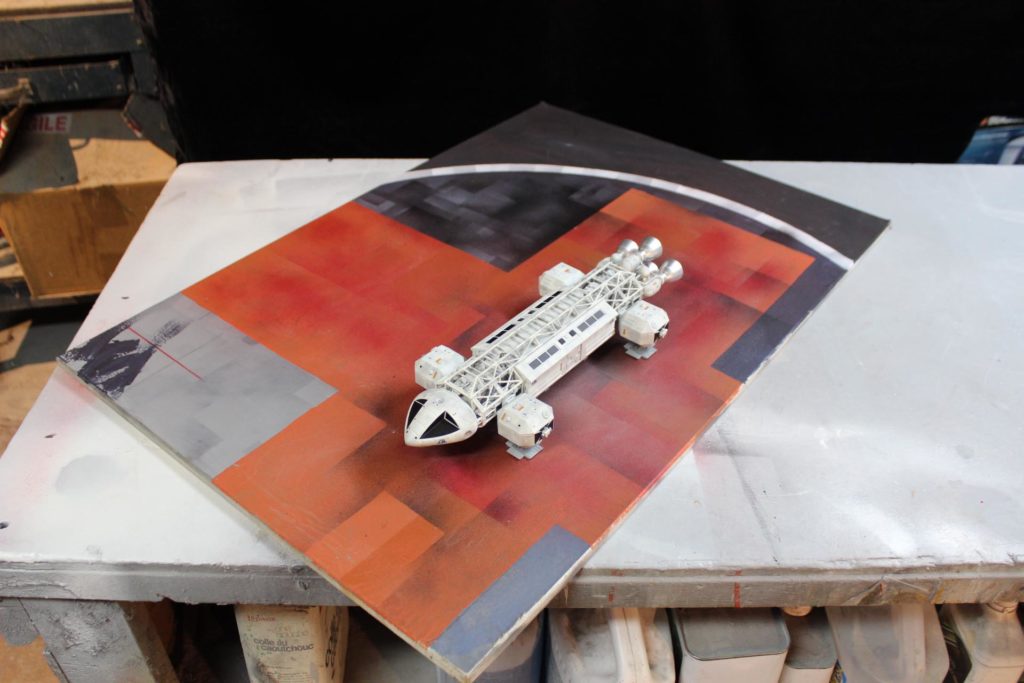
Then when strategically lit to look somewhat dramatic it was photographed then brought into Photoshop where I matted in a background of the Lunar surface using elements I had made from the 22” Eagle Cargo Pod kit box art. The mountains are just bits of foam chunks and tin foil sprayed with gray primer, covered in cement dust for texture and shot up close with appropriate lighting. The mountains are only about 3-5 inches wide or so.
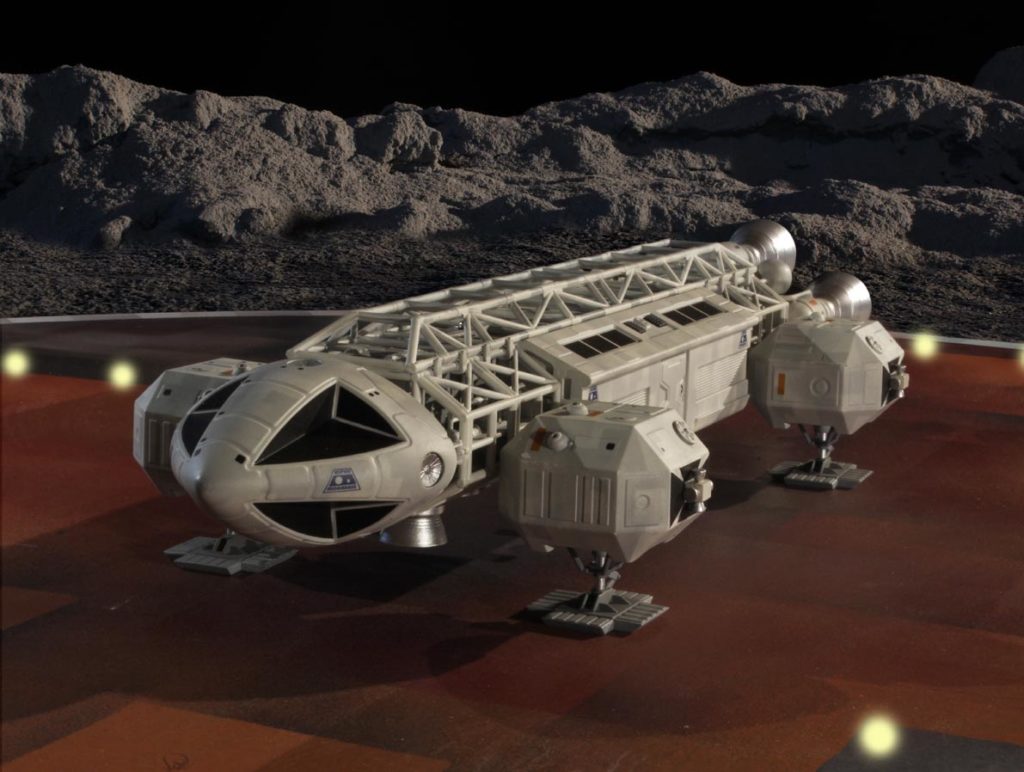
Looks pretty good and reasonably well matches what was seen on screen. Only thing I’m not happy with are the launch pad lights. I didn’t have the time needed to wire in real lights on the pad set so I just digitally plopped those in quick. I’m not the artist in Photoshop that Jamie is though. Maybe he can make them look a lot better by the time he lays out the box art. He can probably improve the entire scene as I did that composite rather quickly, I had other work to get to.
I hope you people out there will enjoy this new kit. It is amazingly well done for its size and has all the external details of the larger 22” model but takes up less space for those of you who don’t have much room to spare. Another fantastic achievement by Jamie and his gang over at Round 2!
We can’t wait to see what you all do with yours!
Jim.
Space: 1999 Models: New 1/72 scale Eagle kit Pt. 6
If you think you are experiencing deja vu, it isn’t just you… This post was published in error earlier. Here it is again following the correct order. Continuing our guest series reviewing the new 1/72 Eagle test shots. Enjoy!
Getting Ready for Paint!
By E. James Small
OK folks, here we are on the home stretch before we break out the spray cans and air brushes!
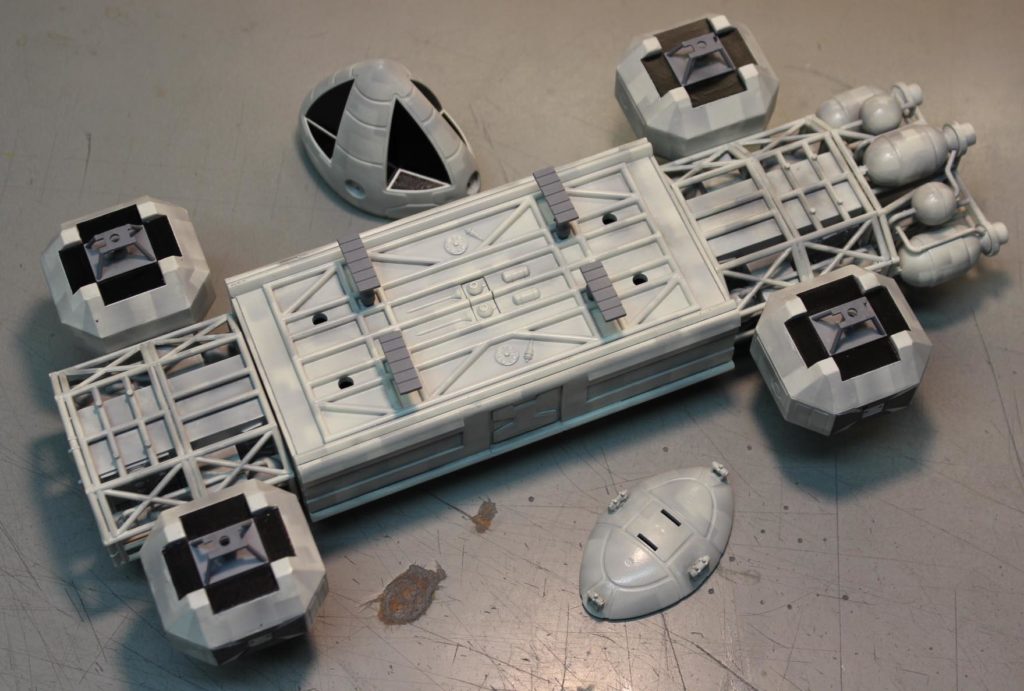
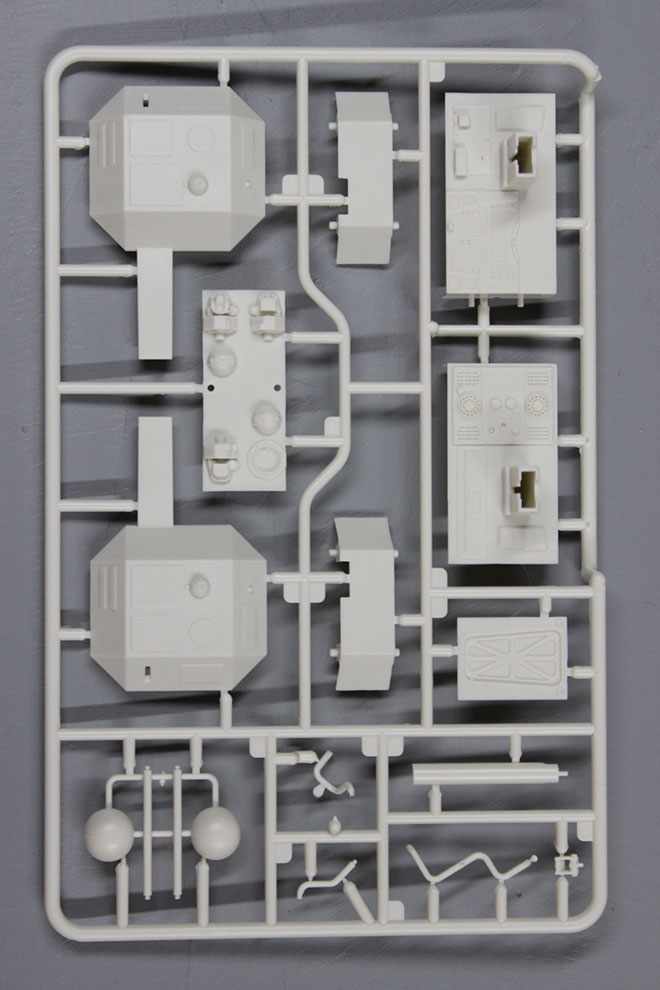
If there is one part of this model that is the most confusing, it’s the shoulder pods. Yes, they are simple to build, but really easy to screw up parts orientation, so if there’s one place where you REALLY have to pay close attention to the instruction diagrams, it’s here. These are the assemblies that you triple check before applying glue. I’ve even seen some of those lower cost “pro” builders get that stuff wrong on the larger 22” model! Meh, you get what you pay for I guess.
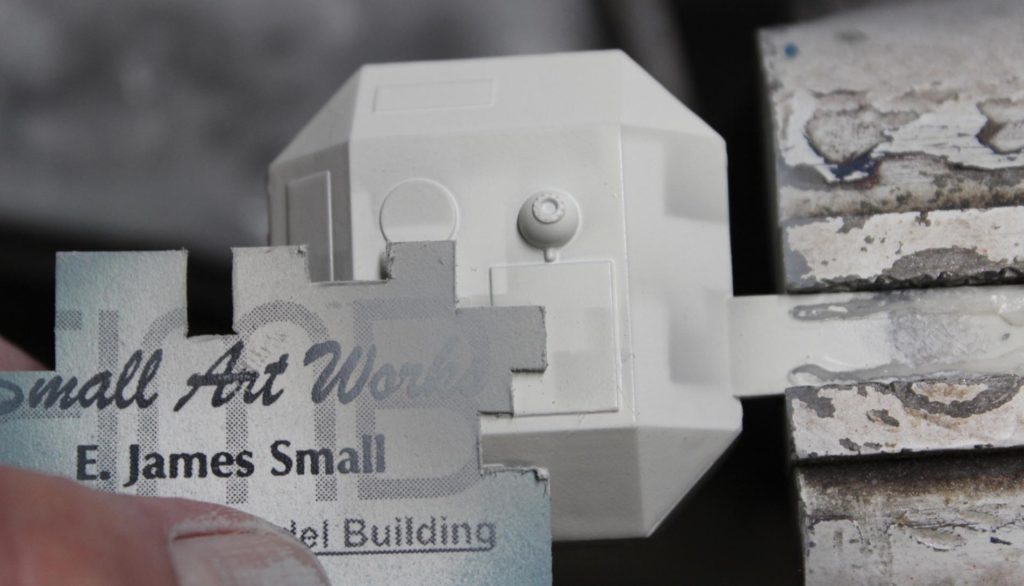
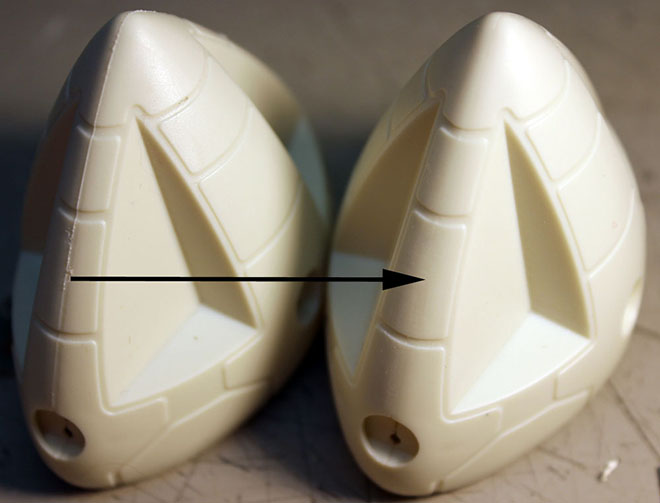
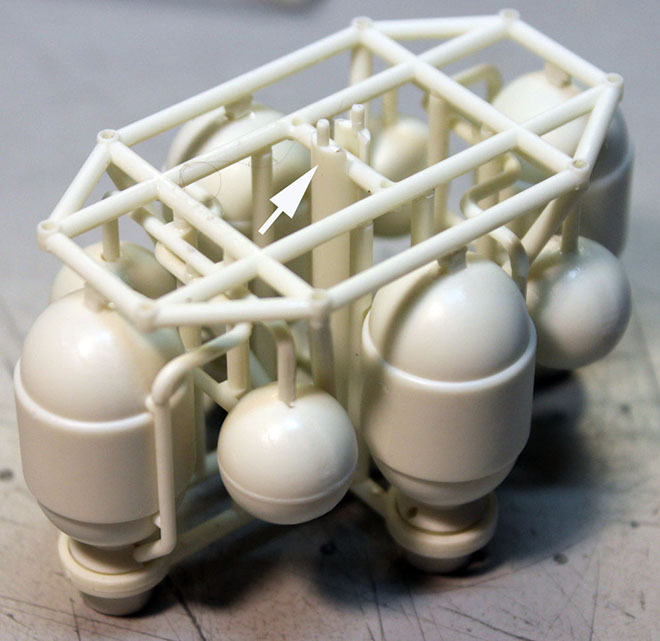
First you need to understand how the detailing on the pods work on the Eagle. Note that the pods are mirrored front to back and side to side. In other words, the detailing on the pods left to right are mirrored from each other and the details between the front and rear are also mirrored… except for ONE detail…
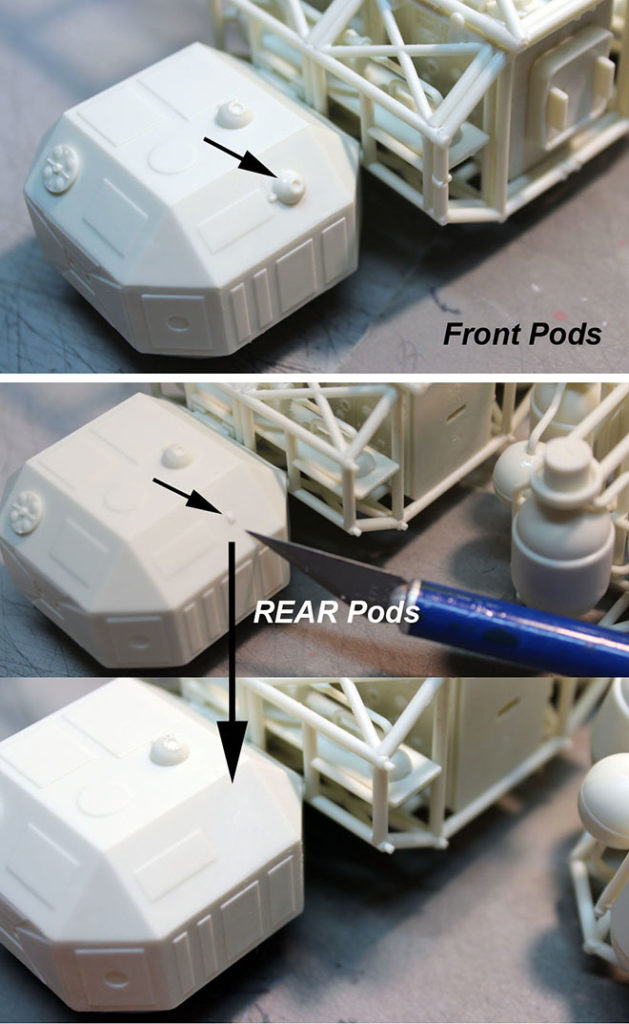
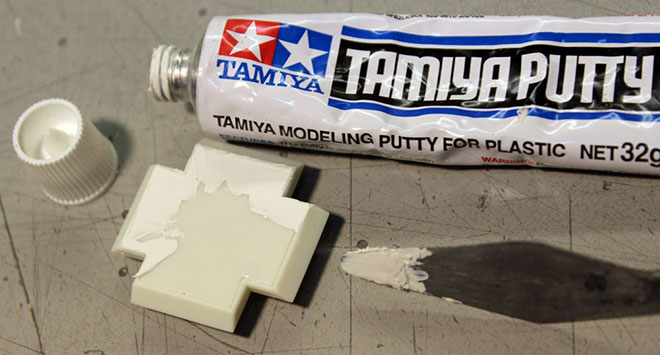
Note that the little dome shown by the arrow on the front pods are left off on the rear pods, so you’ll need to carve or sand off the little locator tab on the rear surfaces as shown. Of course, if you WANT to, you can also put domes on the rear pods too. It’s just that they were left off on the original for some reason. The footpads are two pieces and simple enough but there is a seam/joint running around the bottom that needs to be filled in and then, when putty is fully dry, sanded down.
The nosecone assembly is best handled like this:Put the two main halves together, dry. Then using water thin liquid cement, touch a few drops along the joint, allowing the cement to “wick in” and get carried along the joint with capillary action. Then, after the solvent has worked at melting the plastic for a few seconds, firmly press the two halves together, making he plastic/solvent squish out the sides. DO NOT WIPE IT OFF. Allow it to dry like that overnight. Then, when dry, you can sand down the joint nice and smooth and no puttying is needed. Most joints on the kit can be handled this way. The footpad bottoms, as above, seem to be the only exception.
Now glue the nosecone clamps to the back of the nosecone section. Before the glue sets, offer the assembly to the front cage section to make sure the pins locate properly to the holes in the frame.
Now glue the frames to the spine (watch orientation!! Doors on cage boxes point towards each other!) and you should have all the subassemblies as shown in this final picture below. Some parts, such as the little sensor dishes for the nosecone and the black ribbed bits for the top of the Passenger Pod doorframe are left attached to the runners for easier handling when painting. Do what is easiest for you. I left out the assembly procedure for some of the simpler parts like the engine bells as that should be a no brainer. Clean up any unsightly seams etc. following standard modelbuilding procedures. At this stage you are ready to begin painting. That will be covered in a later post. Stick around!
Space: 1999 Models: New 1/72 scale Eagle kit Pt. 5
Welcome back! Your eyes do not deceive you! This continues our guest series reviewing the new 1/72 Eagle test shots. Enjoy!
Engines of Construction.
By E. James Small
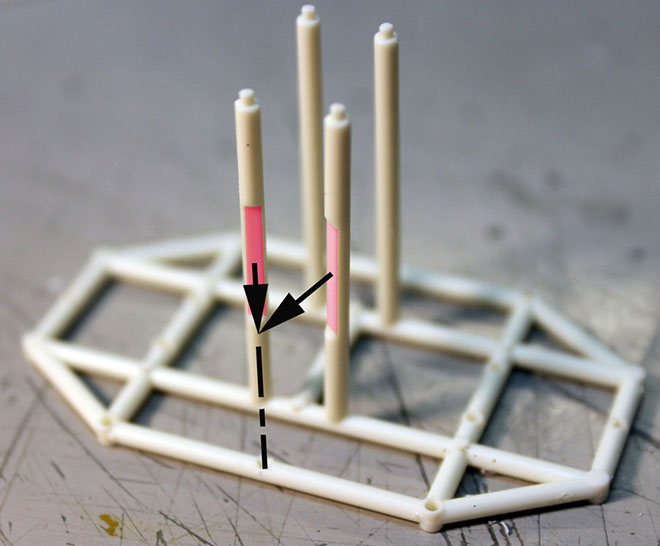
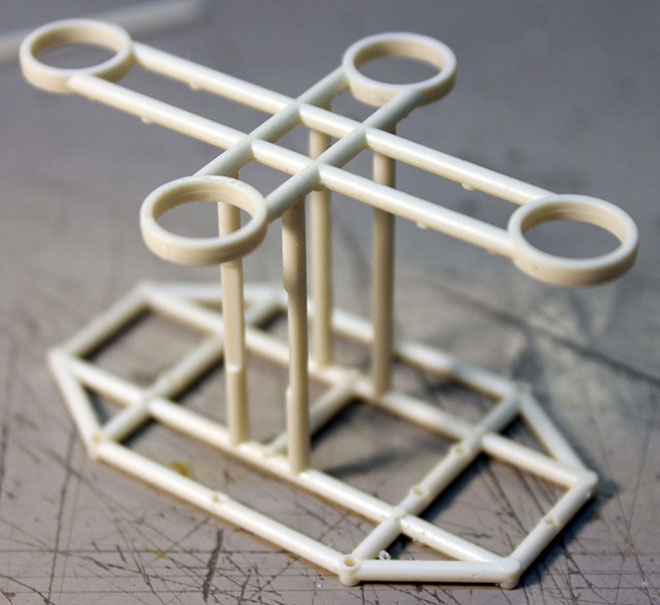
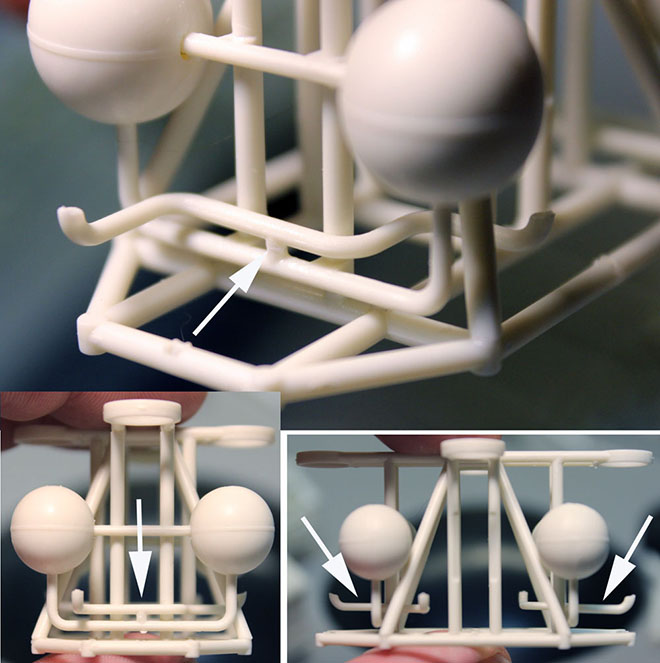
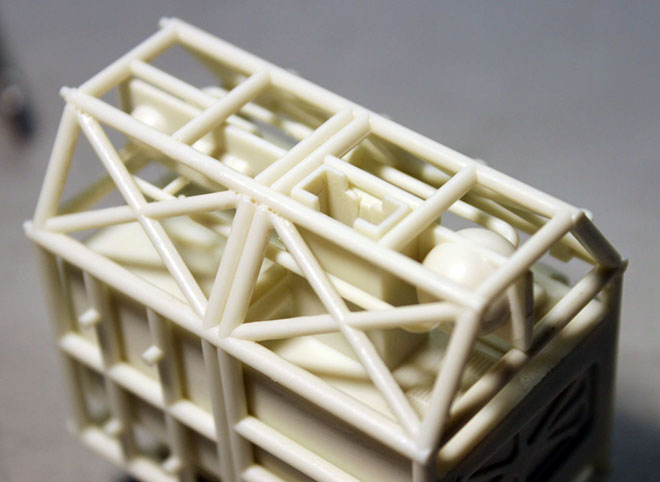
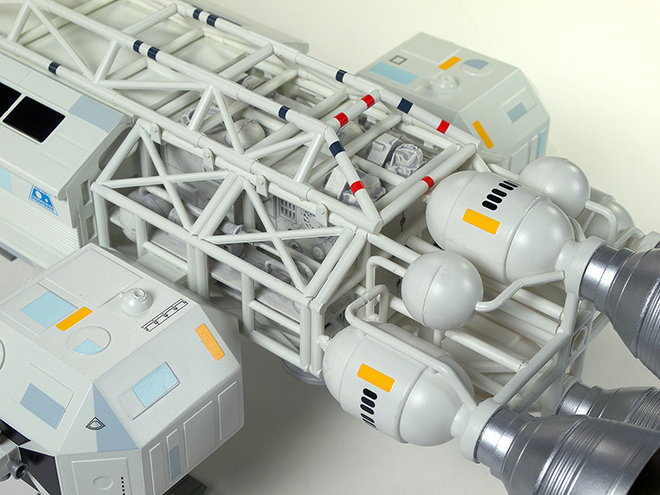
For many people, doing this engine assembly might be the trickiest part with all the piping and so forth, but if you follow this procedure, you will find it actually pretty easy. First grab the octagonal engine mounting main frame and the four supports with flats as shown. Glue them in place, making sure the flats (tinted red in this photo) point toward the centerline of where the top and bottom engines will be mounted. See arrows.
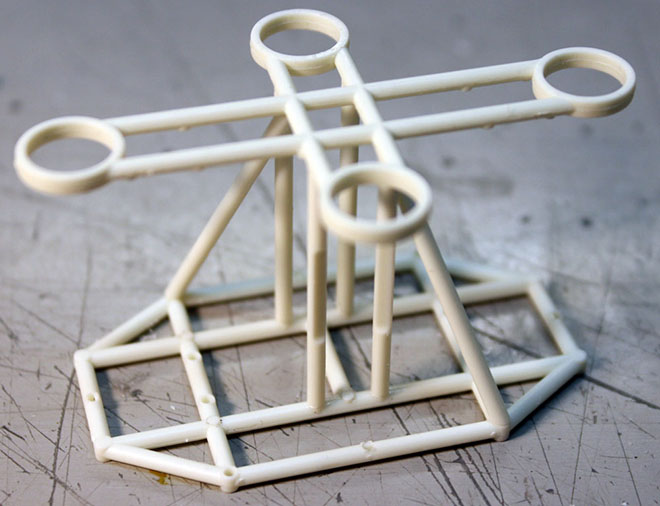
Next glue the cruciform section in place.
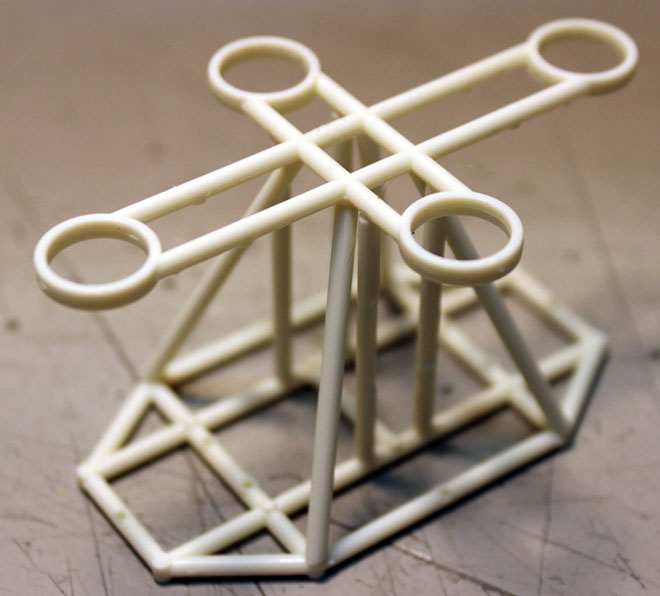
Then with the glue still soft, cement in the four angled braces as shown. Do two opposing corners first, then the other two. It’ll do a lot of wobbling around on you as you do this, but you will find that once all of the braces are in place everything will self-align. Put the unit down on the table as shown and press down gently on the center of the cruciform to weld everything together for a strong bond. Make sure the cruciform is not twisted in relation to the main frame when you sight straight down on it.
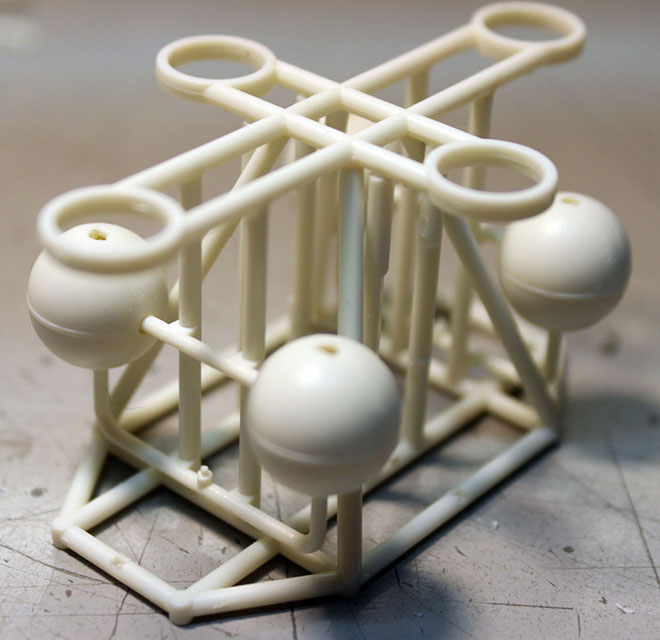
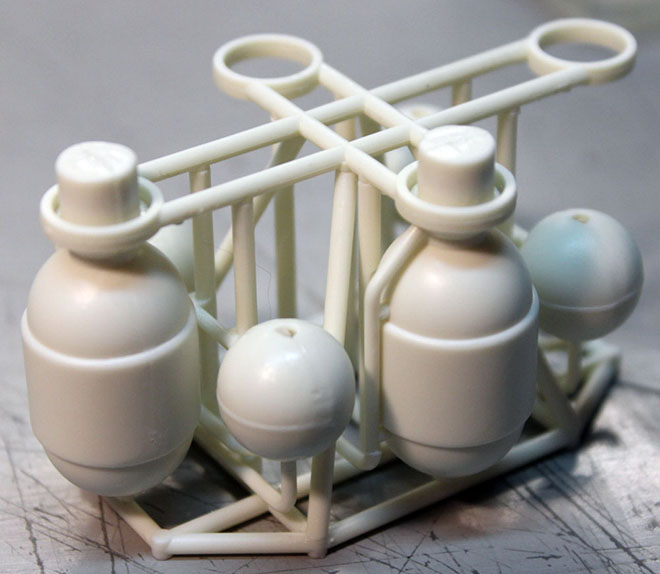
Next assemble the sphere halves onto the sphere frames and then glue those assemblies in place between the main frame and the cruciform as shown. It’s easier to put the end onto the main frame first, then swing it up into place in the cruciform. You can flex the parts just enough to allow the pins to clear.
Now, grab the longest of the squiggly pipe parts and glue them to the main frame as shown exactly in the picture. It’s the same on both sides. Tweezers will help a lot here. Pay close attention to the orientation of the parts, exactly as shown. Just glue the center down on the pin in the middle and make sure you sight it all up and keep the tubes level and parallel as shown. Allow to dry.
Now you can put the main engine bottles into place. Push the back ends through the cruciform hoops first, then swing the front pins down and cement them to the main frame. Line up the piping so they fit with the previously placed squiggly pipe sections and glue the joints together.
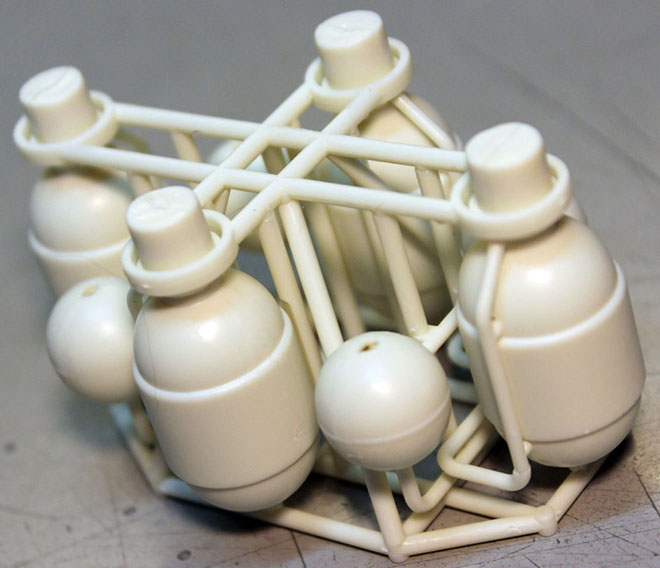
Glue on the remaining piping that goes from the spheres to the back of the engine bottles.
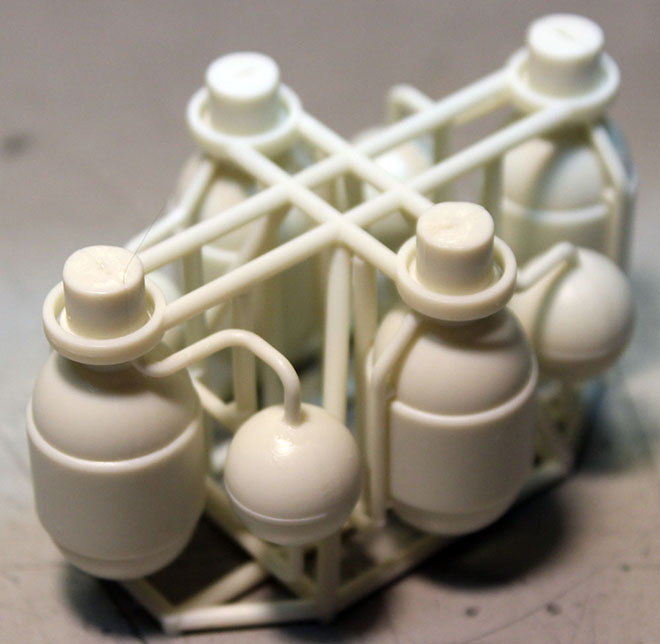
Now you can also put in the center pipe that goes from the center of the cruciform to the main frame. Make sure it is centered and seated as shown. You can offer the assembly up to the rear of the cage assembly to make sure it all lines up before the glue dries.
And you’re done that section! That wasn’t so hard, was it? You can either glue it to the back of the cage assembly now, or you can leave it of and paint it all as a unit. Enjoy! More to follow…
Space: 1999 Models: New 1/72 scale Eagle kit Pt. 4
Continuing our guest series reviewing the new 1/72 Eagle test shots. Enjoy!
Getting Cagey About This Build.
By E. James Small
Here we go again folks. Another update on the 1/72 scale Eagle build.
This one is pretty simple despite the complicated way I’m describing it. Just showing my personal recommendations of the building sequence for the cages on the model. In my opinion this is the best way.
Procedure is the same for both end cages of the model.
First, assemble the 4-part companionway “box” sections with doors and 2-part shelves. Make sure you get the roof oriented front to rear as shown and door oriented properly top and bottom!!!When you glue on the shelves, make sure you get them as close as possible to the box structure and make sure they are dead on parallel with it to make sure the rest of the cage frame structure will glue properly in place.
Next, glue on the TOP cage structure as shown. Make sure it all stays perfectly parallel. Make sure you glue it on the right way ‘round too! Note that the little locator pins on the end of the longitudinal pipes go to the same end as the slotted end of the box, opposite the doorway as shown!
Next get the notched uprights on either side of the boxes as shown and glue the ends ONLY to the top cage section. Tweezers or fine pliers will help a lot in this operation. Make sure the notched sections of the pipe go flat against the shoulder pod plug-in sections as shown by the arrows but don’t glue the flats in place yet!

Glue the non-notched uprights next to them.
Next, you will carefully orient the bottom cage section (pay attention to those longitudinal pipe end pins again!) and line up the ends of those pipes to the holes and glue in place at those joints only. Yes, it’s a little sloppy right now and things can still move but that’s what we want at this point. We want to allow for a bit of movement until we get the side frames in place as this will assure proper alignment.
Next glue the end uprights in place by carefully flexing the top and bottom frames to allow the pins to be inserted.
Now you can glue the side frames to the top and bottom frames. Once those are in place and carefully aligned you can use a long brush and liquid cement to glue the rest (flats on uprights and bottom frames to boxes) in place.
Lastly you can glue the front octagonal frame and nosecone mount in place.
You can test fit it of course, and it is recommended before the frame glue dries, but DO NOT glue on the REAR octagonal engine frame yet! You will need that separate for when you build the engine section. That frame will be put in place only after the engine section is built! More to follow….
Space: 1999 Models: New 1/72 scale Eagle kit Pt. 3
Continuing our guest series reviewing the new 1/72 Eagle test shots.
Let’s Prep for the Future!
By E. James Small
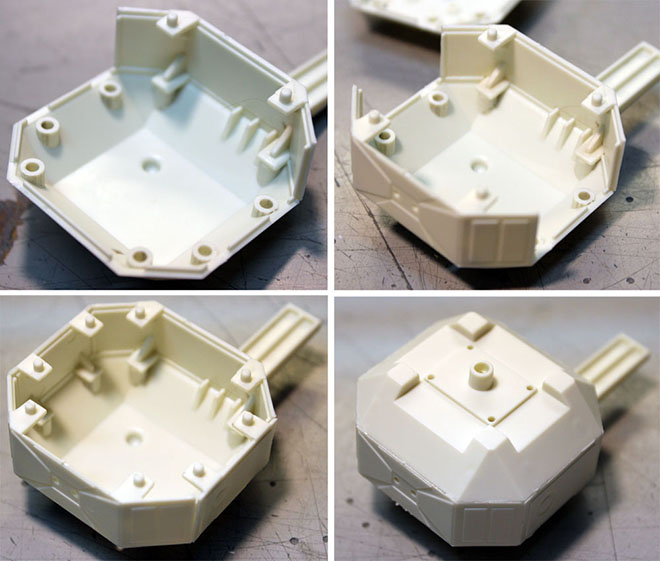
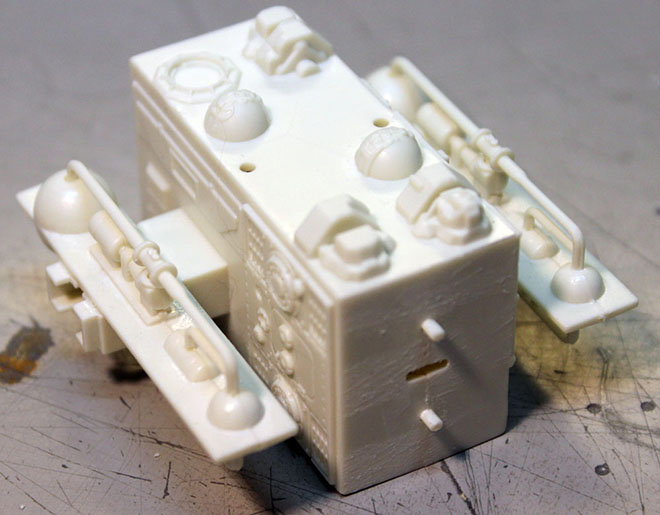
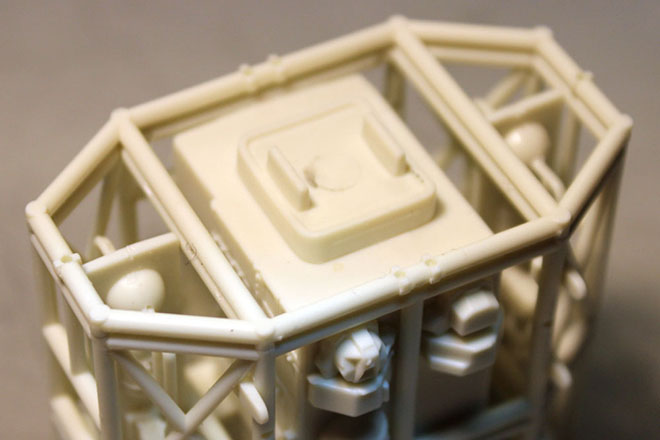
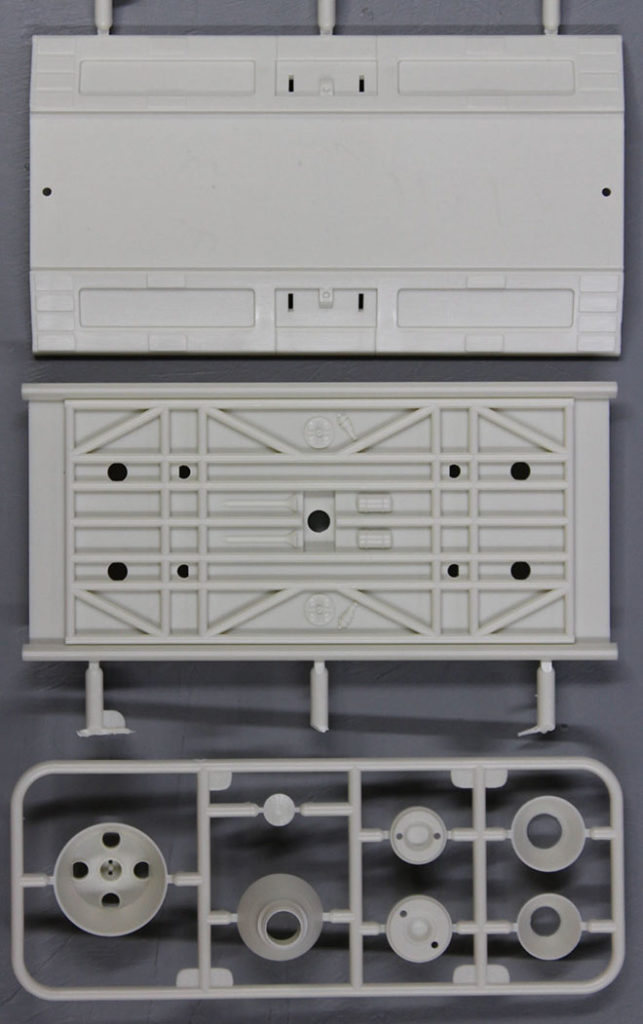
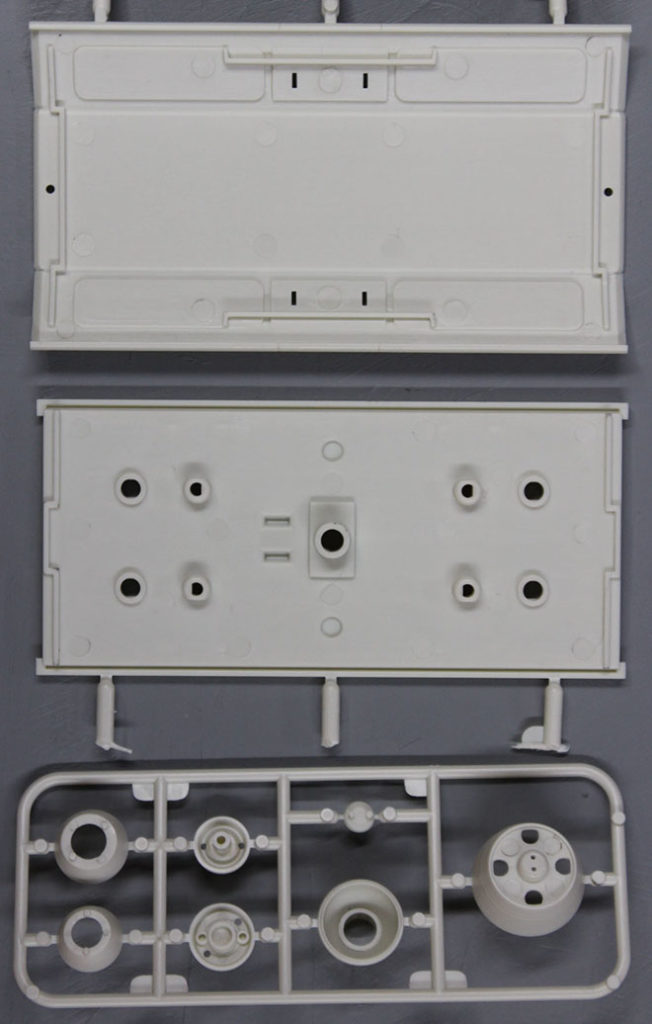
Ok folks, when you build your new 1/72 scale Eagle, you’re going to want to think ahead. What if you need to add something later? What if a cool new optional accessory like… oh, I don’t know… say, a side booster set or something similar gets put on the market? You’ll want to access the inside of the passenger pod so that such an option can be attached with magnets, so you don’t have to glue those accessories to the pod permanently. Access to the inside will allow you to do so at a later date. Therefore, when you build the passenger pod on your Eagle, you might want to do it in the sequence shown…. (same goes for the 22” model too, frankly speaking!)
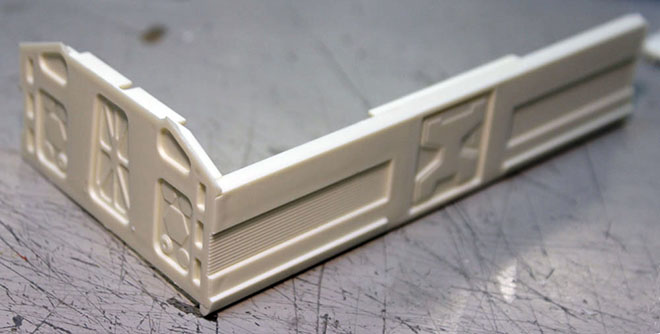
First assemble one side and end wall.
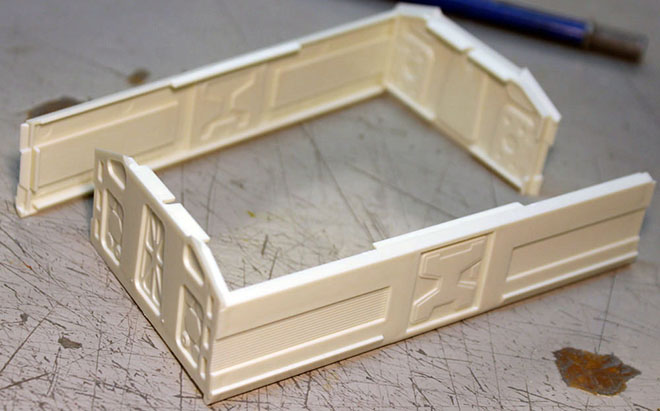
Then do the opposite two.
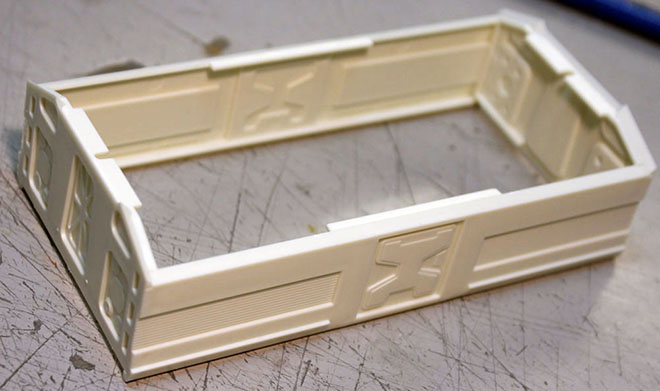
Then lastly add the roof.
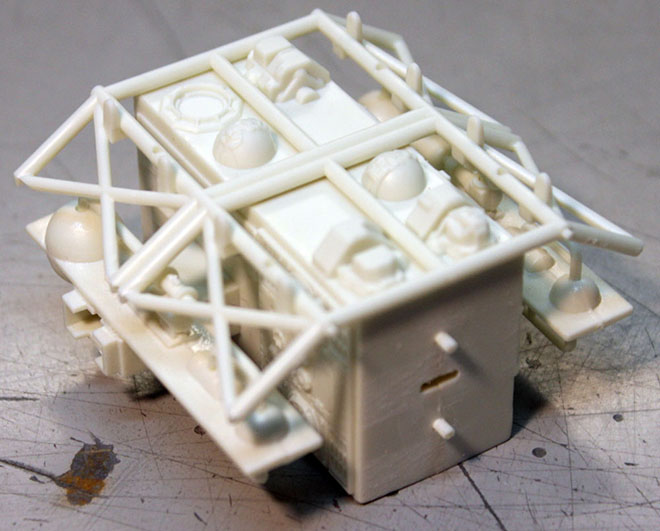
Sand down the seams as needed. (Hint: Leave those two little square ribbed bits that go above the door off until your model is painted… much easier to paint them black separately and add them to the pod after you have finished all your painting! That’s why they were made as separate parts, and why they are not shown here!)
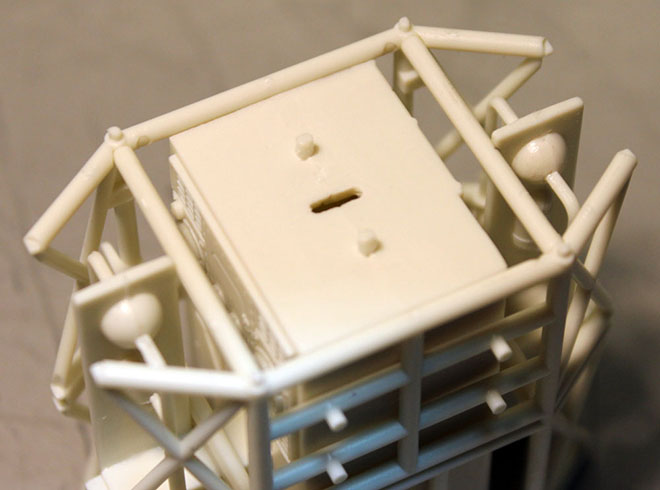
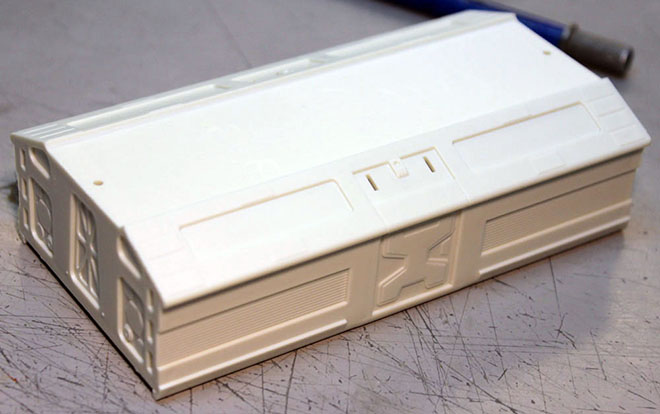
Put the floor on LAST! Why? well, before you put the floor on, you may want to consider allowing it to be removable so the inside can be accessed later as I mentioned above. You can do this by attaching the floor using magnets or screws. Yes, you’ll need to add something of your own design, such as gussets attached to the inside corners for the magnets and screws to mount to. So go ahead and devise your own way of making that floor non-permanent.
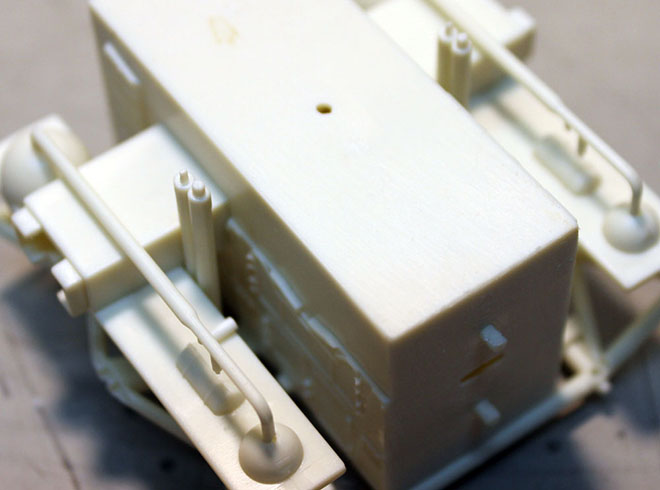
If you are careful when gluing your passenger pod walls together , you may find the floor to be a natural friction fit as well. so you may decide you don’t need magnets or screws, but don’t count on it. Friction fits are not always reliable.
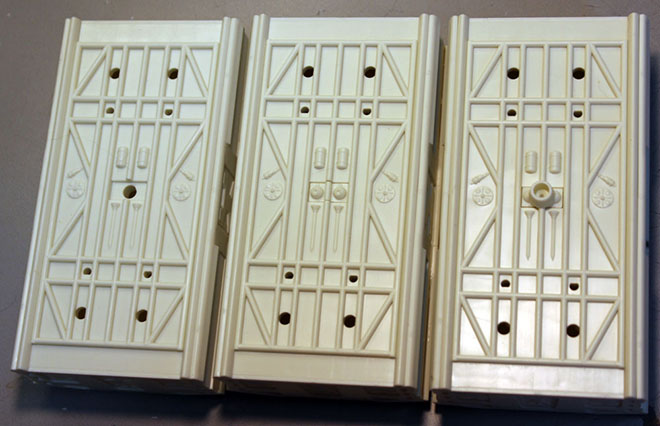
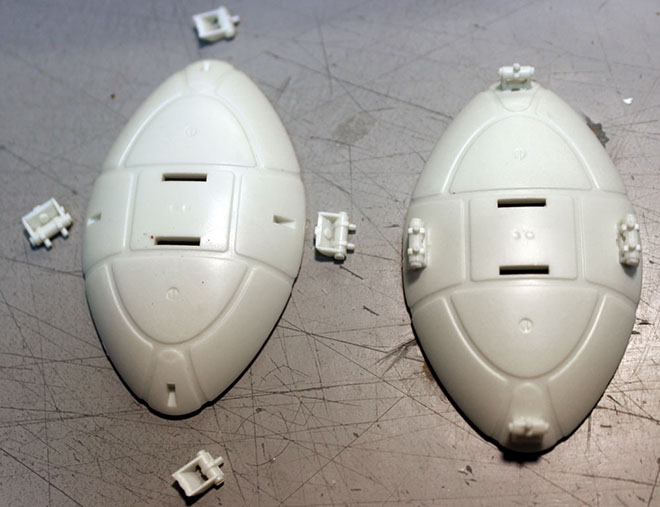
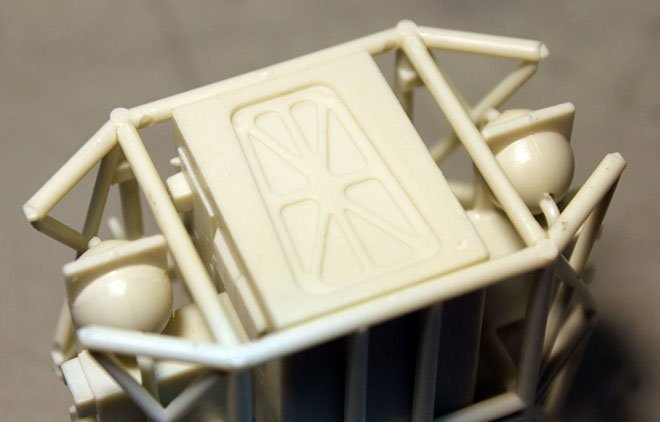
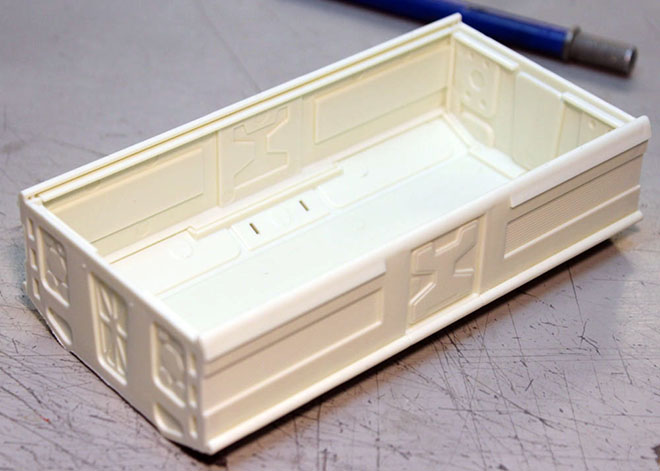
As you can see, the kit as it comes allows for the stand mount to be optional as well. By making the floor removable, that small centre bottom hatch can be more easily replaced if you want to swap them out as desired. See the three pods side by side? The hatches shown are most easily removed by pushing them out from the backside of the floor. By making the floor removable, you can make your model a lot more versatile! Heck, you could even get adventurous and put a lighting power supply and switch in there if you want to modify your model for lighting! So keep this in mind when you build your Eagle! Enjoy!
Space: 1999 Models: New 1/72 scale Eagle kit Pt. 2
Continuing our guest series reviewing the new 1/72 Eagle test shots.
Also, we have posted photos on our facebook page of every entry that was eligible for our award at Wonderfest USA last weekend. We also posted a short video of the four adult finalists.
Enjoy!
Developing a Spine in Today’s World.
By E. James Small
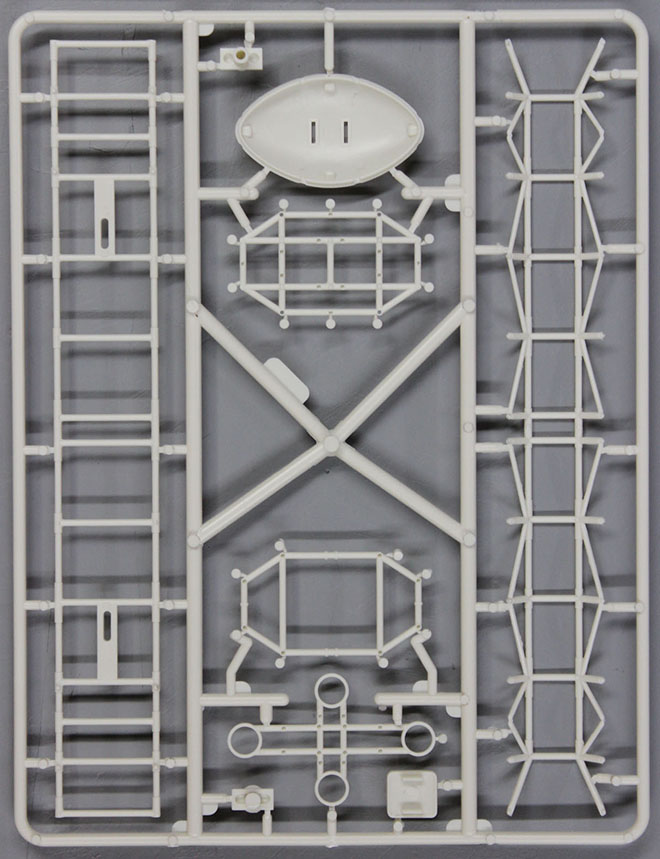
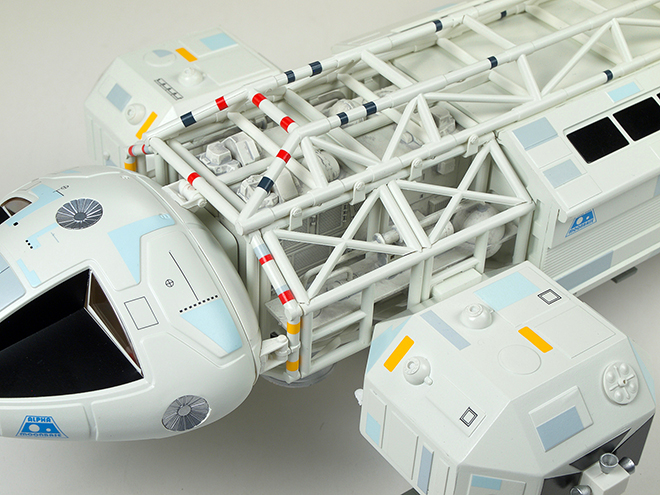
One of the things I personally worried and spent a lot of time thinking about when contemplating the shortcuts needed to take the fantastic MPC 22” Eagle and shrink it down to 1/72 scale was how the new model’s SPINE was going to be molded. We didn’t want it to look like previous versions made at similar scales that had flat backsides of the tubing and still be strong enough to support the finished model. Also it had to be ACCURATE in proportion as well as easy to build. Parts count and tooling real estate had to be kept to a minimum to keep costs as low as possible. Tooling draft, which means that the two halves of a solid steel mold must be able to be pulled apart without trapping plastic parts in undercuts that would otherwise provide full detail, has always been a problem for all injection kits. That standard had to be improved upon so that the new model would still represent the original HERO miniatures and not look like a cheap toy. Previous offerings of die cast and injection molded models and toys all had those problems. Therefore, how to do it better?
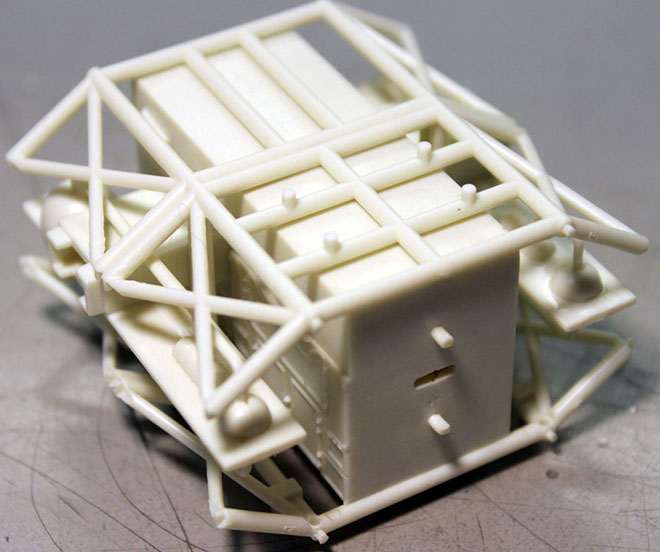
This is one of those times when I wish I could satisfy my personal ego and take credit for such a simple yet ingenious solution as shown in this picture.
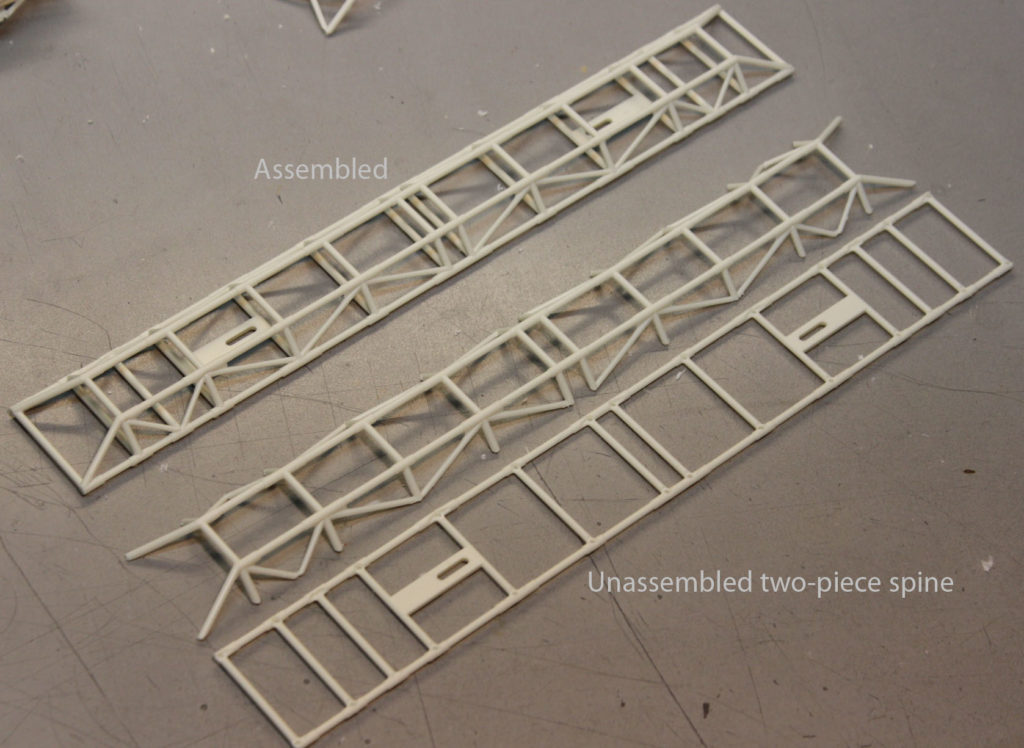
Nope, can’t do it. I had nothing to do with it. The design credit goes entirely to Round 2’s graphic artist and product developer Jamie Hood! In fact it’s one of those Homer Simpson “DOH!” moments when Jamie showed me his idea and I thought to myself “DUH! Why the bloody hell was that never done before? It’s such an OBVIOUS solution to the problem! Why couldn’t I think of that? Why did nobody else think of that decades before?
And, no doubt, all of you reading this, now having seen it will also say the same thing and think; “Why would you do otherwise?”
OK, ask that question of everyone else who made an injection molded Eagle model. Let them wallow in the failure that has been overcome in this new kit! Get it? Yeah, easy to understand once you see it done, not so easy to come up with that simple solution if you’ve not already seen it! Jamie is fairly reticent to take credit for a lot of stuff he does, including the many illustrations he does on kits you do and don’t even know about, so I’m gonna do it for him. Everyone please give him a virtual round of applause for his work! He does a lot that nobody hears or reads about!
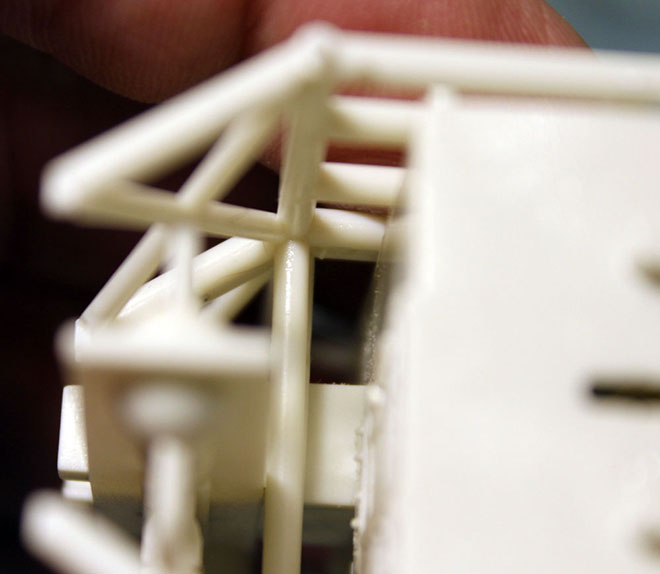
“OK”, you ask, “Why wasn’t that done on the 22” model”…? Well, even with Jamie’s ingenious design that even the factory didn’t figure out, there are some flaws on this smaller model that was overcome with more parts on the larger and more expensive version. You must understand the limitations of injection molding, especially the aforementioned draft. The worst of them is slight “webbing” around the tops of the triangular bracing at the top longerons of the spine. Yes, those are necessary molding shortcuts that are needed to keep parts count and tooling down for a smaller scale and lower cost kit. As a builder you can either ignore them or take the time with a #11 Xacto blade and carefully carve them out. The point is, the model will still look “right” whether you choose to do that cleaning up or not, as shown in the photo you see here. No significant cleanup was done in the examples shown.
Ladder and frame. That’s all there is to it. Now you see what it takes to develop a good solid spine in today’s plastic world!
Space: 1999 Models: New 1/72 scale Eagle kit Pt. 1
We hope sci-fi modelers had a good time this past weekend at Wonderfest USA 2019 or at least heard from friends that were there and saw their pictures, etc. We had a blast ourselves. We will post a report later this week, but first we are going to start a series of guest blogs by Jim Small focusing on our brand-new Space: 1999 1/72 scale Eagle Transporter. It grabbed a lot of attention from everyone who stopped by our booth. We sent a set of test shots to Jim just before leaving for the show and we didn’t want to hold anything back. So here we go…
Eagle Hatchling!
By E. James Small
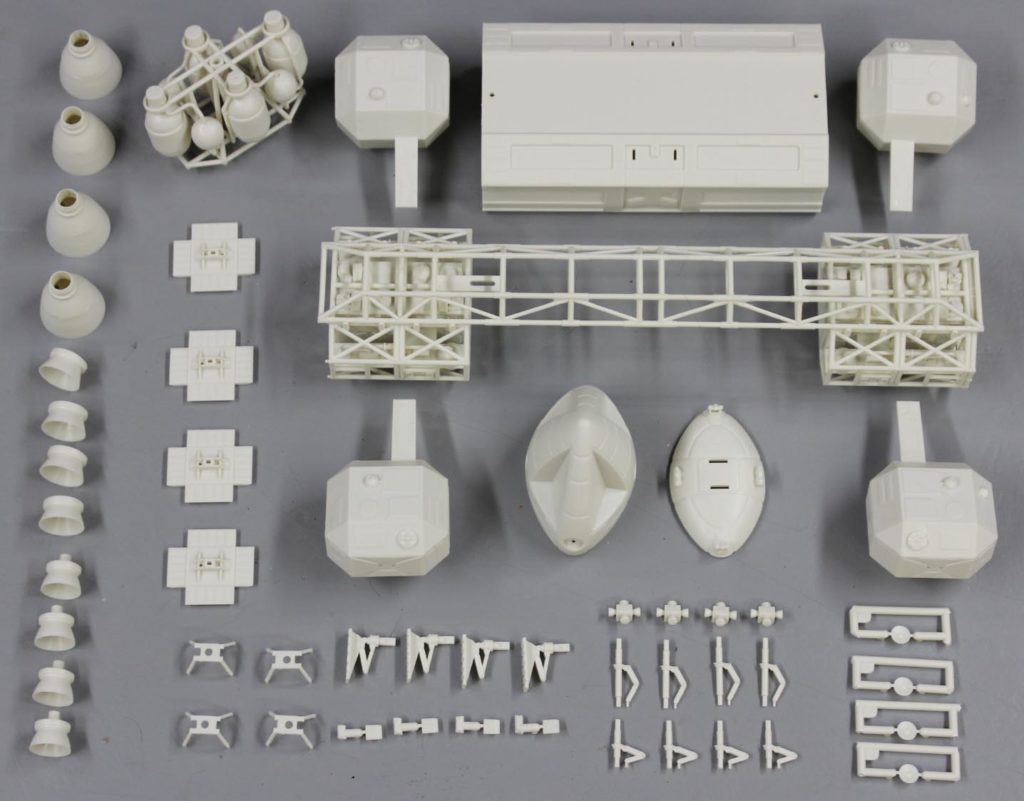
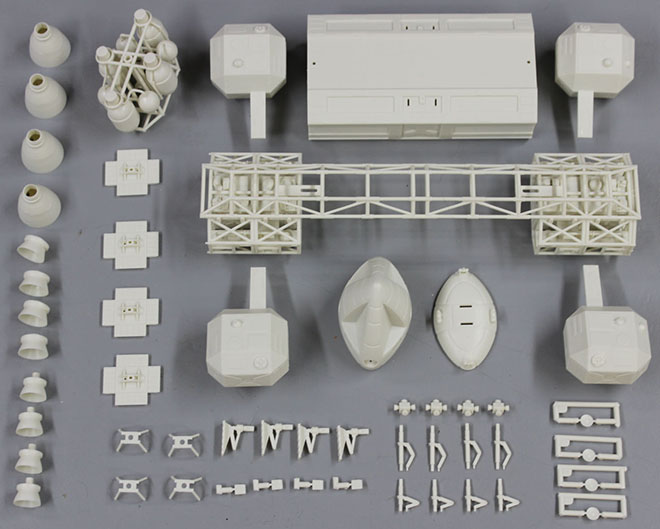
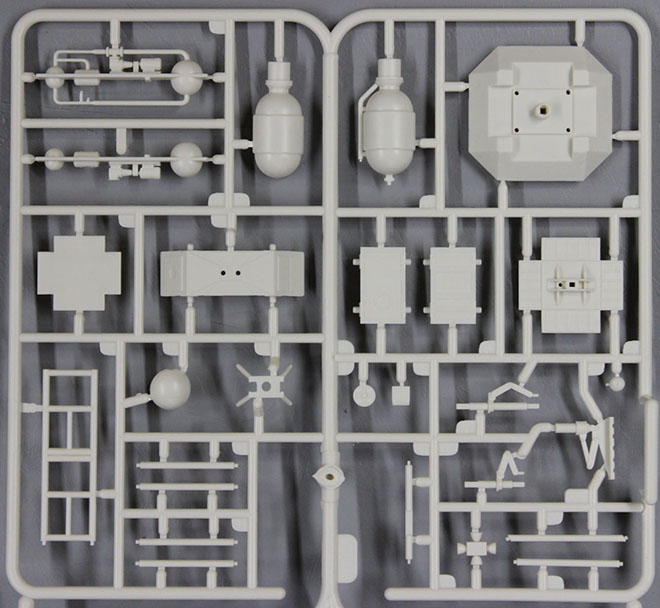
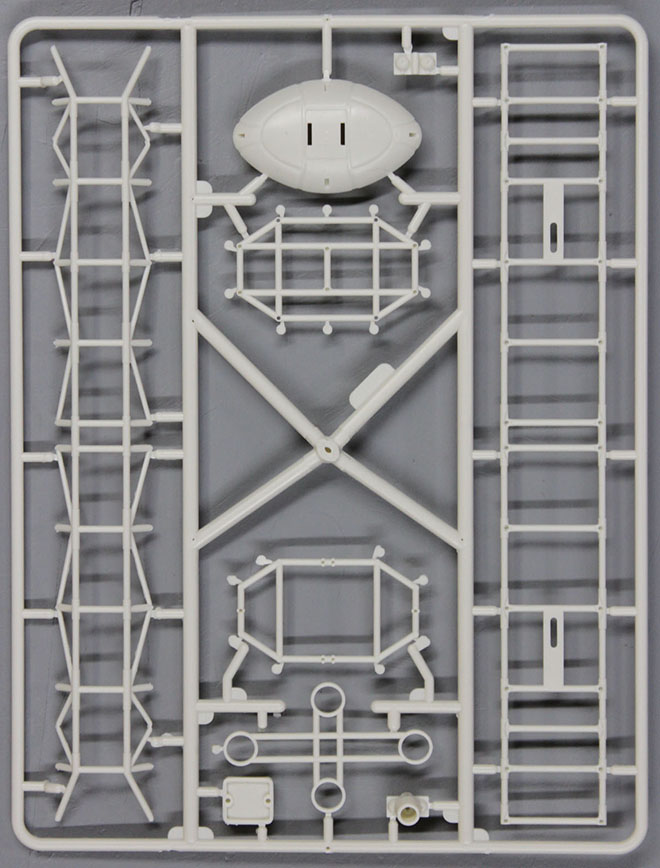
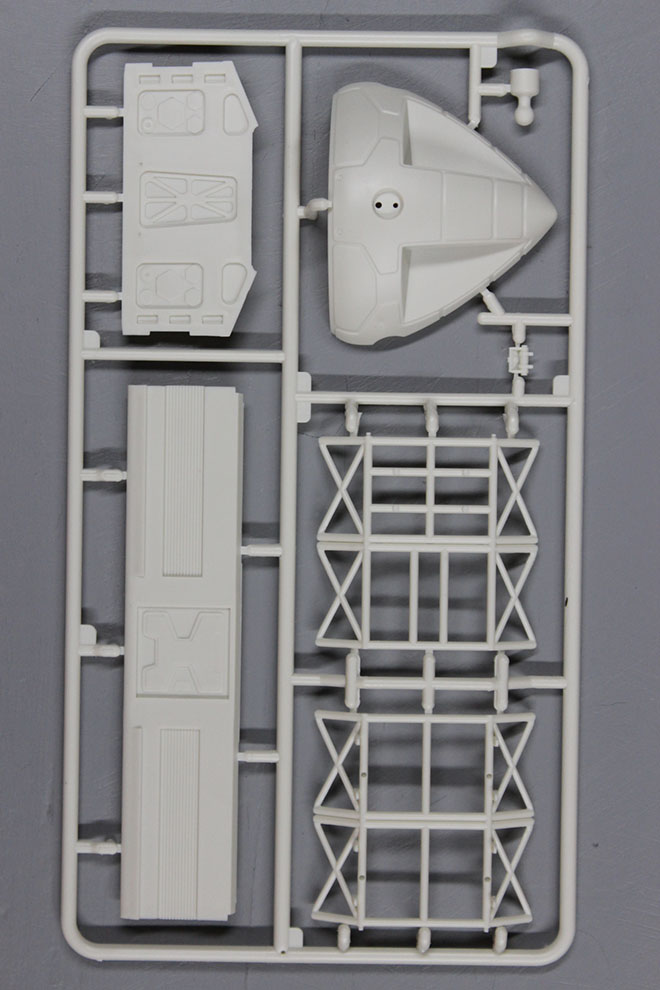
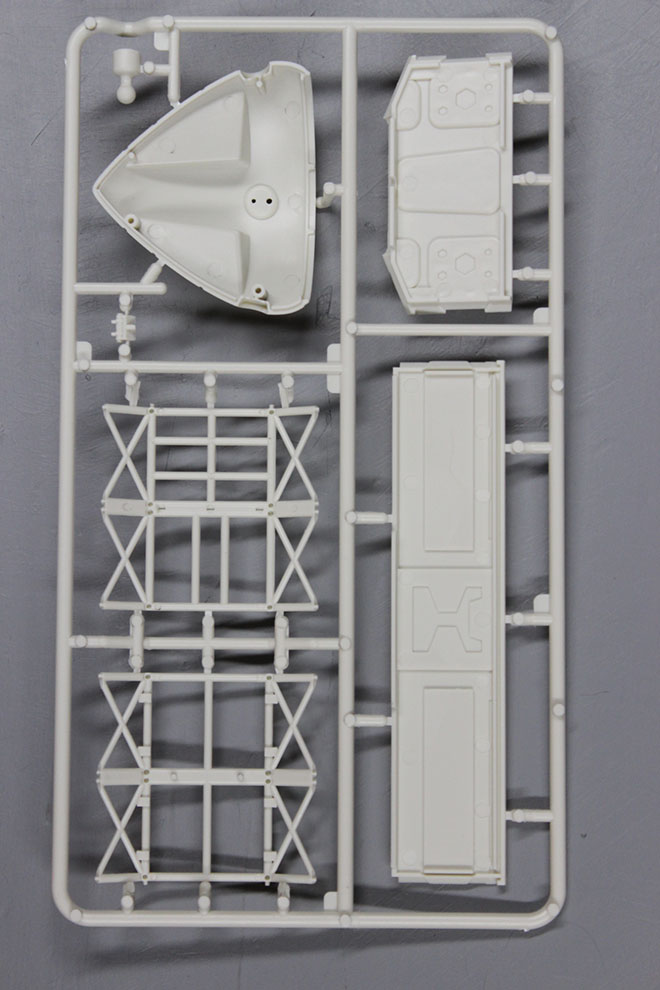
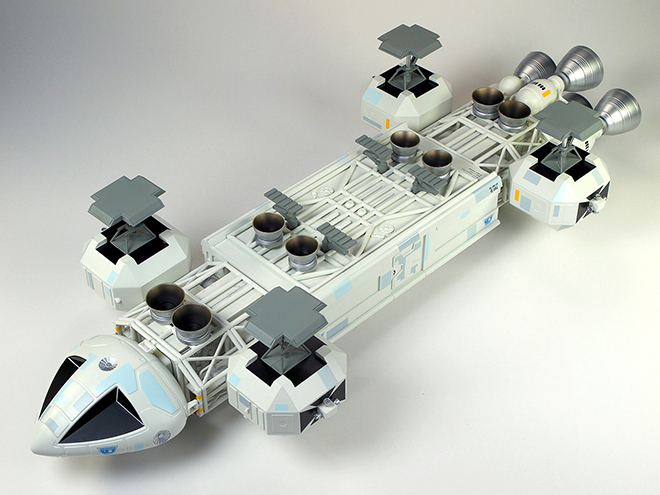
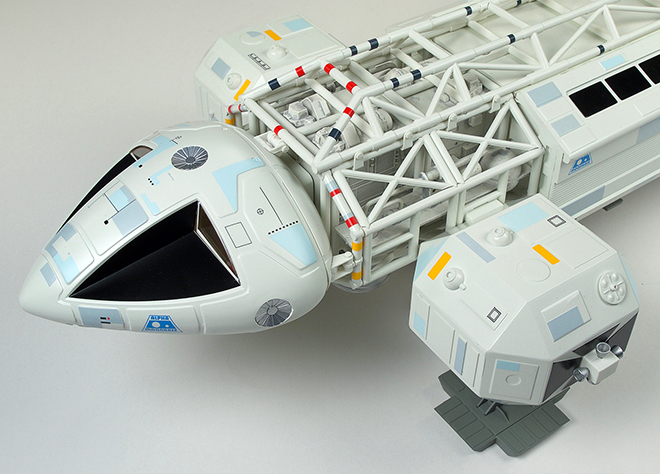
As you all know by now, Round 2 has recently announced their new release of a proper 1/72nd scale Eagle kit. At about 14” long when finished, this kit is perfect for people who don’t have the room to display the larger 22” model, and is made in the popular model aircraft scale. Here is an up-close and personal look at the test shot sprues of the new kit.

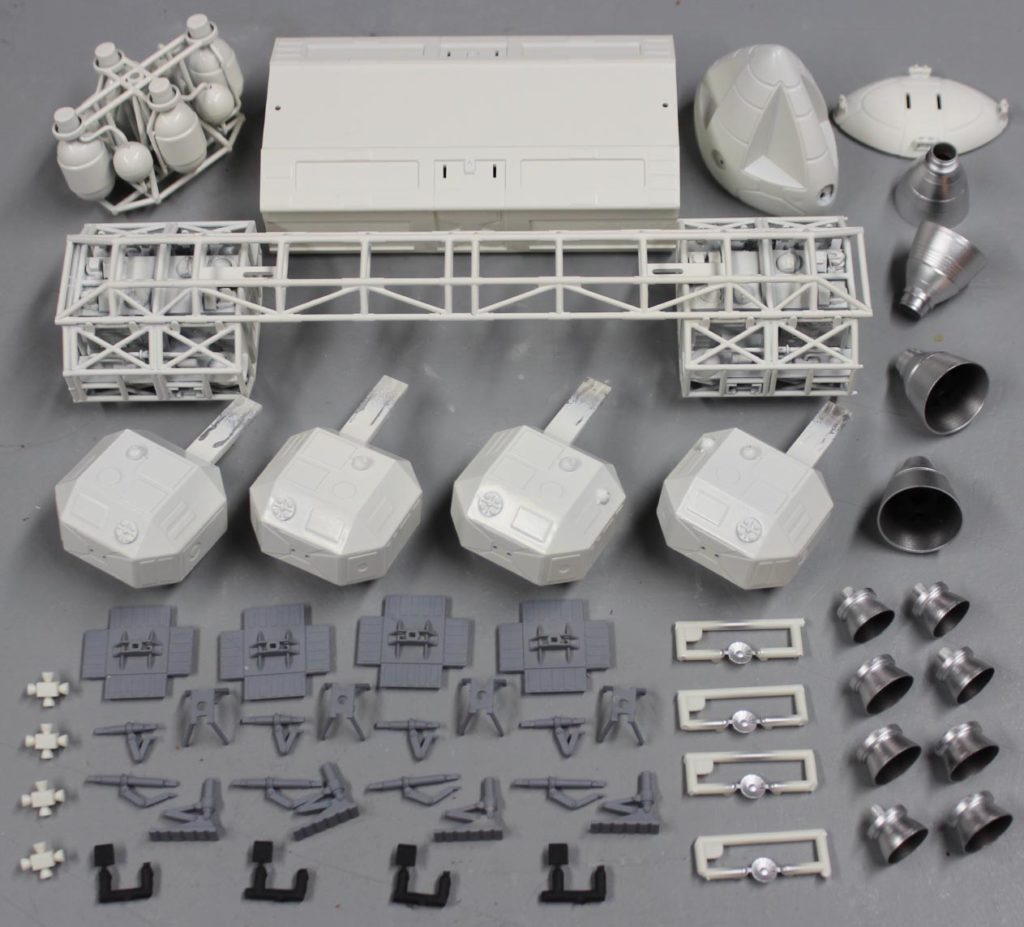
The first pic shows the entire contents of the kit minus the decal sheet and instructions which are yet to be developed. The rest of the pictures show both sides of each type of sprue contained in the kit. Obviously most are repeated. This kit has all the details present in the 22” kit with the added bonus of being able to be mounted on a stand via a replaceable plug on the bottom of the passenger pod. Those who wish to forego the stand can cover the mount with a hatch detailed to match the hardware that is normally in that area. Also like the 22” big brother, the passenger pod is affixed to the spine with screws so it remains removable. Gosh… I wonder if maybe other pod versions will be made available? [Don’t get me in trouble here, Jim. -Jamie] Windows for the passenger pod and nosecone will be represented by decals. Fun fact: on the original 44” studio Eagle models, the Passenger Pod windows were actually not clear but painted over black, so decaled windows in this case are perfectly authentic. Because of its size, articulated landing gear oleos struts were not possible, but you have the option of two positions of struts: landed/collapsed or extended/flying positions.
Enjoy this first detailed look at all the great parts contained in this fantastic new kit!


Heck of a far cry from that old 1970’s version, eh? This is the kit we’d always wished had been done at the time!
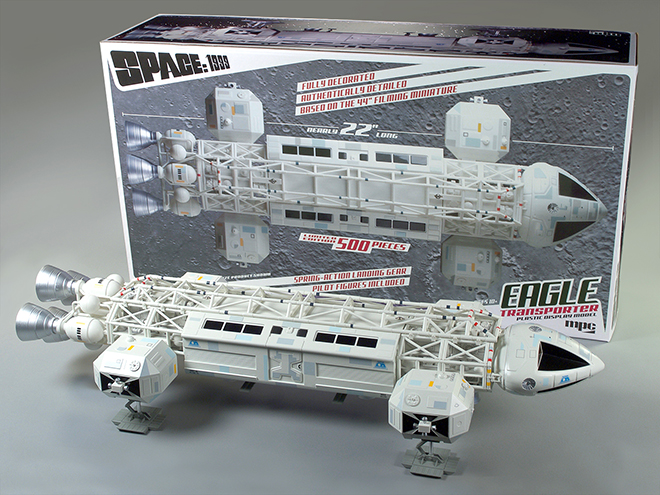
MPC Models: Space:1999 Eagle Display Model
When we signed the Space:1999 license a few years back, we felt we’d take a “let’s roll this out slow and see how things go” approach. First, we found great success with our old MPC 12” Eagle kit. It went so well that we did a deluxe version that included resin parts to create the lab pod version of the ship complete with spine booster parts. Continued sales on those gave us enough confidence to tool up our all-new 22” Eagle Transporter kit. One of our intentions at the time we did that was to eventually bring a relatively affordable 22” Eagle model to market that collectors without modeling skills would appreciate. So here we are…
(BE SURE TO NOTE THE UPDATE AT THE END OF THIS POST!)
We had sent the first factory deco sample to Alpha 2017, a Space:1999 fan event, to get feedback on it to check ourselves. We knew the deco needed a color adjustment, but we wanted to know how plain injected ABS plastic would go over.
Here is a side by side with another Eagle from the Todd Morton collection.
We took heed of the feedback many offered that the product looked too toy-like and opted to apply a base coat of paint to it and we added a weathering treatment to boxes inside the cages at that point. We all agree we ended up with a much better result. Here are a couple close up pics of the ABS plastic.
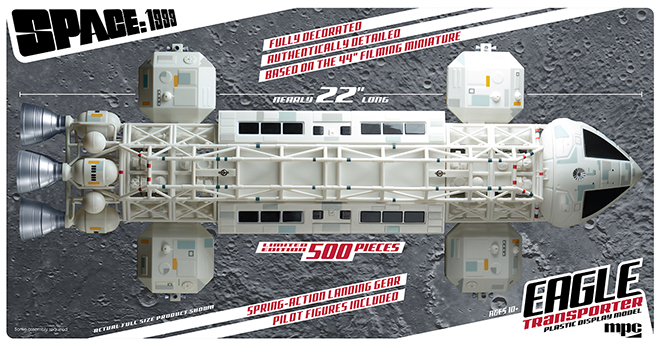
Although the model is –mostly- pre-assembled and it is completely decorated. The deco look is a relatively clean looking Eagle reminiscent of mid-season one appearance of the filming miniature. All of the logos and technical markings are present as is a modest amount of surface paneling and the weathering on the boxes inside the cages. Engine bells come unattached. This was done so that collectors could opt to upgrade to the aluminum engine bells included in our Deluxe Accessory Set.
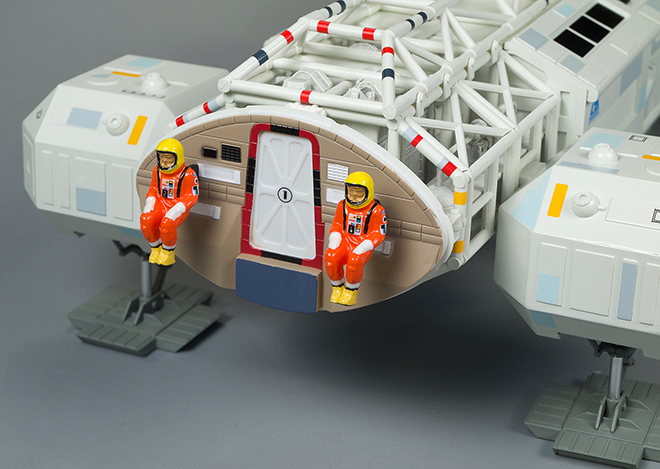
The nose cone cap is also left off to show the pilots and rear cockpit wall. Just like the kit, the landing gear are spring loaded for an authentic feel.
Suggested retail price of the model is $300, but that varies greatly between retailers. Some may feel this is too much, but we can assure you we have done everything we can to keep the cost as low as possible to satisfy as many collectors as we can. The product is meant to appeal to non-modelers. We know what our usual modeler can do quality-wise, and achieving that level of finish is worth every penny a contract builder would charge, but I doubt you will find a contractor to build a kit with an all-in price that competes with our price point. To get a decent grasp on the demand of the market, we have decided to limit this release to 500 pieces. We will use the reaction to the product to judge whether to offer another version later down the road.
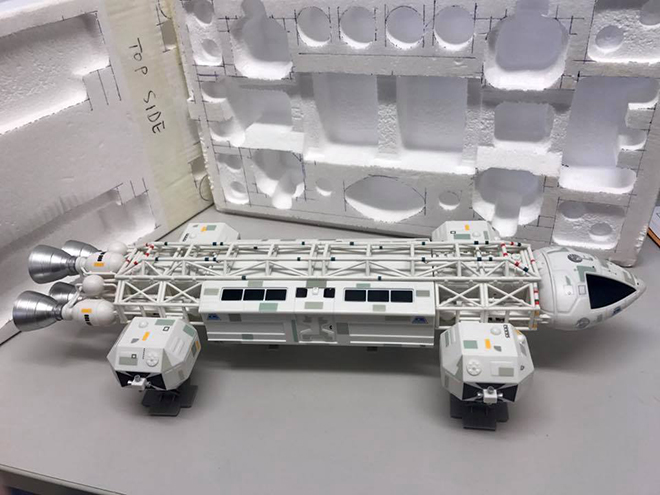
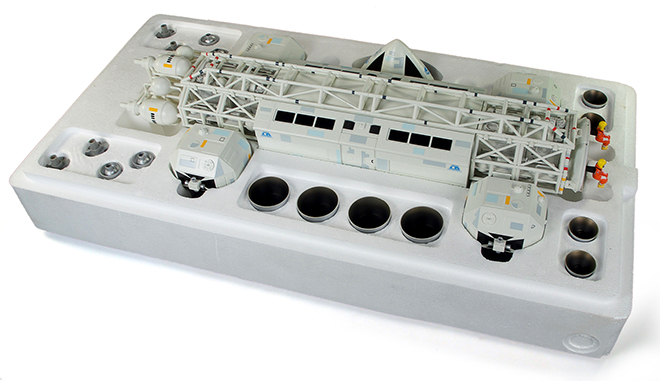
Here is a look at the final pre-production sample. As of this writing, the product is expected be available in December and we are about 75% sold through on the full run of 500. (UPDATE: 11/16/2017 – WE ARE SOLD OUT! BE SURE TO PRE-ORDER WITH YOUR RETAILER. PRODUCT WILL BE AVAILABLE CLOSE TO CHRISTMAS.)
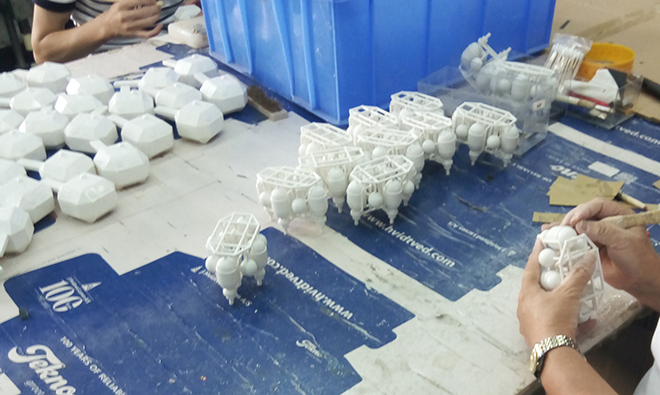
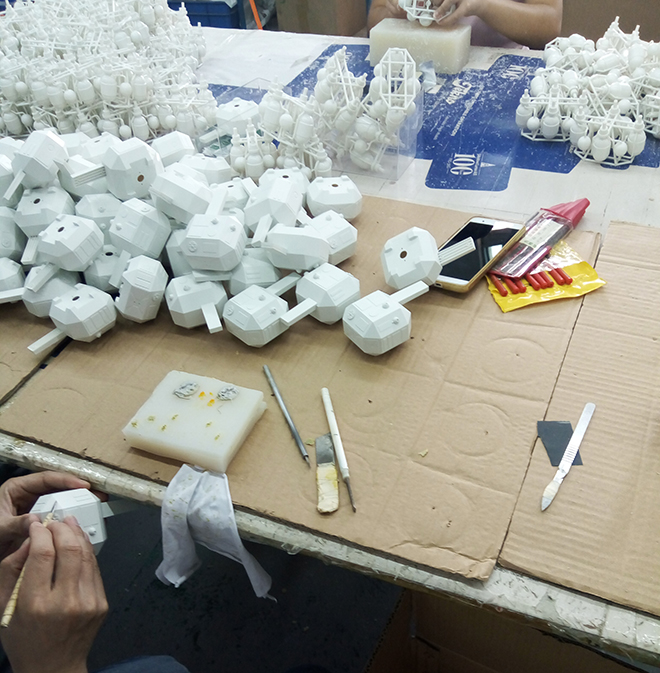
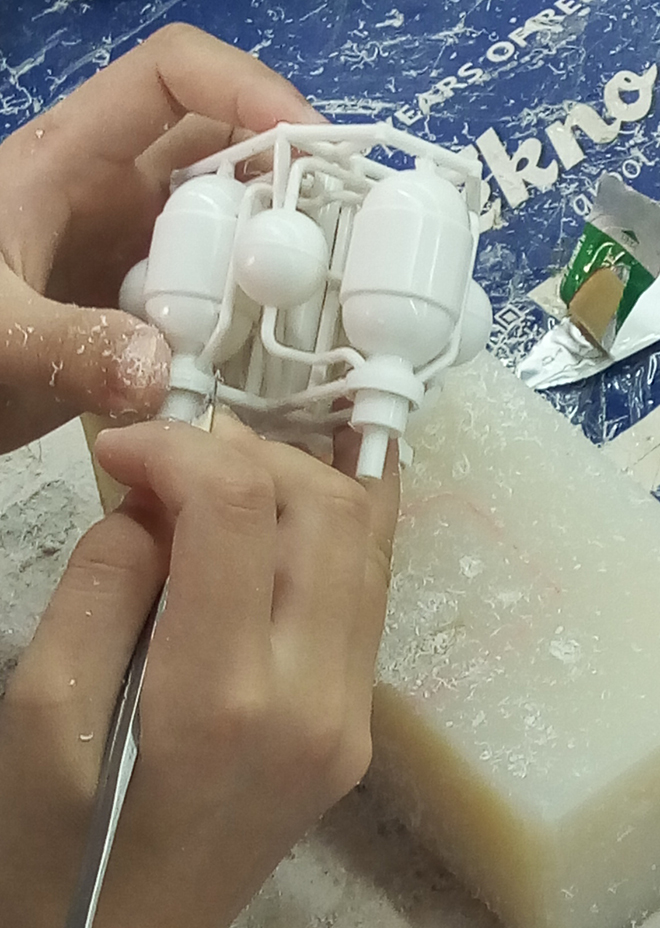
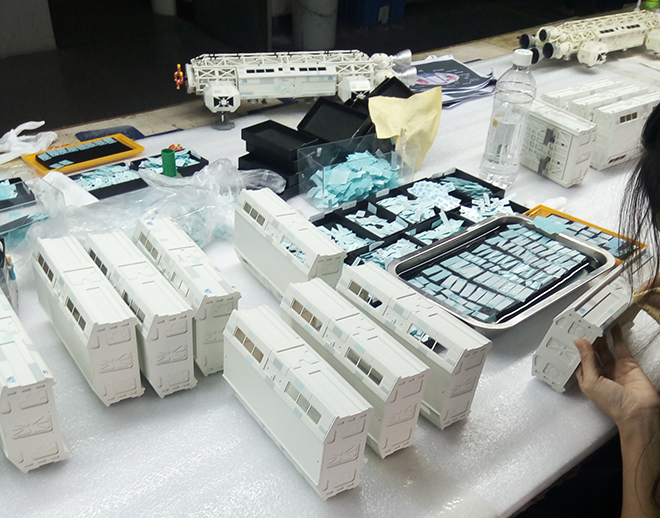
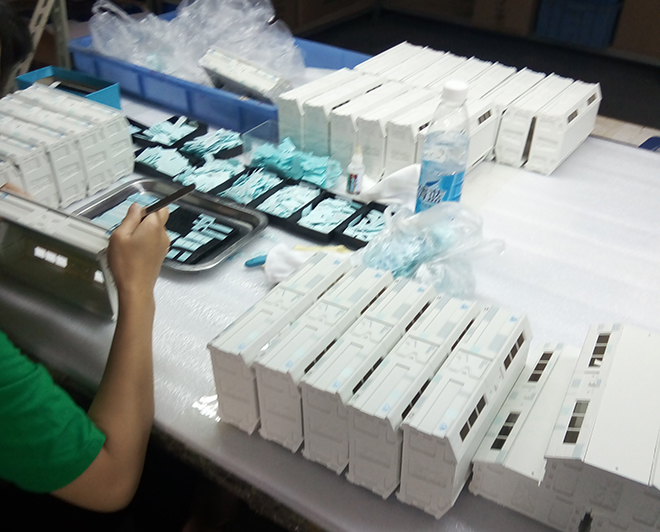
This just in… photos of the production.
Assembly and hand cleaning seams.
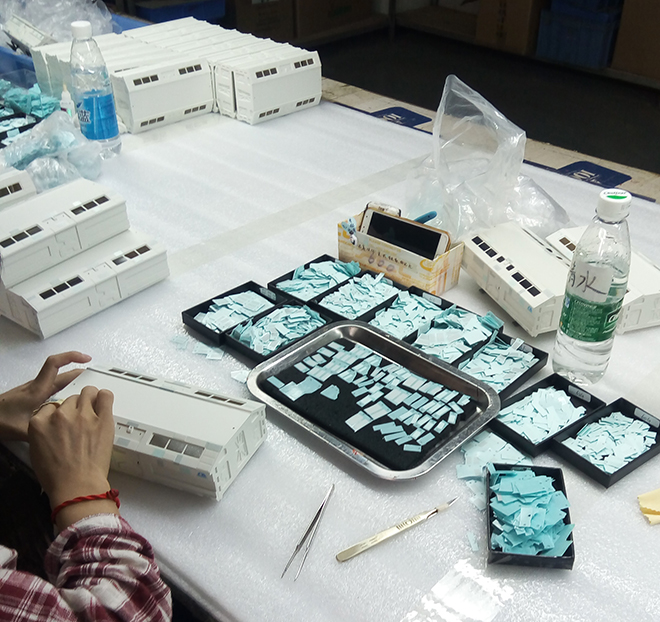
Hand applying all of the decals. Nothing is pad-printed.
(UPDATE #2) Check out this promo video!
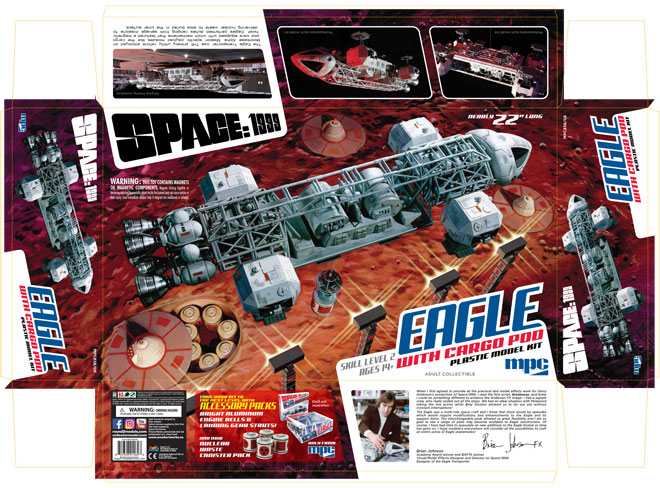
Space 1999 Model kits: MPC Eagle with Cargo Pod packaging part 3
As described in previous posts, I enlisted Jim Small to assist with the new Space:1999 Eagle with Cargo Pod box illustration by having him build some environmental props shown in the nuclear waste storage fields in Space:1999. So with all that work done, it was time to start photographing everything in context which could then be used as reference for the illustration.
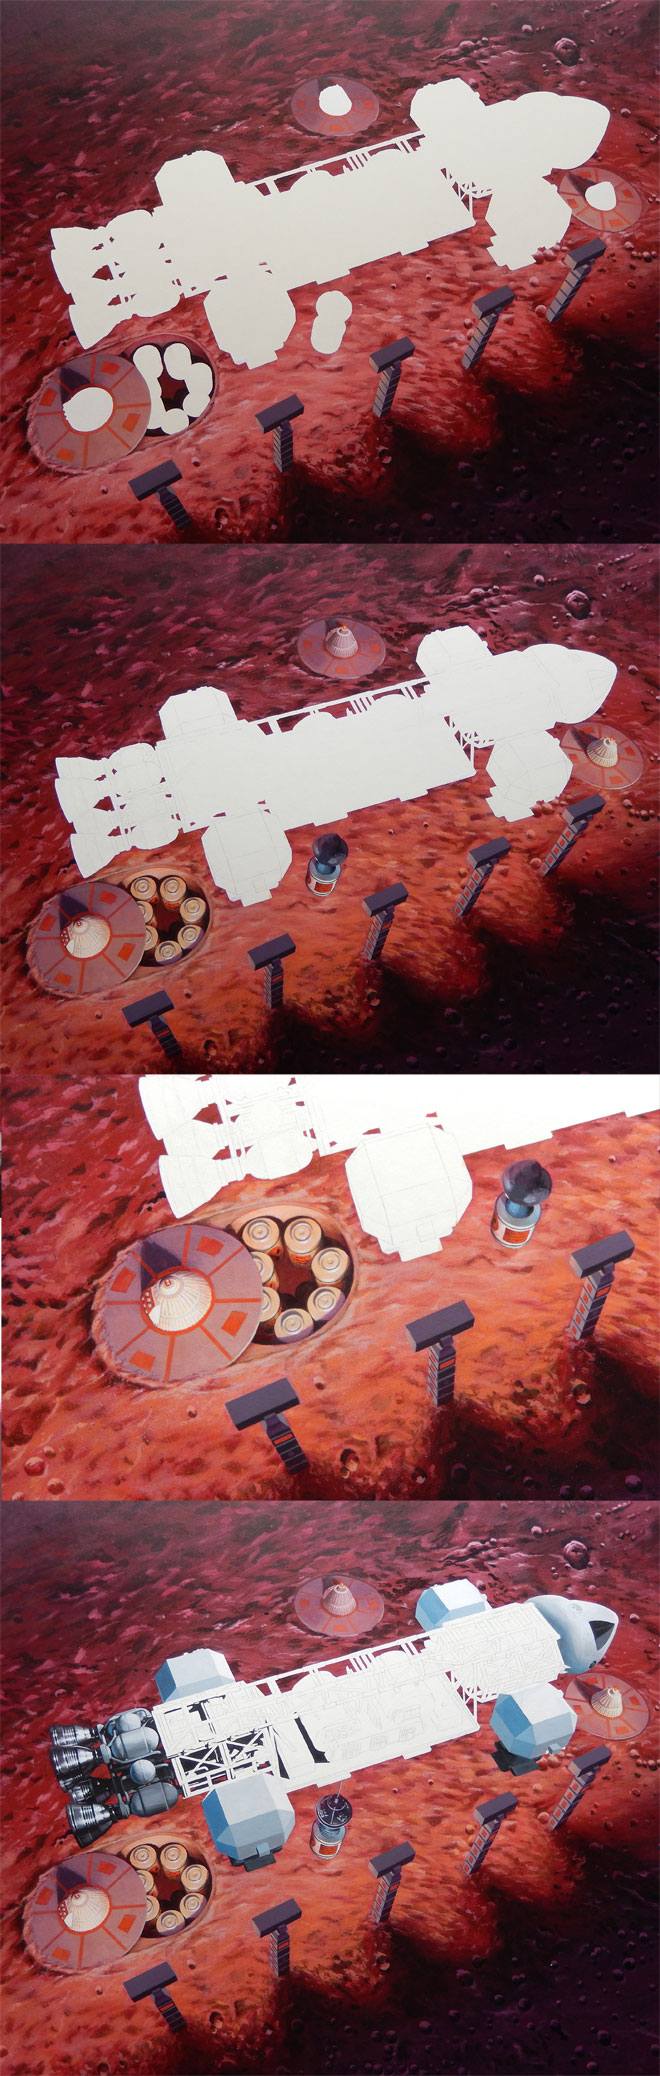
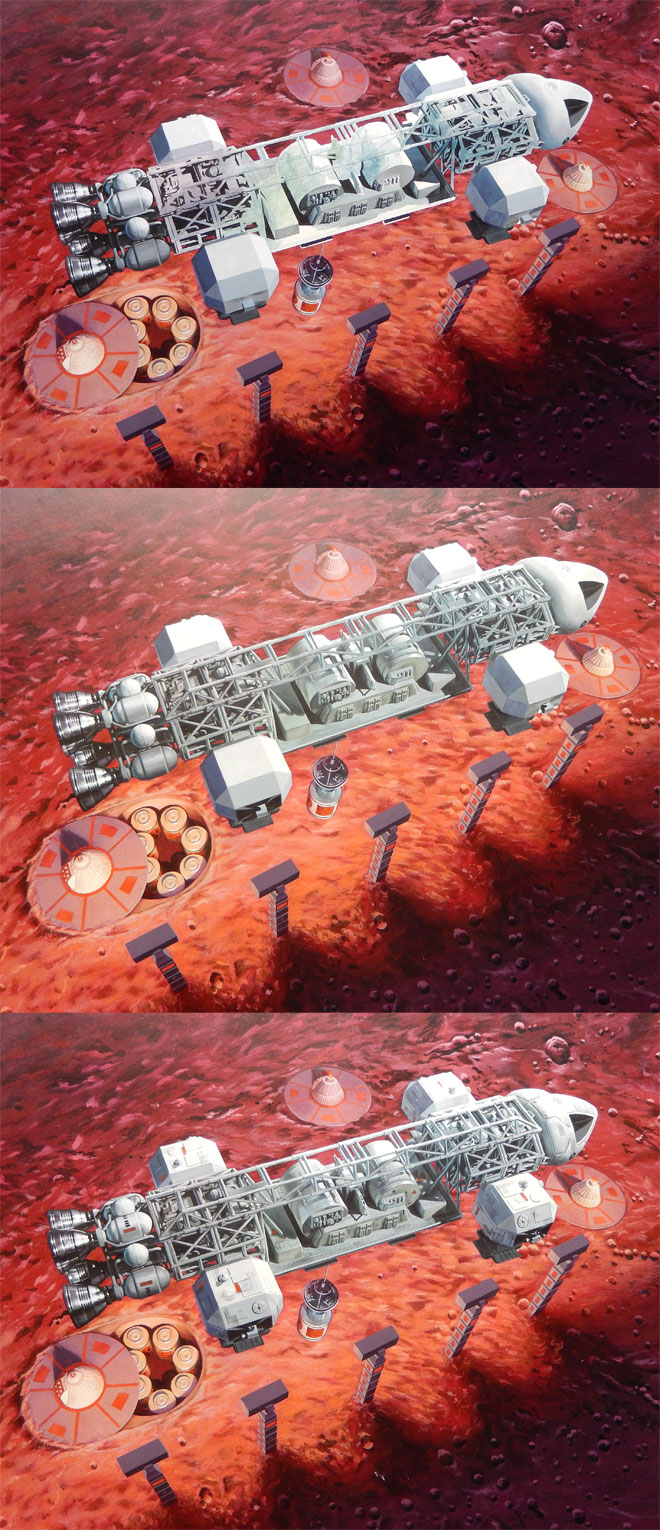
Our method of working through this is kind of like a director working with his director of photography in a film, but we work long distance and transfer images and direction via chat messaging. Jim has everything set up in his workspace and sends over a photo. I usually plug that into my box layout that already holds all of the other design elements. Then I send direction back to him. Is the angle alright? Is the lighting correct? Etc. is worked through. In this instance, Jim sent me one quick photo just to generally set stuff up and see how the angle works, and this was the initial shot.
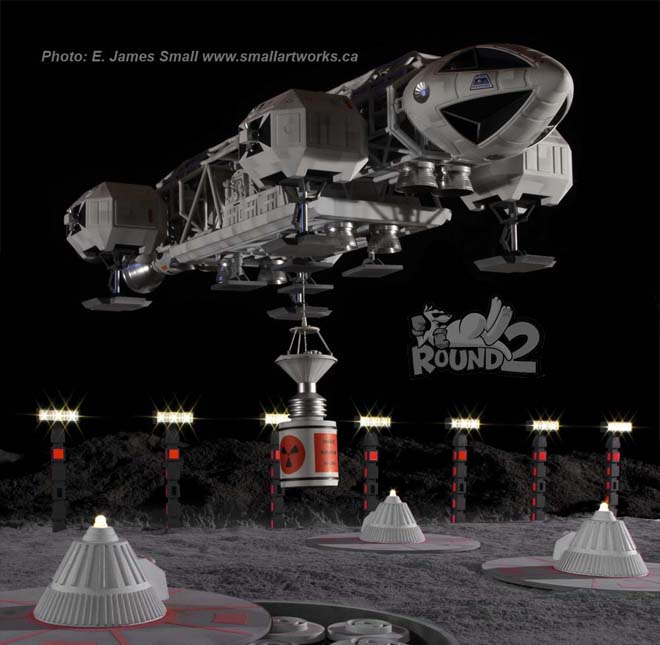
The angle was fine, but I had him play around a little bit with the location of the storage silo, but ultimately landed on the decision to position it below the rear of the Eagle. Once that was settled, we moved on to the other elements. I had him adjust the lighting and position the nuke cone platforms to the space I had built into my design.

My initial vision was to have a row of lamp stands in the foreground, but I thought we would be missing out on seeing the signature light flares coming off of them in that position. So I had him re-position them to the far side of the scene to judge later.
With all of the elements now available to me, I dropped them roughly into photoshop and tweaked positioning where needed and added a photo of the moon surface. This gave me the opportunity to play around with color and to judge where to position the lamps.
I ultimately decided to go with my first instinct (because they always tell you to when you can’t decide) and leave the lamps in the foreground. I wanted to use red to pop the box off the shelf, but I am not a “red guy”, and I wasn’t sure to what degree I wanted to push the “red alert” theme I mentioned in my previous post.
I continued to play around with color and asked for Jim’s input again. As a purist, he thought it might be better to make the moon surface gray and leave the ship white. The only way to separate them in a painting then would be to make one element “warm” and the other “cool”. I went through the exercise of proving one or the other of us wrong.
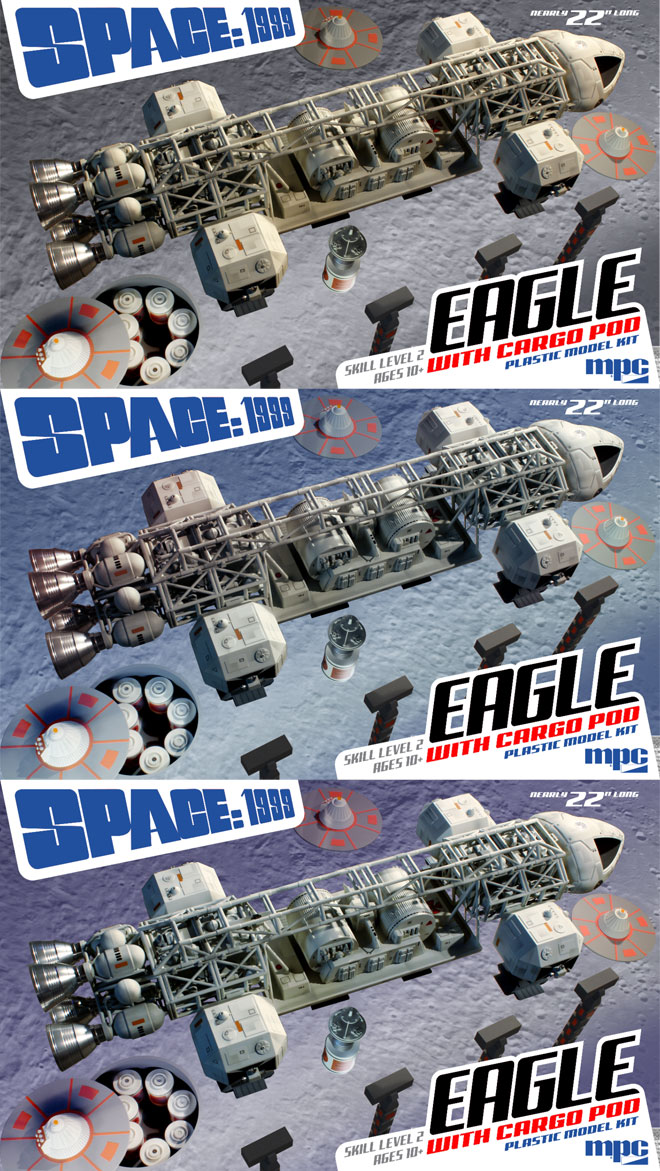
This is the image I used to base my painting on.
The painting itself was painted at 100% print size because the total box area is pretty big to begin with. I learned a lot when doing the first Eagle painting. If you recall, I actually did two paintings the first time around, the large main image and then I painted the smaller background Eagle separately and actually did that one first to get back into practice. I and many other people liked that smaller painting better than the larger main one. I liked it because I thought the end result was a better interpretation of the ship. (I think others liked it more because it was a longer-distance shot with less distortion in the ship) I think the fact that it was smaller made the paint on the board look more satisfying so I didn’t want the ship to get really big again on the new painting. Besides, working larger (which most illustrators do to allow details to sharpen when printed) would have required a large unruly board to paint on. So it was essentially one half a piece of illustration board measuring in the neighborhood of 20” x 30”.
I used acrylic paint again and ended up limiting the number of paint colors with maybe 10 different tubes in the mix. I used cooler reds for the shadow areas of the moon surface and warmed them up under the light of the lamp stands. I started by masking off the ship to preserve it’s pure whites. I then started roughing in the lunar surface before tightening up a few details like the craters, etc. I then moved on to the lamp stands and nuke cone platforms. I tend to paint secondary objects first in order to “keep my juice up” to paint the really exciting stuff like the ship at the end. I only transfer lines for what I intend to paint next. So that means details don’t get drawn in until the overall forms are painted.
One of the things I got hung up on with the first big painting was mixing the colors for the facets of the shoulder pods, and ended up painting over them several times. So I started there on this one, and only ended up painting over them a couple times before being satisfied. That helped set the value key for the rest of the ship. I laid in pure blacks just to get me rolling in detail areas. I tinted the whites a little bit where I wanted subtle color tones. In my digital color study, I purposely put a touch of purple in the outlying areas and shifted to a slightly greenish tone in the central area of the cargo pod. This was in hopes of attracting the eye to that area with it clashing against its complimentary background. For no other reason than not knowing where else to go, I started in on painting the details of the ship at the rear and moved my way forward, leaving the spine for last.
I was pinched for time by the time I got the painting finished, but it didn’t require the stress of staying up through the night and bringing in a slightly unfinished piece in the end. I had to touch up a few details and add logos and weathering patches digitally to the first painting. This time around I was able to paint everything in, and realize the fortuitous angle negated the need to paint Moonbase Alpha crests.
Scanning and digitally “stitching” a large painting like this is a tedious process even with a ledger-sized scanner. It took a total of 12 scans to capture the entire piece. One set of scans was taken from one direction then, turned and rescanned. This step helped eliminate the texture of the board and paint that is inherent in the scans. I tweaked the values to nicely match the original painting. We’ll see how it looks when printed.
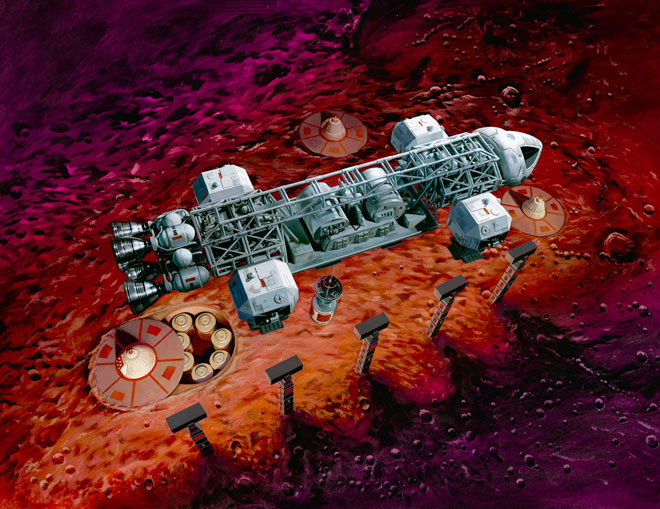
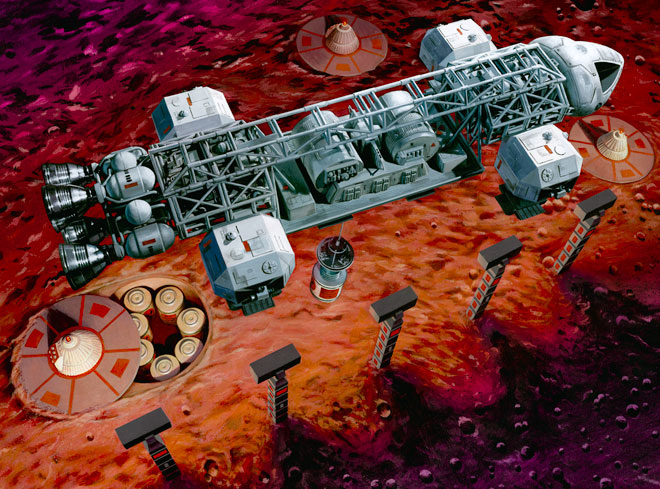
A cause for concern arose when I showed the painting to Tom Lowe. His first question was “what, is it landed?” Um… Not in my head, and the colors should be tipping off everyone that knows the show that the Eagle is taking away one of the nuke canisters, right? Well, I couldn’t get the comment out of my head, and I had always wondered if I shouldn’t “cheat” and show the lamp light flares even though we never see such flares from behind a light source in reality. I thought adding them was worth giving closer consideration, and this IS an illustration. It should show the ideal, not necessarily reality. the light flares were created in photoshop and I think they really do help to show what is happening as well as stressing that the warm red under the ship is coming from a light source.
So, with all that ado out of the way, here is a sneak preview of the entire package layout with the painting and Jim’s buildup photos in place.

I didn’t want to spoil this post by putting this at the top. We had announced at every opportunity that the winch boom included in the Cargo Eagle kit would be magnetic, meaning that we would include the magnets in the kit needed to make one of the nuke waste canisters cling to the boom without requiring glue. Well, it would have been nice… We have been advised that in order to prevent the possibility of child endangerment, we should not include the magnets in the kit under any circumstances. The kit is engineered with locators for the magnets in case anyone wants to procure their own. In lieu of the magnets, we added a peg to the boom that can be easily removed for the sake of accuracy. Was this an over reaction? Probably, but we couldn’t risk the liability.
Space 1999 Model kits: MPC Eagle with Cargo Pod packaging part 2
As part 2 of our look into the packaging for the new MPC Eagle with Cargo Pod model kit, we have a special article written by Jim Small. Jim is our go-to guy for all of our sci-fi model kit buildup work. He also supplies endless consulting on all of our sci-fi kits and especially everything Space:1999 related. In our last blog post, I mentioned that I had him on the hook to do a little scratch-building/heavily altering a set of Eagle nose cone parts to show a wrecked nose cone for the box bottom and a few stand-in mockup parts that could be used for reference for the box illustration. You’ll find, as you read, that Jim really went above and beyond what I asked for. My kudos and many thanks to him for that!
Special Box Art Effects, One Shot at a Time.
James Small, www.smallartworks.ca
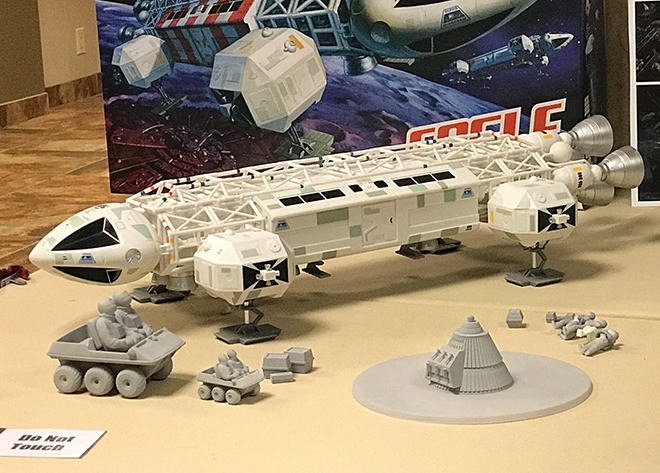
The newest release in Round 2/MPC’s fantastic Space: 1999 lineup is the Cargo Eagle with Winch Pod. As with every great kit, there needs to be great packaging. The work prepared for the box cover needs to be engaging and authentic to satisfy discerning fans today. Jamie Hood, Round 2’s senior designer, product development expert and resident Sci Fi artist is, as usual, right on top of his game with the soon to be revealed new boxtop design showing the iconic Moonbase Alpha workhorse in the fantasy situation as seen in the opening episode, “Breakaway”!
Although another one of Jamie’s gorgeous hand painted illustrations will grace the main box cover, he needed some model photography to flesh out the box bottom and sides to show off how great this kit is, and he asked me to help produce some of that work. I had been supplied test shots of the new Cargo Pod and accessories which I built, finished and used in conjunction with an existing Eagle model I had previously built.
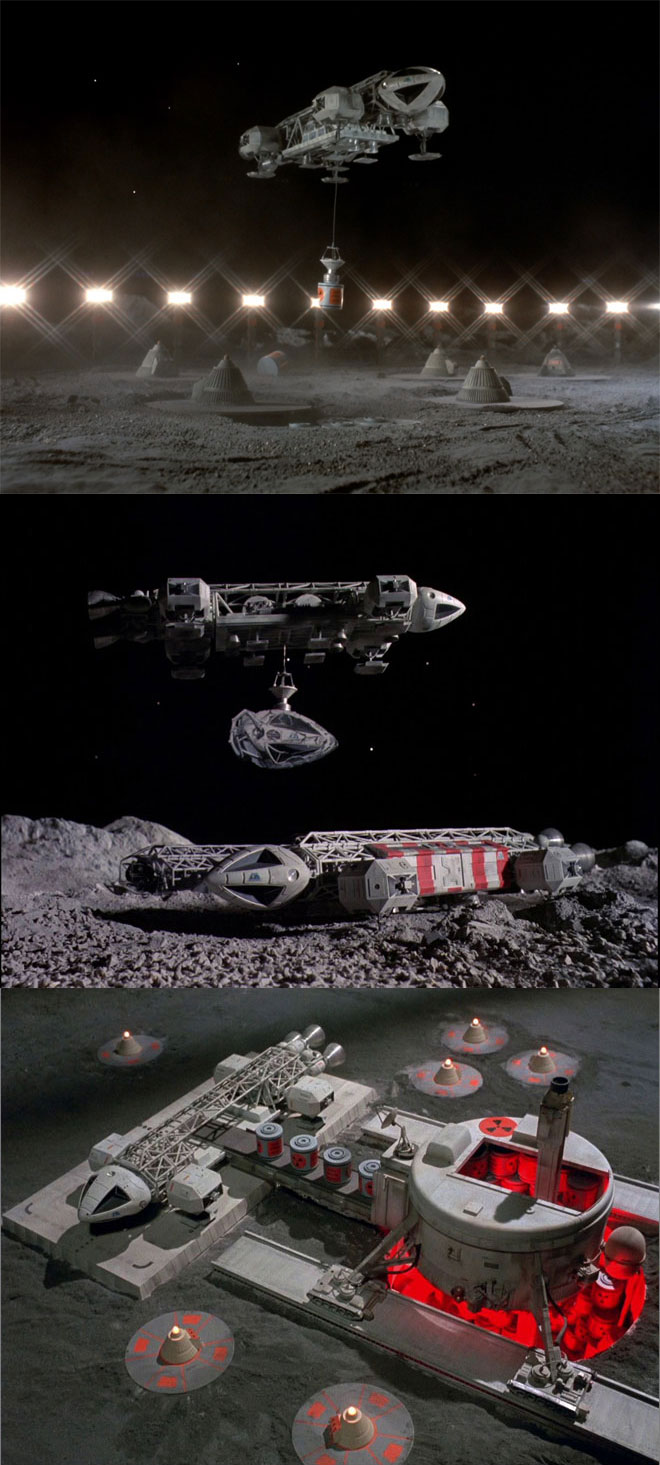
Jamie knows how much I love to photograph models in a dramatic fashion, so he asked me to try and recreate some original scenes from the show using the actual built and painted kit. Jamie started by showing me some screen grabs of the scenes he wanted to recreate. Because of the predetermined photographic layout Jamie had provided, I knew that some of the pictures had to be choreographed somewhat differently than the screen grabs to accommodate the spread.
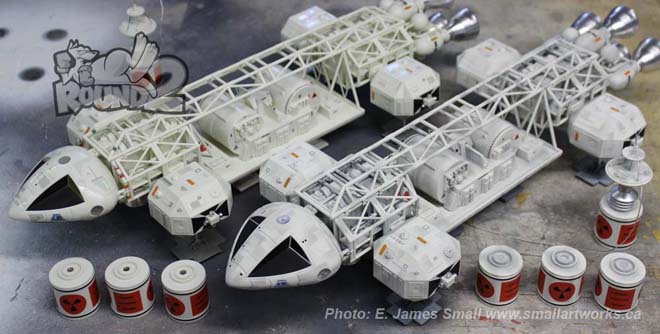
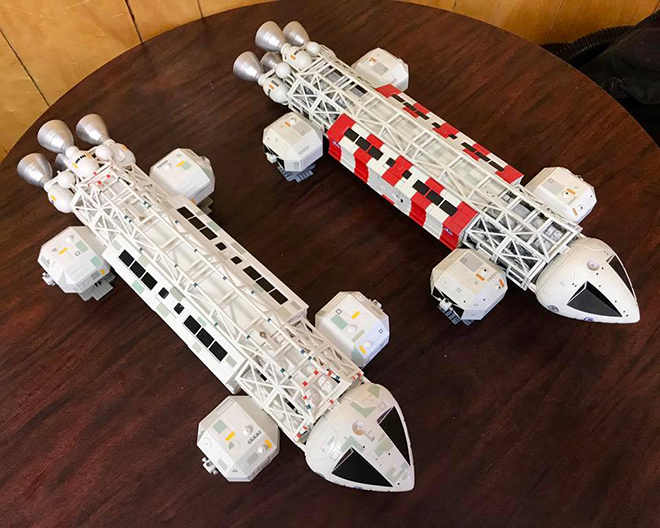
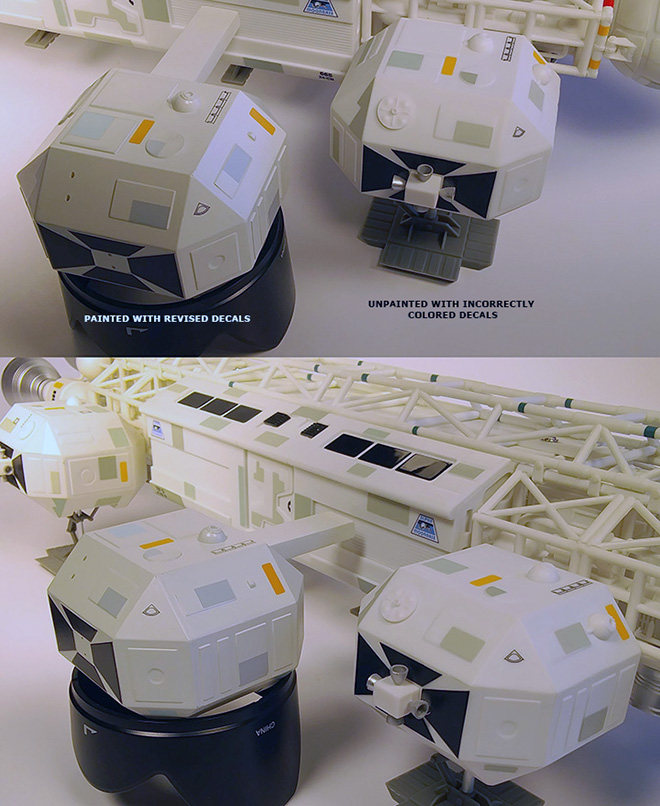
Two models made using test shots of the new Cargo pod and accessories, one painted, the other left unpainted but decaled to show how great the kit can look even without any painting at all! The special machined aluminum accessory sets are also attached to the models.
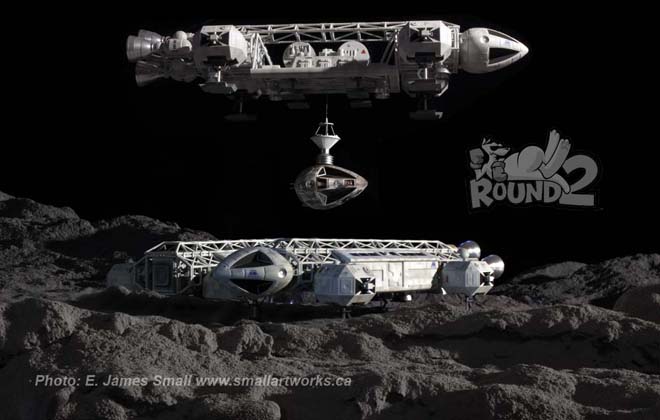
Normally I like to do all my photography completely “in camera” with no digital effects, but in this case because of the limited space in my shop and the expanse of the scenes needed I had to cheat and use Photoshop to assemble the various elements that had to be shot to create the visuals. Also, one of the shots needed to have three Eagles in the picture, but I only had one finished model at my disposal at the time so I had to do some digital manipulation. The picture would also show the red striped Rescue Eagle, but I had only a finished plain white passenger pod available which was earmarked for a customer so I couldn’t paint it. Jamie would later add the red stripes in digitally.
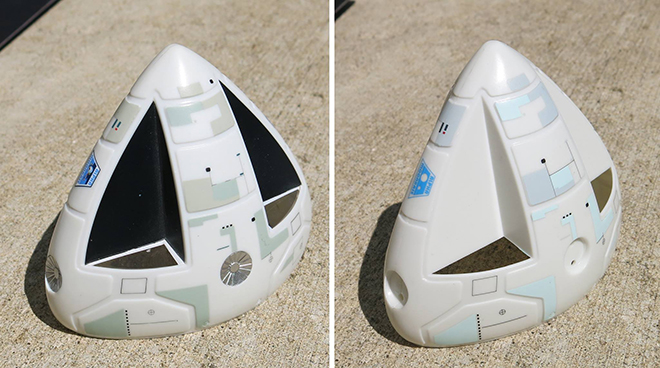
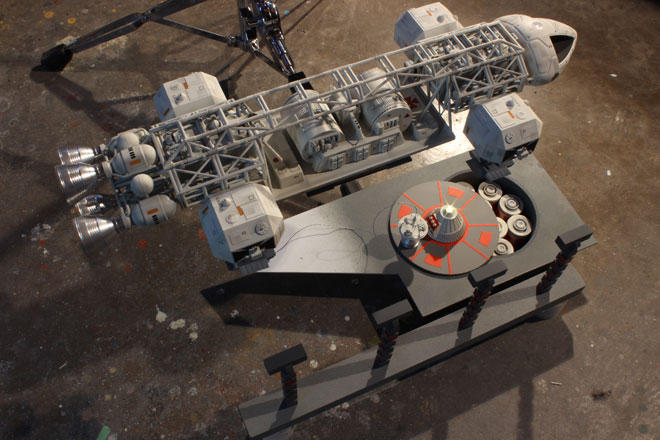
I also needed to scratch build some props not included in the kit to make the scenes required for the box art so I built some quick-and-dirty replicas to scale with the 22” model to provide the necessary backdrop. I made correctly scaled light stands, a simple rectangular landing pad matching the original, a nuclear waste disposal area cone and a “pit” that contained the canisters which matched what was seen in “Breakaway”. Jamie also liked the idea of showing the Eagle carrying away the damaged nosecone as seen in the episode “Missing Link”, so he sent me a spare nosecone from his parts bin which I re-worked to simulate the banged-up cockpit section.
Making the props was a LOT of fun for me as I do love to scratch build and modify stuff. It gives me some real creative license as well as the challenge of reproducing the original models used in the show from scratch. Time was limited so in true traditional VFX style I built everything with just the photography in mind. The waste area cone, for example, was made from a disposable plastic martini style cup and detailed to suit.
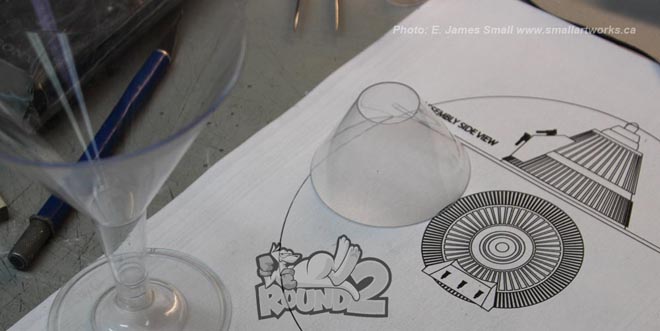
The “nuke dome” being started, the cone cut from a plastic martini glass of the type seen at left which coincidentally has the close-enough-to-work angled sides.
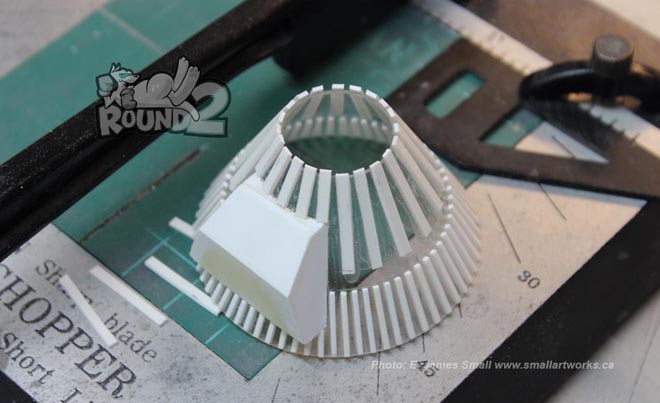
Details added to the cone using sheet and strip styrene.
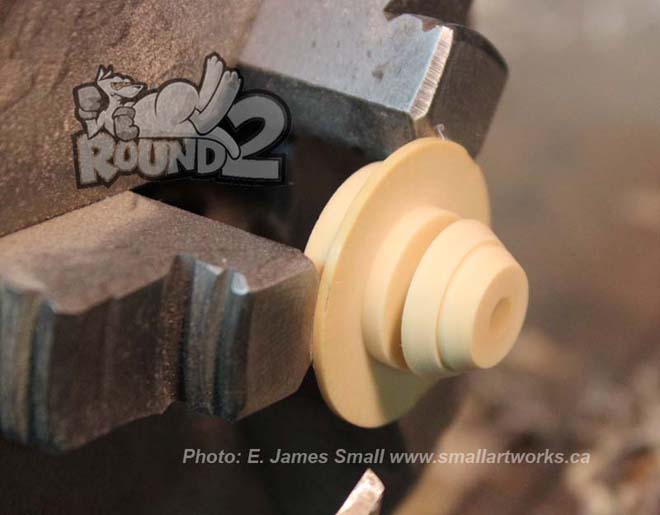
The top of the cone is turned on a lathe from a piece of leftover resin from another project.
The “damaged” nosecone was detailed only on the side that the camera would see. I cut out panels, detailed the voids with kit bashing and made dents on the surface, simulating the damage incurred during a crash landing, using heat from a small blow torch (very gingerly used!) and a Dremel tool. The opposite side, left mostly unfinished, had a plug-in mount installed where the left sensor dish would be so it could be propped up with the supporting rod (simply a wooden dowel) positioned away from the camera.
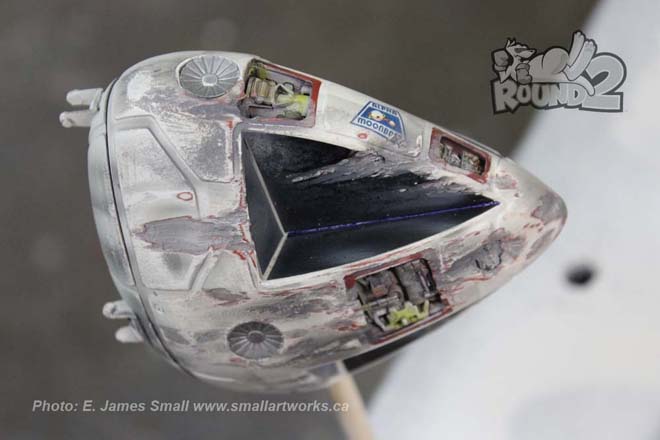
The Eagle nosecone modified with kitbashed parts put into into holes cut out of the kit and painted to resemble crash damage.
I also put functioning LEDs into the light stands and the cone beacon to add authenticity.
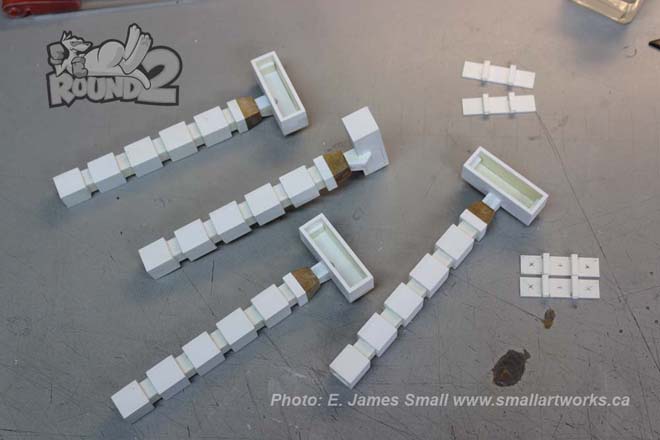
Four light stands were fabricated using sheet styrene and square tubing. These would later be mounted to a base which supplied the power using a 3 volt battery box underneath.
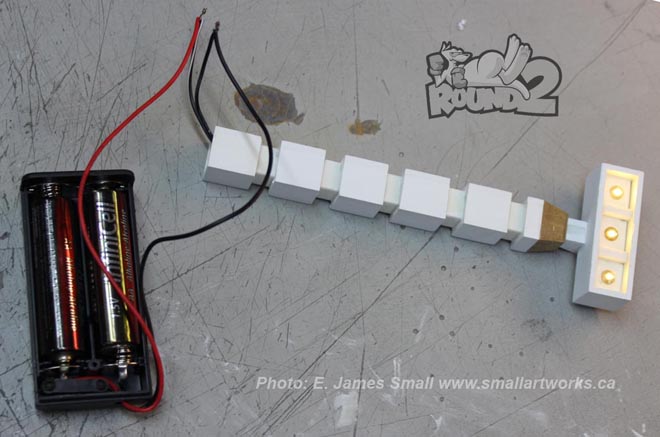
Testing the lights on the stands. Three 5mm “Straw Hat” style LED’s were used in each stand.
The red areas on the trunk of the light stands were also to appear lit up, but this was a VFX cheat, borrowed from Brian Johnson and his crew when they lit up the main model of Moonbase Alpha’s windows, by using red reflective “Scotchlite” tape applied that would bounce the light back to the camera when it was shone from the camera’s point of view, just the same way road signs are lit with car headlights.
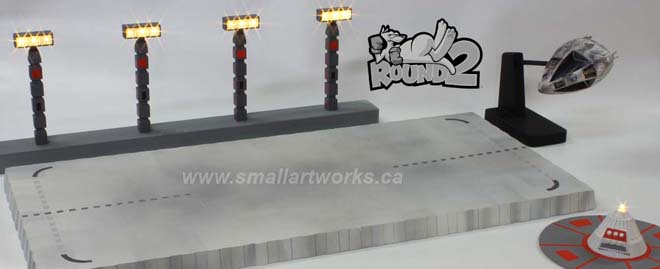
All the finished props built for the box art photo shoot.
Some of the shots I did were the relatively simple ones, those shot against a black velvet background for the outer space beauty shots of the model shown on the sides of the box cover. Because I knew that the motif of colour that Jamie had designed for dramatic impact was to have a significant red tint, I used a red fill light to enhance the shots. I also shot a couple using green and blue fill light to impart a more colourful tapestry in case he had some other ideas in mind, but Jamie wisely rejected them.
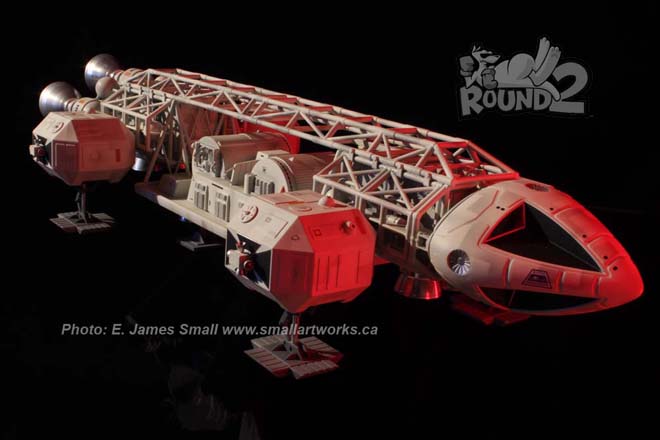
The finished Cargo Eagle model shot against black velvet and fill-lit with a red spotlight for dramatic effect.

The rectangular landing pad the Eagle is shown sitting on with its flatbed loaded with nuclear waste canisters was made quickly from sheet styrene using screen grabs as a guide for proportion and detailing to scale with the 22” kit. Coincidentally, the actual VFX shot for the episode used the like-scaled studio model 22” Eagle!
Jamie H. butting in here. Just for the record. I discussed making prop “stand-in’s” with Jim, all I asked for were rough placeholders. I told him to take some photos of the Eagle matching the angles shown in the unloading scene because it was a nice angle of the ship. Much to my surprise he sent me some photos one morning of the platform itself! Textbook example of “over-delivering.”
Lunar regolith was simply made from sprinkled concrete powder on the 3 foot square work surface. The waste cone was repositioned for different exposures and assembled in Photoshop to make it look as if there were several of them in the scene. Since a true “multiple exposure” is impossible with a digital camera (I currently use a Canon Rebel T3i), this compositing technique was necessary. The same thing was done with the four light stands to make it appear that there were more of them in the scene.
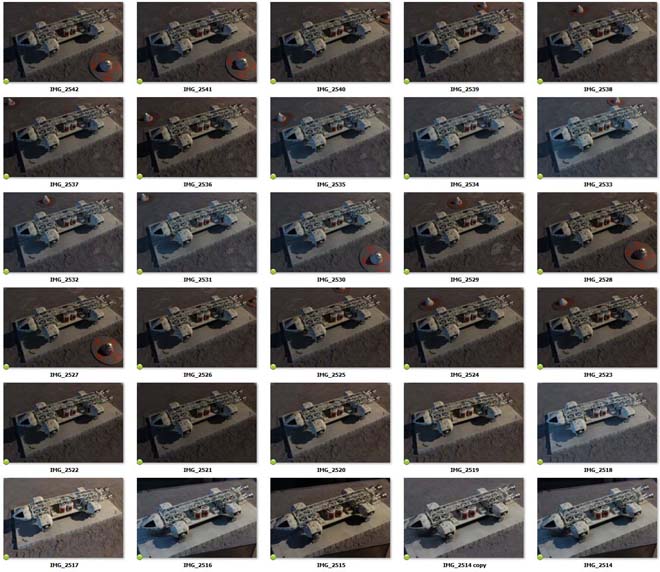
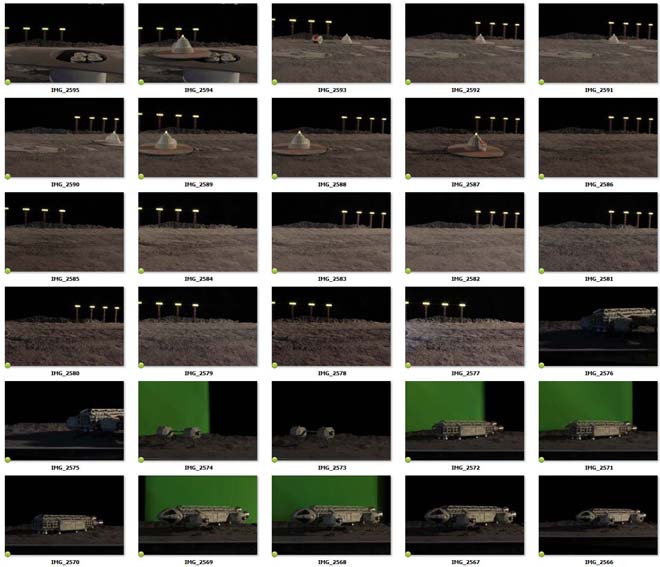
All the shots taken for the Eagle sitting on the pad with the waste cones surrounding it. Several shots were done identical except for lighting effects and the waste cone prop repositioned for each shot so that when composited, it will look like many cones surround the model using the single prop. Not all the pictures were used in the final comp, of course, but I took a lot of extra shots to provide different options.
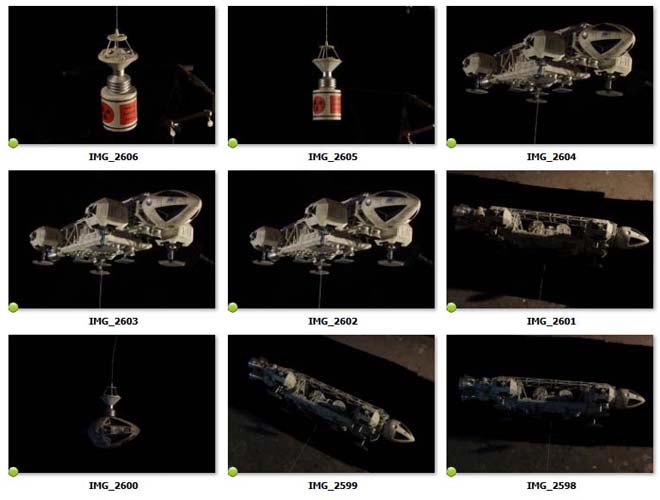
The models were all photographed with the camera mounted to a tripod and suitably lit. Time exposures had to be used to achieve maximum depth of field. The hanging “damaged” nosecone and waste canisters were solid mounted and shot separately to be matted in later, as just the slightest movement during exposure with them hanging off the Eagle would have blurred them in the picture.
In some of the examples of the raw pictures shown you can that see some of the elements were shot against a green screen thinking this would be helpful in isolating them for compositing, but in reality this caused more problems than it solved due to fringing and “green spill”, so that idea was abandoned and I just used the ones shot against black velvet instead.
Some of the elements shot separately which would later be combined into the finished VFX pictures. Not all shown were used, some were used that are not seen here. Some colour correction and sweetening would also be employed to maximize the look of the finished composites.
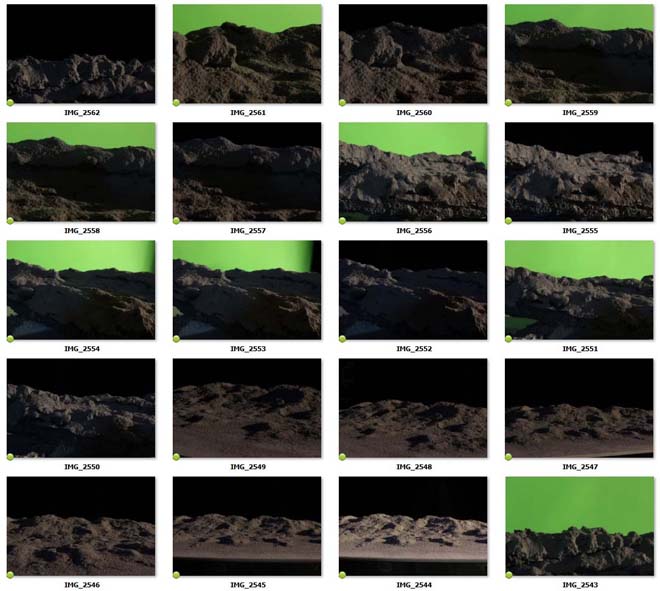
Two of the scenes also required mountains for the background and foreground hills. Because of the limited space on the table I actually made the distant mountains from small pieces of carved foam, sprayed with gray primer which further textured them and sprinkled with concrete dust. These mountains in reality were just about 6 inches wide or so, but shot in extreme closeup and lit harshly. They were simply matted in behind the models. A similar technique was also used by Johnson’s VFX crew for distant mountain ranges, but without the aid of digital compositing! Instead, they had the miniature mountain photographs blown up and mounted to large wooden flats, propped up behind their model sets. I had considered doing the same thing, but it was far less expensive for me to plop them in using Photoshop.
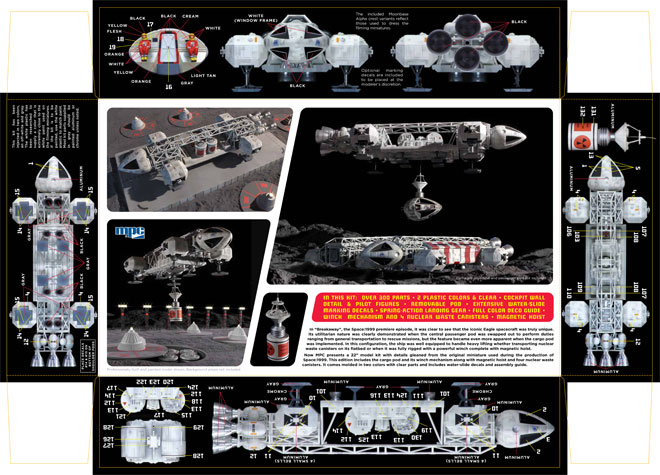
In addition to these VFX shots I also took a series of photographs that were designed to help Jamie compose his painting, but he will cover those in his own article shortly, and are therefore not presented here. I also shot several “orthographic” pictures of the finished model for the box tray sides to show decal placement and paint schemes for the consumer to use as reference. The miniature was propped up in front of a black velvet backdrop, suitably lit and shot with a 300mm telephoto lens from about 25 feet away to help eliminate perspective distortion, making the picture plane look as close to a blueprint-like image as possible.
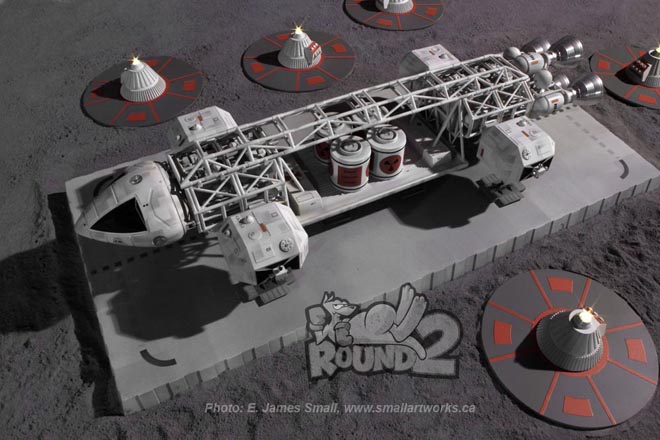
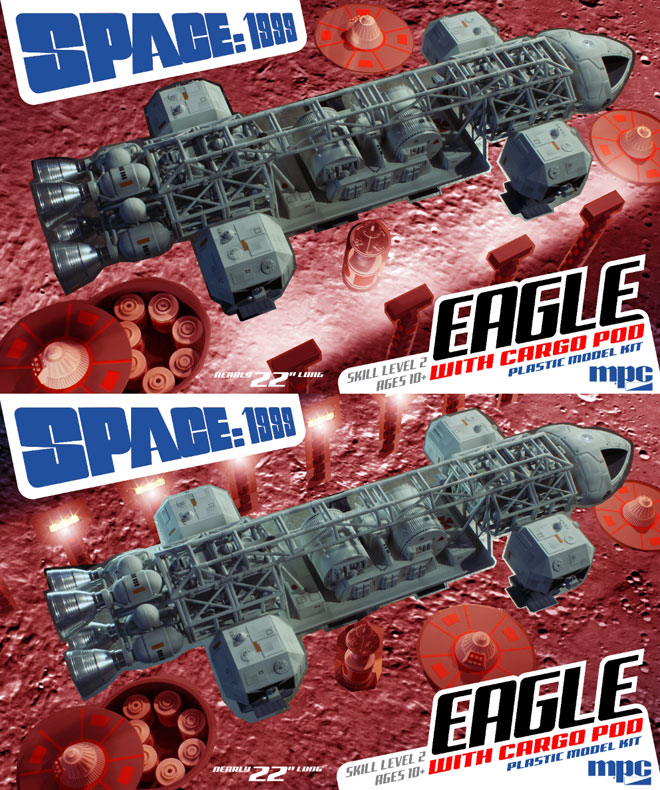
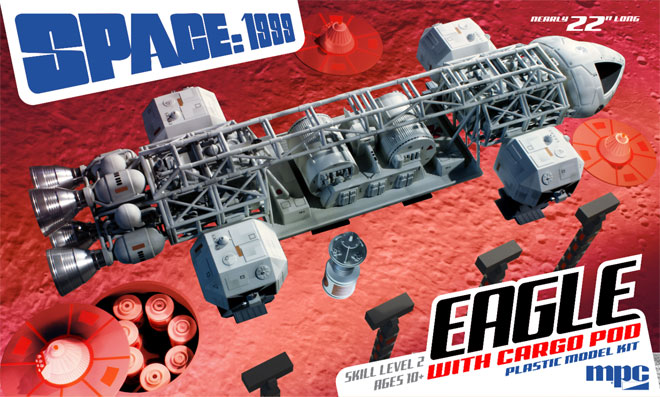
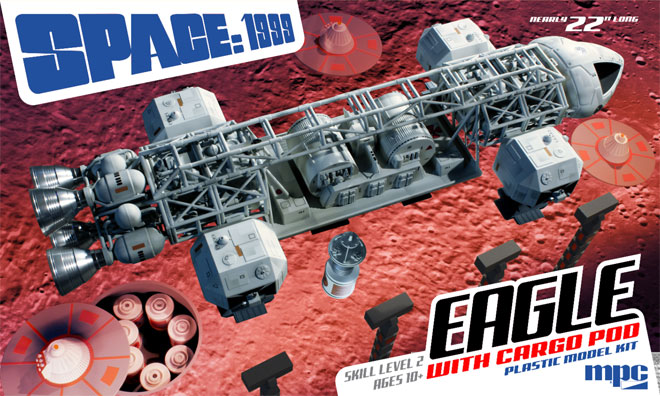
The three finished composites using the previously photographed elements. You will find these images gracing the box tray. Compare to the inspirational screen caps from the show.
I always have a lot of fun building models, but just as fun is when I have the opportunity to recreate the spectacular scenes that remind us why we loved a TV show like Space: 1999 in the first place.
Special thanks to Jamie Hood and all the wonderful people at Round 2 for finding a place for my work to be included as a part of the box art that will soon be on hobby store shelves for everyone to enjoy, containing yet another fantastic kit. Dreams are continuing to come true, thanks to Round 2!
You are welcome, Jim.
If you want to learn more about model photography, be sure to check out the article Jim wrote on the Central Nova Scotia Modelers web page here.
Next time, we will reveal the box illustration…