Recommended Sites


Archive for July, 2016
Transforming the Classic MPC Eagle Kit – Part 2
Here is the second in a series of articles by Michael Scarola showing the steps he has taken to accurize a 12″ MPC Eagle.
My Eagle 1 build continues…
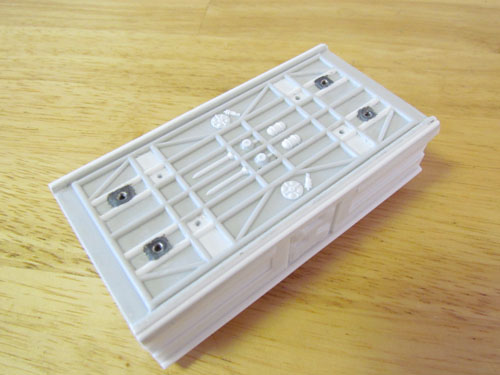
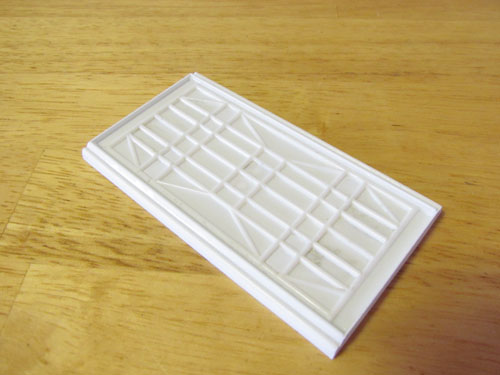
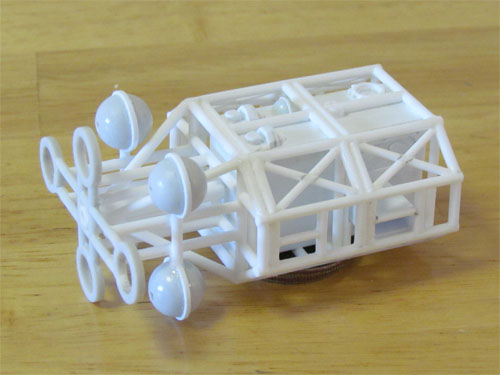
The 4 shelves that go inside the cages were each made from 2 pieces of .5 mm styrene sheet glued together.
The details were matched and scaled down from the Eagle 1 blueprints using 3.2 mm, 2.5 mm, 1.6 mm & .4 mm styrene rods as well as rounded sprue ends and the round domes from the ends of the nacelles of a Polar Lights 1/1000 TOS Enterprise kit.
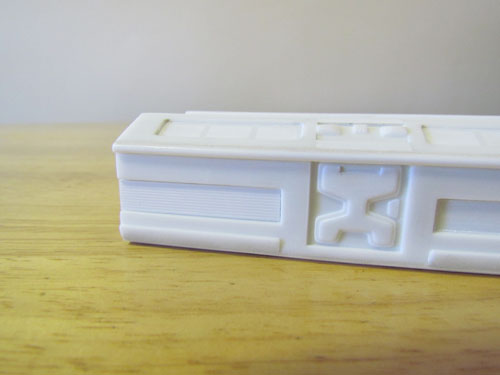
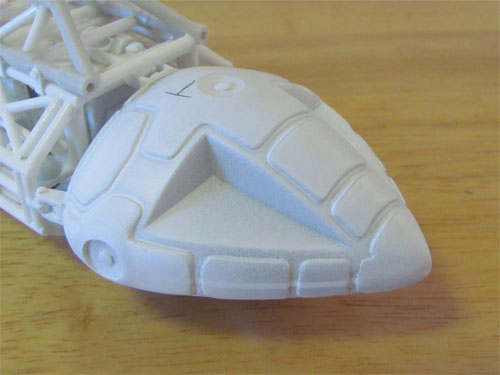
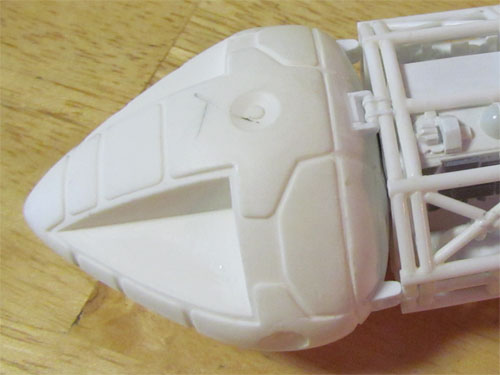
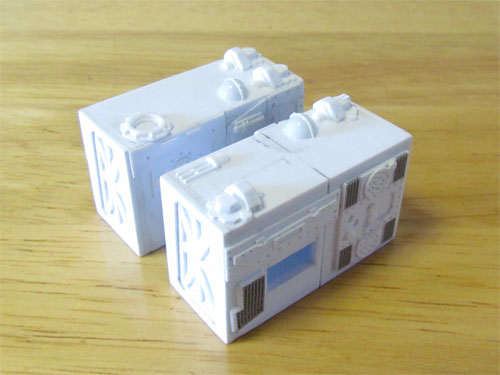
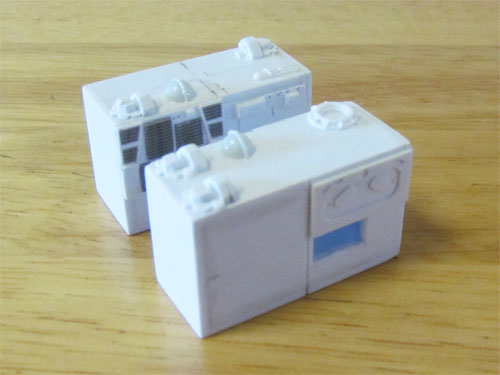
The MPC kit’s passenger pod has some nice detailing so I decided to use as much of it as possible. I started by scratch building new front and rear bulkheads. Three layers of sheet styrene were used with the various shapes and door details cut out…
…and Evergreen V-Groove sheet (.025” spacing, .020” thick) was glued into the side channels.
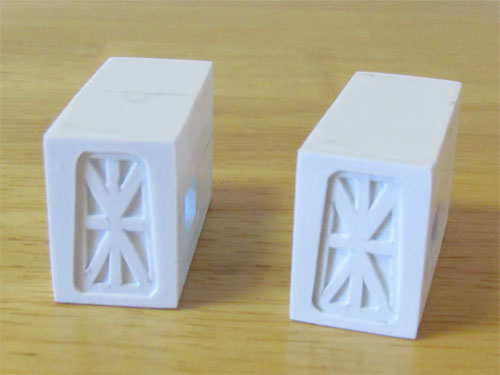
The top has neodymium magnets underneath for attachment to the spine. I made the eves with layered .5 mm sheet styrene and 2 mm round rod at the edge to give them the rounded shape.
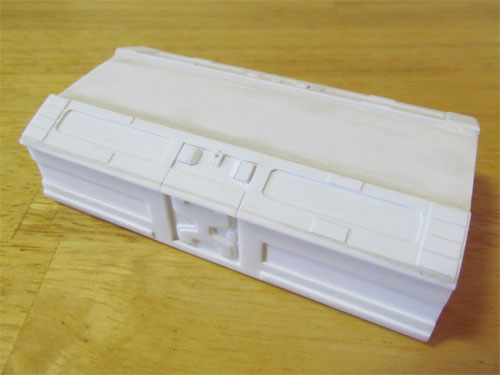
The ‘Gemini’ kit details in the center of the eves were replicated with Evergreen Metal Siding (1 mm thick, .75 mm spacing) as well as the center details taken from the MPC kit’s passenger pod.
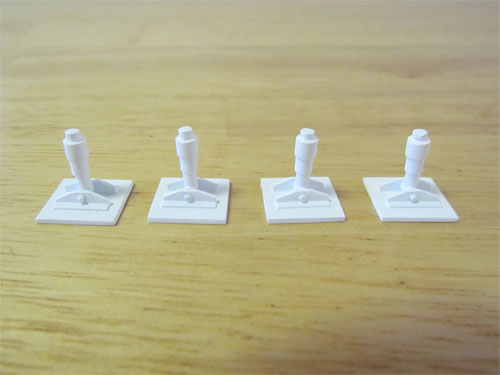
I removed the built in thrusters from the kit’s passenger pod bottom…
…to make way for a set of aluminum thrusters. The footpads were removed and replaced with ones I scratch built…
…and all missing pipes were replaced with 2 mm half round rods. Various styrene rods (3.2 mm, 1.6 mm, 1 mm, & .5 mm) and styrene sheet were used to scratch build the details.
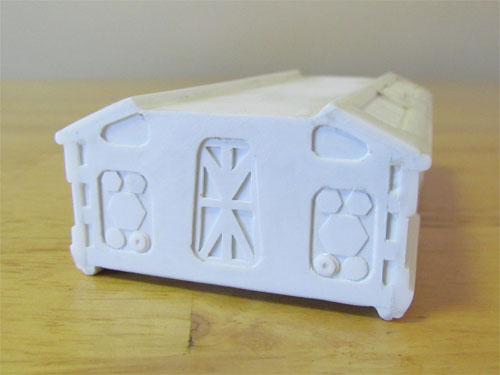
A spare MPC passenger pod bottom piece…
…was used to scratch build a cargo pod. 2 mm and 1 mm styrene rods were used for the front and rear supports…
…and magnets were installed for connection to the spine. Evergreen Metal Siding (1 mm thick, .75 mm spacing) was used on the floor and 1 mm styrene sheet used for the rectangular ‘blocks’. The landing gear…
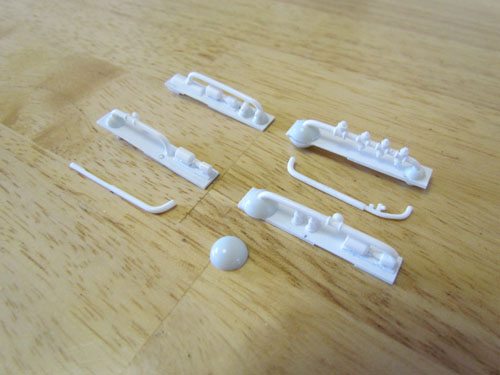
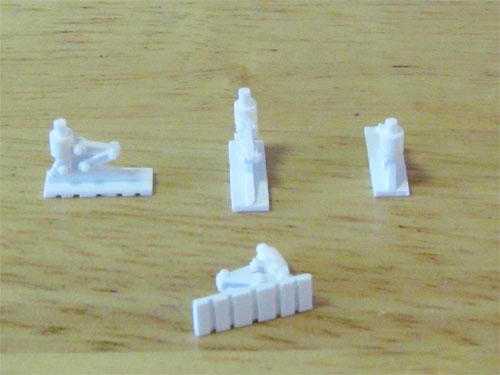
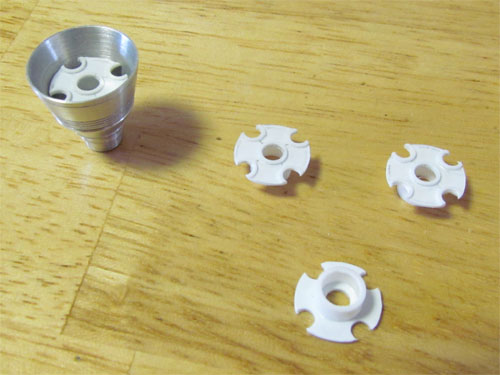
…is made up of various styrene tubes and rods (4 mm/3.2 mm tube and 2.5 mm rods) and 1 mm and .5 mm styrene sheet. Each foot is made to swivel with brass rod pins. A set of aluminum thrusters will be attached to the bottom when it’s all painted. I scratch built two Nuclear Waste Containers…
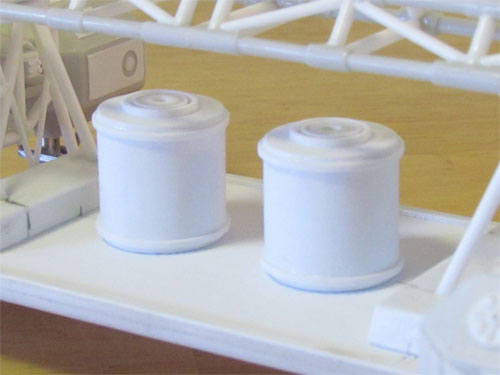
…using .5 mm and .3 mm sheet styrene glued around .5 mm top and bottom plates pieces. 11, 7.9 & 4 mm tubes were used for the top rings and 1 mm styrene strips for the raised bands.
I used the kit’s shoulder pods but removed the raised details and shortened them a couple of millimeters. The details on the kit’s parts are more representative of the Eagle 2 studio model so I replaced them with details seen on Eagle 1.
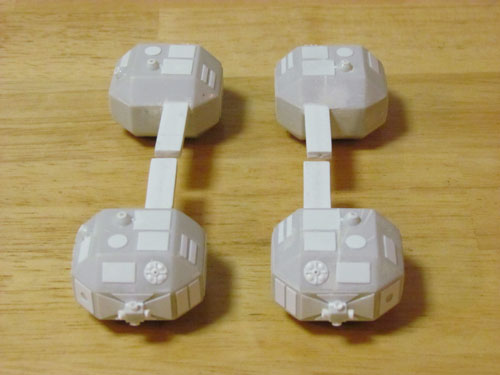
I also attached prongs for connection to the cages so they simply plug in with no need for glue, just like the original Eagle 1 studio model.
The landing gear…
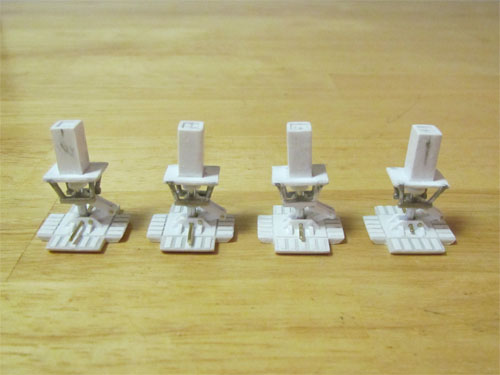
…was scratch built and made to retract with the use of aluminum tubes and the footpads are made to swivel. The footpads are the one’s from the MPC kit with the details removed and replaced with Eagle 1’s details.
The MPC kit’s command module (CM) has a back piece made up of a couple of pieces of 1.5 mm styrene sheet with .3 mm styrene raised panels. 1 mm styrene was glued in between the top and bottom halves and 4 new brackets were added. The 4 sensor dishes were filled with putty and have 2 mm styrene rod glued into the centers to form the raised detail. The CM…
…is also removable with the use of magnets. In addition to the MPC kit’s CM I had a resin Small Art Works CM…
…in the stash that I decided to use as an alternate. I shortened the back by 5 mm’s and added the 4 brackets. A magnet was installed inside as I did with the MPC kit’s CM.
The last parts I had to make were the engine baffles, which were scratch built with .5 mm styrene and tubing for the raised details.
The Eagle has a unique hull color that involved doing some research which I’ll talk more about in the third and final installment as well as weathering and the decals…
Michael Scarola
AMT’s Graveyard Ghoul Duo Rises Again!
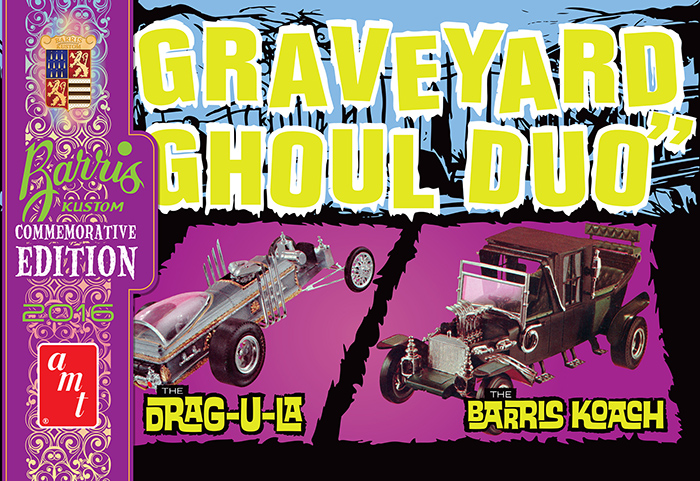
AMT’s association with the King of Kustomizers, George Barris, goes back decades and has produced some of the greatest cars (and model kits) of all time. Many of Barris’ cars became some of AMT’s most popular kits and his input helped develop optional “kustomizing” parts in various models.
But perhaps two of his most famous cars were developed for TV and even people who aren’t custom car enthusiasts recognize The Drag-U-La And Munster Coach. Originally issued during the show’s primetime run, the model kits of these cars have stayed in demand over the years.
This year, AMT is issuing a new Barris Commemorative Edition of The Drag-U-La and the Barris Koach (as it’s now called). We’ve given the Retro Deluxe treatment to the original “Graveyard Ghoul Duo” kit, but this time with a twist. The box now features new, brighter colors and will be wrapped in a special reflective side band.
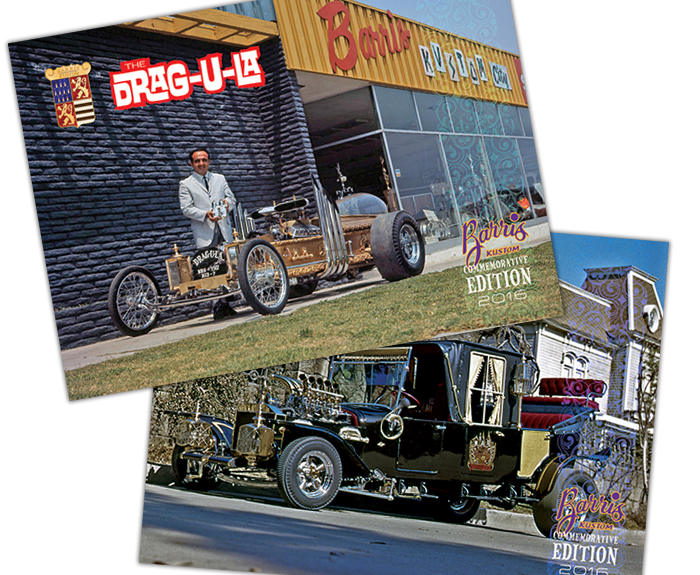
Also included is a special full color postcard featuring either the Drag-U-La or Barris Koach and one card is randomly inserted into each kit.
With the Drag-U-La molded in gold pearl plastic and the Barris Koach molded in midnight black, this is going to be one ghoulishly great kit!
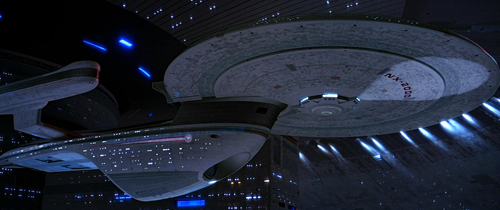
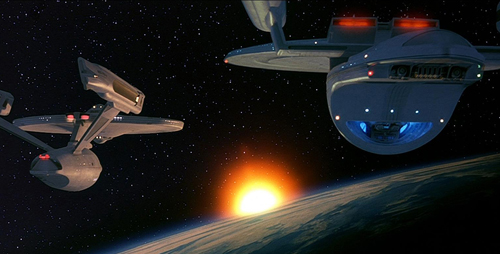
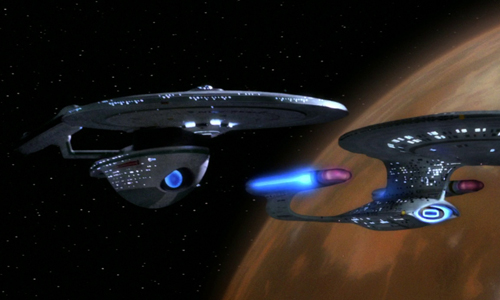
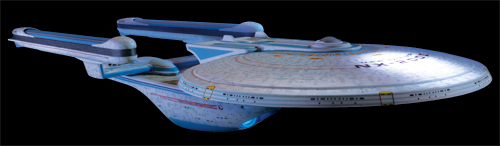
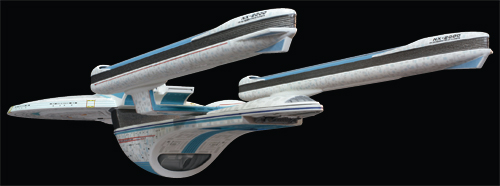
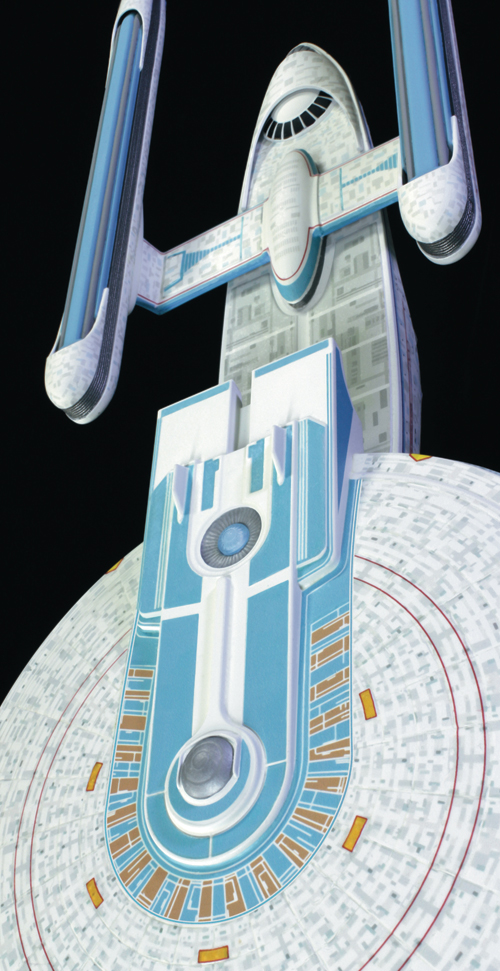
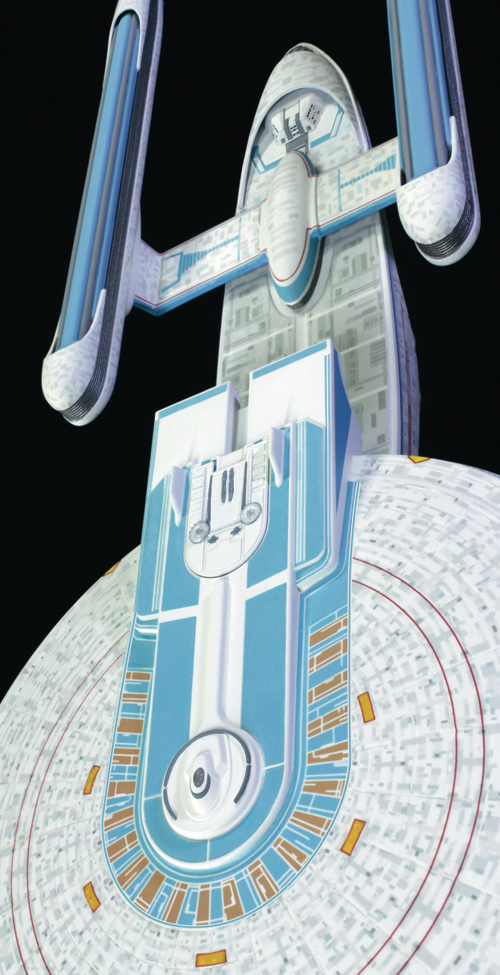
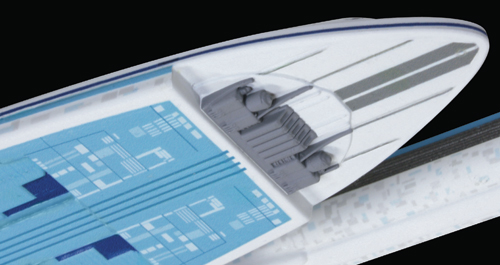
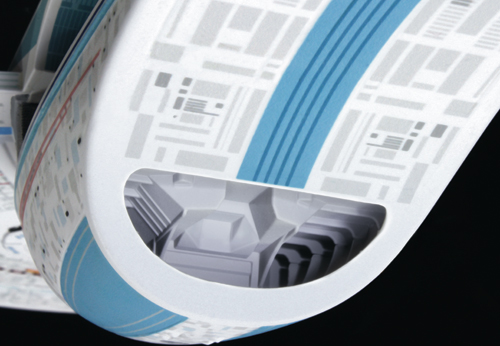
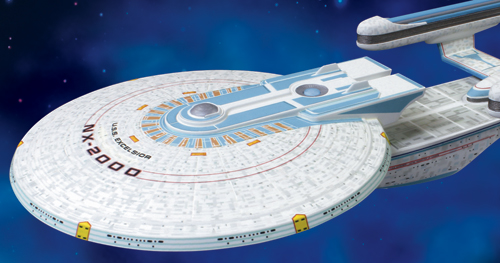
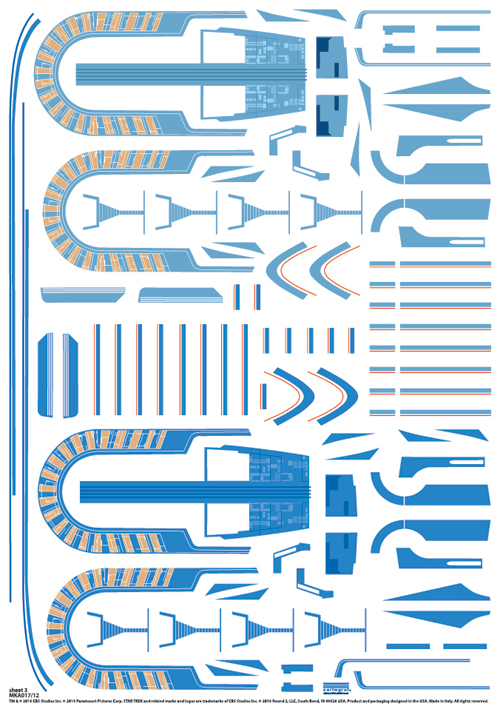
Star Trek Model Kits: U.S.S. Excelsior buildup
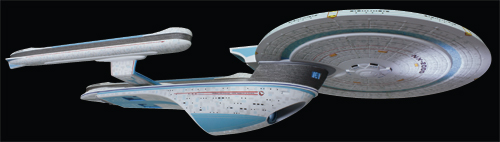
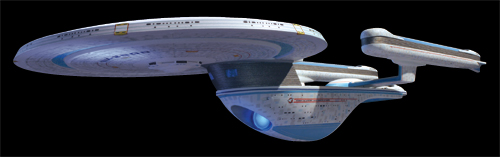
I promised a while back to show some photos of the buildup from our upcoming release of the U.S.S. Excelsior kit from Star Trek. I was kindly reminded of that, so here I am to honor my word.

As you know the fan-favorite ship was featured in two films Star Trek III: the Search For Spock…
and in Star Trek VI: The Undiscovered Country…
Between the films the original shooting miniature made and appearance in the debut episode (among others) of Star Trek: The Next Generation…
Along the way certain details changed and our kit includes parts to build either the NX-2000 or NCC-2000 version.
Another smaller miniature was later built for an episode of Star Trek: Voyager which featured a few additional variations in paint scheme.
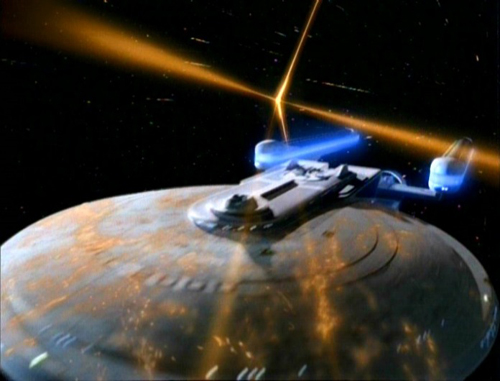
Later still, a CGI version of the Excelsior-class ship was used for some memorable episodes of Star Trek: Deep Space Nine.
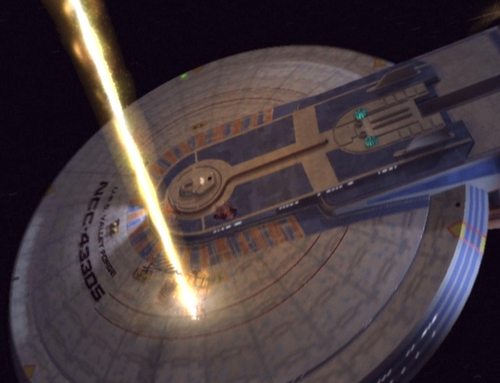
The CG model was faithful in shape to the earlier appearances, but the color of the “strongbacks” was shifted. As an additional bonus to add to our aztec decal set, we have included alternative registries and names of the key Excelsior-class ships as well as the deeper blue strongbacks as featured in DS9.
Without further ado, here are a slew of pics of our buildup.
And here is a look at the decal art for the sheet included in the kits as well as what to expect in the Aztec decal set.
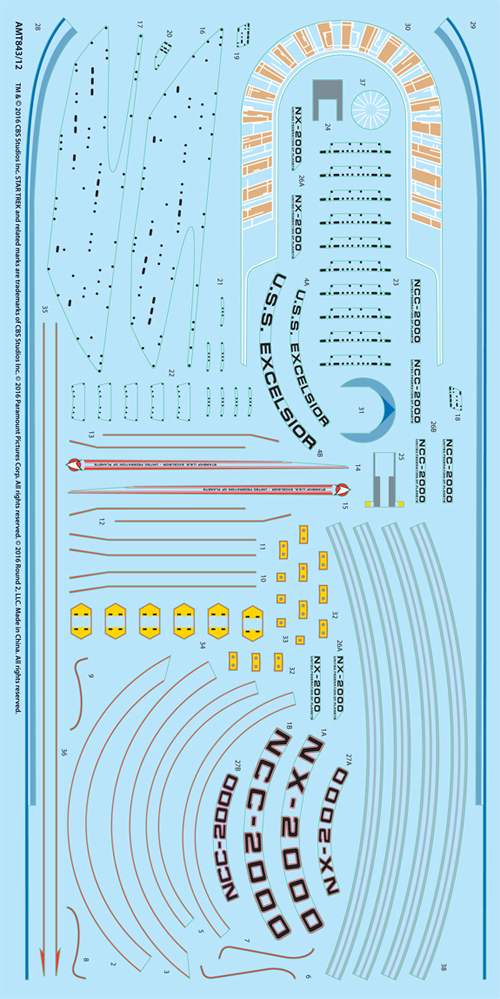
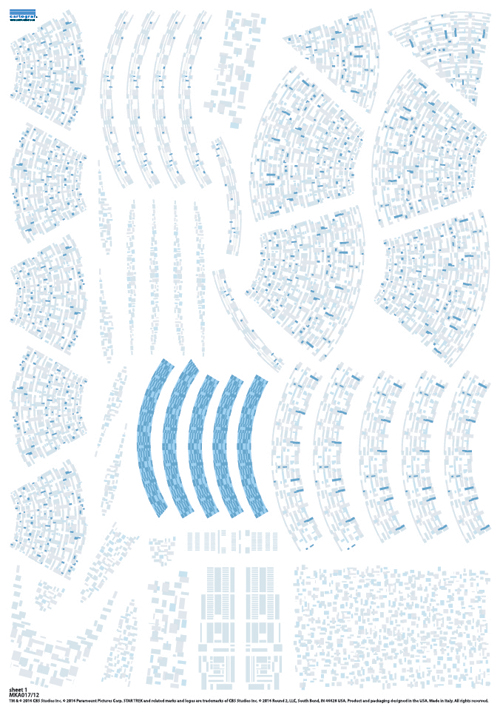
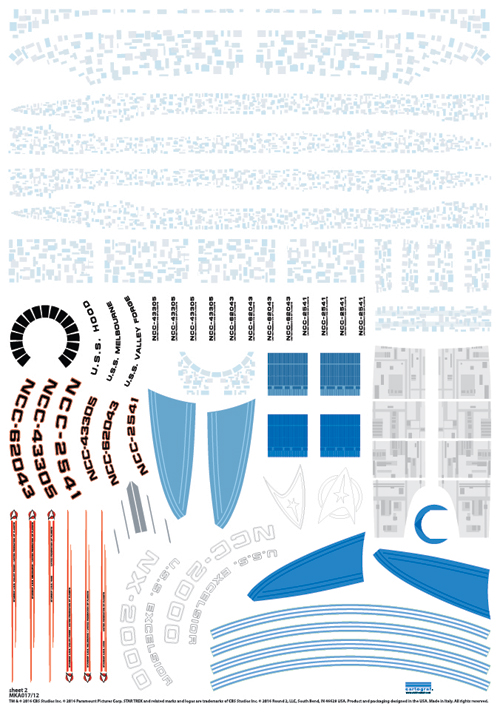
Ask your retailer for AMT843 U.S.S. Excelsior and MKA017 U.S.S. Excelsior Aztec Decal Set. Both should be out by the end of August.
A quick word about our friendly competition’s entry into Star Trek modeling… I hope they fair better than George Kirk did in his voyage into the new frontier…
Kat Chat: Behind the scenes with John Mueller and the SUPER BOSS!
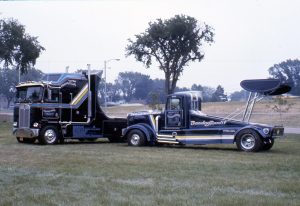
OK modelers, we’ve got a real treat for you this week! It’s an inside look back at the development of one of the most anticipated kits that we announced this year… Tyrone Malone’s AMT Super Boss Kenworth Drag Truck! You don’t get to go behind the scenes like this too often! And who would be better to tell this amazing story than the man who did the development of the kit itself! That’s right, it’s a veteran AMT Kat and talented designer… John Mueller! John played an integral role in more ways than one, but allow us to step aside and let John tell it like it was…
The Tyrone Malone Super Boss kit was one of my most memorable projects, perhaps even my favorite. Either way it was due to meeting and knowing for a while, Jerry “Tyrone” Malone. He was a real character – a “wild and crazy guy!”
I think it was spring or early summer of 1977 when AMT’s president (“CEO’s” hadn’t been invented yet) said to me, “There’s a guy who calls himself Tyrone Malone who drag races a customized semi-truck. He says we should make a model of it. He’s going to be at a truck show in Cincinnati; go down there and see what he’s all about.”
The CB radio/trucker show was held in an older convention or sports arena. Malone’s display booth was close to the parking lot entrance so he wasn’t hard to find. After our introductions, he began his story of getting started in promotional operations, beginning with “Little Irvy the frozen whale”, the “Boss Truck of America” custom Kenworth, and the “Super Boss racing truck”.
Then, while I was explaining model kit design & development, tool costs, etc., to Malone, who should walk up to us, dressed in “Viva Las Vegas” white buckskins, but none other than Evel Kneivel!
Well, the brag-fest started immediately and was more fun than watching an ape eating ice cream! They bragged about who had the best “show”- sponsors, displays, haulers, etc. And then a photographer showed up and took pictures of the two of them doing mock “face-off challenges.”
After Knievel moved on, Malone says, “c’mon, let’s go outside an’ I’ll show you what I do… you got a camera”? We went out to the parking lot where the Super Boss truck was parked on display; he warmed up the engine and told me to station myself with the camera about 40-50 yards down the center aisle of the lot. Mind you, there’s a lot of cars and trucks parked in this lot. Then Tyrone Malone commences to do burn-outs & hole-shots right down the middle of it all!
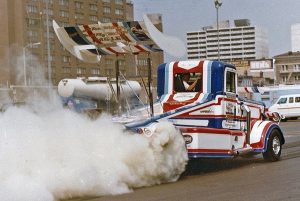
Tyrone Malone doing one of his trademark burnouts in Cincinnati, 1977
J.W. Mueller photo
That evening over dinner, Malone told me how it all got started by his having dinner in a California restaurant that had a live shark in an aquarium; the owner said his business doubled after he got the shark. Malone decided he just needed a bigger fish – like a whale! Well, technically a whale is not a fish, but that shark gave him the idea for “Little Irvy” the frozen whale- that he could haul around the country and people would pay to see it. Do an internet search for “Tyrone Malone” and you’ll probably find the story.
Anyway, when I got back to AMT and told management about Malone and showed them my photos, I said a Super Boss kit would be a refreshing addition to our truck kit line. Plus, I thought Jerry Malone was such a good promoter he just might be our best salesman. But then came the inevitable, dreaded cost vs return question: “It’s a one-trick pony- what else could we do with the tooling”? With that, the meeting adjourned.
Malone called and wrote several times after that, asking if anything was happening on the model kit idea. Regretfully, I had to say no, the execs were not convinced it was a good idea. Finally he says, “I think I need to come up there and show them my trucks”. I said, “OK, I’ll back you all the way, but there’s no guarantee that they’ll say yes.”
I think it was mid-to-late July when Jerry Malone showed up at 1225 East Maple – for the first time.
One of our security guards called saying, “There’s a guy down here, says his name is Tyrone Malone asking for you and he’s got some kind of custom truck on a trailer.” When I got to the parking lot and saw that it was indeed “Tyrone” I called our president and VP of operations and asked them to come out to meet the “Daredevil Diesel Driver.”
Introductions were made and while Jerry was giving everyone the 50 cent tour, a local TV station news truck pulled into the visitor’s parking lot. What we didn’t know was that Malone had already contacted the TV station, giving them a quick run-down on himself and advising what was going to happen that afternoon would be newsworthy. Turned out he was right!
The main entry driveway for AMT was on the west side of the building and ran north from East Maple (15 mile road) to the rear of the plant about 350 or 400 feet, where shipping/receiving was located. Malone unloaded and warmed up the Super Boss, told the TV news crew to get ready, and then did a brake-lock burn-out and speed run up the driveway alongside the AMT plant!
Then he turned around and did the same thing on a return run toward the front of the plant.
Just as Malone was racing back toward the street entrance, a UPS truck pulled in to make a delivery. Needless to say, there was a heavy application of brakes on two trucks – one brown and the other red, white & blue! I think the UPS driver might have made an unexpected delivery that day!
By that time, there was already an audience of AMT employees who got away from their duties. Our president, recognizing that a major PR bomb had just exploded in front of him, shouted to his secretary, “Get me a contract, get me a contract!” The Super Boss model kit was a go project, right now.
We were to start the project as soon as arrangements could be made for Malone to bring the Super Boss back for photography & measurements – he was in the area at this time for sponsor commitments – canny devil, eh? I would do the reference photography, measuring and design drawings myself, and leave the other designers to work on already scheduled projects.
Malone brought the Super Boss back to AMT sometime in August, and he and his wife stayed in their motorhome on the AMT property – you could say we were definitely “plugged in.” And as I recall, I think they were suitably entertained at our president’s home in Birmingham during their stay.
I still remember that day he drove the Super Boss inside the plant so I could photo & measure the underside. He had installed an air horn from a GM Diesel locomotive; when he parked the truck inside the plant he let off a “Casey Jones” blast on the horn. To say that Tyrone made a startling appearance would be an understatement. More than a few bathroom breaks ensued for the assembly line ladies!
With the exception of the tires, which were drawn later by another designer, I created all of the part design drawings, starting around September of 1977, thru mid ’78. So, for better or worse, I’m the guy to blame for any design flaws.
During this time, Lesney-USA negotiated the purchase of AMT. In August/September of ’78, manufacturing moved to Baltimore, Maryland. A reduced AMT office staff remained in Troy. The next time I saw Jerry Malone was in Baltimore, when the first Super Boss model kits ran down the final assembly lines. A few of us got autographed, “first editions” and we all celebrated the event.
Back in ’77 the question had been, “what else can we do with this tooling?” Thanks to “Tyrone” Malone’s promotional drive (and Kenworth connection), he followed up the Super Boss truck with the “Bandag Bandit.”
Through regular communication regarding radical changes, we were able to economically produce the “Bandag Bandit” from the Super Boss tooling. And then came the “Papa Truck” & “Hideout” hauler truck models from new Kenworth Aerodyne COE kit tooling. As I said previously, I thought Tyrone Malone would do as much good for AMT as AMT would do for him.
I think the last time I saw Jerry “Tyrone” Malone was at the fairgrounds in Minneapolis/St. Paul in August 1978, when I photographed the Bandag Bandit truck, along with the rest of his “100 million dollar truck show.”
Bandag Bandit & Hideout truck Minneapolis, MN, Aug. 1978
J.W. Mueller photo
I don’t think I’ve ever had a more enjoyable, slightly crazy working relationship with a vehicle owner during all my years as a model kit/die cast product designer. Had it not been for the short-lived Lesney ownership of the AMT brand and lack of follow-up by ERTL, there might have been more model Malone vehicle replicas for those interested, to enjoy.
So there’s my Tyrone Malone story. Now I’ll just recall sitting across the table from Jerry Malone a couple of times, hearing great stories, joking and laughing. What a hoot!
J.W. Mueller
5/25/16
… and there you have it folks! We are extremely grateful that John took the time to tell us this awesome tale from the glory days of model kit manufacturing. Thanks again John!
We’re also excited to say that the reissue of the Super Boss Kenworth, after a thirty year absence, turned out great and will be available at select retailers real soon!
Transforming the Classic MPC Eagle Kit – Part 1
As promised, here is the first in a series of articles by Michael Scarola showing the steps he has taken to accurize a 12″ MPC Eagle.
Transforming the Classic MPC Eagle Kit – Part 1
After all these years I finally got around to building a Space 1999 Eagle. The Eagle is a unique ship that actually looks like it could work as intended. I love its organic yet utilitarian design. For this build I started with an MPC Eagle and decided to make some modifications of the existing kit parts and also do some scratch building along the way. The MPC Eagle 1 kit is a classic that has been around since the TV show began and represents an Eagle nicely but does have some simplified sections and details that I felt I could improve upon. I wanted to use as much of the original kit parts as possible while attempting to make it accurate to the original Eagle 44” studio model.
The build…
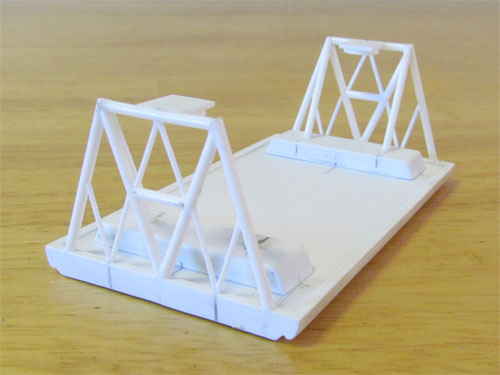
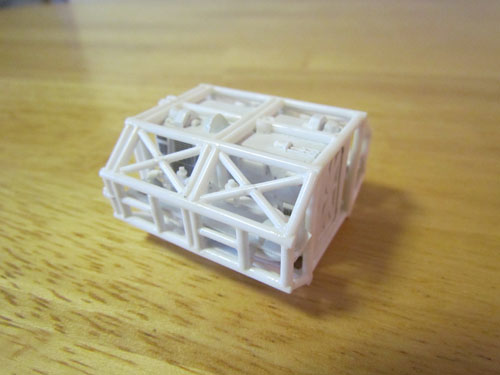
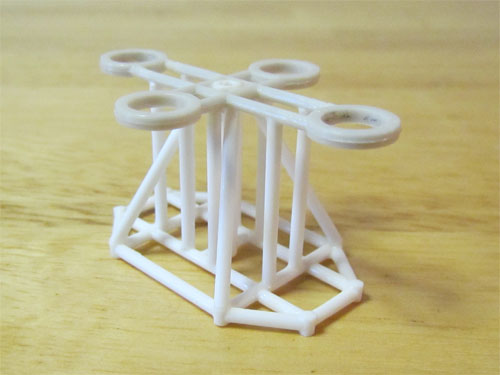
I used a WARP kit I have and access to a friend’s set of Daniel Prud’Homme Eagle blueprints as reference. I decided to start by scratch building the front and rear cage sections. I made a jig…
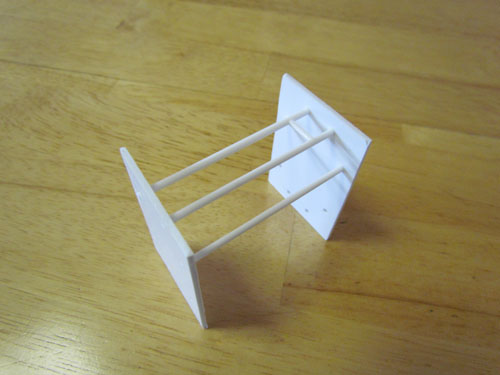
…out of a couple of pieces of 1.5 mm styrene sheet that helped keep everything straight and aligned. Using a round file I ‘fish mouthed’ the ends of the styrene rods so it would all fit together the same as the studio model. 2 mm styrene rods were used for the larger main rods and 1.6 mm rods for the smaller ones. This image shows one of the cage sections after removal from the jig.
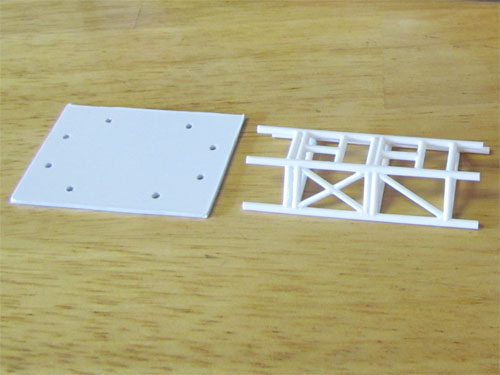
The MPC kit’s spine was shortened and narrowed and a flat file was used to re-shape the tubing since they are flat on the backsides. I replaced the inner supports with 2 mm and 1.6 mm styrene rods.
The corridors inside the spine were scratch built using 1.5 mm sheet styrene with channels made for attaching the shoulder pods. The doors at the ends of each corridor are pieces of .5 mm styrene layered to create the recesses.
The original 44” studio model’s corridor doors were drawn on but these doors match the ones on the passenger pod and look more realistic so I went with this approach.
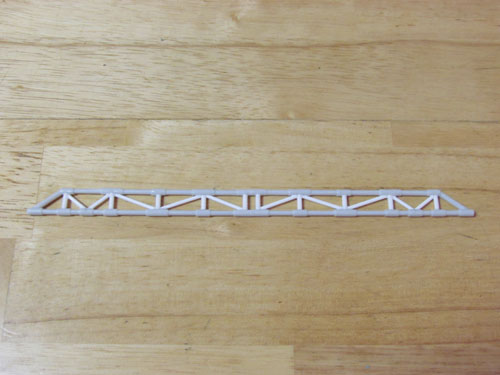
The details on the sides and tops of the corridors…
…were made from scaled down measurements taken from Daniel Prud’Homme’s Eagle 1 blueprints. I used .4 mm sheet styrene layered and other various sizes to create the side details that were actually kit tank parts on the original studio model. All the grill details are made from open grate platforms from Tichy Train Group. The details on top were a bit more challenging. On the studio model most of these consisted of model parts from Saturn V and Gemini kits. I layered .4 mm styrene for the ‘Saturn V’ end details and shaped the ends of sprues taken from a Polar Lights 1/1000 TOS Enterprise kit for the round ‘Gemini’ details. The Polar Lights 1/1000 TOS Enterprise kit has some nice large diameter sprues that I’ve used to scratch build parts on a few models I’ve worked on. That kit keeps on giving.
Now that the cages and corridors were completed I put them together using 2 mm diameter styrene rods that now completed the sections.
It was now time to move on to the rear of the Eagle’s frame. 2 mm styrene rods were used to make the framework that the cross section frame is attached to.
I used all 4 of the engine bottles and ‘balls’…
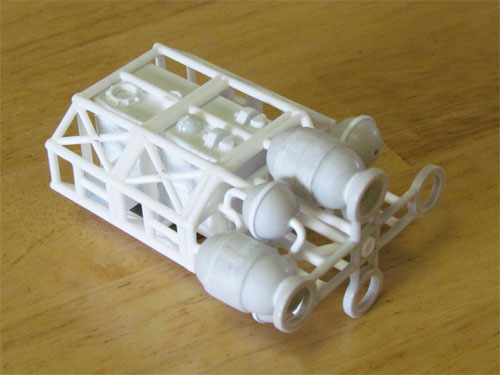
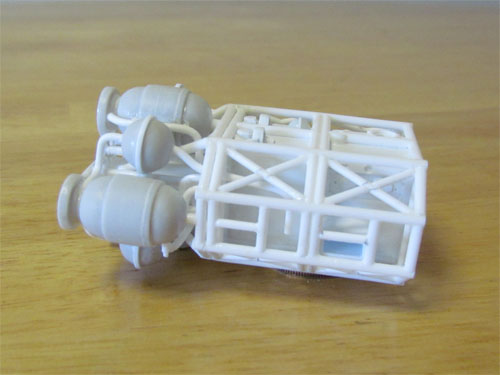
…as well as the rear cross frame from the MPC kit. I modified these parts a bit to more closely match the studio model. The bottles were shortened and new raised detail glued in between the ball halves. The piping, matched to the blueprints, was added to tie it all together.
In the next installment I’ll cover the building of the shoulder pods, landing gear, command module, passenger pod and the cargo pod…
Michael Scarola
Coming off the Shelf – Blazing a Trail
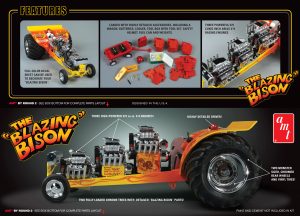
AMT is getting ready to turn a powerful classic loose, a Blazing Bison to be exact. This monster machine was a spectacular show vehicle that amazed fans – pulling 20-plus tons of steel and climbing mountains of cars. It was the show and the go, and now the Kats at AMT are set to turn this incredible machine loose for all to build once again! This 4,000 horsepower modified puller tractor leaves nothing in the bag, featuring three powerful 575 cu. in. Arias V-8 racing engines, two fully loaded chrome trees, two monster sized rear wheels and vinyl tires, a detailed driver and full color decal sheet. Parts are molded in golden yellow and black. But wait, there’s more. The Blazing Bison kit is loaded with highly detailed accessories such as a wagon, batteries, cooler, tool box with tool set, safety helmet, fuel can and weights. And just for kicks, we’ve included a sneak peek of the packaging side panels in this post, which showcases all the rip-roaring features mentioned above.
So, for all the Blazing Bison builders out there, a chance to get reacquainted with this amazing puller tractor is just around the bend.
Arriving soon, at your local hobby stores.
Enjoy!
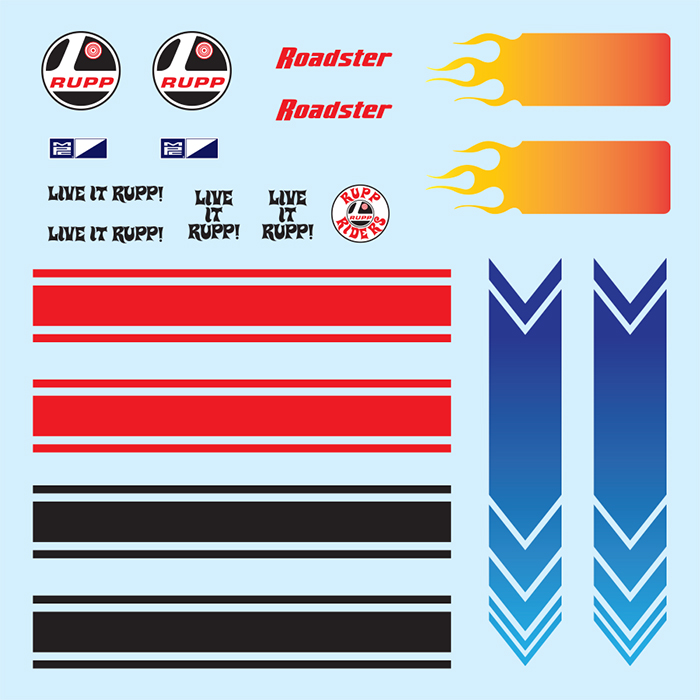
From Mini to Max, MPC’s Got Your Motorcycle Modeling Covered
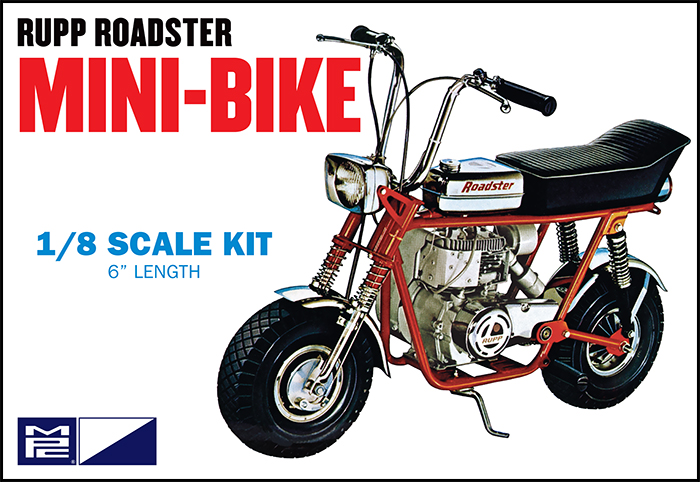
Two new upcoming kits from MPC are sure to be a hit with modelers who love motorcycles both big and small. Starting with MPC’s Rupp Roadster Mini-Bike, we’re re-issuing this classic two-wheeler and it will be molded in pearl red, with plenty of chrome, and comes with vinyl tubing for brake and gas lines. We’ve also expanded the decals sheet to give the builder a few extra options to decorate their finished model. This popular mini-bike was a great hit for Rupp when it was introduced in 1969.
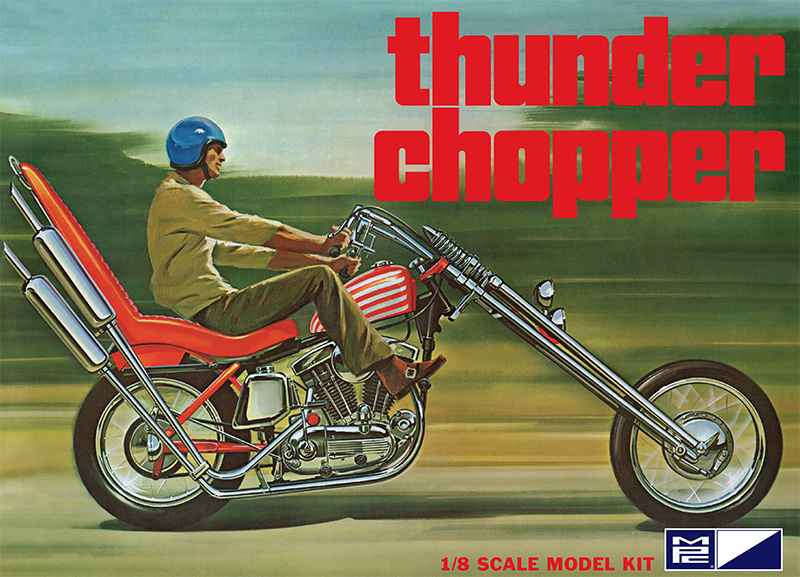
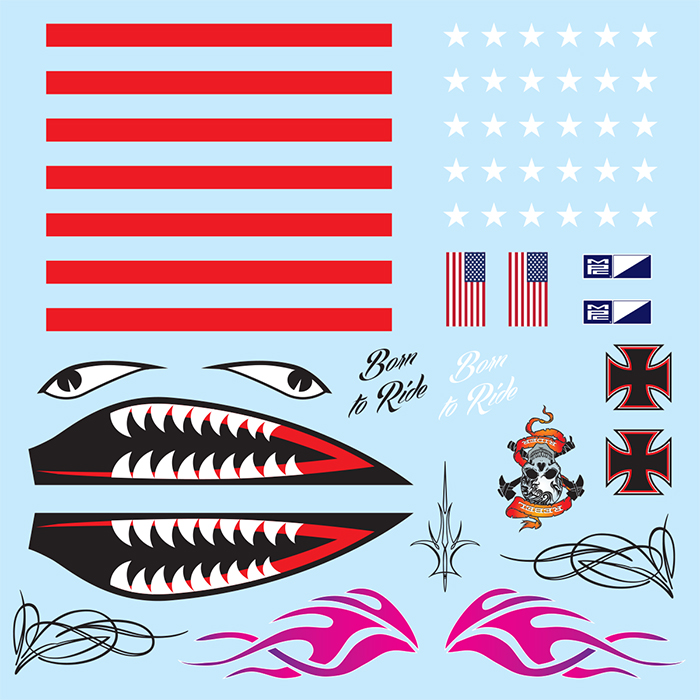
And, as opposed to “mini,” we’re also releasing our classic Thunder Chopper with its extended front fork, “peace sign” sissy bar, 900cc engine and “maximum” chopper details. We’ve retooled several parts to bring it back to its original issue condition and this one will also include an expanded set of decals. Molded in pearl yellow and black with vinyl hoses and lots of chrome parts, this large-scale kit is a great addition to our previously released Honda 750 and Honda Trail 70 models.
Kat Chat: Lost AMT Funny Car REVEALED!
OK modelers, I know you’ve been waiting since my last post with baited breath, to find out which AMT funny car has gone MIA! Well, here it is…
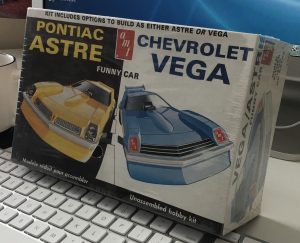
Yes, the rather unique and extremely cool looking Astre/Vega body insert slides and front/rear cap inserts are nowhere to be found. At this time, we have no plans to (ever) retool the missing bits, so those of you with the kit in your collections, consider yourselves fortunate!
To clarify, we DO still have the chassis tooling for this series of funnies, it’s under the upcoming Larry Fullerton Trojan Horse kit coming later in the 3rd quater!
Happy 4th to those in the USA this coming Monday, and stay tuned for another episode of “Kat Chat” in a few weeks!