Recommended Sites


Archive for April, 2013
The 4-H project – the continuing saga….
Okay so apartment living and modeling is proving to be a bit of a challenge. I tried to build the hood (and being mechanically challenged) this was no easy task. It did not work nearly as well as I had thought it would in my head. It did contain some of the fumes and over spray which is good since I did this on my balcony.
But I am getting ahead of myself. Since it is the older ones project and he is old enough to handle some tools safely I have had to step back and allow him to sink or swim. For the most part it has been really good. The one thing that we have done differently this year versus prior years is that we have washed all of the pieces very well. We had a painting issue last year where the paint basically bubbled up and ran off. So this year we took the whole tree and washed it using plain dish soap and hot water. I am hoping that this will be enough to save the paint job.
7 weeks until the fair and counting…
I will post some pictures of our progress next week…
Polar Lights Model Kits- Robby the Robot Returns
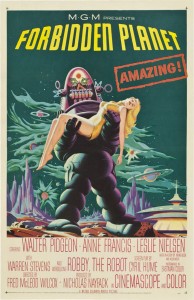
We announced our intention at Wonderfest last year to do give our Robby the Robot model kit a fresh spin to give a 3D representation of the iconic Forbidden Planet movie poster. So this June Robby the Robot returns as the Robby the Robot Movie Poster Edition. It seemed simple enough to take our existing Robby kit, add on a few new parts and boom; we would be off to the races. As usual, there really is no such thing as an “easy” task.
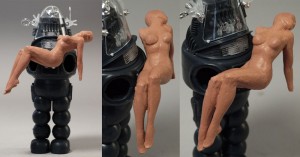
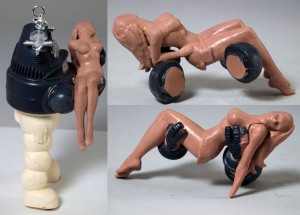
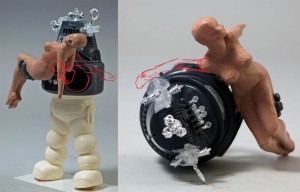
We knew we would need work with the parts we already have, so we knew we couldn’t work digitally in this case. We started out by hiring Tim Bruckner to tackle the sculpting duties. Tim has sculpted many licensed collectible statues and action figures. The difficulty before him was to use hard parts that we wanted to avoid retooling like Robby’s head and body and sculpt the needed Altaira figure along with new arms, legs and base for Robby. On top of that, he needed to stay as close as possible to the main reference, the movie poster, and translate a 2D painting into 3D that keeps all of the human body parts in proper proportion and get it to seat correctly on Robby. Our licensing agreement does not include likeness rights so we knew we needed to make sure the face stuck closely to the poster, and looked nothing like the actress. The Robby you see on the poster also strays a bit from the look of the real character. Ultimately we found that we needed to find that elusive sweet spot between the poster and what the “real” thing should look like in 3D. So with the parameters of our mission set before us, Tim began sculpting.
The first hurdle that was encountered was the fact that the movie poster shows no trace of Altaira’s right arm. It really isn’t something you notice when you look at it, because the mass of Robby’s body lends enough cover to make us assume that it must be there somewhere. Robby’s shoulder dome restricts the notion that the arm could drop straight down like the left one does. That left two possibilities. A) Her arm was tucked in between Altaira’s and Robby’s bodies, but her right hand could not land in her lap which would have been the natural position for it. B) Her arm had somehow landed up resting back over Robby’s shoulder. (Think it through, if Robby was lifting her unconscious body, how could her shoulder have ended up there?) We decided to proceed with notion A and see where that would lead us.
While we were figuring that out, creating Robby’s new wide stance was a simpler proposition. Old kit parts were utilized to create a mockup of the new part. They were cast up into solid resin soon enough.
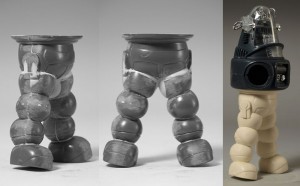
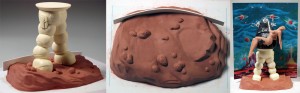
With the legs in hand, the base was begun. We wanted the new base to represent the rocky alien ground that he was standing on in the poster. We also wanted to finish off the full poster effect by including a cardboard backdrop that supplies the background. So a channel was implemented to situate the backdrop. We left it to the factory to supply some gravel/soil texture to the piece after tooling was cut.
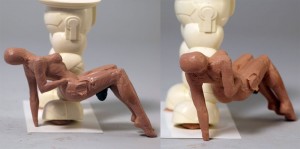
Getting back to the figure, another problem that arose during the process is that in the illustration, Altaira isn’t really resting on Robby’s arm. The right side of her torso is raised so that we can see it, but she is clearly being held up by Robby’s hand on her left side. This left a gaping hole in the model. We played with the idea that her right arm had been caught up under her and that was what was holding her up.
Building our model for the fair…
Well it is that time of year again and we are just starting our fair projects at home. Unfortunately we live in a 3rd floor apartment, which makes painting both inside and outside difficult. To minimize fumes and mess I began to look for options for building a miniature spray booth. I am not endorsing either of these, because I have not completed it yet, but I found 2 sets of instructions for completing this project.
It looks like the materials I will need to complete this project are
1) Plastic Storage Crate or Similar Size Cardboard Box depending on which set of instructions you choose..mine will depend on whichever box I can find.
2) An extractor fan – the second set of instructions uses the exhaust hood from a stove. This one seems simplest.
3) Flexible hose – like for a dryer vent
- Full instructions are available on the individual pages.
http://www.militarymodelling.com/news/article/homemade-spray-booth/3661/
http://www.interlog.com/~ask/scale/tips/booth.htm
This second set also includes some great ideas for cleaning, painting, and preparing your model. Once we get started I will share our photos.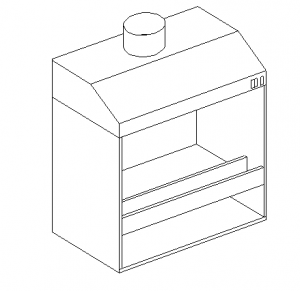
Polar Lights: Shedding Light On An Old Enterprise
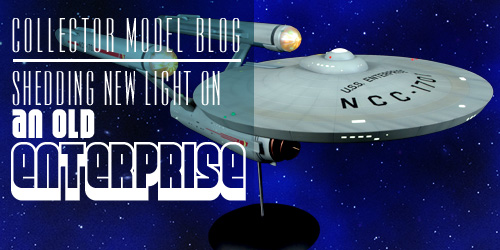
We have received some questions about the installation of the new lighting sets for the 1:350 scale U.S.S. Enterprise model kits so we put together a quick tutorial video that is available through our YouTube channel and our Collector Model Blog. Polar Lights brand manager, Jamie Hood, shows step-by-step how the lights should be installed into the model. This video covers some of the trickier spots that a modeler may encounter as well as some helpful hints to ease the assembly of either MKA005 Deluxe Accessory Set and MKA007 Lighting Kit. As with any of our model kits, we recommend reading all of the instructions completely before you begin any project, but this video should grant a great insight about the installation before the project is begun.
We’ve seen some excellent buildups with the lights installed. We hope this video assists those that have been holding back from lighting their builds. Enjoy!
Polar Lights Model Kits: Back to Back to the Future
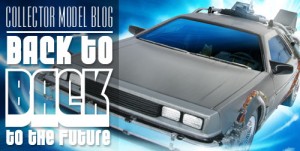
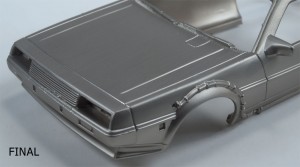
Polar Light recently decided it was time to get back to Back to the Future and bring back the 1:25 scale Time Machine this summer. We recently inspected a copy of the previous release examine the faux “stainless steel” finish was already present on the model’s body. After discussing with the factory about the possibility of repeating this finish on the new release, we were offered a slew of options to explore. (Be sure to click on the pics for close-up views)
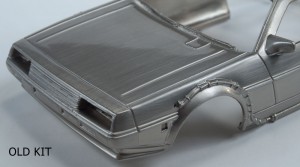
The original kit had what would looks to be a standard chromed body that had been sanded with steel wool before it had been gloss coated. While the look was a valiant and notable effort, it looked very toy-like. The sanded lines were too big and noticeable to be considered true to the scale and the gloss coat was excessive.
Our factory offered a few alternatives from various sources that used a couple different techniques for applying the chrome and sanding.
Example A looked the best. I had a nice fine and evenly distributed sanded finish, but the color was a bit dark more like pewter than silver. A couple of the highest details also had a bit of a bronze color showing through. This was the base color of the plastic. I assume this example had been used on another faux-pewter looking product as the crevasses looked darker as if it was antiqued.

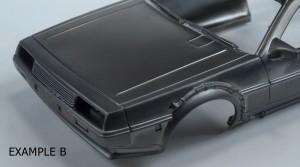
Example B looked similar to A, but it lacked the sanded lines. The finish was easy to mar and discolor with fingerprints. A significant amount of rubbing removed them, but the finish maintained a blotchy look overall.
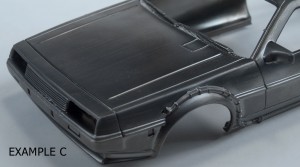
Example C looked like B, but had sanded lines added back in. They weren’t as evenly applied or as apparent as A. Some areas were missed and some were a bit heavy-handed.
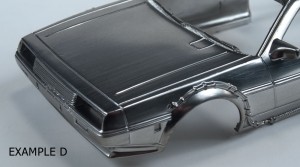
Example D looked like a departure form the first three. It looked like it went back to the chrome/silver look of the old one. In this case, the gloss level wasn’t as high, but the sand lines looked like they had been applied with coarser grit. There weren’t as many lines, but the ones that were there were too prominent.
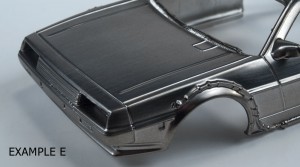
Example E also looked similar to the old kit, but didn’t have as high of a gloss level finish. The example came with a note saying “process warps body. Advise not to use.” And the body was warped (wider than it should have been) so we won’t be using this one.
This left us with a quandary. All told the quality and finish of example A was by far the best looking, but it was too dark. So we asked if it could be lightened to look more like silver. The result looked perfect… well, as perfect as we could expect for a 1:25 scale kit. The color is pretty spot on and the sanded lines are nice and even and aren’t too deep. It doesn’t use a heavy clear coat so all of the details show up nicely too.
We think this change is a significant improvement over the last release. Keep an eye out for the kit coming in June.