Recommended Sites


Archive for August 8th, 2018
Polar Lights Models: Klingon K’t’inga buildup process Pt.6
Continuing our series of guest blogs covering our brand-new STAR TREK: The Motion Picture 1:350 Klingon K’t’inga model kit…
Painting in Klingonese. The Grueling (But Still Fun) Part.
James Small, www.smallartworks.ca
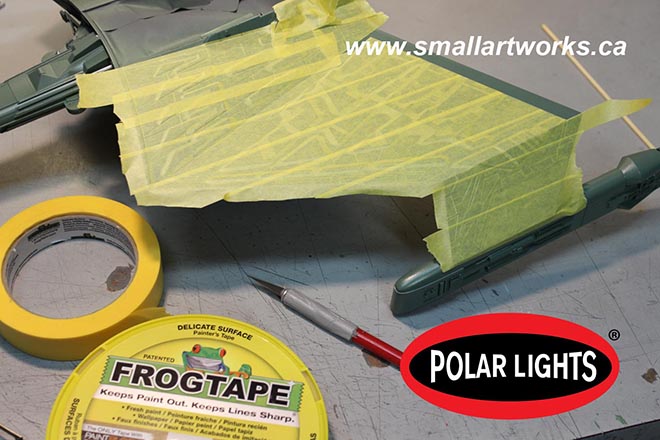
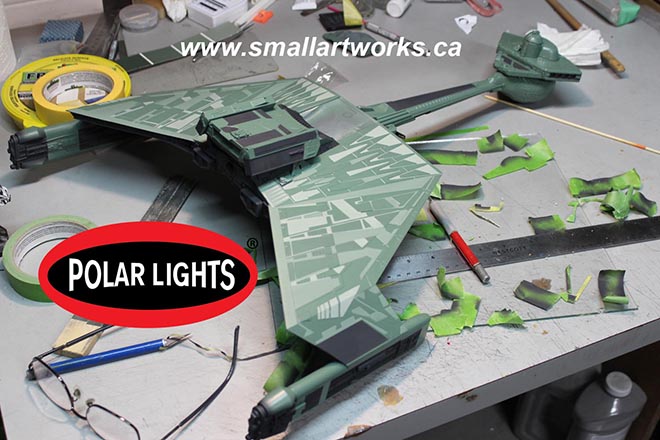
“The Making of Jaws” pocket book printed back in the mid 1970’s has a funny line placed as a caption beneath one of the photos of the crew preparing to shoot a scene. The line has always stuck with me. I quote it a lot because I think it’s clever and is true of many things besides just film making. It reads, “It’s not the time it takes to take the takes, it’s the time it takes between the takes that take the time to take.” I was trying to find a way to adapt that to how you paint a model like this and fell short by a wide margin. The closest I could come up with is “It’s not the time it takes to paint the model, it’s the time it takes to prepare and mask the model that takes the time to paint.” Yeah. Really lame, I know. I’m not much of a meme generator. Hopefully I’m a much better model builder than a writer or I’ll have to go get a job at Wal-Mart.
Anyway, the following shows what I consider by far to be the most grueling part of building this kit. It requires tremendous patience and even more masking tape. The tape itself is important. Make sure you don’t use some cheap-o no-name bargain tape. Use something that really works. I like to use “Frog Tape” which is readily available even here in the backwater town of Truro, Nova Scotia. It’s twice the price of standard painter’s tape but is better for preventing paint seepage under it than generic tape, but still a hell of a lot cheaper than the hobby tapes like Tamiya and so on, especially when you need to use a lot of it like on this model. It comes in two types. Regular (green) and the yellow stuff made for delicate surfaces. I used both as you will see. There are advantages and disadvantages to both. The green has a more aggressive adhesive, but the yellow type is semi-translucent and is less likely to peel off the paint you are masking over when you remove it. The hobby tapes are a lot thinner (meaning less wide) and people see that as a massive advantage. It’s easy to adapt the Frog Tape to do the same thing though. Simply lay a strip down onto a CLEAN, dry piece of glass and use a ruler and X-acto knife to cut strips to whatever width you like. Then just peel the tape off the glass when you’re ready to use it and put it in place.
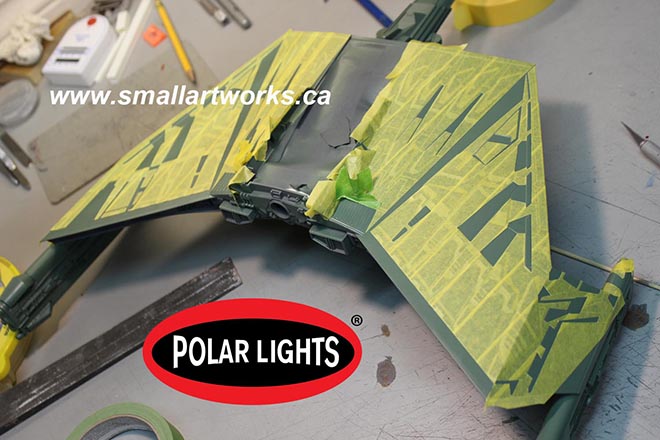
But with the green paneling that covers the bottom and top surfaces of the main body and “wings” of the K’Tinga, I opted to simply cover the whole thing in tape and then use a pointed bamboo Kebab skewer, (but toothpicks could work too) to push the tape down into the nooks and crannies and then cut out the sections that will be sprayed onto. Just make sure the edges are pressed firmly into place. Because there are three different green colours, it gets a little complicated and confusing, and is really hard to describe here so I’ll let the pictures do most of the talking.
The yellow Frog Tape is laid down onto the darkest green painted surface. Normally you’d want to paint the lighter colours first and then cover that with the darker colours, but in this case the darker green is the main colour so it was put down first over the primed and light-blocked hull (the production kit will be molded in black so light blocking will not be much of a problem!).
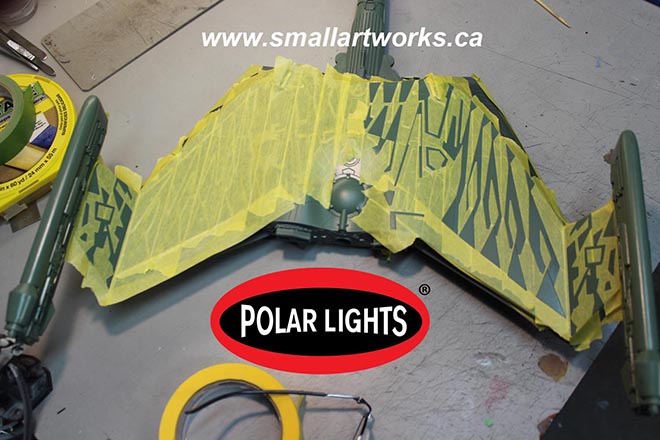
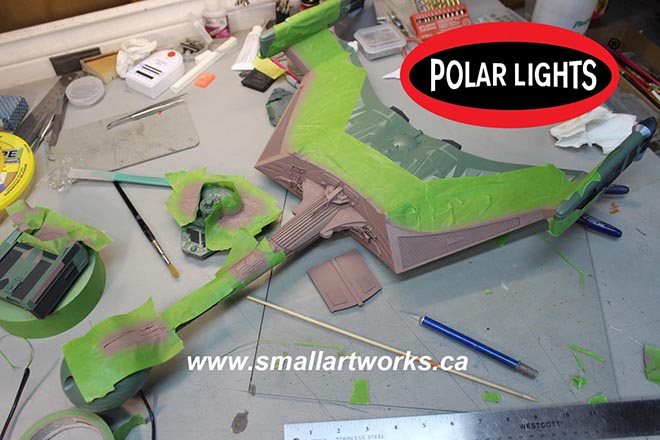
The long and tedious task of cutting out the panels to be sprayed first, the “medium” green colour, begins.
Same for the bottom.
Spraying the medium colour with an airbrush is done and then the tape is cut out and removed for the next (lightest) colour of green to be applied. All the colours were mixed by decanting various rattle can paints into a mixing cup in previously determined proportions to match the colour chips that Jamie gave me to follow. How those colours were determined was covered extensively in Jamie’s previous blogs posted or linked to on this page.
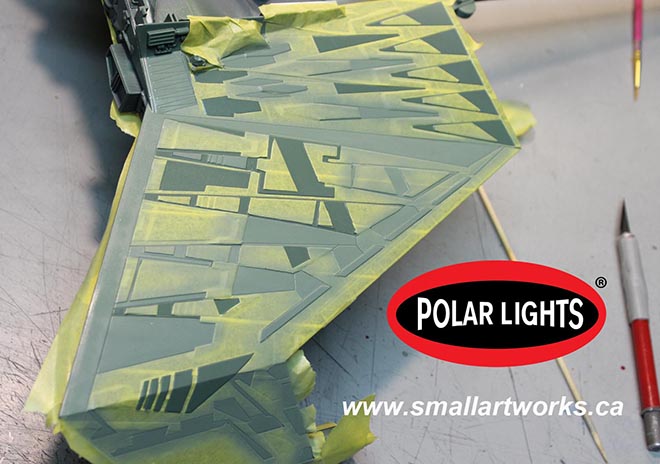
With the medium colour done and dry, it’s covered up again and then the panels that will receive the lightest green colour are cut out and sprayed.

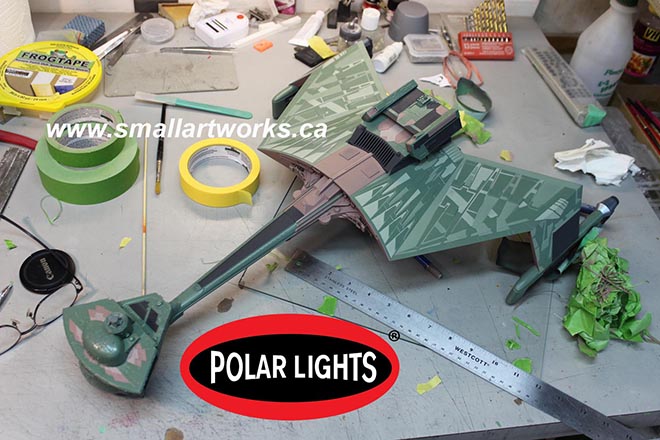
The green colours all applied, all the masking is removed. This procedure took me several days as the alkyd paint needed to be fully dry for 24 hrs or more before the next colour could be applied, and the masking alone took many hours. All the paint was applied with an airbrush, done by decanting the paint from the rattle cans into cups, mixed to match the colour chips Jamie provided me with and sprayed onto the primed surfaces.
With the three layers of green out of the way, it was time to start laying down the other colours. This part was actually a lot more fun, as it was a lot easier, less time consuming and really started to flesh out the final look of the ship! This picture shows the model with the “light black” sprayed on. For this, I used 10 parts black Krylon primer (which is not true black to begin with but actually an extremely dark gray bordering on black.. difficult to describe!) mixed with 1 part white primer, and it seems to have the right effect. The nice thing about using primers is that it dries quickly, is less likely to react with the paints underneath and provides a nice silky matte finish.
The indescribable brown/tan/pink/oxide/mauve/taupe style colour… (I’m convinced that the VFX people said to themselves “Let’s see if someone forty years from now will be able to figure THAT one out when they try to build replicas of this ship!”) was painted on after the black, so all the green and black were masked off as one should expect and the pinkish stuff was sprayed on. Since there was also a lighter colour of pink to spray on, the same was done for it as was done for the green for various panels. I cheated in some areas and simply brush painted a few of them.
Starting to look the part, eh?
Now some of the smaller details are decorated using the old tried and true brush painting method using the small jars of easy to use hobby paints. There are some errors as seen here which will be touched up before proper photography.
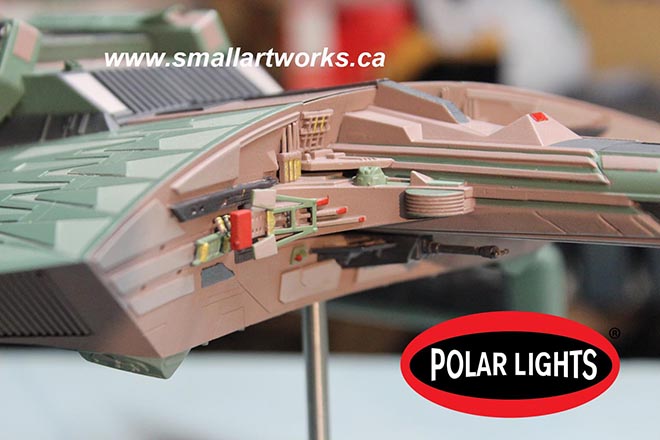
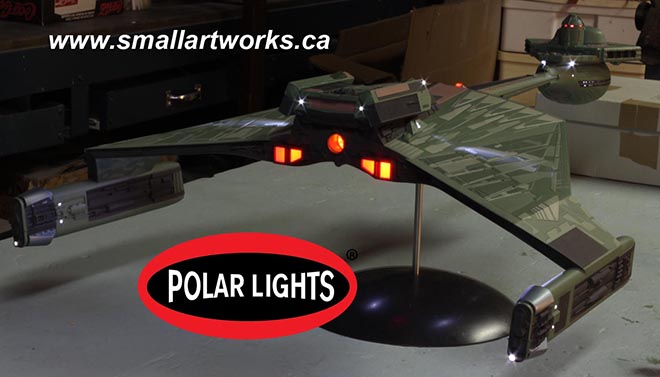
The model is nearing completion. Lighting is tested and paint work evaluated. At this point I did some photography of the model in this state for some of the painting instructions that will be included with the kit. Jamie will work his Photoshop magic as required to perfect the shots as needed to make sure the model is accurately depicted.
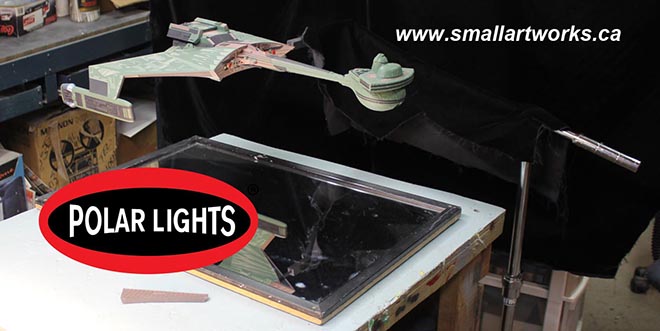
The mounting point modifications I made for this particular one can be seen here used as designed. In this case, the left grille, normally held in place with a magnet and seen here below the Polar Lights logo, is removed and the model mounted to a C-stand in front of a black velvet backdrop over a mirror to bounce light up onto the underside surface to give it a flat-lit appearance. It was shot using a 300mm lens from about 25 feet away, making the photos appear mostly orthographic so as to best show off the paint work in a blueprint-like format. The removable grille and other hatches designed into the modified kit as described previously allows the stand to be mounted into the model away from camera so as not to be in the way of any other parts of the it when photographed. This technique has become a staple for much of the photography I do for Round 2’s box art that Jamie uses to show how to decorate the kit for you, the builder. This makes finishing as clear as possible using actual photographs of the finished model in full colour instead of the usual crude grayscale diagrams that used to be done by kit makers in the past. Similar setups will be used after the model is completely finished with decals and weathering and dramatically lit for some VFX shots for the main box art photography.

Now you can see why I made all those modifications!
One more blog post to follow when the model is completely finished.
Jim did an excellent job matching the paint swatches I sent him, but everything turned out lighter in real life than I had guessed. I would never ask him to remask and repaint this ship. Luckily, we have the weathering stage to darken it up and the magic of Photoshop to get the look we want on the packaging. But did you see the light!?! Holy cow!!! -JH