Recommended Sites


Archive for the ‘Star Trek’ Category
Star Trek Models: (not a U.S.S. Excelsior, but a) Galileo Shuttle update

I was actually going to make this a lead in to a longer Star Trek models post that also included an update on the U.S.S. Excelsior since I’ve received the first set of test shots. My point in doing that was to deliver positive news along with what will be a disappointment to some of you. Instead I’m just going to rip off the band-aid lay out the situation with the Galileo Shuttle. No forward progress is being made to engineer the kit. I doubt this will come as a huge shock to anyone. I hope my directness and openness on the subject is appreciated. It pains me more than anyone to make a statement like this.
I won’t drop that bomb without giving some kind of reason. Basically it comes down to timing and the budgetary limits of a company our size that offers such a wide range of products that we do. Sci-fi model kits take up a relatively slim slice of the pie when considering our automotive and military kits, die cast cars in several scales (including the recently re-acquired Johnny Lightning brand) along with other endeavors. Priorities have to shift when opportunities arise and for now we aren’t in a place where we can commit to the kit. Sometime we can invest in something grand, and sometimes other lines get to do something else instead.
You may ask why we’ve steered away from this one while producing others instead. That’s a fair question and this is where timing kind of comes into play. Initially, there was a bit of a delay in getting completed plans of the ship. Gary Kerr is our most trusted consultant on all things Star Trek, but when we first dug into the project, his plans were very preliminary and just captured the basic shape which we used for the basis of the shuttle in our 1:350 kit. By the time he turned them in, they consisted of over a hundred pages of crystal clear information. That took some time to do and while he was hard at work drawing up the plans we did other kits. Keep in mind it is easy to think about the old AMT kit and imagine that we could just do an improved version of that, but you know our reputation of doing a new kit right when we do one. At scale, the ship measures 11” long and over 7” wide. In that old kit one wall provided the interior and exterior. That won’t work for a kit that is intended to be accurate. it requires separate interior and exterior walls, floor, ceiling, roof, etc. So once parts get laid out on a tool, it essentially becomes the equivalent of two kits! I studied ways to cut back or compromise, but ultimately they would have seemed like a shortcut or cheat. The savings in doing so were negligible. One factor that actually worked in our favor was that when combined the 1:1000 Romulan BoP and U.S.S. Reliant were more manageable financially and they gave us more marketable kits at a lower price point. They also tied directly to other kits of the same scale. If we had done the Galileo those kits may never have come to market.
Why do the Eagle and not the Galileo? That qualifies as a textbook “tough decision”. Ultimately we decided that the Eagle gave us the basis for three variations along with many potential add-ons and accessories while the Galileo could pretty much only exist as itself and therefore limited us with what could be done with the tooling. On top of that, sales on the Space:1999 license proved that the market was hungry for a new kit and that seems to indeed be the case. That isn’t to say one license won over the other. We still have a lot we can and want to do with the Star Trek license!
So why say this now? I could have said something a few months ago, but I was knee deep in other matters. Plus, I still have hope and an idea to be able to do the kit sooner than later. I just wanted to clear the air with everyone that really wanted a straight answer on it. So the straight answer is we aren’t doing it right now, and they way things look we won’t be considering it for a while. I DO want the kit to happen and like I said, I have schemes and ideas, but it is time to move on for a bit with the intention to work back around to it. So what will we do? We’ll see. I’ll show you when I have something to show. Onward…
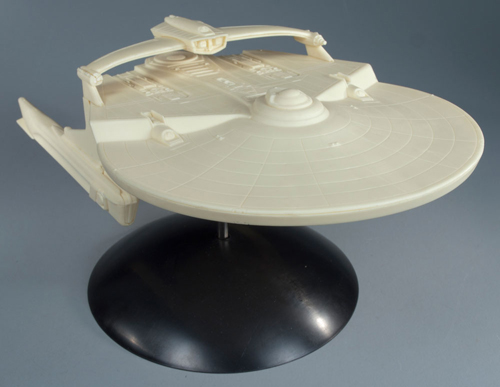
Star Trek Models: U.S.S. Excelsior new part preview
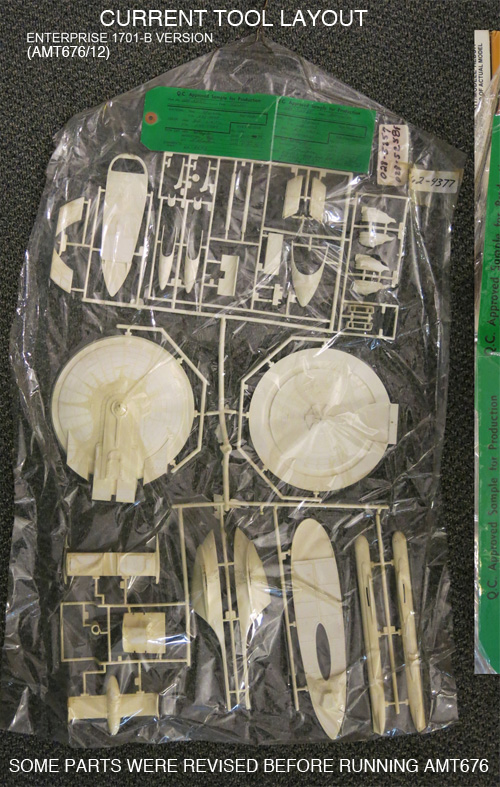
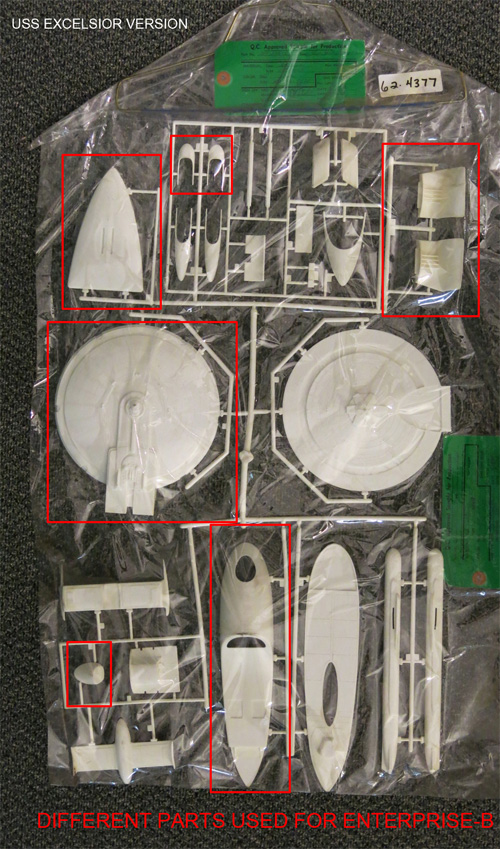
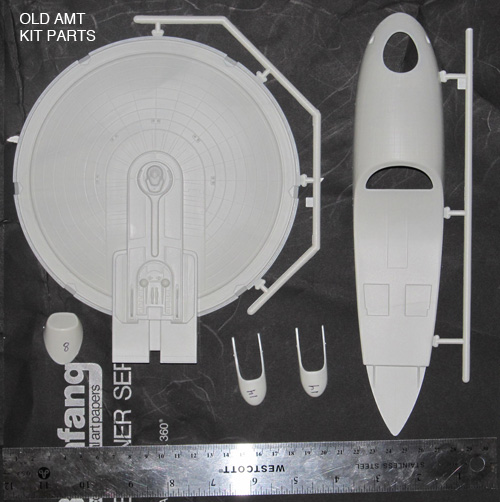
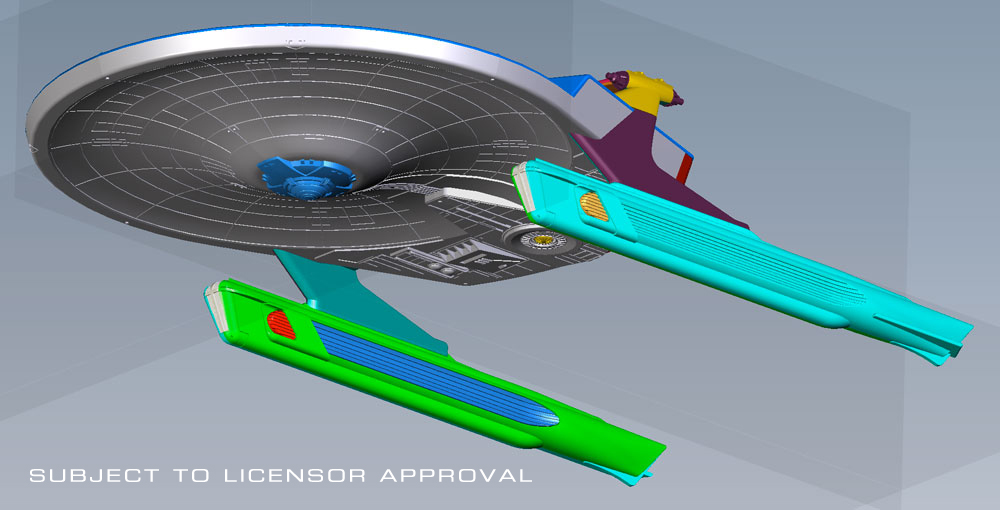
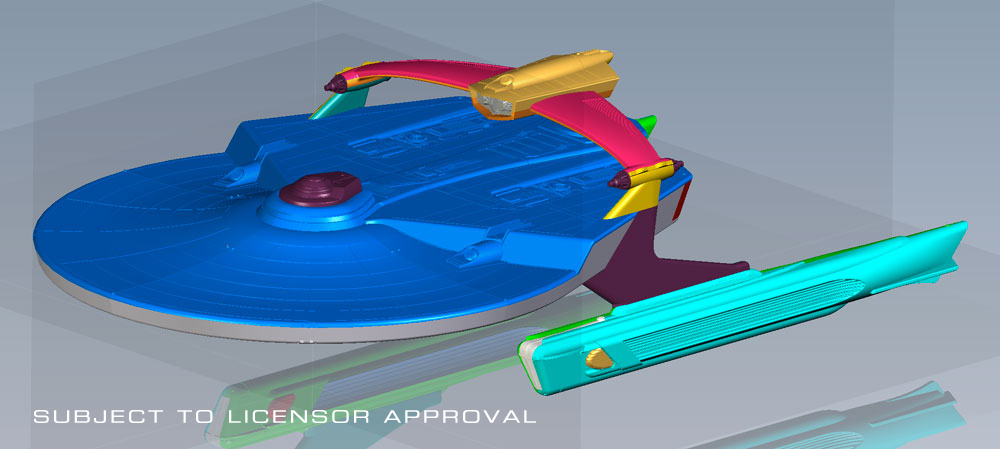
At long last, here is the promised sneak peek at the new parts that have been brewing to create our upcoming release of the U.S.S. Excelsior from Star Trek. The short history on the old AMT tooling is that the inserts that are needed to transform the U.S.S. Enterprise-B kit into the Excelsior have been lost. So we have had to recreate the missing parts. Like most of our work on new Star trek kits, the CAD work was done by Angelo Bastianelli. If you never picked up our reissue of the Enterprise-B a few years back, we made a few corrections on that one. Most significantly, we completely redid the lower saucer and curved the back wall of the neck. Some might ask if we are just recreating the parts from the old Excelsior kit. You know us by now. We approach these kits like the Six Million Dollar Man. We make them better than they were before, better stronger, faster… Okay, maybe just better, but you get the point.
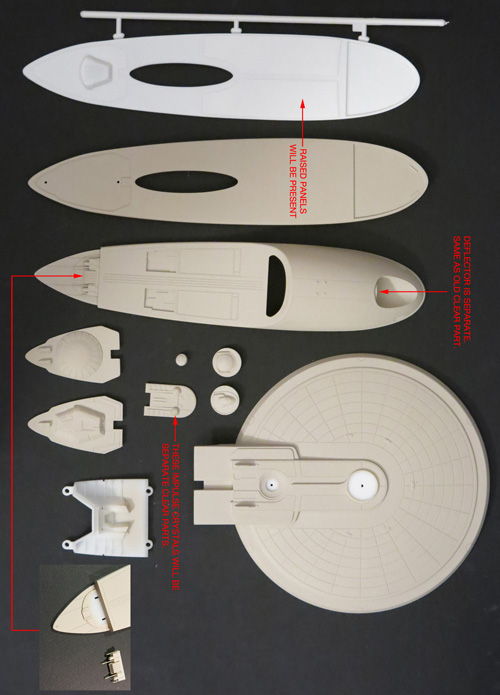
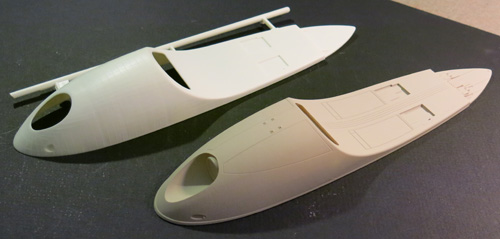
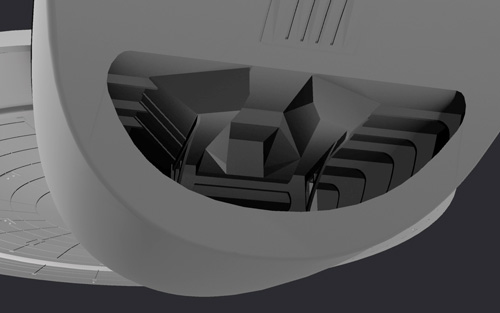
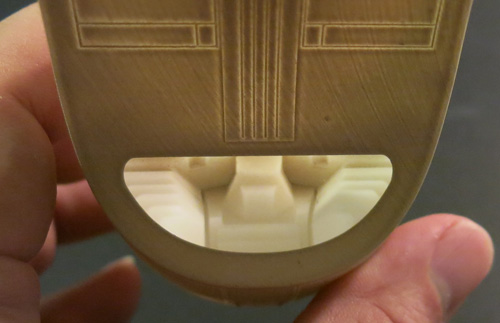
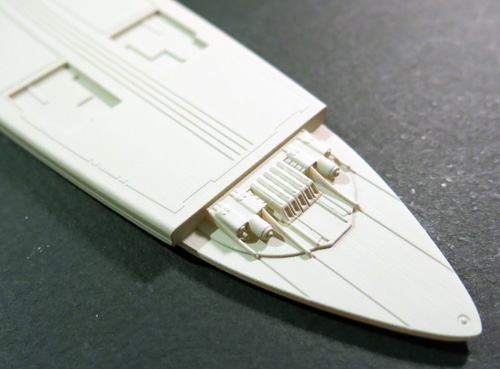
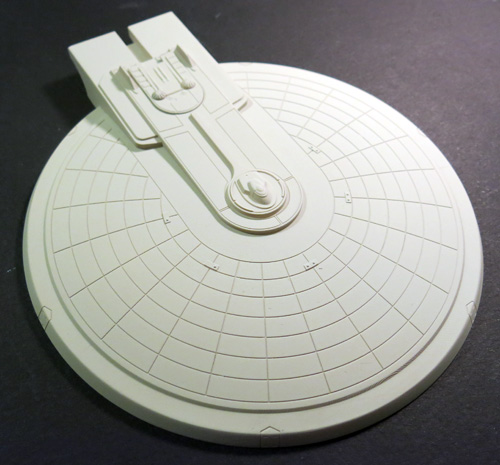
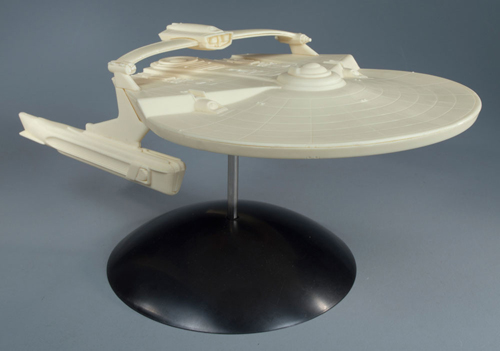
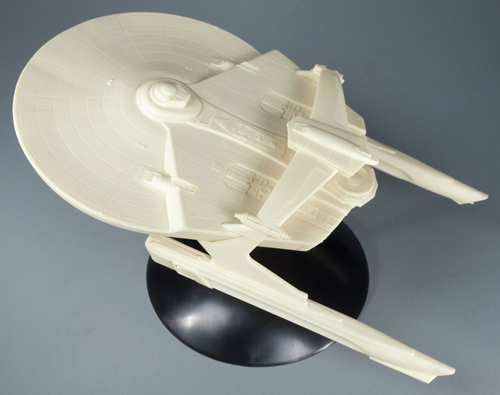
With this edition, we examined the shape of the lower hull carefully, but found that the shape of the old part was proportionally accurate. Without necessarily meaning to, the new one is relatively close to the shape of the old one. We’ve decided to implement a slide mold this time though so the deflector trench will no longer be a separate part. That also allows us to get the weapon details a little better on the sides of the hull. We are completely redoing the inner “gut” detail of the hull based on Gary Kerr’s research into the model kit parts used when the filming miniature was built. A few compromises were made to allow us to inject the part with minimal fuss, but few will pick up on the differences. The look of the “whalebone” is more accurate now with that detail being split between the inner bay part and the outer hull part.
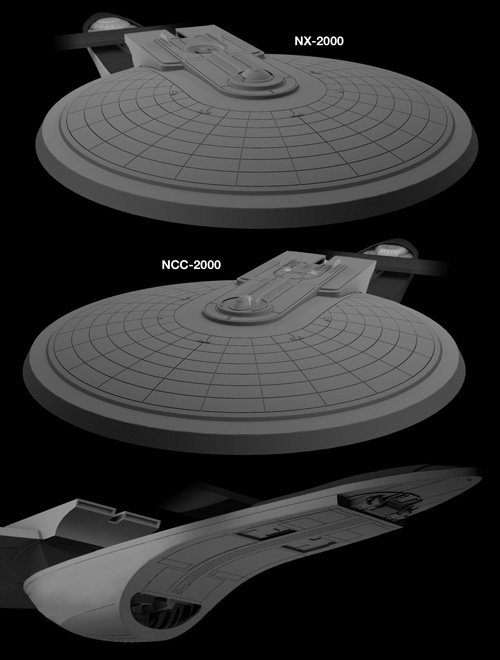
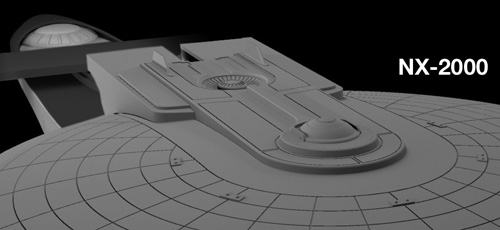
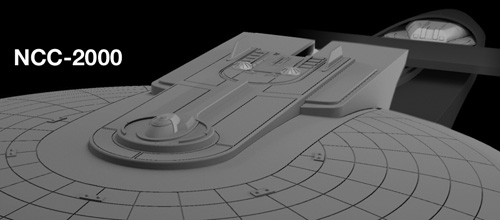
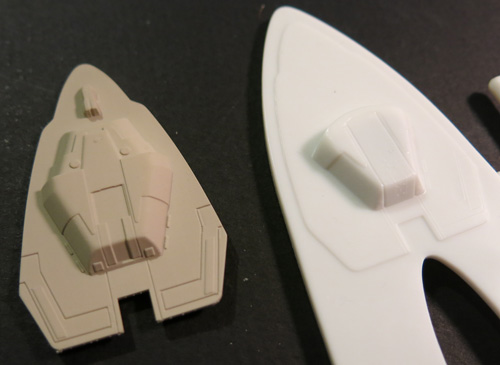
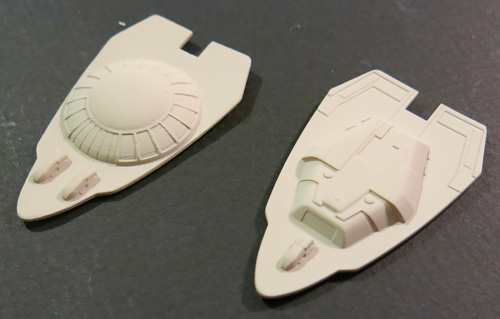
We had to recreate the top of the saucer as well and this was probably the most significant undertaking. The old part was kind of soft on details, so we made sure this one is up to snuff and a substantial upgrade will be the ability to use parts to build the ship as either the NX-2000 as shown in STAR TREK III: The Search For Spock or as the NCC-2000 as commanded by Sulu in STAR TREK VI: The Undiscovered Country. That means the bridge dome, impulse crystals and hangar bay will all come with swap-able parts. Speaking of impulse crystals, they will come as clear parts regardless of which version you choose.
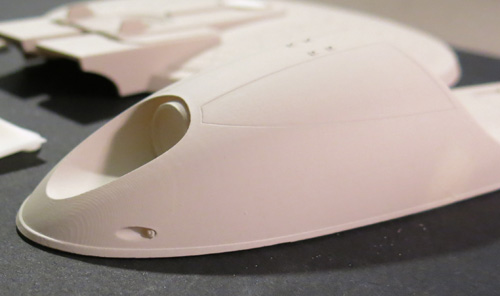
Here are a whack of photos to take a gander at. I’m sure you’ll pick up on some of the other fun details and features I haven’t mentioned. Right now, it looks like the kit will be out in May.
For those hungry for more Eagle updates. I hope to have another post about that out next week.

Polar Lights Model Kits: U.S.S. Reliant Aztec decals
Hi guys-
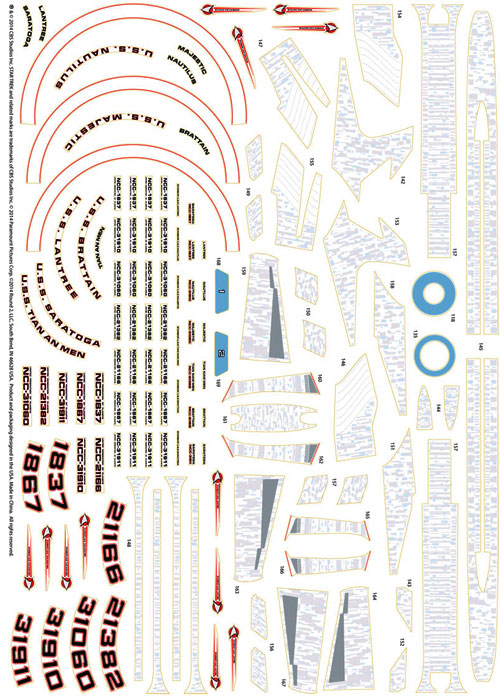
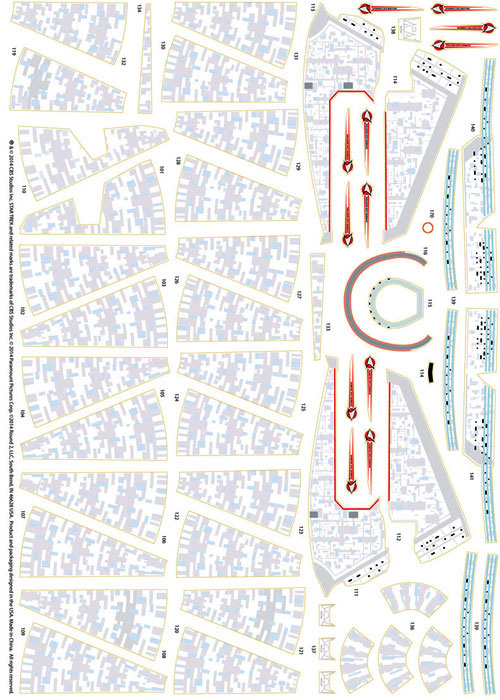
I promised this post a while back. I know we are running behind on getting the U.S.S. Reliant decals out to market, but they should be here by the end of August.
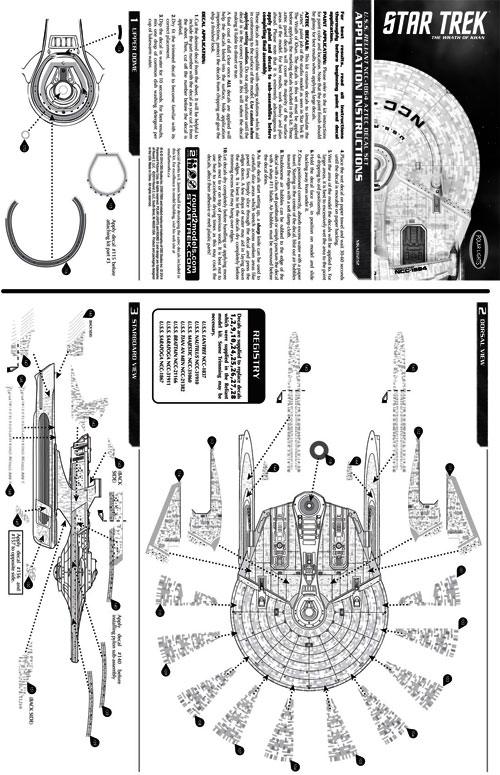
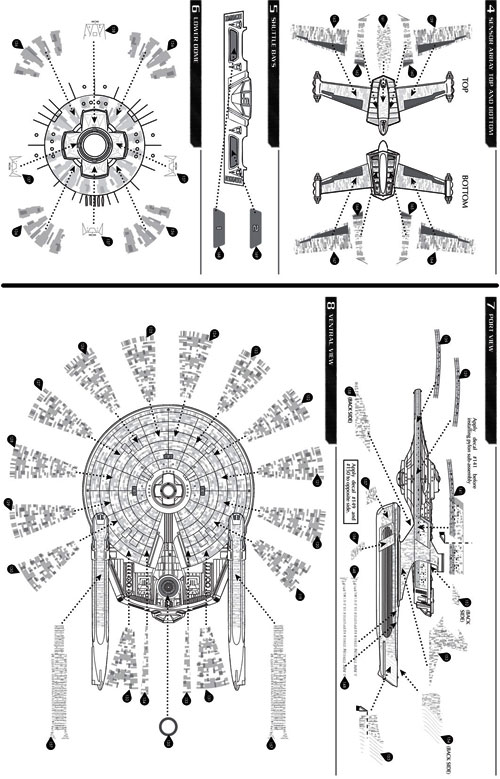
The images below show you what to expect so you can plan ahead so you can start building while waiting for the decals. as expected, it s a our usual aztec wrap and we’ve added in several alternative names and registries as well. A preview of the instructions gives you a better idea of how they are broken up and placed on the model. I’ve pumped up the contrast of everything I am previewing here so you can see it at the relatively low resolution that our blog system restricts me to.
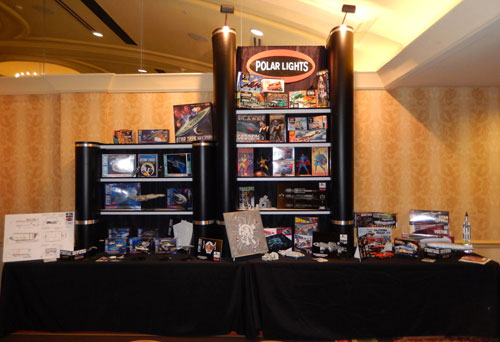
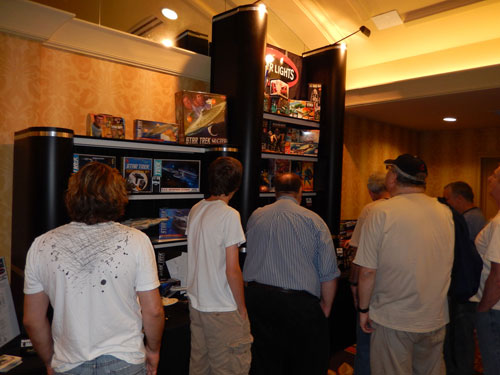
Round 2 Models: Wonderfest 2014 roundup
Another Wonderfest has come and gone once again. I have to admit that though this year’s show didn’t sneak up on me it seems like the time needed for planning for it gets pinched more and more every year. In such great haste, mistakes are bound to happen. Luckily they were small and no one got hurt. (What is it with me and Star Trek ship name spelling…?)
More than anything else show attendees want to see what we have coming next. In light of recent events (which I’ll get into later) I’ve decided it is best to wait on getting too far ahead of ourselves with product announcements. So, we focused mostly on things that are coming very soon, but we still slipped in a few things that we feel confident enough to talk about.
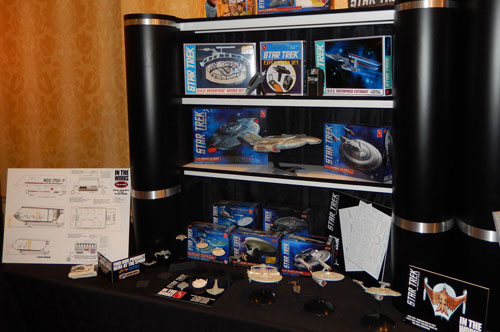
On the Star Trek front, we had…
The U.S.S. Reliant 1:1000 scale snap kit which will be out very soon. I received production samples the day I returned from the show. This means the kit is about 4-6 weeks from hitting store shelves.
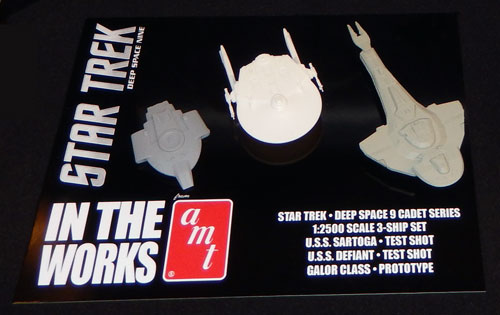
The next new kit on deck is a 3-ship Cadet Series set that focuses on Deep Space 9. It features the U.S.S. Saratoga, U.S.S. Defiant and Galor-class ships. As usual the set will include full decals for all three ships.
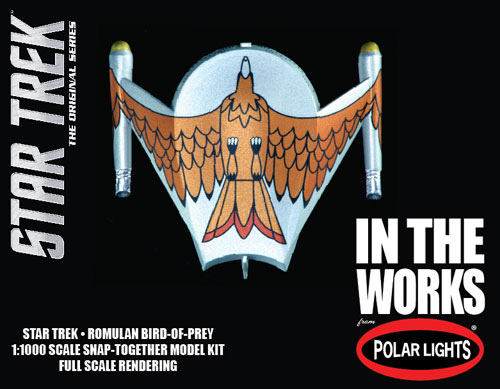
New to our 1:1000 scale ship lineup of will be the TOS Romulan Bird-of-Prey. The ship is a personal favorite of mine. We are just getting started on it, but we hope to have it out in about a year.
Also coming in 2015 will be a reissue of the U.S.S. Enterprise Cutaway. We are just now starting to examine the kit to see what changes we might make to it. I wouldn’t expect anything terribly extensive, but we’ll see if there is anything “logical” we should do to improve it from previous releases.
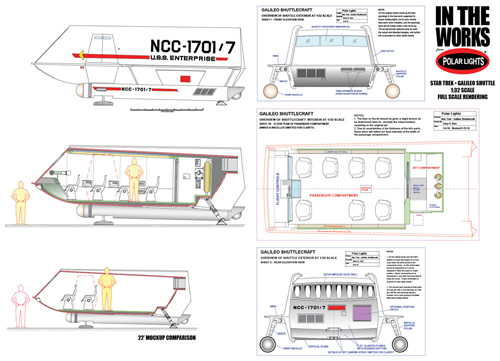
Lastly, though it may not look like much as far as our display goes, we’ve completed the overall plans for the Galileo shuttle kit. So we can now begin the mockup process.
Next, Space:1999…
We showcased our new reissue of the Moonbase Alpha kit. It features an all-new four-part vacuform base. I know dealing with the vacuform base in the past was kind of a hassle, so we’ve done what we can to make it as easy as possible to assemble and hide the seams. The new base was necessary to present the entire layout of the base including five all-new launch pads that feature optional docking extensions and new in-scale Eagle transporters. The travel tubes are included as separate pieces where the original release had them embedded as part of the base. New decal artwork rounds out the improvements. These are supplied for the launch pads as well as the computer terminals for the command center interior.
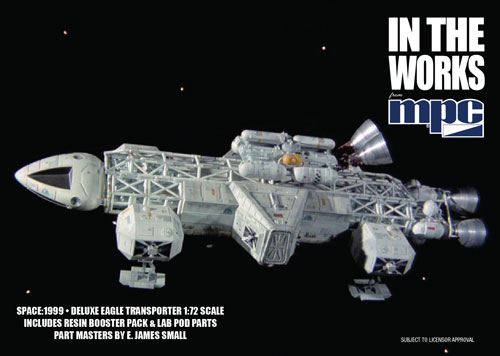
The next development for license is a Deluxe Eagle Transporter. This kit utilizes our existing Eagle kit, but now includes resin parts for the laboratory pod and booster pack.
For the Alien license…
We showed our RP of the resin XO Kane kit which was a little worse for the wear having been sent around the world and back. The #1 question we got at the show was “when will this be available?” We hope to announce a price and release date for the kit soon.
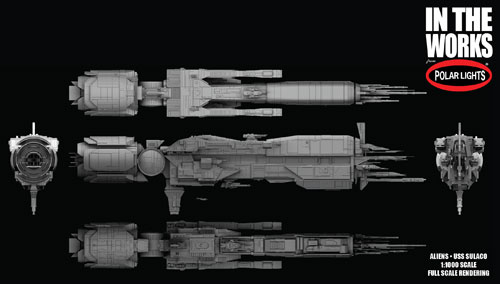
We also showed the CG work done by Angelo Bastianelli on the USS Sulaco. His work has since been approved by the licensor so we’ll be moving to the next step on the ship. I hope to get the kit to market in 9-12 months.
Best of the rest…
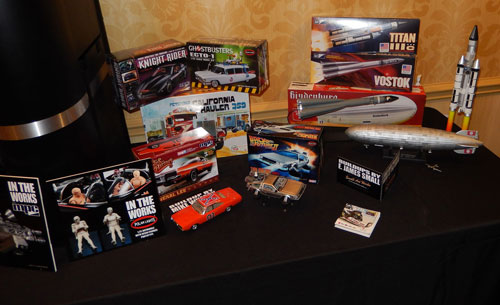
We presented our Back to the Future II Time Machine and all-new General Lee snap-together kits along with a reissue of the Hindenburg. All should be out later this summer. We gave a preview of new Lindberg reissue box art that shows our approach to using vintage art and design cues in a fresh way. Everything else on display is available now from your usual hobby retailer.
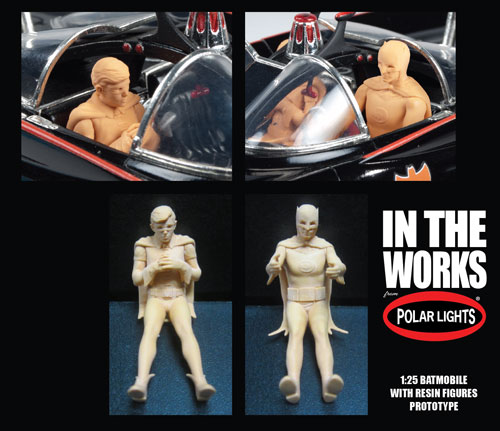
Along with the compliments on our product, we also fielded questions about a few projects that were conspicuously absent. After “When will Kane be available?”, the next most common question was “So, what happened to the Wicked Witch kit?” Please believe me when I say there isn’t purely one reason, but a pile of reasons that made us reconsider releasing the kit. The final decision was hotly debated here and was a painful one to make. Unfortunately the Witch wasn’t the only kit we have to talk about… Sadly, I had to inform those that asked that the King Kong kit which we’ve shown images will also be cancelled as will the Marvel Comics Thor kit and 1966 Batman & Robin 1:8 scale figures. None of these decisions was taken lightly and I can assure you every one was fought for to continue.
I’m loathed to end a blog post on such a down note, so back to other aspects of the show…
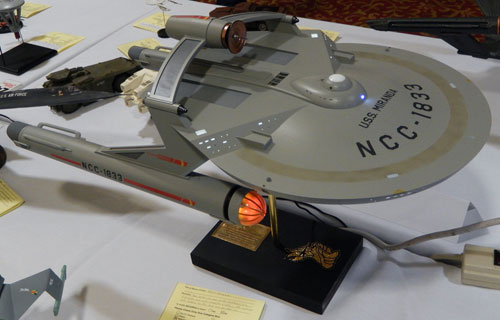
For the past three years Round 2 has presented awards for the “Best Use of a Round 2 Model Kit” in the Wonderfest model contest. This year’s competition had a record number of entries with well over 600. As usual, the level of quality in the buildups was amazing. We present our award for three categories Adult, Teen and Junior. This year’s adult winner was David Lewis who used one of our 1:350 scale TOS Enterprises to build his vision of a TOS-era Miranda-class ship. It was a beautifully built model that featured lights as well as interior details like an arboretum and dual shuttle bays. The junior division winner was Alex Tabor whose diorama presented his vision of the TOS U.S.S. Defiant making waste of a mirror universe Enterprise era ship. Unfortunately, we ran into the same problem we had in the past two years as no buildup was entered in the teen division that had used one of our kits. We’ll have to reconsider next year’s awards and probably do one award for junior/teen. Alex walked away with both junior and teen prizes which featured three 1:1000 scale Star Trek kits (child award) and a pile of kits including the Man In Space rocket set, 1:144 scale C-57D and an Enterprise-E (teen award). David walked away with a $100 coupon for autoworldstore.com. Congrats to the two of you. Also, I want to send a special shout out to Mark McGovern who we have build our own “amazing figure models” who took away the big award for Most Amazing Figure sponsored by Amazing Figure Modeler magazine. His work on the Absorbing Man was truly “amazing.”
As always, it is great to see everyone at the show. We always walk away with the clear message received that we are doing all right by everyone there. I personally have to say that it is my pleasure to be there. I always leave with a sense of renewed vigor for the tasks awaiting me when I return to the office.

Polar Lights Model Kits: 4 weeks of Christmas Part 2
Continuing weekly Polar Lights Model Kit updates for the month of December, here is a look at the U.S.S. Reliant mockup that was reviewed recently. This is a much anticipated addition to our Star Trek line of 1:1000 scale kits. This is a new source and the prototype had a few unexpected flaws (like the wavy saucer) as well as the usual amount of fix up we find that is required. A slight mishap resulted in broken Starboard phasers.
Other than that the ship isn’t in too bad of shape overall, but as anyone reading this blog will know that the devil is in the details. Most notably are the grid lines on the top of the ship, not just the saucer section, but the rear end as well. We’ll get that fixed up as well as the other 20-odd points of interest pointed we out to the factory.
Next week… Kong!
New York Comic con is just around the corner!
New York Comic con is just around the corner – October 10-13, 2013!
Round 2 will be there – stop by and see us at booth 443. You won’t want to miss our new model kits, die-cast cars, slot cars, Forever Fun, Captain Action, and even the Wicked Witch of the West will be in display.
http://www.newyorkcomiccon.com/
Star Trek Model Kits: U.S.S. Reliant preview
We had announced at Wonderfest that we’ll be releasing a 1:1000 scale kit of the U.S.S. Reliant in 2014. It is personally one of my favorite Star Trek ships. We’ve been working on it for a while now.
Angelo Bastianelli who worked on our recent Cadet Series models built the CG model. At this stage, there are still a few details for the factory to nail down, and then we’ll be able to see a prototype (hopefully soon).
Polar Lights: Shedding Light On An Old Enterprise
We have received some questions about the installation of the new lighting sets for the 1:350 scale U.S.S. Enterprise model kits so we put together a quick tutorial video that is available through our YouTube channel and our Collector Model Blog. Polar Lights brand manager, Jamie Hood, shows step-by-step how the lights should be installed into the model. This video covers some of the trickier spots that a modeler may encounter as well as some helpful hints to ease the assembly of either MKA005 Deluxe Accessory Set and MKA007 Lighting Kit. As with any of our model kits, we recommend reading all of the instructions completely before you begin any project, but this video should grant a great insight about the installation before the project is begun.
We’ve seen some excellent buildups with the lights installed. We hope this video assists those that have been holding back from lighting their builds. Enjoy!
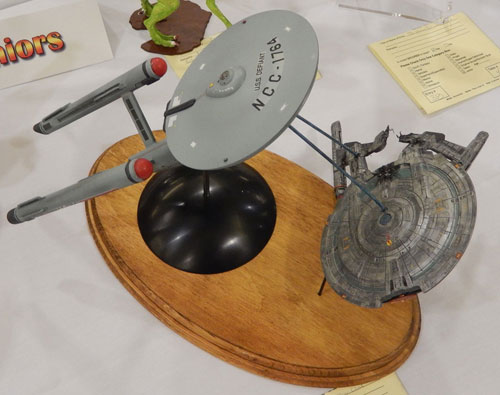
Defying The Dark
Lighting a Mini “U.S.S. Defiant”
by E. James Small
Round 2 have begun doing a few things differently lately, and the difference is clear to see.
Let’s look at the newest re-release of the Star Trek Deep Space Nine kit. The entire model is now molded in clear plastic, allowing for the adventurous modeler to light up the whole thing more easily rather than having to bother with the tedious job of drilling hundreds of holes and installing fiddly fiber optics. The same thing was also recently done with the Star Trek Enterprise D kit.
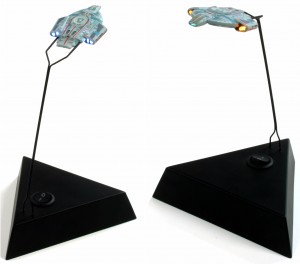
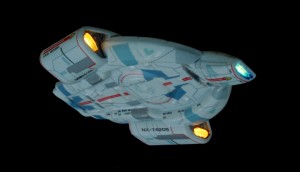
For an example of how casting the kit in clear is advantageous, let’s show you how to shed some light into something that most people might consider impossible, the newly tooled and diminutive 3 inch “Defiant” model that comes with the DS9 kit. Remember you can light up the entire station using the methods shown here too.
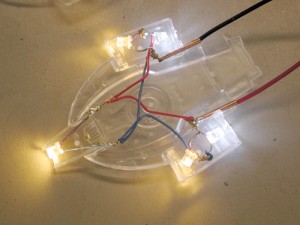
Using five 3mm LED’s, the tiny ship can be fully lit with relative ease, and it’s easy to make a stand to both support the model “in flight” and serve as a power supply.
The photos here pretty much show it all. Note that, using files, you can even sculpt and sand down LED’s to fit your needs, such as in cramped areas. Just as long as you don’t sand through to the metal bits inside the solid epoxy case, you can modify LEDs to the shape and size you need and install them in areas where they would not normally fit. Plus, because LED’s stay cool, you don’t need to worry about them damaging the model.
First, the kit is test assembled and examined to see where you can install the LED’s. The Defiant’s engine and bussard scoops are glued in place, being careful to test to make sure the top of the body can be installed correctly afterwards.
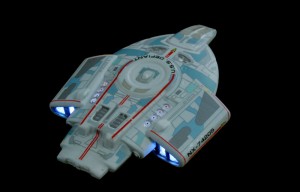
Next choose the LED’s to use for the model. I decided to use “warm white” 3mm LED’s for the bussard scoops and front sensor area, and regular (cool) white for the engines in the rear. Use whatever you think is best. Upon reflection I suppose I should have used a cool white or blue LED for the front sensor area since it is supposed to be blue, but it still worked out.
Hint: Stick with white, blue and green LED’s for most of your projects because they work rather happily on 3 volts, generated by two regular 1.5 volt dry cells connected in series. They can be tinted with transparent paints if you want different colours. The new pink and purple LED’s also work using 3 volts. But red, orange and yellow LED’s work at around 2 volts (one cell won’t light them up but two will burn them out!), necessitating the use of resistors which is more complex for the average modeler who may not be familiar with electronics. Please see my other article on lighting the K-7 space station here on the Round 2 Workbench for more details in using and soldering LED’s.
The most time consuming part is next… Practice installing each LED in place within the model, file down both the LED and the inside of the model as necessary until the LEDs fit in place and the hull fits together properly.
When you are satisfied with fit, choose some very thin insulated wire (such as telephone wire) and solder the LED’s together paying particular attention to polarity. You will need to plan it carefully and trim the LED’s leads accordingly.
Hint: Don’t solder the parts inside the model. Test fit, get the correct positions then solder the parts together, holding them with alligator clips and clamps outside the model to avoid damaging the plastic. Just keep test fitting often, and also keep testing the circuit as you go to make sure your polarity is correct and your LED’s aren’t damaged.
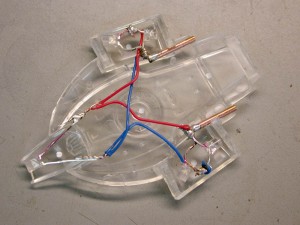
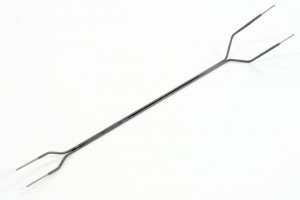
Next, you can use narrow brass or copper tube (available from K&S metals at your hobby shop) as a receptacle for the stand mount which you will make from Plastruct’s plastic coated steel wire (made in two sizes), also available at your hobby shop. Choose sizes that will allow the stripped wire to slide easily but firmly into the hollow tube. This wire will act as support for the model as well as carry electrical current to the LED’s. The plastic insulation on the wire will allow you to glue it together and prevent short circuits. The tiny tubes will allow you to remove the model from the stand any time you wish. Solder the LED’s to these tubes with one for the positive leads, the other for the negative. You will need to drill holes and cut channels into the interior of the model to accept the tubes. See Fig. 1.
When you are satisfied with your internal assembly, make sure you fully test it by plugging in some wires from your battery pack before gluing the hull together, sealing it up forever. See Fig. 2.
Now is a good time to make your stand. First, make your support by stripping and preparing the plastic coated wire, bend it into the shape shown and make sure the stripped ends fit into the model snugly but easily without strain on any parts as in Fig. 3
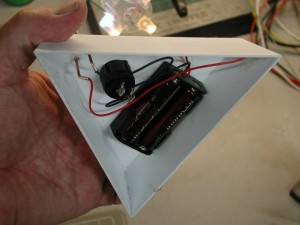
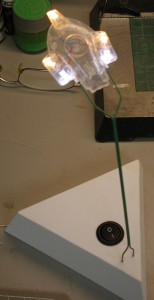
The stand shown in these pictures was scratch built from sheet plastic, but you can make one out of just about any kind of box you want. A switch is installed as well as a battery pack to hold two dry cells and two tubes, the same as the ones installed in the model, are used to plug the support wires into. See Fig.4.
Imagine what you’d have to go through to light this little fella up if it were molded in opaque material!
When you are satisfied everything can be mounted in place and the hull can be glued together, test everything (Fig. 5) then go ahead and finish the model as usual but with the following exceptions:
1: Mask off the areas you want to light up, OR be prepared to scrape paint off those areas when the model is finished. Liquid masking film is handy for this operation. Note the stand you made can be used to hold the model when spraying it as well as keep paint from getting into the inside of the tube!
2: Spray the entire model’s outer surface with white primer and when dry, follow up with dark gray primer. The white will help the light bounce around more inside the model to light up other things like windows, the gray primer will help keep the light from leaking through the hull colour, as most other paints are not entirely light-tight. Continually test the lighting while priming to make sure the model’s hull is sealed. Silver also makes for a great light blocking alternative as well, just make sure you can paint over the silver with your hull colour. Some silver paints don’t take well to being re coated with another colour.
When that is done, finish and decorate the model as desired. Install the batteries, plug in the stand, throw the switch and… (Fig 6)… ENGAGE!
Get yours now from the Autoworldstore.com
http://www.autoworldstore.com/SearchResults.asp?Search=AMT751&Submit=Search
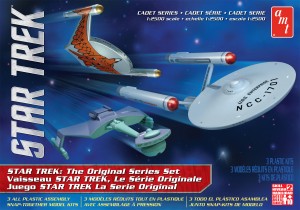
Star Trek: The Original Series Cadet Series 3-ship set
This iconic set of three 1:2500 Scale Star Trek models is a great way to pass the
snowy winter days. It includes three mini snap kits, featuring the U.S.S.
Enterprise along with the newly tooled Romulan Bird-of-Prey and Klingon D7
Battle Cruiser. Molded in silver and green the Romulan Bird-of-Prey and Klingon
D7 Battle Cruiser have never before available at this scale. These simple snap
assembly kits are great for beginners and include detailed decal sheets
featuring all three ships’ markings.