Recommended Sites


Polar Lights Models: Klingon K’t’inga buildup process Pt.5
Continuing our series of guest blogs covering our brand-new STAR TREK: The Motion Picture 1:350 Klingon K’t’inga model kit…
K’tinga Build Part F’ORE!!! Watch it!
Painting is (VERY) Messy.
James Small, www.smallartworks.ca
Okay folks, this next bit is gonna be messy, especially to the rivet counters out there. That’s OK cuz I’m doing this for the box art and I’m still confused. Why? Because understanding colour is one of the most difficult things to figure out when building a replica model. Many blogs, posts, essays and maybe even books have been written that “prove” proper colours of various models. Some are right, some are wrong. When it comes right down to it, the only thing that matters is whether you like the finished model or not when you build and paint it using your own interpretation. In the case of the K’Tinga, a lot of interpretation is required because it is quite literally (and for you grammar Nazis out there… of which I’m one… the word literally is used correctly here) impossible at this point in history to prove exactly which colours were really used on the original filming miniature of the ship as you see on screen, because other than some rather limiting photos, no absolute record of the actual colours exist. For example, when you watch the movie, the colours don’t look anything like those that were actually applied to the model. Various lighting techniques, colour values on film and blue-screen photography combined with film duplication all have massive effects on what the models really look like between stage and theatre screen.
Jamie will (at some point) follow this with a write up of the extensive research he did to try to figure out the correct colours to paint the model. The model you will eventually see on the box art and publicity pix both here and on the SAW page will be the results of his heroic research based on extensive photographic colour correction and information supplied by some of the original model makers who worked on the VFX miniature.
However, you must remember that in the case of this model, the ultimate result is what YOU the builder thinks looks right in the end. I repeat myself when I say that since it is IMPOSSIBLE to know what the original colours were, everything is open to personal interpretation and preference.
OK? Got it? Then here we go. The photos may seem somewhat incoherent, but then, it’s messy, and the nature of the way I work doesn’t necessarily lend itself to structured photos. I’m afraid you’re just gonna have to deal with that.
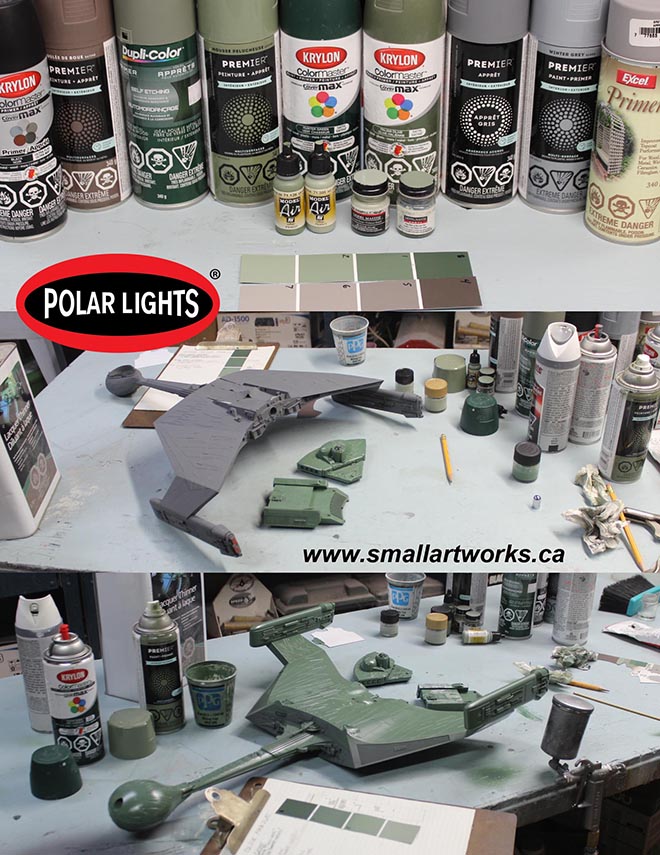
I began by spraying the model (after strategic masking) with Krylon grey primer. This primer is dense enough to provide adequate light blocking but multiple applications were necessary in some areas. Nooks and crannies are more problematic to fill in. Then I mixed up some colours using the cans I have available. I am usually limited to what local hardware stores sell as the nearest hobby shops are a few hours’ drive away and I’ll be damned if I spend $45 on gas to buy a $10 per tiny jar of hobby paint that doesn’t necessarily match anyway. One of the things one must accomplish with model making when you live in rural areas is to play with the cards you’re dealt, you know? Spray cans cost a fortune up here but they are still the lowest cost alternative. I’m showing you in the picture some of the colours that I am using, but that’s not written in stone either. Jamie will provide information on more universally understood colour selections.
Here’s a hint: Mask all areas you want light to shine through (obviously) and then spray the model overall with the grey primer. Then when done, hook up the lights and turn them on (in total darkness) to find light leaks. Then, put primer into your airbrush and spray it into the light leaking areas when you have the model’s lights on and can see the light leaks in the dark. In other words, you will be painting in pitch black. That’s the best way to find and seal up light leaks.
After the light leaks were sealed, I mixed up some paint and sprayed the overall hull colour the darkest of the three greens that Jamie figured out which is the overall colour of the ship. Was this a mistake or the right way to do it? Well, just like you, I’ll find that out in the next installment of….
“Painting, The Klingon Way”
Yeah, sorry. I’m sure there were a lot better ending lines to finish this post but I just didn’t have the time to think of something clever. I’m tired. I need to sleep now. The paint needs to dry anyway.
Great to read this.
After looking at all the colors, I decided to experiment on some leftover plastic. I came up with a nice paint job that uses krylon camo dark green and a over coat of krylon quick silver. The green shows but has a metallic sheen. You have to play with it a bit, but it works. I did the same with all the different como colors I think I will use. The colors show up as panels, but still have a nice flat looking sheen. I’m still playing around but so far that’s what I going with.