Recommended Sites


Archive for the ‘1701 CLUB’ Category
New York Comic con is just around the corner!
New York Comic con is just around the corner – October 10-13, 2013!
Round 2 will be there – stop by and see us at booth 443. You won’t want to miss our new model kits, die-cast cars, slot cars, Forever Fun, Captain Action, and even the Wicked Witch of the West will be in display.
http://www.newyorkcomiccon.com/
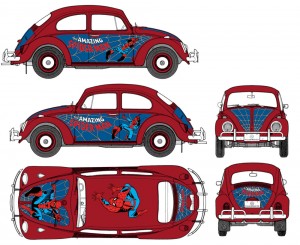
Spider-Man VW Beetle
Two all time classics join forces as Polar Lights presents Marvel Comics’ Spider-Man VW Beetle. This intricately detailed 1:24 scale snap-together kit features Spider-Man stickers to appeal to young modelers and several optional parts for the VW modeling enthusiast. Part options include steering wheels, bucket seats, bumpers, mirrors, exhaust systems, wheels and more. The hood and trunk open to show the spare tire and complete engine assembly.
The 4-H model…or starting it…
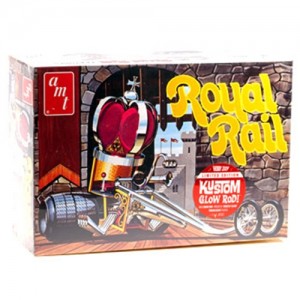
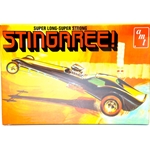
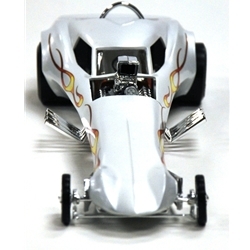
My son has selected the AMT Stingagree (http://www.autoworldstore.com/AMT_Stingaree_1_25_Scale_Model_Kit_p/amt38664.htm) which he will kitbash with pieces from the AMT Royal Rail (http://www.autoworldstore.com/AMT_Royal_Rail_ihobby_Exclusive_1_25_Scale_Model_K_p/amt630ihobby.htm). The Stingaree is described as a wild showrod-meets-dragster, which will be a perfect fit to kitbash with some of the wilder elements of the Royal Rail. But more on that later.
This year we are taking what we have learned over the last few years and combining the use of glue, paints, and decals to create a finished model – incorporating parts of another model.
In addition to the materials that are referenced above we have also purchased or at least gathered (and by we I mean I have purchased for my sweet 11 year old) the following items:
- Assorted paints (mostly greens – because he likes green)
- Plastic cement – several kinds including one especially for windows
- Tweezers and small nailclippers (these are great for trimming sharp bits from the sprue)
- Assorted elastic bands
- Modeling knife (this is my exacto knife – and used with my supervision)
- Small shears
- Masking tape – we do very little masking because the painting we do is pretty basic
- Paper towel
Some people would also include modeling putty and sand paper but we are also a little more basic. Now the rules say he could do any vehicle, spaceship, airplane, etc… but since this was the first year he has done a combination kit like this, I suggested something a little more basic. Our first few attempts were basic designs, snap together kits, then last year marked a new project where he had to both paint and glue.
The paint did not stick to the model, bubbled – badly. So when I started at Round 2 I set out to figure out just what had happened to avoid having it happen again.
1) So now that we have selected the model. This is not the kit he wanted, but we had to select one that was more advanced than some of his choices, and a little less exotic than others.
2) While we did not research these cars, we did visit the Auto World store to look for a model that we would like to do, that fit the requirements. We looked at the number of pieces, materials required to complete this project and the ability to modify this particular piece. Without the ability to see the step-by-step instructions – I think he made a good choice.
3) Next he had to look at the configuration. Configuration may include tires, accessories, the doors and windows open or closed, or even embellishments and exhaust pipes. In the case of the Stingaree, and the Royal Rail both offered many customization options.
Polar Lights: Shedding Light On An Old Enterprise
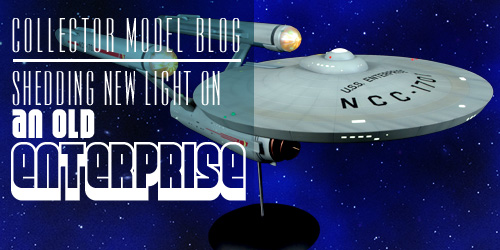
We have received some questions about the installation of the new lighting sets for the 1:350 scale U.S.S. Enterprise model kits so we put together a quick tutorial video that is available through our YouTube channel and our Collector Model Blog. Polar Lights brand manager, Jamie Hood, shows step-by-step how the lights should be installed into the model. This video covers some of the trickier spots that a modeler may encounter as well as some helpful hints to ease the assembly of either MKA005 Deluxe Accessory Set and MKA007 Lighting Kit. As with any of our model kits, we recommend reading all of the instructions completely before you begin any project, but this video should grant a great insight about the installation before the project is begun.
We’ve seen some excellent buildups with the lights installed. We hope this video assists those that have been holding back from lighting their builds. Enjoy!
GLUING A SNAP KIT IS A SNAP! …Part 1
You can turn a snap-fit kit into a competition quality model if you know a few tricks.
By Mark McGovern
I’ve been a competitive model builder for years and, I’m sorry to say, I tended to look down on snap-fit models. My assumption was that the parts would fit poorly because they were made to snap together. Then I was asked to assemble Round 2’s reissues of the MPC snap-fit models of the Incredible Hulk and the Amazing Spider-man, doing the best assembly and paint jobs I could on them. I found out that, with a little adjustment of my building techniques, I could produce models that were every bit as nice as more complex glue kits. Here’s what I learned.
Every Journey Begins With a First Step
It’s a good idea to begin any modeling project by checking the instruction sheet to make sure that all the kit parts are there in the box. The suggested assembly sequence shown will familiarize you with how the parts are supposed to go together. With that knowledge you can decide whether to follow the instructions exactly or deviate from them if you’re going to alter the model to suit your own taste.
Then the parts can use a good bath in soap and water. This will remove the mold release agents, your finger oils, and any other substances that could interfere with paint or cement adhering to the plastic. The parts can be dried with rags or paper towels and then you’re ready to start building.
To be continued…
Defying The Dark
Lighting a Mini “U.S.S. Defiant”
by E. James Small
Round 2 have begun doing a few things differently lately, and the difference is clear to see.
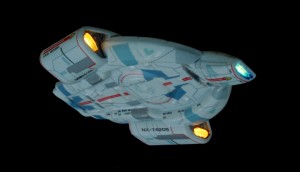
Let’s look at the newest re-release of the Star Trek Deep Space Nine kit. The entire model is now molded in clear plastic, allowing for the adventurous modeler to light up the whole thing more easily rather than having to bother with the tedious job of drilling hundreds of holes and installing fiddly fiber optics. The same thing was also recently done with the Star Trek Enterprise D kit.
For an example of how casting the kit in clear is advantageous, let’s show you how to shed some light into something that most people might consider impossible, the newly tooled and diminutive 3 inch “Defiant” model that comes with the DS9 kit. Remember you can light up the entire station using the methods shown here too.
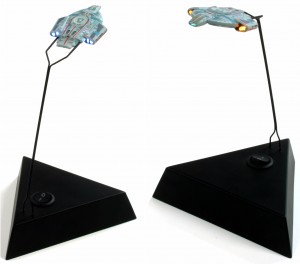
Using five 3mm LED’s, the tiny ship can be fully lit with relative ease, and it’s easy to make a stand to both support the model “in flight” and serve as a power supply.
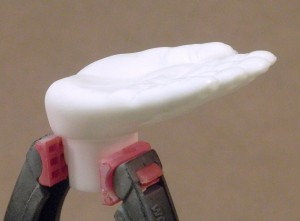
The photos here pretty much show it all. Note that, using files, you can even sculpt and sand down LED’s to fit your needs, such as in cramped areas. Just as long as you don’t sand through to the metal bits inside the solid epoxy case, you can modify LEDs to the shape and size you need and install them in areas where they would not normally fit. Plus, because LED’s stay cool, you don’t need to worry about them damaging the model.
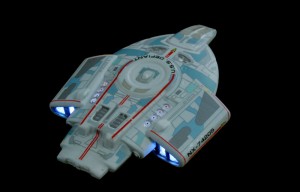
First, the kit is test assembled and examined to see where you can install the LED’s. The Defiant’s engine and bussard scoops are glued in place, being careful to test to make sure the top of the body can be installed correctly afterwards.
Next choose the LED’s to use for the model. I decided to use “warm white” 3mm LED’s for the bussard scoops and front sensor area, and regular (cool) white for the engines in the rear. Use whatever you think is best. Upon reflection I suppose I should have used a cool white or blue LED for the front sensor area since it is supposed to be blue, but it still worked out.
Hint: Stick with white, blue and green LED’s for most of your projects because they work rather happily on 3 volts, generated by two regular 1.5 volt dry cells connected in series. They can be tinted with transparent paints if you want different colours. The new pink and purple LED’s also work using 3 volts. But red, orange and yellow LED’s work at around 2 volts (one cell won’t light them up but two will burn them out!), necessitating the use of resistors which is more complex for the average modeler who may not be familiar with electronics. Please see my other article on lighting the K-7 space station here on the Round 2 Workbench for more details in using and soldering LED’s.
The most time consuming part is next… Practice installing each LED in place within the model, file down both the LED and the inside of the model as necessary until the LEDs fit in place and the hull fits together properly.
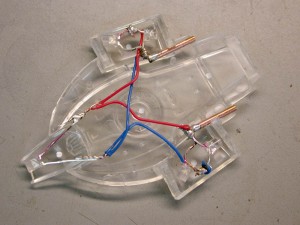
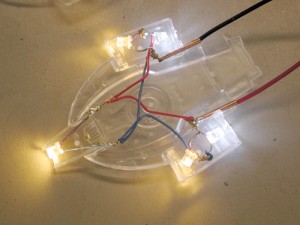
When you are satisfied with fit, choose some very thin insulated wire (such as telephone wire) and solder the LED’s together paying particular attention to polarity. You will need to plan it carefully and trim the LED’s leads accordingly.
Hint: Don’t solder the parts inside the model. Test fit, get the correct positions then solder the parts together, holding them with alligator clips and clamps outside the model to avoid damaging the plastic. Just keep test fitting often, and also keep testing the circuit as you go to make sure your polarity is correct and your LED’s aren’t damaged.
Next, you can use narrow brass or copper tube (available from K&S metals at your hobby shop) as a receptacle for the stand mount which you will make from Plastruct’s plastic coated steel wire (made in two sizes), also available at your hobby shop. Choose sizes that will allow the stripped wire to slide easily but firmly into the hollow tube. This wire will act as support for the model as well as carry electrical current to the LED’s. The plastic insulation on the wire will allow you to glue it together and prevent short circuits. The tiny tubes will allow you to remove the model from the stand any time you wish. Solder the LED’s to these tubes with one for the positive leads, the other for the negative. You will need to drill holes and cut channels into the interior of the model to accept the tubes. See Fig. 1.
When you are satisfied with your internal assembly, make sure you fully test it by plugging in some wires from your battery pack before gluing the hull together, sealing it up forever. See Fig. 2.
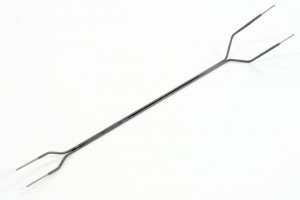
Now is a good time to make your stand. First, make your support by stripping and preparing the plastic coated wire, bend it into the shape shown and make sure the stripped ends fit into the model snugly but easily without strain on any parts as in Fig. 3
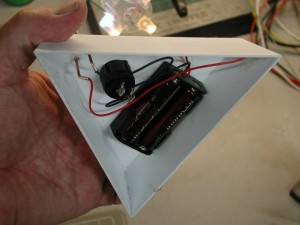
The stand shown in these pictures was scratch built from sheet plastic, but you can make one out of just about any kind of box you want. A switch is installed as well as a battery pack to hold two dry cells and two tubes, the same as the ones installed in the model, are used to plug the support wires into. See Fig.4.
Imagine what you’d have to go through to light this little fella up if it were molded in opaque material!
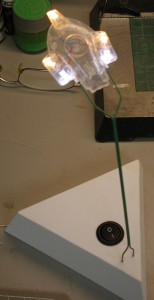
When you are satisfied everything can be mounted in place and the hull can be glued together, test everything (Fig. 5) then go ahead and finish the model as usual but with the following exceptions:
1: Mask off the areas you want to light up, OR be prepared to scrape paint off those areas when the model is finished. Liquid masking film is handy for this operation. Note the stand you made can be used to hold the model when spraying it as well as keep paint from getting into the inside of the tube!
2: Spray the entire model’s outer surface with white primer and when dry, follow up with dark gray primer. The white will help the light bounce around more inside the model to light up other things like windows, the gray primer will help keep the light from leaking through the hull colour, as most other paints are not entirely light-tight. Continually test the lighting while priming to make sure the model’s hull is sealed. Silver also makes for a great light blocking alternative as well, just make sure you can paint over the silver with your hull colour. Some silver paints don’t take well to being re coated with another colour.
When that is done, finish and decorate the model as desired. Install the batteries, plug in the stand, throw the switch and… (Fig 6)… ENGAGE!
Get yours now from the Autoworldstore.com
http://www.autoworldstore.com/SearchResults.asp?Search=AMT751&Submit=Search
Star Trek model kits- Galileo Shuttle

Hi all. I know all of you 1701 Club members are anxiously waiting to find out what is going on. Update #8 is finished and should be sent out soon. Many have been asking when we will ask for payment information and you may be assuming the worst that delivery has been delayed… and unfortunately it has a little bit. Fear not though. All development is complete and the kit is currently in production. Details will be in the update.
This blog post might not fill the void left from the above statement, but still we must carry on.
Hopefully you have had a chance to review our Wonderfest video that went live as of my last post. If you stayed tuned in until the end, you found out that the winner of our poll was the 1:32 scale Galileo shuttle! It seems that the Galileo benefited from a grassroots movement that made it the clear winner. I was surprised, but not shocked by the result.
All of the candidates were strong contenders. Some have made the point that with so many great subjects to choose form, some kind of cannibalized the votes of others. If, say, either the Reliant or K’tinga had been left off the ballot that the remaining 1:1000 scale craft would have drawn the votes of the other and therefor put it over the top. I purposely tried to stay out of the nomination process. As long as the winning kit would fit what we had in mind for the size and budget, I knew whatever won would do well. But, I didn’t want to limit the choices in any way. Why? Because I wanted the modeling public to get a taste of the decisions we have to make when it comes to our product line. Our range of choices are also nearly unlimited. Whether it is another Star Trek kit or any other license there are tons of great subjects deserving of being made into a great kit. Figuring out where to start is the trick.
You might wonder if any of the other contenders could get made someday. I threw out several ideas at the presentation covering several types of kits from many properties. In the perfect world of my mind, they would all get made some day. The disappointing truth is that I doubt that 100% of them will get done, but they are all on a list of kits I pull out each year to determine what we will do next. I’ll need to weigh our tooling budget and licensing responsibilities against popular demand.
When it comes to creating brand new kits, we need to hit a home run every time. With reissues, if something doesn’t sell well, we are only out the time it took to create the packaging, etc. But if a newly tooled kit fails, the chances of getting another one made lessens. We have heard the demand for NEW kits and we are putting a plan into action to create new tooling. It will be up to you guys to vote with your wallets to tell us you want more.
Getting back to the Galileo, Gary has already begun digging into the project. As you know getting the interior set to fit within the craft as seen on the show is impossible so our work is cut out for us. We have already started discussions on what kind of details we hope to include in the kit. We will do our best to get the kit finished and on store shelves by the end of 2013. I’ll keep you updated as we progress.
Next week… Wolverine…
Round 2 Models: 1701CLUB T-shirts
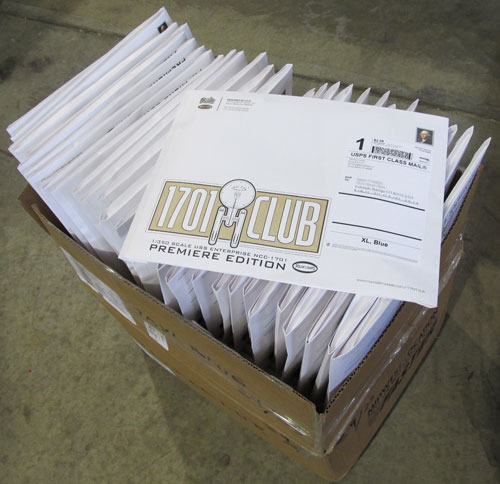
The delay has been inexcusable, (sorry, it was out of my hands) but the 1701CLUB T-shirts started shipping out this week. Something was discovered as they were being packed up though. It turns out that we received 500 blue shirts from the printer instead of 250. I’m not sure why, but it is obviously too late to go back now. So congratulations to members 101-600 on getting the blue shirt. The last of the blue shirts will go out today and bundles of red shirts will be shipped out daily until we get caught up with the most recent members.
We’ve still got slots open for anyone who hasn’t signed up yet. We haven’t reached our goal of 1701 members yet but the number of people who have indicated they want duplicate kits is getting within striking distance of a sell out. We will continue to take memberships until we have 1701 members though.
I am planning on sending out the next club update in early September. We’ve got some exciting news to report.
Star Trek Model Kits: The Great Debate
We made a promise not to discuss the development of our 1:350 TOS Enterprise Star Trek model kit outside of our 1701CLUB updates. This blog post won’t talk about it directly but it does address a significant concern among modelers that seems to have turned into a great debate. This post won’t be about what we will do or what we won’t do, but explains the kinds of things that we have to keep in mind when making decisions about our new kits.
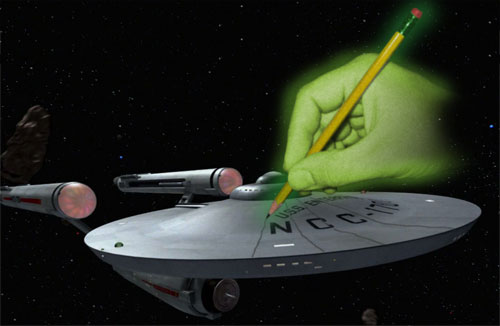
Two words seem to strike fear into the hearts of model builders everywhere… GRID LINES. So, let’s ask the question. Why in the universe would we consider adding such a detail to a hyper-accurate model kit? I don’t have to remind modelers that until we came along, no AMT Enterprise model was ever built without a modeler having to slave over meticulously sanding the stupid things off the saucer… Wait, none of them were ever built without doing that…? Well maybe as kids we never removed them. There was no way to accomplish that at that age and get it to look right. With time, our skills improved and we found ways of improving things as best we could and every build any of us ever did came out looking great… Didn’t it? Well, maybe there were some cases where incredible effort was put forth but some builds weren’t quite as nice as the next. Is that all on the modeler? Or is the manufacturer responsible to some extent? How many kits were made back in the day with saggy nacelles? If it wasn’t one thing, it was another.
So here’s the quandary, do we appeal to a core demographic of the really amazing modelers out there and leave something like the top of a saucer smooth or should we consider adding VERY fine engraved lines that would really help out everyone else to make their build look as accurate as they can manage? What if we could do lines so fine that when viewed from an arms length look like they’re drawn on…
Let’s break it down further…
REASONS AGAINST:
1) it is not accurate to the filming model. The lines were drawn on with a pencil, not engraved.
2) Talented modelers are capable of drawing the lines on themselves.
3) … well… See reasons 1 & 2, I guess.
4) SEE REASONS 1 & 2! (Expletives mercifully deleted)
REASONS FOR:
1) The model kit should represent the TOS U.S.S. Enterprise… as in the one with Captain Kirk standing on the bridge and Scotty in the back screaming that he needs more time. The ship has a deflector grid on the saucer that falls between metal plating resulting in narrow valleys on the surface of the hull. (Or did Apollo’s green hand draw them on with a giant space pencil?). The filming model had some other wonky stuff that we wouldn’t want to copy exactly either. So, we aren’t completely beholden to the filming model, our mission is to create a representation of Matt Jeffries’ design in support of what was shown onscreen.
2) If handled correctly, the engraved lines would look just like penciled on lines.
3) Drawing concentric circles on a 14” curved saucer is not an easy task for anyone. More often than not, most modelers will struggle with it.
4) Star Trek has a wide appeal beyond the modeling market. Tons of Star Trek fans would be interested in building such a kit even if they aren’t modelers or even artists. If engineered well and thought through, the kit should allow them to be able to build an accurate representation of the ship for themselves.
5) If we don’t keep in mind that any kit could be someone’s first kit, we as model kit manufacturers wouldn’t be doing our due diligence.
6) Most modelers who really work over the details of a build to achieve their vision of perfection have the skill to eliminate the lines without much trouble. Or at least they would not have nearly as much trouble removing them, as another modeler would have with drawing them on.
All this is considered without a firm decision in mind at this point. We’ll see how it goes. 1701CLUB members will be the first to find out the answer.
Polar Lights Model Kits: This and That.

Our first 1701CLUB update has been sent out. If you signed up for the club but did not receive it, just drop us an email through the contact page of our website. Please be sure to check your spam filters. In a few cases, we have had members’ correct email information in our system but they did not receive the update. We will still be able to show the first update to them using an alternate method but we will not be able to do that every time going forward.
If you haven’t seen it yet, we finally got our Wonderfest presentation set up on our Round2ForYou YouTube Channel. Be sure to check it out! Thanks to Modelman Tom for putting all the polish on the clips.
Thanks for all of the feedback to my last post. It will really help us decide what to do next in our Star Trek Cadet Series line. Feel free to keep responding to that thread with more comments or suggestions.
I was going through my bookmarks the other day, doing some house cleaning and organizing and came across the Polarpaedia page. Someone had pointed it out to me way back at our first appearance at Wonderfest. It was a site I thought would be a good reference about the history of the Polar Lights Model Kits brand. I knew there was a lot going on the PL message boards back in the day and had heard some of what went on back then from some of the folks that carried over from PM to R2. As I looked at the site again, I took note of traditions that had been begun but had fizzled through the years. I know bringing back the glory days is impossible but I’m wondering what little things can we bring back that were worthwhile back then? What are we missing? What can we bring back? The one particular thing that I took notice of was the Golden Frankie awards given out each year at Wonderfest to celebrate one individual’s impact on the hobby. Though we don’t currently have the license to pop a Frankenstein, maybe we could do something similar. I’m open to any thoughts or ideas.