
- 1/25 scale, skill 2, paint & cement required
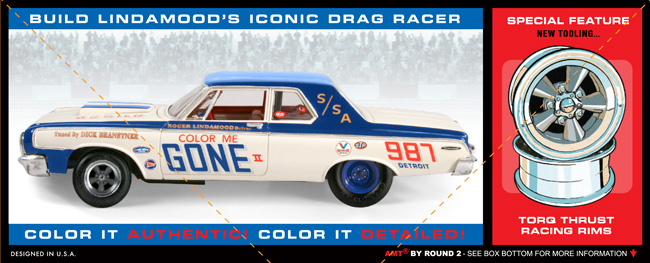
- Iconic drag racer
- Authentic detail inside and out
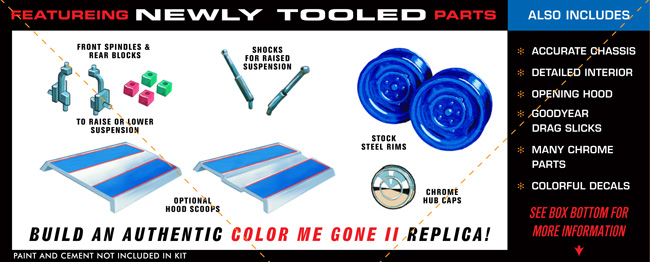
- Opening hood
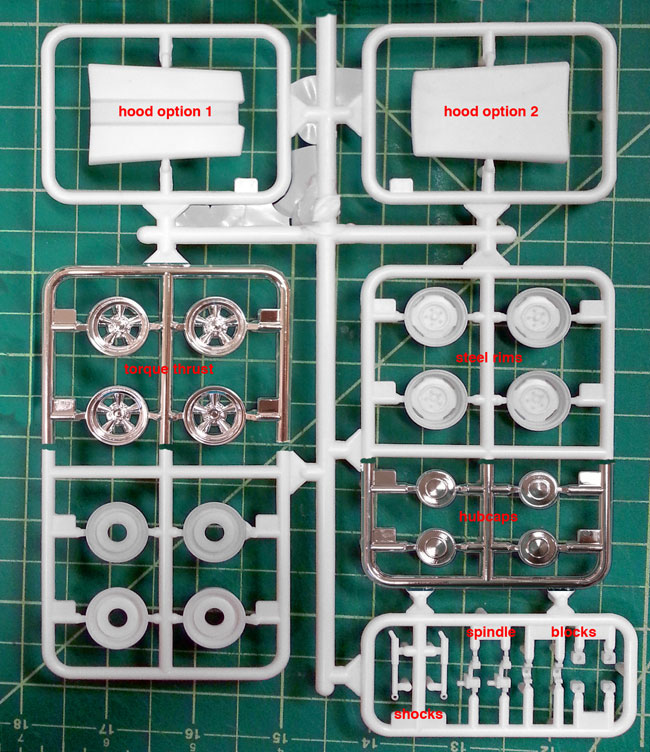
- White, chrome and clear parts
- Goodyear drag slick rubber tires
- Full-color Cartograf decals
- SPECIAL FEATURE: Newly tooled Torq Thrust racing rims, stock steel rims, hubcaps, and multiple hood scoop options!
Recommended Sites


Posts Tagged ‘Round 2’
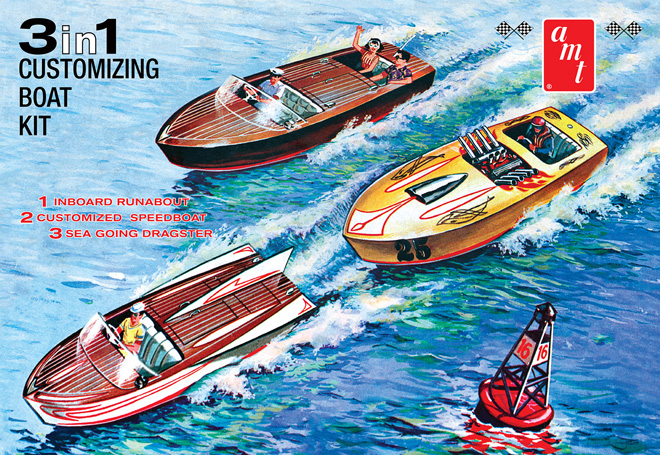
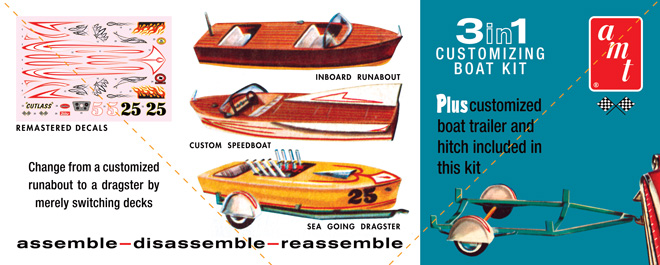
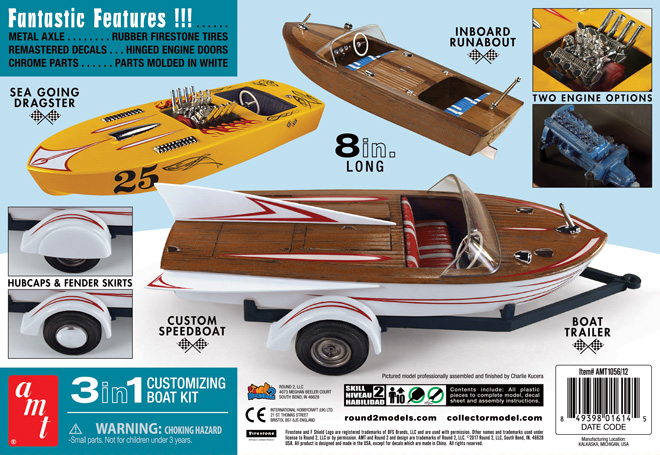
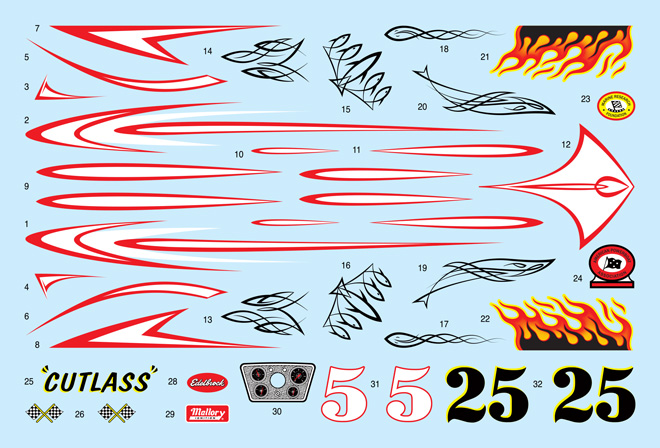
AMT Model kits: 3in1 Customizing Boat!
Friday, July 28, 2017
Summer vacation is not over yet! Cool yourself off with this hot item!
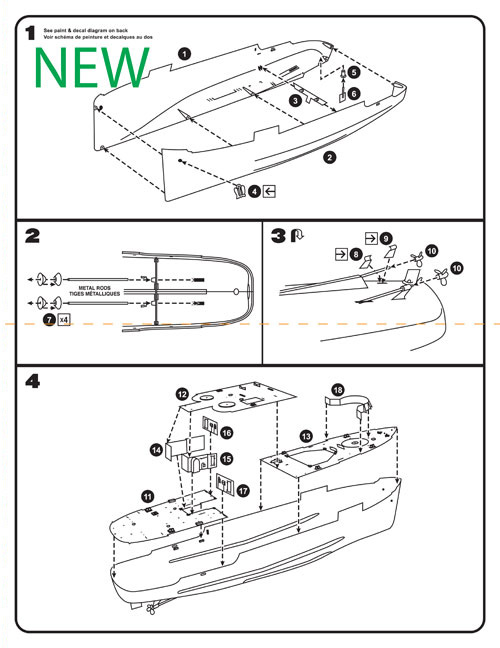
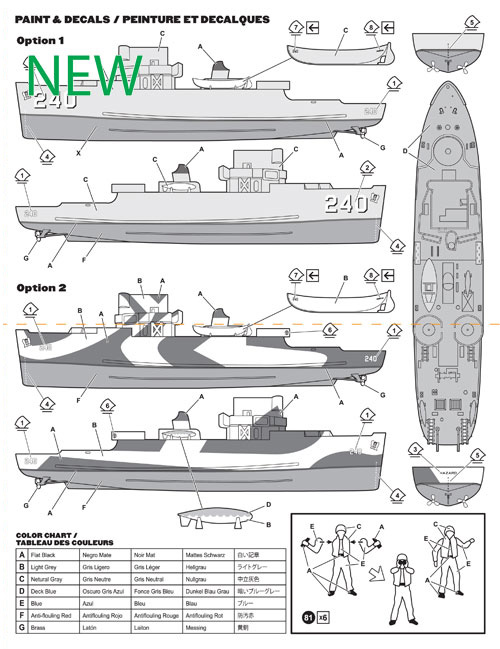
AMT is bringing back the 3in1! Customizing Boat. This summer have endless fun by building this kit 3 different ways – an Inboard Runabout, a Sea Going Dragster or a Custom Speedboat. Features include two detailed motor options, parts injected in white, chrome parts, hinged engine doors and custom fins. The included trailer features metal axles, rubber tires, hubcaps and optional fender skirts. The decals are remastered for better fit and realism, and include new decals to match the vintage box art that were unavailable in previous releases. The packaging includes vibrant, vintage graphics and a full color tray displaying photos of the 3 completed versions.
So keep a lookout this summer for the AMT 1/25 3in1 Customizing Boat.

add comment
read comments ( 0 )
AMT Model kits: 1964 Dodge 330 Color Me Gone!
Thursday, January 5, 2017
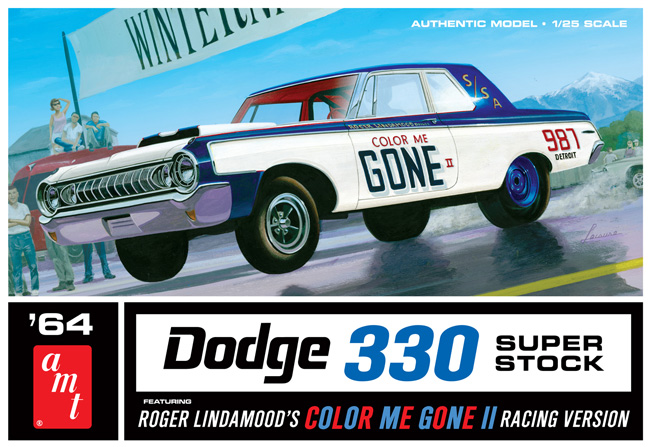
Racing down the track this month from AMT is the 1/25 scale 1964 Dodge 330 Color Me Gone. A historic car in drag racing lore, the 1964 Dodge 330 Color Me GONE was built and driven by Chrysler transmission lab tech Roger Lindamood. Implanted with a 426 big block, the car could hit a 12 second quarter mile. AMT puts this kit on the starting line. It features white, clear and chrome parts with rubber tires. An illustrated instruction sheet assists assembly and a full color decal sheet rounds out the product.
Get yours before it’s GONE!
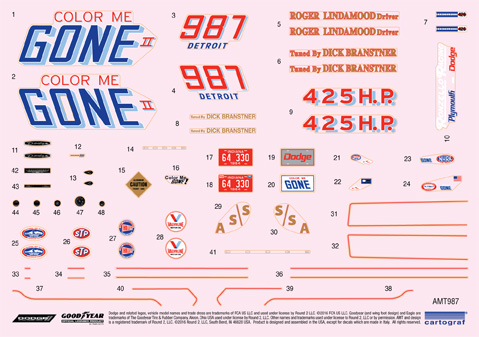
***We’ve gotten reports that the boxes say “300” rather than “330”. We are aware of that and we will make a correction on future production runs.
Save
add comment
read comments ( 0 )
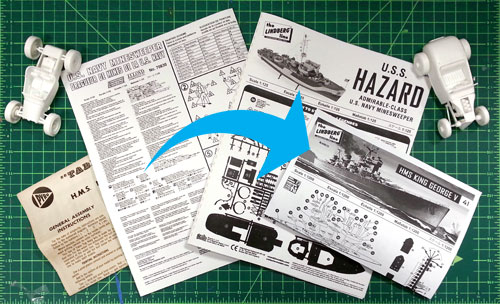
Lindberg Model kits: New Instruction Sheets
Friday, May 13, 2016
One of the great features in the new Lindberg and Hawk releases are the improved instruction sheets. We want modellers to have fun with our kits and the instructions are a large part of that experience.
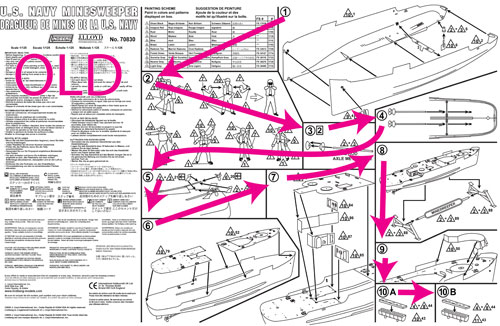
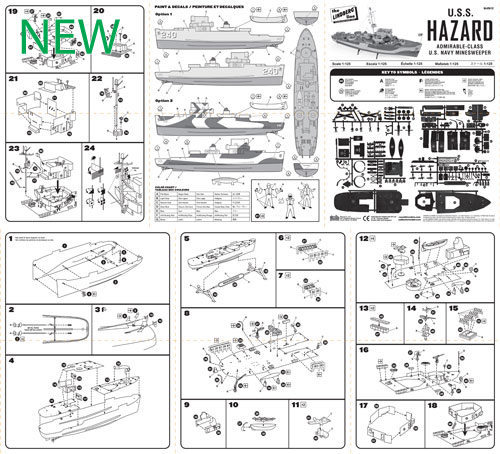
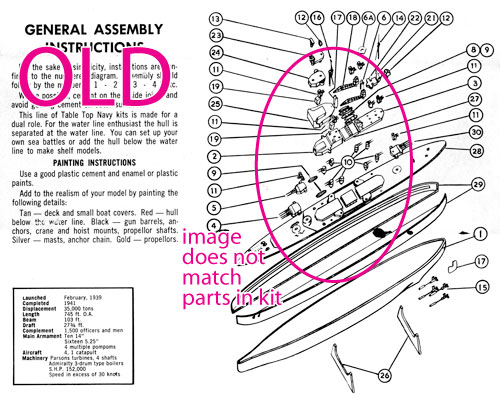
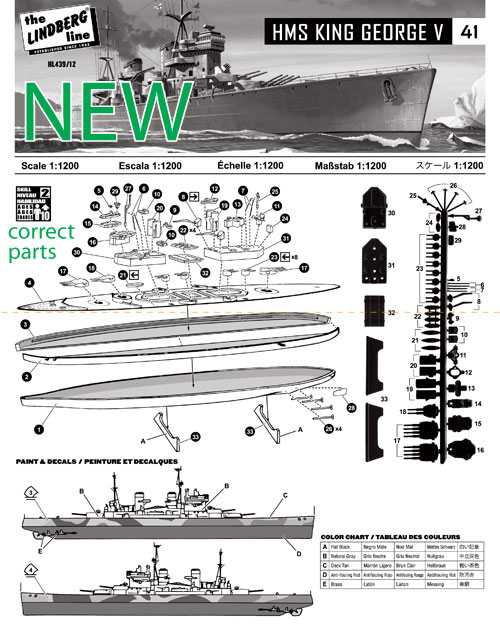
Many of the previous iterations included excessive amounts of text, steps that jumped around the page, and sometimes in sequences that made little sense. See the old and new version of the HL429 USS Hazard Navy Minesweeper. Or in some cases, such as the HL439 Tabletop Navy 2-Pack: HMS King George V & HMS Dorsetshire, the vintage instructions contain errors that have been overlooked for year. The parts in the kit were different than what was pictured in the original instructions. I have found several instances where tools were modified but the instruction sheet stayed the same.
In our new releases you will see instructions with clean line art, steps ordered in a more clear and thoughtful manner, an extended layout allowing for more detailed paint and decal diagrams, and an overall better look. Let us know what you think of the improvements.
add comment
read comments ( 0 )
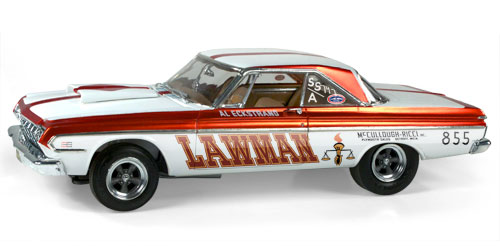
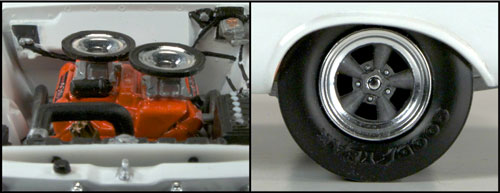
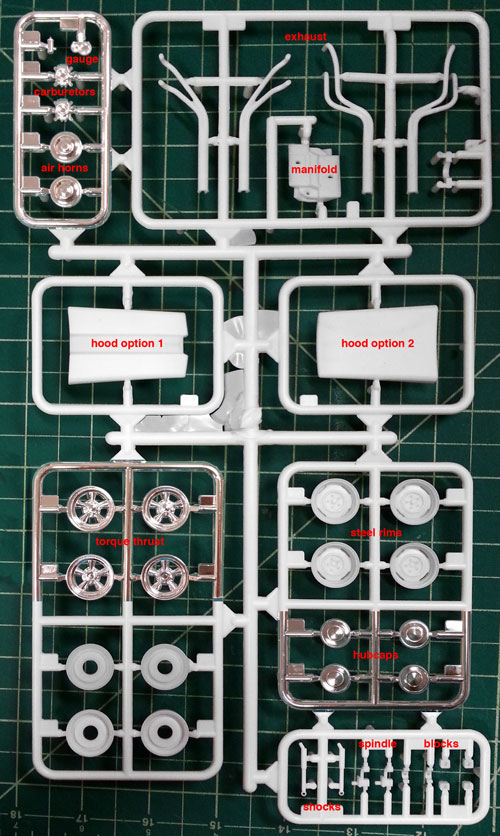
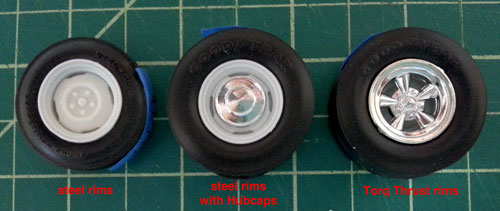
AMT Model kits: 1964 Belvedere Lawman NEW PARTS!
Thursday, April 14, 2016
The long-rumored and anxiously awaited 1964 Belvedere 426 Super Stock Lawman will soon be here! With the release comes a few parts from new tooling. The shining features of the new tooling are the 2 all new sets of rims: a stock steel rim with an optional chrome hubcap and a Torq Thrust rim. New front spindles, rear blocks, and shocks will be included that enable the suspension to be raised or lowered, to achieve the proper wheel stance of the drag racer. The new parts will also include: racing headers, dual chrome air horns, intake manifold, chrome tachometer with oil gauge, and 2 different hood scoop options.
Accompany the new parts, the Lawman will have highly accurate decal sheet, updated instructions, chrome parts and vinyl drag slicks. The packaging will feature a full color tray and a new painting from Brad Leisure.
add comment
read comments ( 0 )
Lindberg Model kits: New Attitude, New Logo!
Thursday, March 31, 2016
![]()
Since acquiring Lindberg, one of our main goals at Round 2 has been to do right by the rich history of the brand and the people that grew up building Lindberg kits. We are celebrating that history by bringing back many of the vintage illustrations and feel of the old packaging while giving Lindberg a new look, improved tooling, new instruction sheets, and more versatile, historically accurate decals. We want to revitalize the brand and put out products that we can be proud of and putting right what once went wrong! With this new attitude comes a new logo.
In 2013 we brought back the vintage yellow rectangle logo that everyone knows and remembers. We wanted the new logo to be reminiscent of that logo but have a fresh feel, representing a tribute to Lindberg’s past while moving into the future.
And a trip down memory lane…..
![]()
add comment
read comments ( 0 )
Polar Lights Model Kits- Robby the Robot Returns
Thursday, April 18, 2013
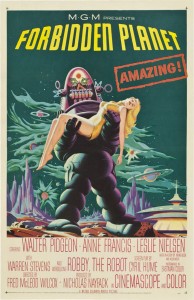
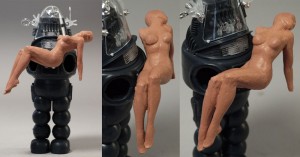
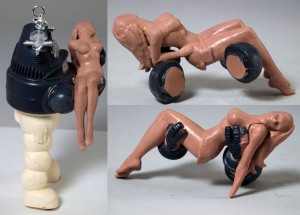
We announced our intention at Wonderfest last year to do give our Robby the Robot model kit a fresh spin to give a 3D representation of the iconic Forbidden Planet movie poster. So this June Robby the Robot returns as the Robby the Robot Movie Poster Edition. It seemed simple enough to take our existing Robby kit, add on a few new parts and boom; we would be off to the races. As usual, there really is no such thing as an “easy” task.
We knew we would need work with the parts we already have, so we knew we couldn’t work digitally in this case. We started out by hiring Tim Bruckner to tackle the sculpting duties. Tim has sculpted many licensed collectible statues and action figures. The difficulty before him was to use hard parts that we wanted to avoid retooling like Robby’s head and body and sculpt the needed Altaira figure along with new arms, legs and base for Robby. On top of that, he needed to stay as close as possible to the main reference, the movie poster, and translate a 2D painting into 3D that keeps all of the human body parts in proper proportion and get it to seat correctly on Robby. Our licensing agreement does not include likeness rights so we knew we needed to make sure the face stuck closely to the poster, and looked nothing like the actress. The Robby you see on the poster also strays a bit from the look of the real character. Ultimately we found that we needed to find that elusive sweet spot between the poster and what the “real” thing should look like in 3D. So with the parameters of our mission set before us, Tim began sculpting.
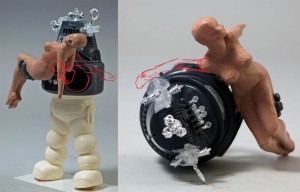
The first hurdle that was encountered was the fact that the movie poster shows no trace of Altaira’s right arm. It really isn’t something you notice when you look at it, because the mass of Robby’s body lends enough cover to make us assume that it must be there somewhere. Robby’s shoulder dome restricts the notion that the arm could drop straight down like the left one does. That left two possibilities. A) Her arm was tucked in between Altaira’s and Robby’s bodies, but her right hand could not land in her lap which would have been the natural position for it. B) Her arm had somehow landed up resting back over Robby’s shoulder. (Think it through, if Robby was lifting her unconscious body, how could her shoulder have ended up there?) We decided to proceed with notion A and see where that would lead us.
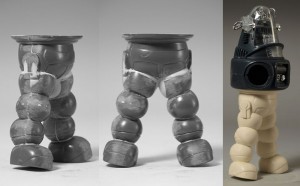
While we were figuring that out, creating Robby’s new wide stance was a simpler proposition. Old kit parts were utilized to create a mockup of the new part. They were cast up into solid resin soon enough.
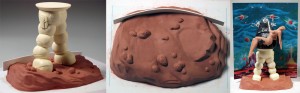
With the legs in hand, the base was begun. We wanted the new base to represent the rocky alien ground that he was standing on in the poster. We also wanted to finish off the full poster effect by including a cardboard backdrop that supplies the background. So a channel was implemented to situate the backdrop. We left it to the factory to supply some gravel/soil texture to the piece after tooling was cut.
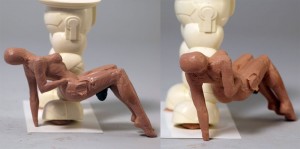
Getting back to the figure, another problem that arose during the process is that in the illustration, Altaira isn’t really resting on Robby’s arm. The right side of her torso is raised so that we can see it, but she is clearly being held up by Robby’s hand on her left side. This left a gaping hole in the model. We played with the idea that her right arm had been caught up under her and that was what was holding her up.
add comment
read comments ( 0 )
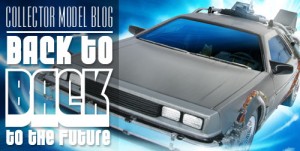
Polar Lights Model Kits: Back to Back to the Future
Wednesday, April 3, 2013
Polar Light recently decided it was time to get back to Back to the Future and bring back the 1:25 scale Time Machine this summer. We recently inspected a copy of the previous release examine the faux “stainless steel” finish was already present on the model’s body. After discussing with the factory about the possibility of repeating this finish on the new release, we were offered a slew of options to explore. (Be sure to click on the pics for close-up views)
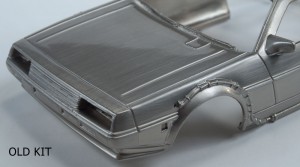
The original kit had what would looks to be a standard chromed body that had been sanded with steel wool before it had been gloss coated. While the look was a valiant and notable effort, it looked very toy-like. The sanded lines were too big and noticeable to be considered true to the scale and the gloss coat was excessive.
Our factory offered a few alternatives from various sources that used a couple different techniques for applying the chrome and sanding.
Example A looked the best. I had a nice fine and evenly distributed sanded finish, but the color was a bit dark more like pewter than silver. A couple of the highest details also had a bit of a bronze color showing through. This was the base color of the plastic. I assume this example had been used on another faux-pewter looking product as the crevasses looked darker as if it was antiqued.

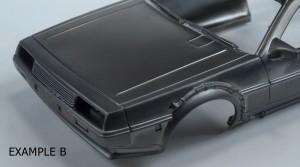
Example B looked similar to A, but it lacked the sanded lines. The finish was easy to mar and discolor with fingerprints. A significant amount of rubbing removed them, but the finish maintained a blotchy look overall.
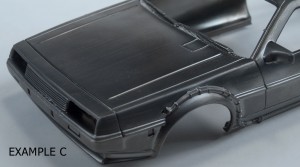
Example C looked like B, but had sanded lines added back in. They weren’t as evenly applied or as apparent as A. Some areas were missed and some were a bit heavy-handed.
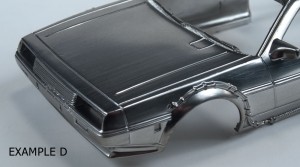
Example D looked like a departure form the first three. It looked like it went back to the chrome/silver look of the old one. In this case, the gloss level wasn’t as high, but the sand lines looked like they had been applied with coarser grit. There weren’t as many lines, but the ones that were there were too prominent.
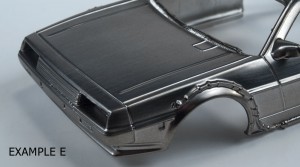
Example E also looked similar to the old kit, but didn’t have as high of a gloss level finish. The example came with a note saying “process warps body. Advise not to use.” And the body was warped (wider than it should have been) so we won’t be using this one.
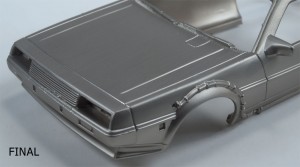
This left us with a quandary. All told the quality and finish of example A was by far the best looking, but it was too dark. So we asked if it could be lightened to look more like silver. The result looked perfect… well, as perfect as we could expect for a 1:25 scale kit. The color is pretty spot on and the sanded lines are nice and even and aren’t too deep. It doesn’t use a heavy clear coat so all of the details show up nicely too.
We think this change is a significant improvement over the last release. Keep an eye out for the kit coming in June.
add comment
read comments ( 0 )
GLUING A SNAP KIT IS A SNAP! …Part 3
Tuesday, March 26, 2013
Continued…
Puny Human Pin Hulk?
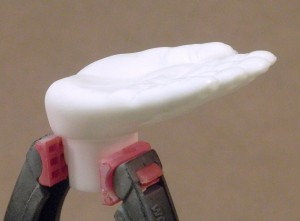
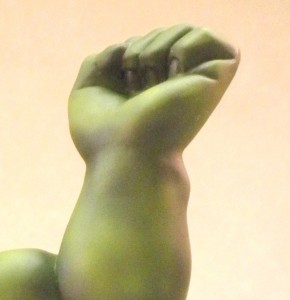
Whether you use the base that comes with the Hulk or you’re planning to use something different, I suggest you plan on pinning the big guy. Pinning isn’t difficult and will make your model more stable on its feet. It starts by filling the hollow foot assemblies with a solid material that will hold the mounting pins. I used epoxy putty that I pushed into the foot halves before I assembled them. The assembled feet could be filled with plaster of Paris just as well, but make sure all the water in the plaster has time to evaporate before you close up your model.
It hadn’t occurred to me to include pinning in this article when I was building my Hulk, so I will illustrate the procedure for pinning with another MPC snap-fit kit, the Vampire Glo-Head, Fig. 5. Round 2 has taken pains to make the model more stable than it was when originally issued, but I wanted to make sure it wouldn’t fall over at model contests. After the hand halves were joined, I filled the hollow interior with epoxy putty and sanded the bottom smooth.
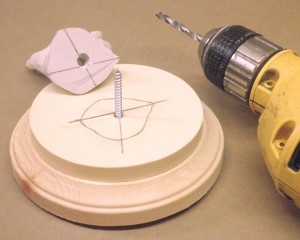
Then I needed to locate the hole in the resin and wood bases on which I would mount the model. This hole also had to line up with the epoxy plug in the base of the hand so it would sit in the proper position on the resin base. While I held the hand in position, I penciled four alignment marks around it, extending the marks onto the resin base. Then I connected the marks with the aid of a straightedge, locating the centers of the holes, Fig. 6. They were drilled into the hand and base; for this model, I used a big screw for the pin, Fig. 7. A section of sprue or a dowel would work also. I used this technique to pin Spider-man to his base as well.
If you’re reading this article in the first place, I presume you probably weren’t going to leave your Hulk unpainted. His upper body and feet assemblies were designed to be trapped by the trouser halves. It’s easy to paint the trouser parts and Hulk assemblies separately and then join them together.
The fit of the Hulk’s upper body to the top of his trousers isn’t the greatest, and the seams along the trouser halves are prominent. However, they appear where seams on real trousers do, so they don’t have to be eliminated for a realistic appearance. The pieces of the test shot I assembled had to be glued and clamped carefully to prevent them from coming apart. The gap between the Hulk’s torso and his trousers can be filled fairly easily (I brushed several layers of white glue in there) and the paint on the trousers touched up.
A Model of a Different Color
Everything I’ve had to say about gluing the snap-fit Incredible Hulk applies to the Amazing Spider-man – and all other snap-fit models, for that matter. Spidey was designed so the red and blue parts of his costume could be snapped together unpainted. The design itself is ingenious, but it makes life harder for the modeler who wants to assemble the model with glue.
I tried and failed to remove the mounting tabs from the hands and feet assemblies, thinking I could paint them separately from the body and attach them after painting. It would have been much easier to simply assemble Spider-man entirely (which I eventually did) and then paint him. This required a lot of masking, but the results were well worth the effort.
The hardest part was to get the red and blue sections to fit smoothly. I sort of cherry picked the areas where one section would have prominence over the other. And the usual seams reared their ugly heads under a coat of primer, Fig.8. I had to be careful not to fill the incised web pattern when filling gaps. Where I did fill the webbing, I tried to resculpt it with hobby knives and even a fine routing bit in a rotary tool – that proved unnecessary as we’ll see.
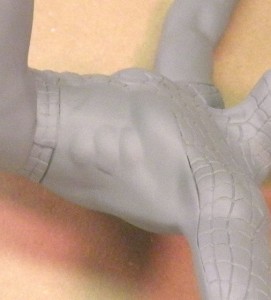
Painting the web pattern may seem daunting, but I found a few ways to make it easier. Over a good base of white primer, I painted the red areas of Spidey’s costume with an airbrush, using Testors Model Master Guard Red. This is a very bright red and dries to a gloss finish. To paint the webbing, I mixed a bit of liquid detergent with some Hunt’s black ink in a small cup. The soap broke the surface tension of the water-based ink so it wouldn’t puddle on the gloss red paint. Using a fine, pointed sable brush made it fairly easy to apply the ink into the incised webbing.
I found it best to plan ahead when applying the ink so that I could avoid grabbing a wet spot while holding the model. I began painting the back of Spidey’s boots – these were areas where I could practice painting the webbing without my mistakes being too noticeable (rubbing alcohol cleaned stray ink marks off the gloss red paint). I tended to hold the figure around the waist, so the next areas I painted were the arms, then the head, and finally the torso.
The ink dried rapidly; to prevent my finger oils from marring it or the red paint, I wore rubber gloves while I worked. I saw that the intensely black ink looked the same in the molded webbing as it did on any parts of it I had inscribed. Even flat surfaces where the webbing got filled looked okay; on its own the ink reinstated the detail very well.
Time to Celebrate!
– Because I’m done with this article and a couple of fine models. I was very impressed with the final appearance of these snap-fit kits. Their engineering made me take some different approaches to those I’d have made with glue kits, but the results were otherwise the same. I hope you enjoy building your models as much as I did mine.
add comment
read comments ( 0 )
GLUING A SNAP KIT IS A SNAP! …Part 2
Tuesday, March 19, 2013
You can turn a snap-fit kit into a competition quality model if you know a few tricks.
By Mark McGovern
Continued…
Keeping a Model in Trim
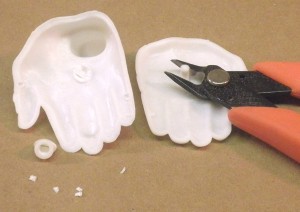
After cleaning the flash off the halves of one of the Incredible Hulk’s hands, I snapped them together, as you can see in Figure 1 (this was a test shot, which is why the plastic is white). You can see quite a seam showing between the parts. My aim when I build a model is to create the appearance of the subject in miniature. Since no Hulk in his comic book, television, or movie incarnations has ever been shown with seams running around his body, I did everything I could to eliminate them.
With most glue kits, and certainly snap-fits, the parts can be made to fit better simply by removing the locators molded into them. I used sprue cutters for this job because the snap-fit locators were so large, Fig. 2. A curved #10 hobby knife blade was helpful for cutting in tight places.
If you hold your kit part up to a strong light so you can look along its edges, you’ll see that they’re not flat. The may be rounded or have lots of irregularities, where what’s needed are flat surfaces that will be fused together by the plastic cement you’ll use. Sanding the part edges flat is the first step in assuring a good fit; I used 150-grit sandpaper to do this.
The best fit comes with a little more work. I held the hand halves together in front of the light and checked for gaps. The light showed them clearly; by sanding the point where the parts were touching, I was able to close most of the gaps. At some points, I penciled arrows on the outsides of the parts to show me just where to sand. When I felt I had the best fit I could get, I glued the parts and clamped them. By the way, sanding the mating surfaces has the additional benefit of adding “tooth” to the edges, which gives the cement more surface area to grip; this ensures a stronger bond between the parts.
Stuck on Modeling
There’s really no single material that’s best for every plastic modeling job, so I keep a variety of paints, glues, etc. on my workbench to fill various needs. I used liquid cement for this assembly and tube glue for the larger ones, like the upper body. After the liquid cement had fused the hand halves, a thin line of melted plastic was left in the seam. A little scraping and sanding (with progressively finer grades of wet-or-dry sandpaper, ending with 400-grit) pretty well removed the melted plastic and the seam, Fig.3.
With the exception of the Hulk’s trousers, I followed these procedures for the entire model. Round 2 wanted the fists used only so those assemblies, along with the head, were cemented to the upper body and arms with tube glue. The gaps between these assemblies were filled with two-part epoxy putty because it sets slowly enough to be blended and sculpted. This made it possible to blend the hands into the wrists and head into the neck for a natural (?) appearance. A little more sanding with the 400-grit wet-or-dry sandpaper completed the job. Fig. 4 shows the results under paint.
To be continued….
add comment
read comments ( 0 )
GLUING A SNAP KIT IS A SNAP! …Part 1
Tuesday, March 12, 2013
You can turn a snap-fit kit into a competition quality model if you know a few tricks.
By Mark McGovern
I’ve been a competitive model builder for years and, I’m sorry to say, I tended to look down on snap-fit models. My assumption was that the parts would fit poorly because they were made to snap together. Then I was asked to assemble Round 2’s reissues of the MPC snap-fit models of the Incredible Hulk and the Amazing Spider-man, doing the best assembly and paint jobs I could on them. I found out that, with a little adjustment of my building techniques, I could produce models that were every bit as nice as more complex glue kits. Here’s what I learned.
Every Journey Begins With a First Step
It’s a good idea to begin any modeling project by checking the instruction sheet to make sure that all the kit parts are there in the box. The suggested assembly sequence shown will familiarize you with how the parts are supposed to go together. With that knowledge you can decide whether to follow the instructions exactly or deviate from them if you’re going to alter the model to suit your own taste.
Then the parts can use a good bath in soap and water. This will remove the mold release agents, your finger oils, and any other substances that could interfere with paint or cement adhering to the plastic. The parts can be dried with rags or paper towels and then you’re ready to start building.
To be continued…
add comment
read comments ( 0 )