Recommended Sites


Defying The Dark
Lighting a Mini “U.S.S. Defiant”
by E. James Small
Round 2 have begun doing a few things differently lately, and the difference is clear to see.
Let’s look at the newest re-release of the Star Trek Deep Space Nine kit. The entire model is now molded in clear plastic, allowing for the adventurous modeler to light up the whole thing more easily rather than having to bother with the tedious job of drilling hundreds of holes and installing fiddly fiber optics. The same thing was also recently done with the Star Trek Enterprise D kit.
For an example of how casting the kit in clear is advantageous, let’s show you how to shed some light into something that most people might consider impossible, the newly tooled and diminutive 3 inch “Defiant” model that comes with the DS9 kit. Remember you can light up the entire station using the methods shown here too.
Using five 3mm LED’s, the tiny ship can be fully lit with relative ease, and it’s easy to make a stand to both support the model “in flight” and serve as a power supply.
The photos here pretty much show it all. Note that, using files, you can even sculpt and sand down LED’s to fit your needs, such as in cramped areas. Just as long as you don’t sand through to the metal bits inside the solid epoxy case, you can modify LEDs to the shape and size you need and install them in areas where they would not normally fit. Plus, because LED’s stay cool, you don’t need to worry about them damaging the model.
First, the kit is test assembled and examined to see where you can install the LED’s. The Defiant’s engine and bussard scoops are glued in place, being careful to test to make sure the top of the body can be installed correctly afterwards.
Next choose the LED’s to use for the model. I decided to use “warm white” 3mm LED’s for the bussard scoops and front sensor area, and regular (cool) white for the engines in the rear. Use whatever you think is best. Upon reflection I suppose I should have used a cool white or blue LED for the front sensor area since it is supposed to be blue, but it still worked out.
Hint: Stick with white, blue and green LED’s for most of your projects because they work rather happily on 3 volts, generated by two regular 1.5 volt dry cells connected in series. They can be tinted with transparent paints if you want different colours. The new pink and purple LED’s also work using 3 volts. But red, orange and yellow LED’s work at around 2 volts (one cell won’t light them up but two will burn them out!), necessitating the use of resistors which is more complex for the average modeler who may not be familiar with electronics. Please see my other article on lighting the K-7 space station here on the Round 2 Workbench for more details in using and soldering LED’s.
The most time consuming part is next… Practice installing each LED in place within the model, file down both the LED and the inside of the model as necessary until the LEDs fit in place and the hull fits together properly.
When you are satisfied with fit, choose some very thin insulated wire (such as telephone wire) and solder the LED’s together paying particular attention to polarity. You will need to plan it carefully and trim the LED’s leads accordingly.
Hint: Don’t solder the parts inside the model. Test fit, get the correct positions then solder the parts together, holding them with alligator clips and clamps outside the model to avoid damaging the plastic. Just keep test fitting often, and also keep testing the circuit as you go to make sure your polarity is correct and your LED’s aren’t damaged.
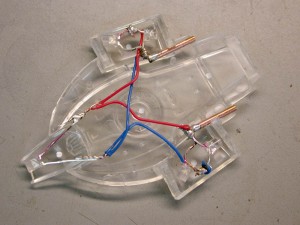
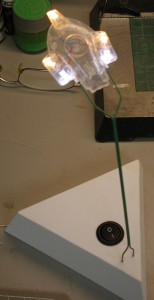
Next, you can use narrow brass or copper tube (available from K&S metals at your hobby shop) as a receptacle for the stand mount which you will make from Plastruct’s plastic coated steel wire (made in two sizes), also available at your hobby shop. Choose sizes that will allow the stripped wire to slide easily but firmly into the hollow tube. This wire will act as support for the model as well as carry electrical current to the LED’s. The plastic insulation on the wire will allow you to glue it together and prevent short circuits. The tiny tubes will allow you to remove the model from the stand any time you wish. Solder the LED’s to these tubes with one for the positive leads, the other for the negative. You will need to drill holes and cut channels into the interior of the model to accept the tubes. See Fig. 1.
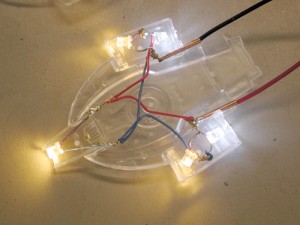
When you are satisfied with your internal assembly, make sure you fully test it by plugging in some wires from your battery pack before gluing the hull together, sealing it up forever. See Fig. 2.
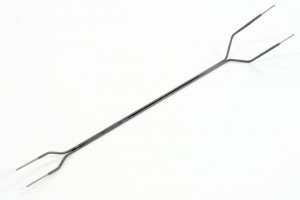
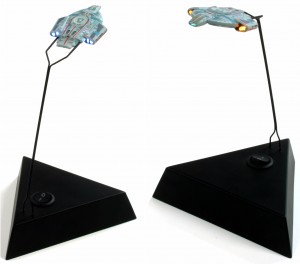
Now is a good time to make your stand. First, make your support by stripping and preparing the plastic coated wire, bend it into the shape shown and make sure the stripped ends fit into the model snugly but easily without strain on any parts as in Fig. 3
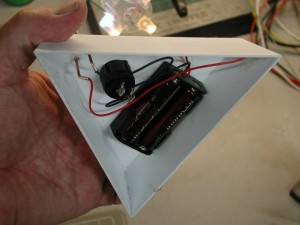
The stand shown in these pictures was scratch built from sheet plastic, but you can make one out of just about any kind of box you want. A switch is installed as well as a battery pack to hold two dry cells and two tubes, the same as the ones installed in the model, are used to plug the support wires into. See Fig.4.
Imagine what you’d have to go through to light this little fella up if it were molded in opaque material!
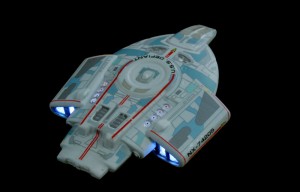
When you are satisfied everything can be mounted in place and the hull can be glued together, test everything (Fig. 5) then go ahead and finish the model as usual but with the following exceptions:
1: Mask off the areas you want to light up, OR be prepared to scrape paint off those areas when the model is finished. Liquid masking film is handy for this operation. Note the stand you made can be used to hold the model when spraying it as well as keep paint from getting into the inside of the tube!
2: Spray the entire model’s outer surface with white primer and when dry, follow up with dark gray primer. The white will help the light bounce around more inside the model to light up other things like windows, the gray primer will help keep the light from leaking through the hull colour, as most other paints are not entirely light-tight. Continually test the lighting while priming to make sure the model’s hull is sealed. Silver also makes for a great light blocking alternative as well, just make sure you can paint over the silver with your hull colour. Some silver paints don’t take well to being re coated with another colour.
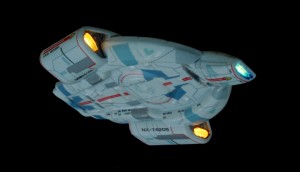
When that is done, finish and decorate the model as desired. Install the batteries, plug in the stand, throw the switch and… (Fig 6)… ENGAGE!
Get yours now from the Autoworldstore.com
http://www.autoworldstore.com/SearchResults.asp?Search=AMT751&Submit=Search
That is awesome!