Recommended Sites


Archive for the ‘Polar Lights’ Category
ROUND 2, LLC, ACQUIRES LINDBERG & HAWK MODEL KIT BRANDS
Round 2 to Produce Popular Land, Air, Sea & Space Models – Adding to AMT, MPC & Polar Lights
For Immediate Release
SOUTH BEND, Indiana – 03/18/2013 – Round 2, LLC, is pleased to announce the acquisition of the Lindberg and Hawk Models brands and assets from J. Lloyd International. With the transaction, Round 2 adds these two well-recognized and historic plastic model kit names to their existing trio of AMT, MPC and Polar Lights mode kit lines, licensed from Learning Curve Brands, Inc. in 2008 and purchased outright in 2012.
Consumer trust and excitement has been building over Round 2’s efforts with the initial three brands since 2008. Now, with the assets of five major model companies in its stable, Round 2 solidifies its position as a top producer and fierce competitor in the plastic kit sector of the hobby industry. Thomas Lowe, President and CEO of Round 2 states, “The addition of Lindberg and Hawk results in a combined product catalog for Round 2 that is so diverse, it will include virtually every type of model kit genre imaginable and in a wide range of scales. Whether you’re looking for cars, trucks, aircraft, ships, sci-fi, space exploration, anatomy and figures or even crazy monsters, we now have it all! We’ve made plans to hit the ground running with these brands and are ready to go. As we progress into the future, we will be working with the vintage Hawk and Lindberg tooling to resurrect more exciting kits that haven’t seen the light of day in decades, just like we have with AMT and MPC. We’ll also be happy to put the 1934 Ford Pickup tooling back under the original AMT brand, from where it originated.”
Lowe continues, “Like our customers, we love model building. Lindberg and Hawk models are sure to excite modelers of all ages. From the connection with history to a hunger for an understanding of how various machines, both human and mechanical function, the kits created by the original brands have always offered a wide variety of subject matter for model makers, and we plan on continuing that long standing tradition.
About Round 2
Round 2, LLC is an innovative collectibles company located in South Bend, IN. The team at Round 2 is dedicated to producing detailed, high quality collectible and playable items appealing to the young and young at heart. Round 2 brands include Polar Lights®, AMT® and MPC® model kits, Auto World® slot cars, Forever Fun™ seasonal products and the licensed brands American Muscle®, Ertl Collectibles® and Vintage Fuel™ die cast.
For more details on all the product lines produced by Round 2, visit our website at: www.round2corp.com
AMT, Polar Lights, MPC and Round 2 and design are trademarks of Round 2, LLC. ©2011 Round 2, LLC, South Bend, IN 46628. All rights reserved. ###
-END-
GLUING A SNAP KIT IS A SNAP! …Part 2
You can turn a snap-fit kit into a competition quality model if you know a few tricks.
By Mark McGovern
Continued…
Keeping a Model in Trim
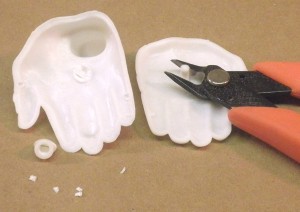
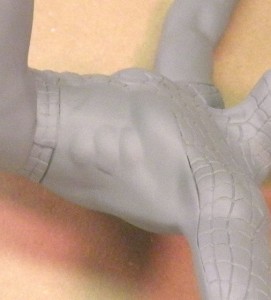
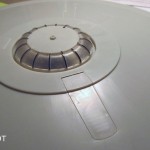
After cleaning the flash off the halves of one of the Incredible Hulk’s hands, I snapped them together, as you can see in Figure 1 (this was a test shot, which is why the plastic is white). You can see quite a seam showing between the parts. My aim when I build a model is to create the appearance of the subject in miniature. Since no Hulk in his comic book, television, or movie incarnations has ever been shown with seams running around his body, I did everything I could to eliminate them.
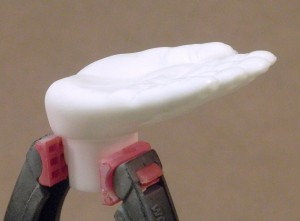
With most glue kits, and certainly snap-fits, the parts can be made to fit better simply by removing the locators molded into them. I used sprue cutters for this job because the snap-fit locators were so large, Fig. 2. A curved #10 hobby knife blade was helpful for cutting in tight places.
If you hold your kit part up to a strong light so you can look along its edges, you’ll see that they’re not flat. The may be rounded or have lots of irregularities, where what’s needed are flat surfaces that will be fused together by the plastic cement you’ll use. Sanding the part edges flat is the first step in assuring a good fit; I used 150-grit sandpaper to do this.
The best fit comes with a little more work. I held the hand halves together in front of the light and checked for gaps. The light showed them clearly; by sanding the point where the parts were touching, I was able to close most of the gaps. At some points, I penciled arrows on the outsides of the parts to show me just where to sand. When I felt I had the best fit I could get, I glued the parts and clamped them. By the way, sanding the mating surfaces has the additional benefit of adding “tooth” to the edges, which gives the cement more surface area to grip; this ensures a stronger bond between the parts.
Stuck on Modeling
There’s really no single material that’s best for every plastic modeling job, so I keep a variety of paints, glues, etc. on my workbench to fill various needs. I used liquid cement for this assembly and tube glue for the larger ones, like the upper body. After the liquid cement had fused the hand halves, a thin line of melted plastic was left in the seam. A little scraping and sanding (with progressively finer grades of wet-or-dry sandpaper, ending with 400-grit) pretty well removed the melted plastic and the seam, Fig.3.
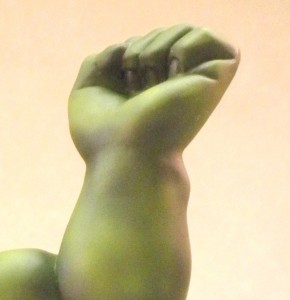
With the exception of the Hulk’s trousers, I followed these procedures for the entire model. Round 2 wanted the fists used only so those assemblies, along with the head, were cemented to the upper body and arms with tube glue. The gaps between these assemblies were filled with two-part epoxy putty because it sets slowly enough to be blended and sculpted. This made it possible to blend the hands into the wrists and head into the neck for a natural (?) appearance. A little more sanding with the 400-grit wet-or-dry sandpaper completed the job. Fig. 4 shows the results under paint.
To be continued….
GLUING A SNAP KIT IS A SNAP! …Part 1
You can turn a snap-fit kit into a competition quality model if you know a few tricks.
By Mark McGovern
I’ve been a competitive model builder for years and, I’m sorry to say, I tended to look down on snap-fit models. My assumption was that the parts would fit poorly because they were made to snap together. Then I was asked to assemble Round 2’s reissues of the MPC snap-fit models of the Incredible Hulk and the Amazing Spider-man, doing the best assembly and paint jobs I could on them. I found out that, with a little adjustment of my building techniques, I could produce models that were every bit as nice as more complex glue kits. Here’s what I learned.
Every Journey Begins With a First Step
It’s a good idea to begin any modeling project by checking the instruction sheet to make sure that all the kit parts are there in the box. The suggested assembly sequence shown will familiarize you with how the parts are supposed to go together. With that knowledge you can decide whether to follow the instructions exactly or deviate from them if you’re going to alter the model to suit your own taste.
Then the parts can use a good bath in soap and water. This will remove the mold release agents, your finger oils, and any other substances that could interfere with paint or cement adhering to the plastic. The parts can be dried with rags or paper towels and then you’re ready to start building.
To be continued…
Defying The Dark
Lighting a Mini “U.S.S. Defiant”
by E. James Small
Round 2 have begun doing a few things differently lately, and the difference is clear to see.
Let’s look at the newest re-release of the Star Trek Deep Space Nine kit. The entire model is now molded in clear plastic, allowing for the adventurous modeler to light up the whole thing more easily rather than having to bother with the tedious job of drilling hundreds of holes and installing fiddly fiber optics. The same thing was also recently done with the Star Trek Enterprise D kit.
For an example of how casting the kit in clear is advantageous, let’s show you how to shed some light into something that most people might consider impossible, the newly tooled and diminutive 3 inch “Defiant” model that comes with the DS9 kit. Remember you can light up the entire station using the methods shown here too.
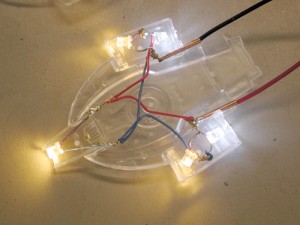
Using five 3mm LED’s, the tiny ship can be fully lit with relative ease, and it’s easy to make a stand to both support the model “in flight” and serve as a power supply.
The photos here pretty much show it all. Note that, using files, you can even sculpt and sand down LED’s to fit your needs, such as in cramped areas. Just as long as you don’t sand through to the metal bits inside the solid epoxy case, you can modify LEDs to the shape and size you need and install them in areas where they would not normally fit. Plus, because LED’s stay cool, you don’t need to worry about them damaging the model.
First, the kit is test assembled and examined to see where you can install the LED’s. The Defiant’s engine and bussard scoops are glued in place, being careful to test to make sure the top of the body can be installed correctly afterwards.
Next choose the LED’s to use for the model. I decided to use “warm white” 3mm LED’s for the bussard scoops and front sensor area, and regular (cool) white for the engines in the rear. Use whatever you think is best. Upon reflection I suppose I should have used a cool white or blue LED for the front sensor area since it is supposed to be blue, but it still worked out.
Hint: Stick with white, blue and green LED’s for most of your projects because they work rather happily on 3 volts, generated by two regular 1.5 volt dry cells connected in series. They can be tinted with transparent paints if you want different colours. The new pink and purple LED’s also work using 3 volts. But red, orange and yellow LED’s work at around 2 volts (one cell won’t light them up but two will burn them out!), necessitating the use of resistors which is more complex for the average modeler who may not be familiar with electronics. Please see my other article on lighting the K-7 space station here on the Round 2 Workbench for more details in using and soldering LED’s.
The most time consuming part is next… Practice installing each LED in place within the model, file down both the LED and the inside of the model as necessary until the LEDs fit in place and the hull fits together properly.
When you are satisfied with fit, choose some very thin insulated wire (such as telephone wire) and solder the LED’s together paying particular attention to polarity. You will need to plan it carefully and trim the LED’s leads accordingly.
Hint: Don’t solder the parts inside the model. Test fit, get the correct positions then solder the parts together, holding them with alligator clips and clamps outside the model to avoid damaging the plastic. Just keep test fitting often, and also keep testing the circuit as you go to make sure your polarity is correct and your LED’s aren’t damaged.
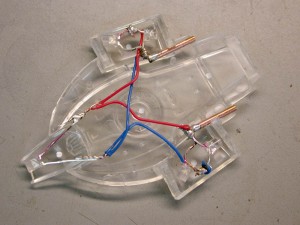
Next, you can use narrow brass or copper tube (available from K&S metals at your hobby shop) as a receptacle for the stand mount which you will make from Plastruct’s plastic coated steel wire (made in two sizes), also available at your hobby shop. Choose sizes that will allow the stripped wire to slide easily but firmly into the hollow tube. This wire will act as support for the model as well as carry electrical current to the LED’s. The plastic insulation on the wire will allow you to glue it together and prevent short circuits. The tiny tubes will allow you to remove the model from the stand any time you wish. Solder the LED’s to these tubes with one for the positive leads, the other for the negative. You will need to drill holes and cut channels into the interior of the model to accept the tubes. See Fig. 1.
When you are satisfied with your internal assembly, make sure you fully test it by plugging in some wires from your battery pack before gluing the hull together, sealing it up forever. See Fig. 2.
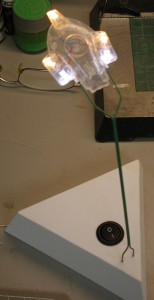
Now is a good time to make your stand. First, make your support by stripping and preparing the plastic coated wire, bend it into the shape shown and make sure the stripped ends fit into the model snugly but easily without strain on any parts as in Fig. 3
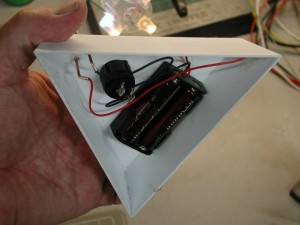
The stand shown in these pictures was scratch built from sheet plastic, but you can make one out of just about any kind of box you want. A switch is installed as well as a battery pack to hold two dry cells and two tubes, the same as the ones installed in the model, are used to plug the support wires into. See Fig.4.
Imagine what you’d have to go through to light this little fella up if it were molded in opaque material!
When you are satisfied everything can be mounted in place and the hull can be glued together, test everything (Fig. 5) then go ahead and finish the model as usual but with the following exceptions:
1: Mask off the areas you want to light up, OR be prepared to scrape paint off those areas when the model is finished. Liquid masking film is handy for this operation. Note the stand you made can be used to hold the model when spraying it as well as keep paint from getting into the inside of the tube!
2: Spray the entire model’s outer surface with white primer and when dry, follow up with dark gray primer. The white will help the light bounce around more inside the model to light up other things like windows, the gray primer will help keep the light from leaking through the hull colour, as most other paints are not entirely light-tight. Continually test the lighting while priming to make sure the model’s hull is sealed. Silver also makes for a great light blocking alternative as well, just make sure you can paint over the silver with your hull colour. Some silver paints don’t take well to being re coated with another colour.
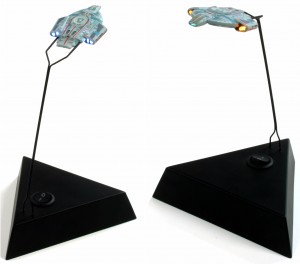
When that is done, finish and decorate the model as desired. Install the batteries, plug in the stand, throw the switch and… (Fig 6)… ENGAGE!
Get yours now from the Autoworldstore.com
http://www.autoworldstore.com/SearchResults.asp?Search=AMT751&Submit=Search

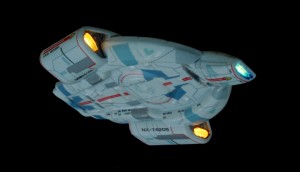
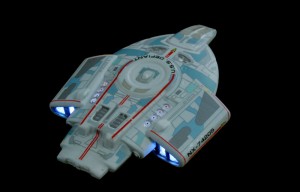
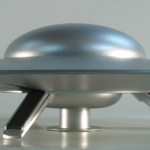
Polar Lights Model Kits: A sneak peek at the new 1:144 scale C-57D
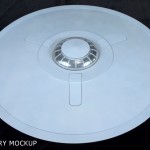
We announced our plans last year at Wonderfest to do a 1:144 scale model of the C-57D flying saucer and the project is nearing completion. Here is a behind the scenes look at some of its development.
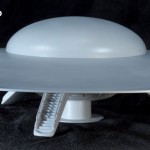
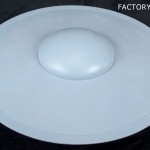
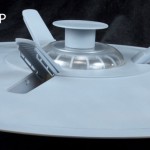
Everyone is aware of our larger 1:72 scale kit. It is legendary for its difficulty in finding a place to display it, measuring in at 28” in diameter. We knew that the smaller kit would be rather simple and that the interior detail that the larger model presented would not be featured in this one. We did want to maintain the opening landing ramps and offer both the central landing pillar was well as a lower dome cap to replace it to display in a flying position. Other than that, we put no faith in anything found in the large kit. We knew of the upper dome profile so we didn’t trust that and figured the rest of the kit’s proportions would be just as unreliable.
In the early stages, we strongly considered using a system of three pie wedges for each of the upper and lower saucers in order to keep tooling costs in check. We could then use three copies of each part drawn from a smaller tool. Every modeler we mentioned this to hated the idea and after taking another look at things, we determined to go the extra mile and do it right with solid upper and lower saucer parts.
As with most sci-fi subject matter, the first thing we needed to decide on what size would the “real” ship be and what size would we want to make our model kit? We had a ballpark size in mind based on the tooling budget we had allotted. We just needed to figure out what logical scale might fall within our range. The first thought was to go to half of the scale of the larger kit and shoot for 1:144. With a 28” diameter being cut down to 14”, the kit was going to be too big. My second inclination was to use 1:200 scale based on the saucer diameter I had found in a set of plans that stated a 162’ 9” diameter. That would have provided us with an approximate diameter of around 10”. I also looked into 1:144 scale at that scale and found that to be over a foot in diameter. This was a bit bigger than we had planned, but we decided it would make the most sense, but further research would be needed to nail down that size.
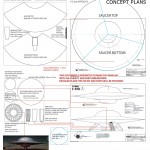
We enlisted Jim Small to do the research and to draw up a set of plans for the kit. As we explored figuring out what size the kit would ultimately be, we found that the proportions of the measurements we had found did not match those of the filming miniature. We felt pretty beholden to the height measurement of 38’ 6” that was based on the movie set which had pictured real men standing under the ship. If anyone wanted to do a diorama using 1:144 scale figures, the height would need to work with that in mind. We then took that consideration and used photos of the large filming miniature to determine the diameter would end up around 144’ which presented a handy 1-foot diameter for our kit.
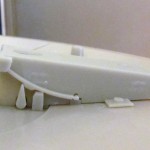
Jim used screen grabs and photos of the filming miniatures to draw up the plans based on our final measurements. As he worked through the kit, he engineered a simple spring mechanism that would hold the ramp doors open or closed without having to glue them in one position or the other. Besides the detail the ramps present, the other interior detail we added to the kit is the inner motor “cage” that we see rotating in the lower dome when the ship is in flight.
As usual, the factory created a digital version of the ship for us to critique. Thanks to the quality of Jim’s blueprints, we only found a few minor matters to correct. Eventually they supplied a physical mockup that, again, had few things to complain about. The tooling was cut and test shots were sent. We tidied up a few things here and there. Jim did the buildup for us and the product is on track to be released this Spring. Here are a few images from along the way.


Polar Lights Model kits: Wolverine model kit development

I’ve said many times before I’m a lifelong comic book collector. As a young kid, I was into the standard Superman, Batman and Spider-Man fare. I loved team books like the Justice League of America and the Avengers. If I already had the current issue of my favorite solo characters, I’d buy the book that had the most costumed heroes in it. As I grew older, I started actually READING the books instead of just looking at the pretty pictures. One day I stumbled across a comic I hadn’t eve noticed before and picked up X-men #136. My fellow readers can probably tell you that this was at the point where the X-men were growing in popularity among readers due to the classic work of writer Chris Claremont and artist John Byrne whose run on the title was building to a crescendo. No one outside of comics really knew about the X-men. They could point out Superman or the Hulk, but they wouldn’t be able to tell you who Colossus was. This issue hooked me and I loved every character in the book. A few years later Wolverine was got the spotlight treatment in his own mini-series and the story presented him as a deep, but savage and ruthless character. Over time, the X-men and especially Wolverine continued to grow in popularity until the rest of the world caught on. I still read Wolverine and X-men comics and they are all in incredibly different places now, but some of my fondest comic book memories are of the guy that claimed, “I’m the best there is at what I do… but what I do isn’t very nice…”
So it was with those fond memories in mind that I began our Polar Lights Wolverine model kit development. I wanted to keep him in his 70’s/80’s era look and landed on the yellow version of the suit mainly because that’s the one he started gaining popularity in. I also figured that anyone wanting to see a later version costume could omit the shoulder cuffs and with a little putty filling and sanding could make the brown suit version or with further mods create a more contemporary look. My goal was to make a great looking kit in his classic costume and keep it in reach to make any other version a modeler might want.
For the base, I originally considered making it out of a mass of dead Hellfire Club goons or ninjas. I felt ninjas would, by design, cause too many trapping problems on the tool. After thinking about how much more it would probably costs to sculpt several figures lying in a pile, I abandoned the Hellfire Club goons pretty quickly. Besides as villains, they weren’t terribly recognizable by anyone but longtime X-men fans. I landed on doing a Sentinel head. Even though they aren’t considered Wolverine’s arch foe, they were the villains in the classic “Days of Future Past” storyline in the Claremont/Byrne run in which Wolverine played a key roll. They would return to battle the X-men on several occasions. Besides, robots are cool and anyone who isn’t a die-hard would accept it as a normal occurrence for Wolverine to have taken down a big one.

So here I show my original control drawing of the model. I wanted to capture a pose with plenty of movement for plenty of great views in the round. It was important for m to have the Sentinel look like he had lost a fight and supply plenty of room for additional detail in the eyes, mouth and other wounds. (I can’t wait to see someone add some fiber optic spark effects) We’ll be including the unmasked head, but the second set of claws has gone by the wayside.
We hired Erick Sosa to sculpt the kit for us. If you are familiar with the many licensed resin statue products on the market, you may know his work. He has sculpted some great ones including iconic Punisher and Deadpool figures. Erick sculpts digitally in Zbrush and works on the look of the figure before posing it. This shows his initial sculpt which I deemed to be too contemporary for what I intended for this kit. The look of the character was too close to how we see him in comics today rather than his “bronze age” appearance. I wanted to stylize him slightly to make him look more like a character from a comic book rather than a real guy in a suit. We had to weigh the realism we can achieve today with the flavor of an Aurora-style figure. I think we ended up striking the perfect balance.


Here is a look at the Sentinel head before getting battle damaged. Figuring out the “waterline” was no easy task. As with all comics, the drawing allows any number of cheats, but translating it into real life gets tricky. I had designed it with an exact angle in mind that would result in a clean pull from the steel tooling. Conceptually, besides the rectangular shapes around his head and the structural damage protruding from the eye socket, it could be made as one piece. Whether or not this will be the case remains to be seen.

A look at the sculpt and images of the factory’s digital mockup next time…
Star Trek model kits- Galileo Shuttle

Hi all. I know all of you 1701 Club members are anxiously waiting to find out what is going on. Update #8 is finished and should be sent out soon. Many have been asking when we will ask for payment information and you may be assuming the worst that delivery has been delayed… and unfortunately it has a little bit. Fear not though. All development is complete and the kit is currently in production. Details will be in the update.
This blog post might not fill the void left from the above statement, but still we must carry on.
Hopefully you have had a chance to review our Wonderfest video that went live as of my last post. If you stayed tuned in until the end, you found out that the winner of our poll was the 1:32 scale Galileo shuttle! It seems that the Galileo benefited from a grassroots movement that made it the clear winner. I was surprised, but not shocked by the result.
All of the candidates were strong contenders. Some have made the point that with so many great subjects to choose form, some kind of cannibalized the votes of others. If, say, either the Reliant or K’tinga had been left off the ballot that the remaining 1:1000 scale craft would have drawn the votes of the other and therefor put it over the top. I purposely tried to stay out of the nomination process. As long as the winning kit would fit what we had in mind for the size and budget, I knew whatever won would do well. But, I didn’t want to limit the choices in any way. Why? Because I wanted the modeling public to get a taste of the decisions we have to make when it comes to our product line. Our range of choices are also nearly unlimited. Whether it is another Star Trek kit or any other license there are tons of great subjects deserving of being made into a great kit. Figuring out where to start is the trick.
You might wonder if any of the other contenders could get made someday. I threw out several ideas at the presentation covering several types of kits from many properties. In the perfect world of my mind, they would all get made some day. The disappointing truth is that I doubt that 100% of them will get done, but they are all on a list of kits I pull out each year to determine what we will do next. I’ll need to weigh our tooling budget and licensing responsibilities against popular demand.
When it comes to creating brand new kits, we need to hit a home run every time. With reissues, if something doesn’t sell well, we are only out the time it took to create the packaging, etc. But if a newly tooled kit fails, the chances of getting another one made lessens. We have heard the demand for NEW kits and we are putting a plan into action to create new tooling. It will be up to you guys to vote with your wallets to tell us you want more.
Getting back to the Galileo, Gary has already begun digging into the project. As you know getting the interior set to fit within the craft as seen on the show is impossible so our work is cut out for us. We have already started discussions on what kind of details we hope to include in the kit. We will do our best to get the kit finished and on store shelves by the end of 2013. I’ll keep you updated as we progress.
Next week… Wolverine…
Round 2 Models: And the winner is…

Believe it or not, I’m still here working away on Round 2 Models of all kinds. Just like you I wish I could have posted sooner than this. Many people have been clamoring for a 1701 Club update. Of course so much time and work has gone by that I have a lot to write about. So much so that as I’ve been writing it, I’ve come to the realization that I will probably have to find a way to break it up into two reports. Besides the 1701 Club, many people are waiting with baited breath to hear what ship won the poll I talked about in my last blog post. More on that in just a bit…
I have a sliver of time this week where I think I can write up several blog posts showing progress on some of the projects I mentioned at Wonderfest. I’ve already got some test shots on the Motion Picture Cadet kits, a few versions of the Wolverine kit digital files and I’ve have reviewed he mockup for the Robby the Robot kit featuring Altaira. I should also be seeing the 1:144 C-57D mockup soon. I look forward to sharing some behind the scenes looks at these kits similar to what I’ve been sharing in 1701 Club updates. I’m not sure I’ll have time to get quite as in-depth as those reports have been, but there will still be plenty to share. Once I get them written, I’ll schedule them to release once or twice a week.
Back to the poll results… as you may know, we recorded video footage of this year’s Wonderfest presentation just like we did last year. We had hoped to get it finished and posted some time ago (like before the poll went live) but as things usually happen, other fires got in the way. That isn’t to say we haven’t been working on it all along. Modelman Tom is well known for his Youtube model kit reviews and he has been putting in all kinds of time on our video to make it extra-special and much more entertaining than last year’s edition. As production on the video has wrapped up, the poll has also come to a close. So like a Reese’s peanut butter cup, two great things have come together. So as they say… WITHOUT FURTHER ADO… Check out the 2012 edition of our Wonderfest presentation video to find out the poll winner!
http://www.youtube.com/watch?v=cIbgnXVOZDU
After you’ve viewed it, give us some feedback and let us know what you think.
Round 2 Models: Product Preview

I gave a quick overview of our iHobby booth last time and touched on several Round 2 Models products that will make their way to workbenches in 2012. I’ll give a more in depth product preview of some of our early 2012 sci-fi and genre kits.
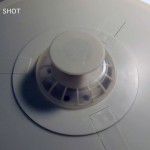
First we are offering up something we consistently get requests for- our Universal Dome Base. Though not a groundbreaking achievement, many have found it to be just what we intended, a nice clean method for displaying a model. It is suitable for pretty much any space ship or aircraft model. The dome is a perfect sphere section that can be painted as a planet if desired. The metal rod and ball joint will also be included. It should be available in January. If this one sells well, we’ll look at bringing out our larger version.
Next, a few Star Trek favorites are returning. From the old three piece Adversary Set, the Klingon Bird-of-Prey and Ferengi Marauder return in their own mini ship set. We are adding widow decals for the Marauder that will also include clear orange engine parts. Though there aren’t much to them, once built, they make a couple sharp looking little models.
Also from the old Adversary set comes the Romulan Warbird in its own box. The kit includes a dome display base and new window decals. The engine parts will come injected in regular clear and glow-in-the-dark options. The buildup Jim Small did for us is very striking.
Those knuckleheads, the Three Stooges are coming back again. Why so soon, you ask? We are starting an initiative to bring some model products to market that give some decent results to more casual modelers that don’t have the time or skill to put all the work into them that most of our core consumers do. So this time, the Stooges will come prepainted in shades of gray. Facial detail like eyes etc. will have enough detail to give a nice look with no paint required. They will be great for beginners and just require some glue to hold them together.
These Round 2 Models products will kick off 2012 for us. We’ve got a few others in the works too. More on those as we get further along. Some exciting new projects are in the planning stages and we should be moving into development with them very soon.
Round 2 Models: 2011 iHobby Recap

Hi guys. It’s been too long (again). I wanted to take a few minutes to give you a 2011 iHobby recap. This was the national hobby industry show where companies of all kinds displayed their wares with everything form trains to remote controlled vehicles to models. We always have a big display of all of our hobby lines of 1:18 scale American Muscle die cast cars, Auto World slot cars and of course our Round 2 Models line.
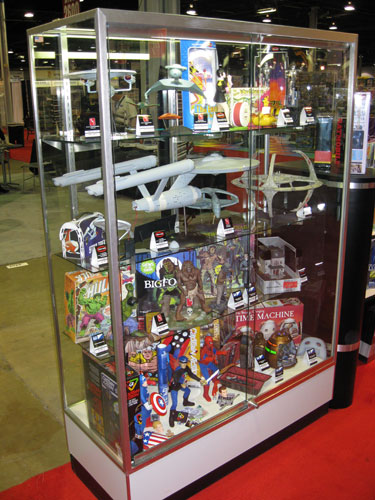
I’m sure more details are available elsewhere, but I’ll give a real quick recap of our automotive products before delving more deeply into our sci-fi/genre stuff. Our display case was filled with a ton of great buildups and box proofs and mockups. On display were…
1:25 1966 Batmobiles of all three varieties, the snap, glue and deluxe versions were all on display. The snap and glue versions are available now. The deluxe version will be out by December.
’76 AMC Gremlin X is being brought back as the first in our line of Original Art Series where we are scanning original box art for our packaging.
Munster Coach and Drag-U-La individually sold kits. Each includes a cardboard backdrop. Drag-U-La is part of our Katch the Kat program that offers chase variant body colors.
The Meyers Manx buildup arrived bruised and beaten (thanks to a customs inspection) but John and a friend or two helped put it back together again. The kit is also part of the Katch the Kat program and also includes a cardboard backdrop.
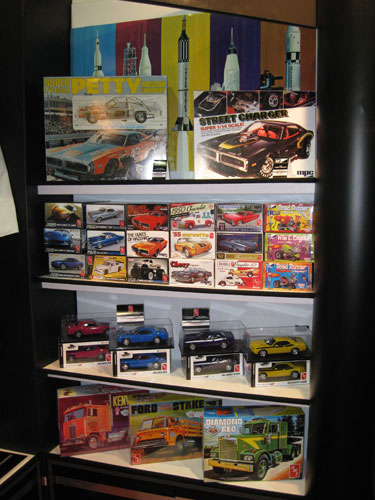
1:16 Street Charger is being brought back for a limited run under our 1 Run of Fun program. After one production run of the kit, the tooling will be backdated to turn it back into the Petty Charger kit that modelers have been asking about for a while.
Chevy 100th Anniversary collector’s tins bring back the ’51 Chevy Fleetline and ’57 Chevy that will be struck from the Mueller-era Pro Shop version of the tool. The kit features an opening trunk. The kit includes detailing foil, engine wire and photo-etch parts.
The Dirty Donny Vantasy Chevy Van offers several decal mural options.
The Diamond Rio Tractor was on display continuing our line of popular big rig kits.
Buildups of the Dark Shadows Vampire Van and Looney Tunes Roadrunner & Coyote vehicle kits made an appearance along with the Chevy Caprice as well as our new tire sets.
Looking ahead to 2012, the Hot Curl and his pals will be back riding the waves. The AMT version of the Ghostbusters Ecto-1 will be coming back as will the Monkeemobile, Arnie Beswick’s Super Judge GTO, Superwagon and Vantom Ford Van. The AMTronic makes a comeback as well. It will come in reproduction packaging and include the original cardboard backdrop and clear green and crystal clear window options.
Outside of kits, one exciting product was Auto World’s new line of men’s apparel including classy button up shirts and vintage looking racing jackets. I’ll need to see what I can do to get one emblazoned with a Polar Lights logo. I think everyone that saw them wanted one. They will be available exclusively through autoworldstore.com.
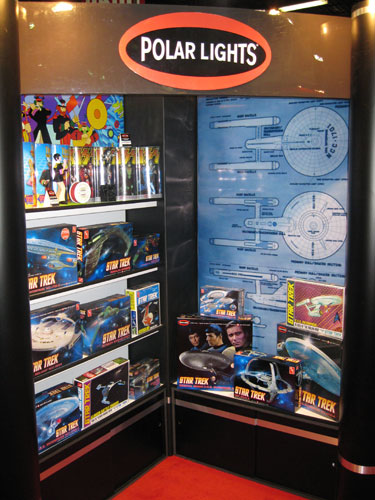
Across the booth, our lineup of Polar Lights model kits was on display.
U.S.S. Enterprise 1701-C will be available in December. A printout of the battle damage decal sheet was on display as well.
2 piece Adversary Set will be offered with glow in the dark engine parts and window decals for the Ferengi Marauder. Like the cadet series model kits, these little ships will not include bases. This set will be out early in 2012.
The Klingon Battlecruiser with all of its revised parts was on display. The version of the kit in cardboard packaging will be out by Christmas.
The Yellow Submarine kit will be out in early 2012 in a tin package. Reproduction box and prebuilt versions will follow later in the year.
The Yellow Submarine figures and KISS figures will be available as prebuilt models in 2012.
A lunchbox tin collector’s edition of the 1:1000 scale Enterprise will be out in early 2012. The box graphics will be reminiscent of vintage Star trek lunchbox decoration.
A big hunk of gray resin had its unveiling. Most things look good. Some things need work. For more info sign up for our 1701 Club to get updates. We have around 350 spaces left to reserve your kit.
Romulan Warbird previously of the 3 piece Adversary Set gets its own release. New window decals and dome base will be added to the kit.
Deep Space 9 will be a late 2012 kit. It will be injected in clear plastic for lighting and also include window decals for those that don’t want to bother. We are looking into another extra add on for inclusion in the kit. More on that whenever our plan for it is finalized.
MPC Hulk and Spider-man kits will make their way back to modelers workbenches. Most people that saw them confessed to having never seen them before. They must have had very short releases back in the day. Though some parts seem wonky, they are nice sculpts overall. They will come injected in color with spots of prepainting. They are snap together kits so they will be great for kids.
Bigfoot is another snap together kit. He, along with the Strange Change Vampire and Strange Change Mummy model kits, will be part of our 1 Run of Fun program and these three kits were made here in the US. They arrived in our warehouse last week so look for them on store shelves soon.
Dark Shadows Barnabas is available now and The Werewolf will be available soon if he isn’t out already.
Psycho House will be another in our line up of pre-built models.
Strange Change Time Machine will be out in 2012.
Also on display was our Captain Action lineup. Or first release of was represented, as was a preview of our second release, Thor and Loki.
Our iHobby display of Polar Lights model kits might not have offered many surprises but check us out at Wonderfest where we hope to have several new projects to announce.
Prepping for then working the booth at iHobby is always a lot of work. I’m still dragging a few days later. But, it is always good to get a chance to talk to modelers and get a sense of their excitement for the product. That is reward in itself.