Recommended Sites


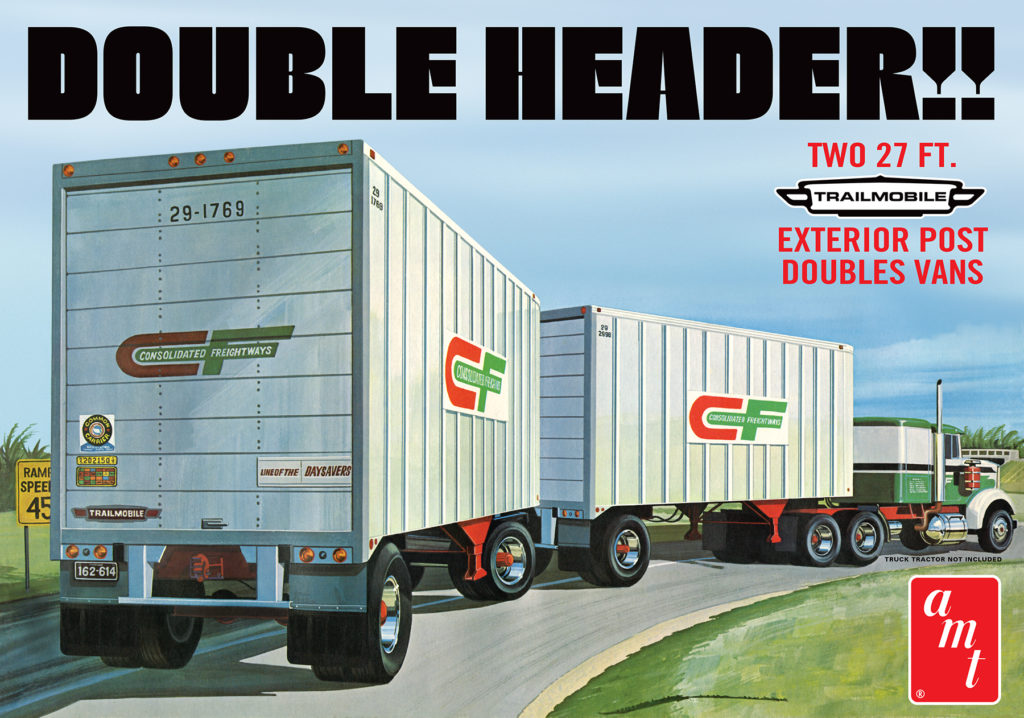
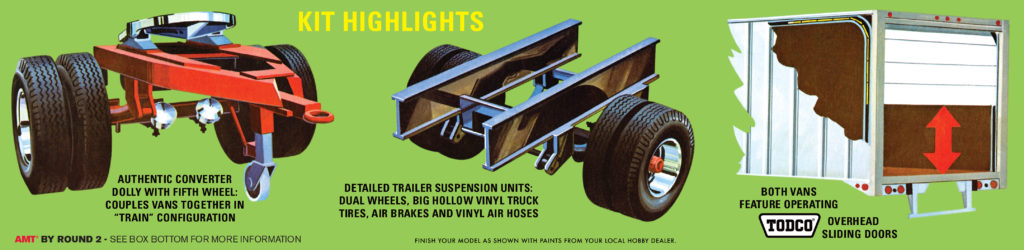
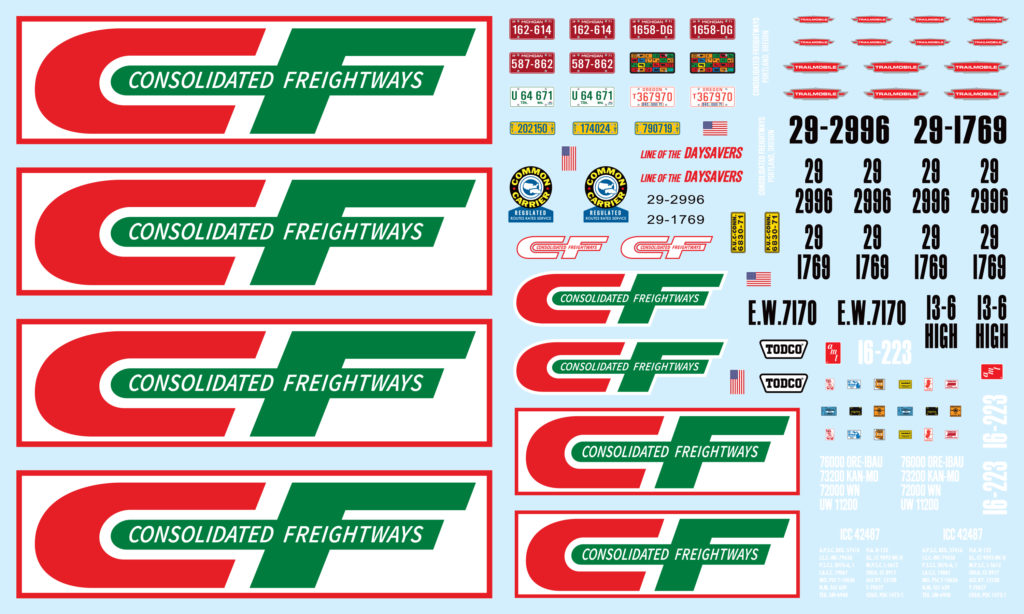
Coming off the Shelf – A Double Header Spring!
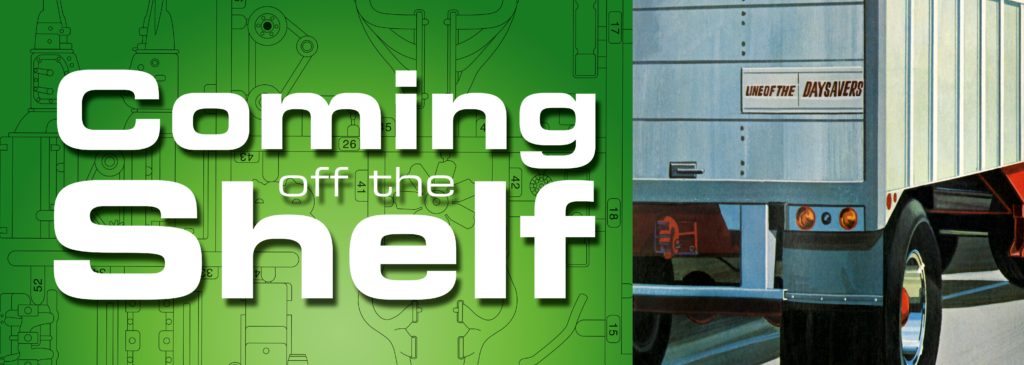
As the grass and daylight grows longer, it’s the perfect time to roll up your sleeves and get those model kit projects going. And what better way than with a BIG AMT classic—the Double Header!! Shot in white, this tandem vans kit offers an authentic converter dolly and functional, sliding rear doors. Not to mention, it’s over 2 feet long when assembled, and includes vintage style packaging and improved decals, thanks to the kats at AMT.
Spring is here, and so is the Double Header!! Coming soon wherever kits are sold.
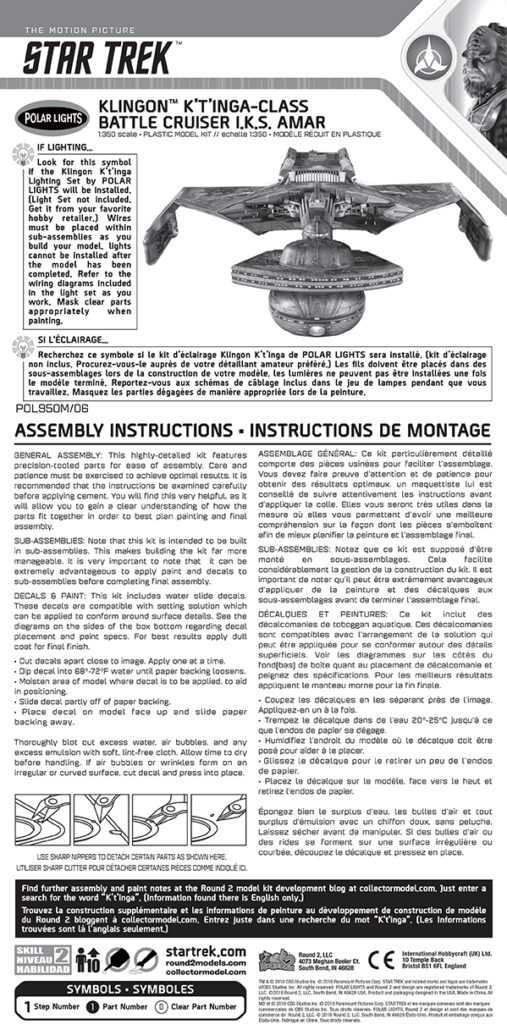
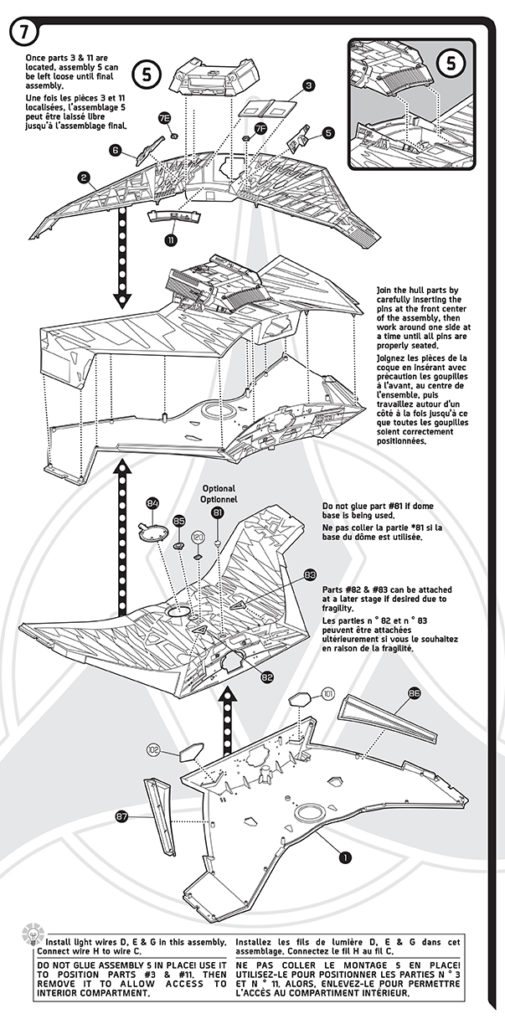
Polar Lights Model Kits: Klingon K’t’inga instruction revisions
UPDATE [4/1/2019]: Links have been repaired.
We have gotten an amazing reaction to our 1:350 Scale Klingon K’t’inga kit, and we want to thank everyone for all of the accolades. As with any new product, a few minor problems were brought to light and we will work on correcting them in future production runs. One of the biggest things seemed to pertain to the instruction sheets for both the kit and lighting set. That is something we can correct and share now with everyone that has already bought the kits.
Feel free to pass along these download links to friends that have the kit. We have already gotten positive feedback on the revisions already. Hopefully, this helps everyone.
Light Set Installation Instructions
K’t’inga Light Kit Instructions
Kit Assembly Instructions
K’t’inga Model Kit Instructions
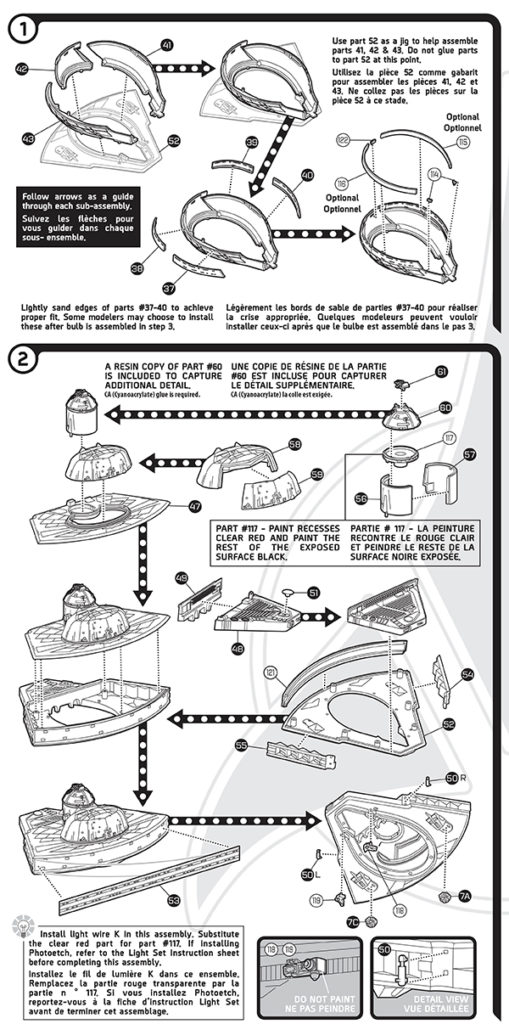
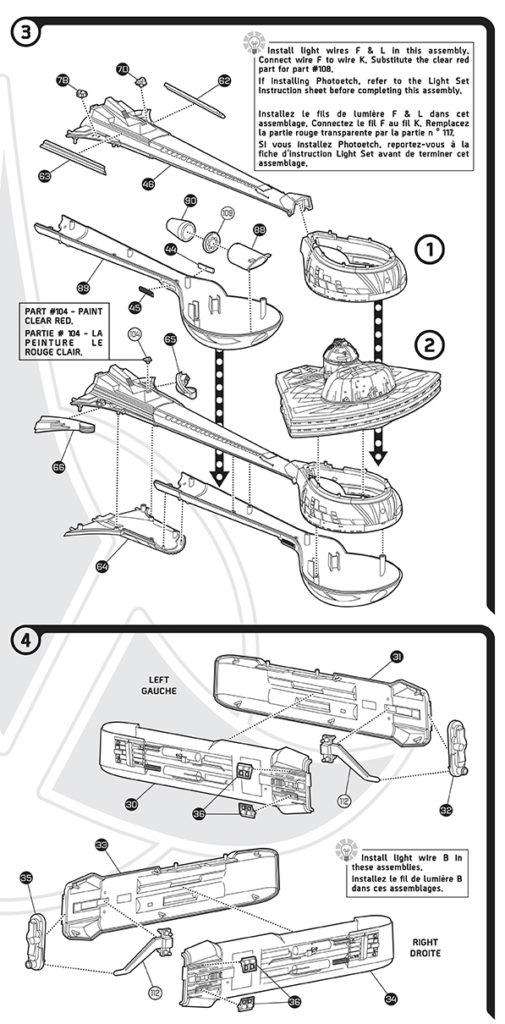
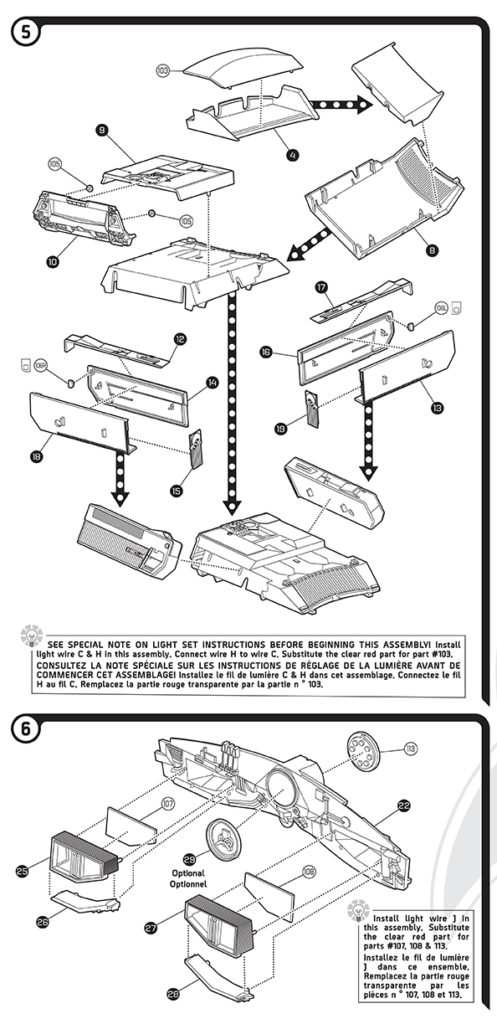
Here is a low res look at the revised kit instructions.

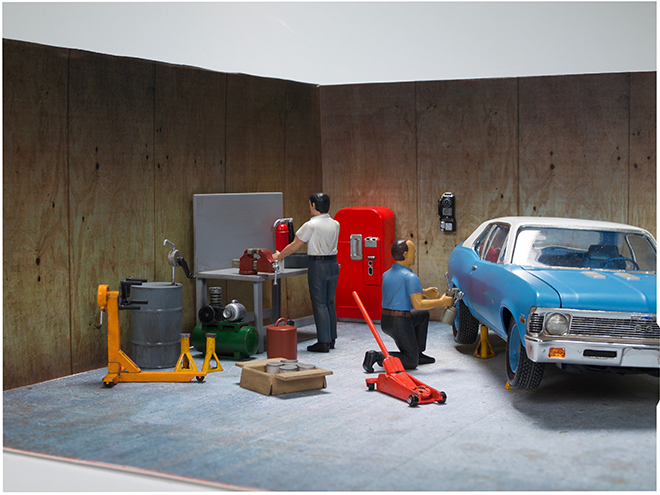
AMT Model Kits: Garage Accessory Series Set #3
Continuing a series of articles that take a look at some upcoming sets of 1/25 scale garage accessories…
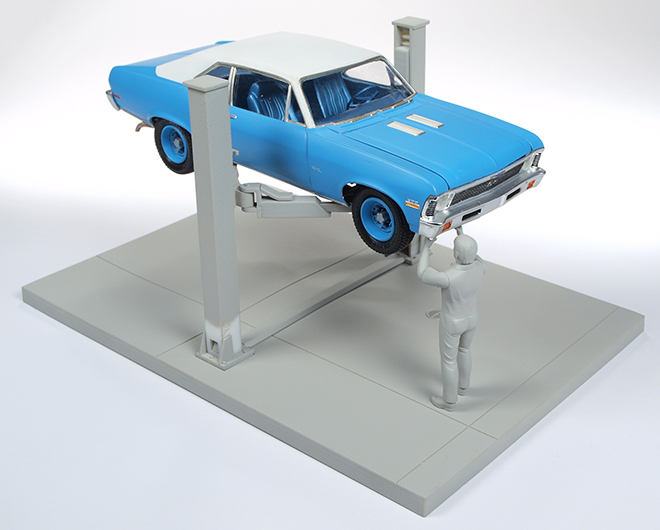
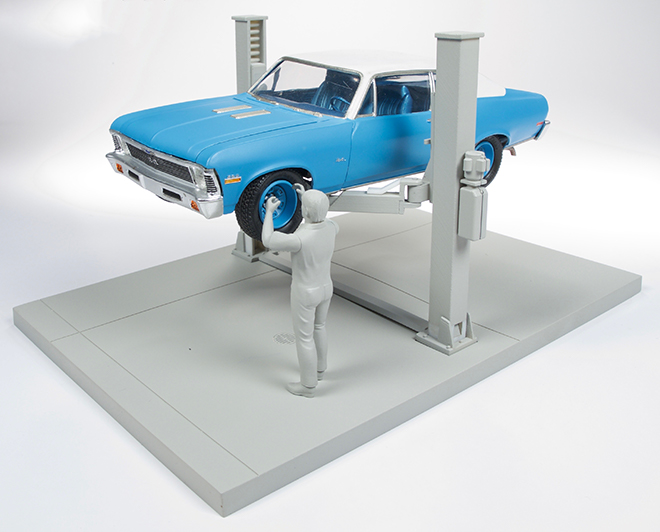
We don’t want to make the same mistake for our third release as we did with the first two. Release #3 is scheduled for a Q2 2019 release, but the mockup has already been completed and we should have test shots soon. Here is a sneak peek at our mockup for this uplifting release. (see what I did there?)
As you can see it will be a 9′ service lift. It includes a figure with an impact wrench. The arms of the lift are articulated and they can be set at any height.
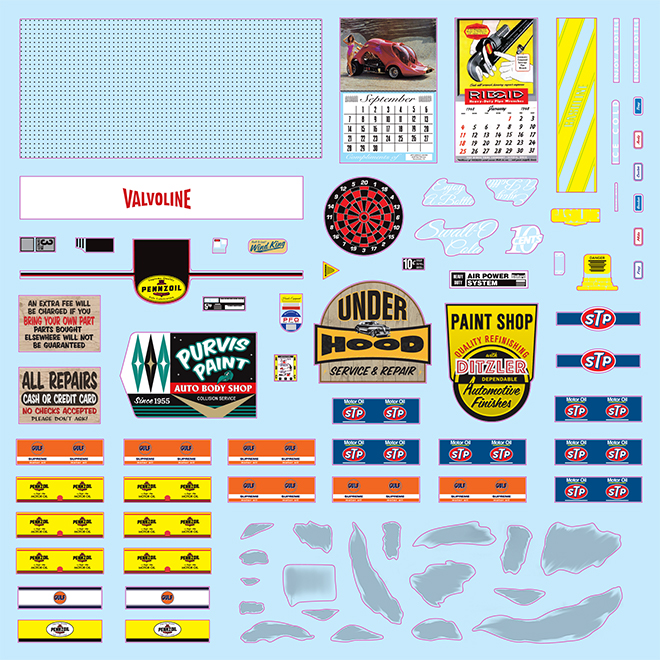
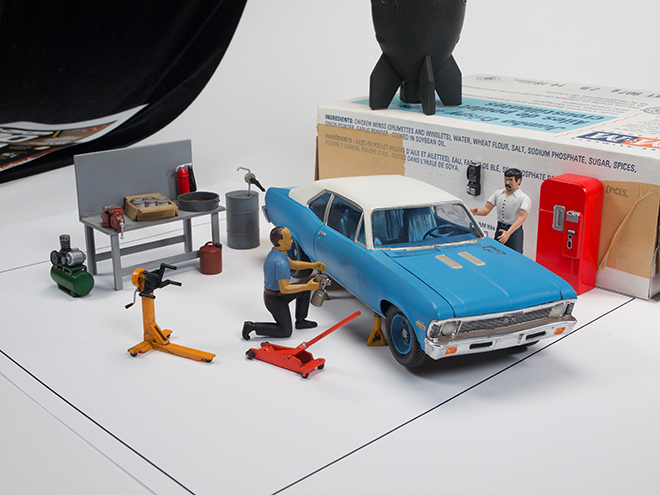
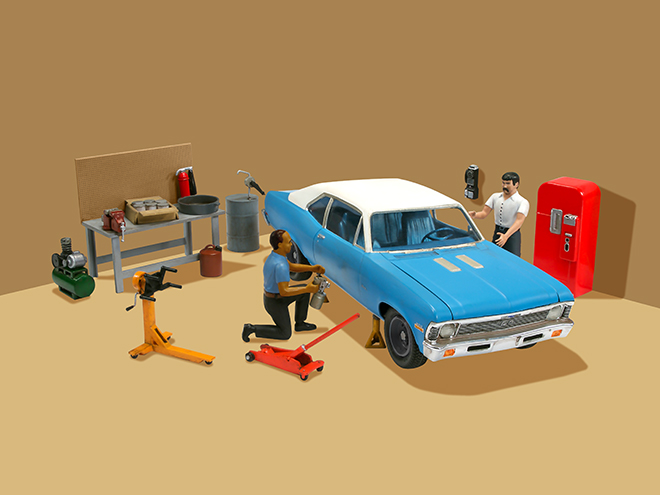
AMT Model Kits: Garage Accessory Series Set #2
Here is the first look at our second upcoming 1/25 scale garage accessories set, Tip Top Shop! The set features two figures, workbench, compressor, jacks, and soda machine along with a plethora of other handy equipment.
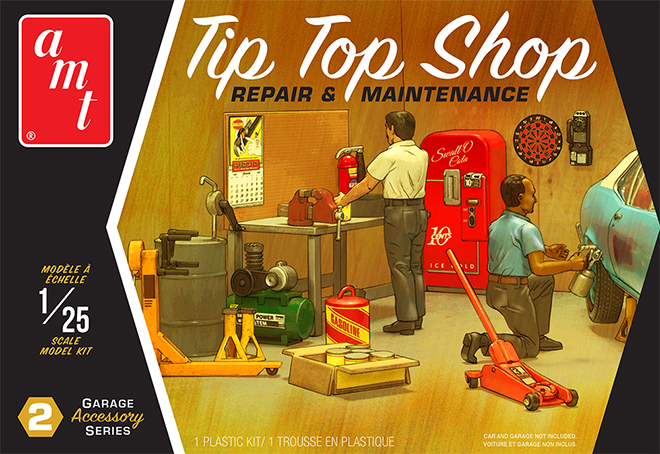

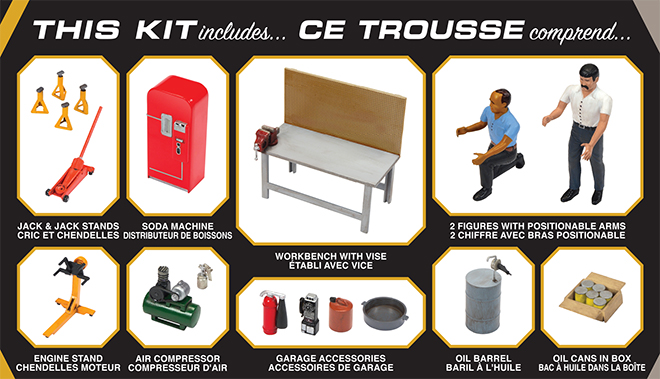
The decal sheet includes peg holes for the workbench, equipment labels oil brand labels, calendars, shop signs and more.
Some folks like to see “behind the scenes” processes that go into creating our packaging. Here is a look at before and after photographs compared to the illustrated look you find on the packaging.

Look for the kit in December!
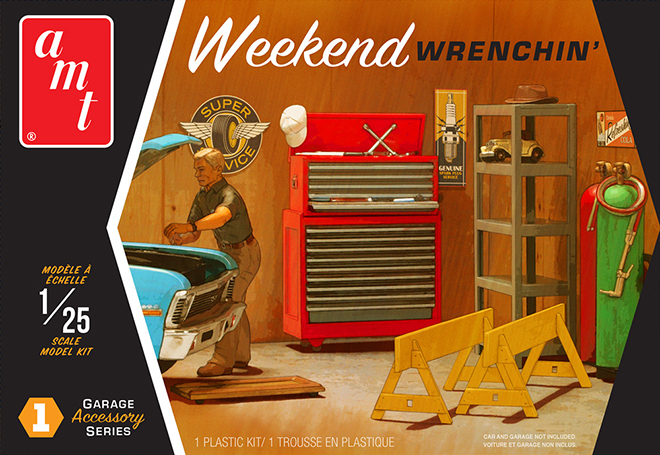
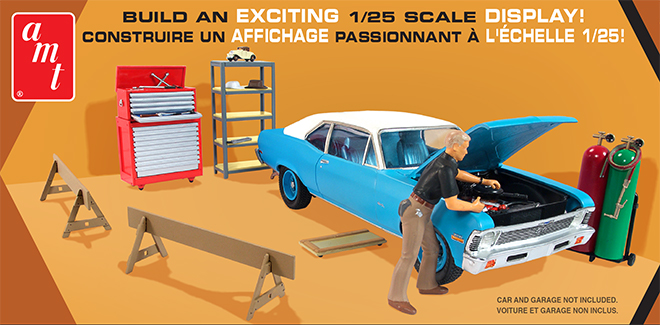
AMT Model Kits: Garage Accessory Series Set #1
We have been working on a special new series of kits that we have not yet taken the time to reveal. And it is almost time to deliver! (egg on our face!) So check out the next few blog entries to see what we have coming.
Here is the first look at some upcoming sets of 1/25 scale garage accessories.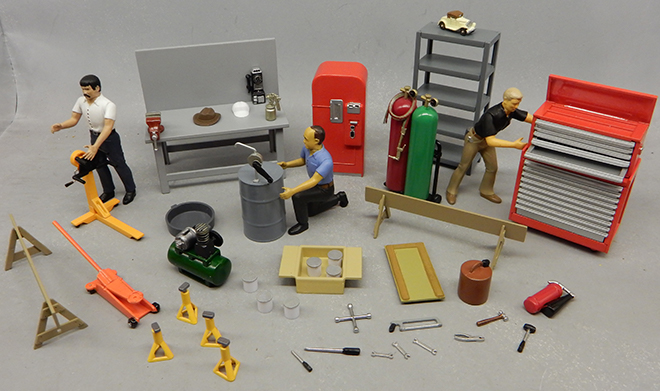
We are starting with two sets. The first comes in November and the second comes in December.
Weekend Wrenchin’ comes first featuring a hard-working mechanic, tool chests, creeper, shelf unit, acetylene welding tanks and hand tools.
This gives a detailed look at everything in the kit.
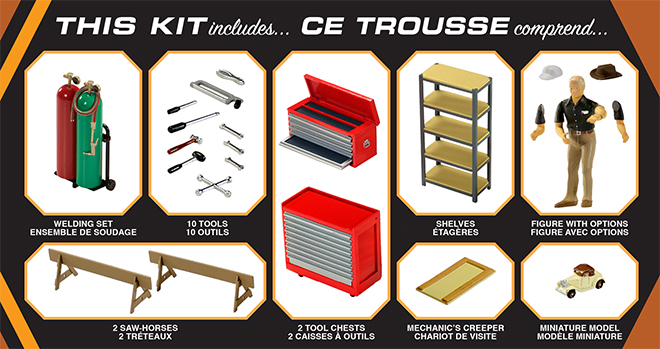
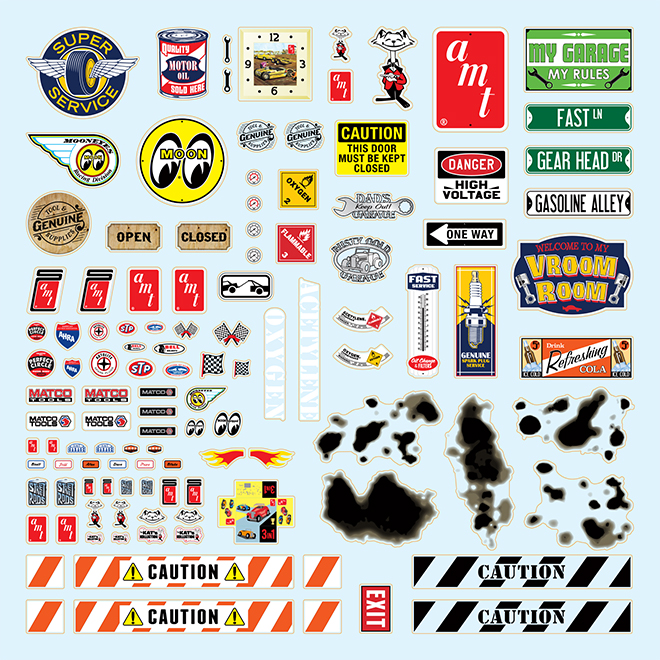
And here is a look at the great decal sheet that comes with it. All equipment labels are included along with decals for garage signs, oil stains and even logos for the figure’s baseball cap!
Look for this kit in just a few weeks!
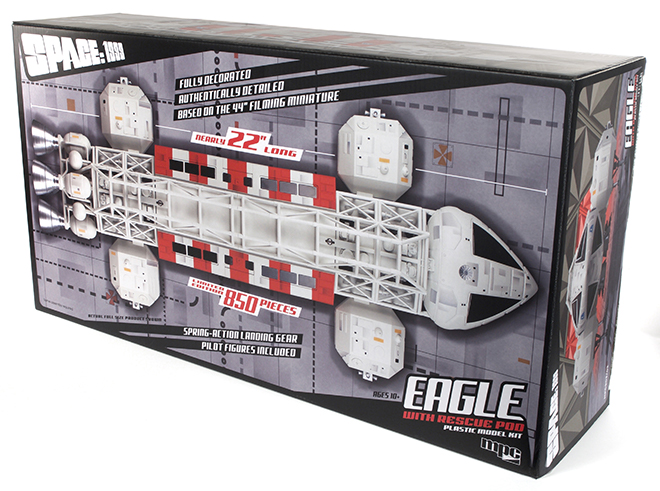
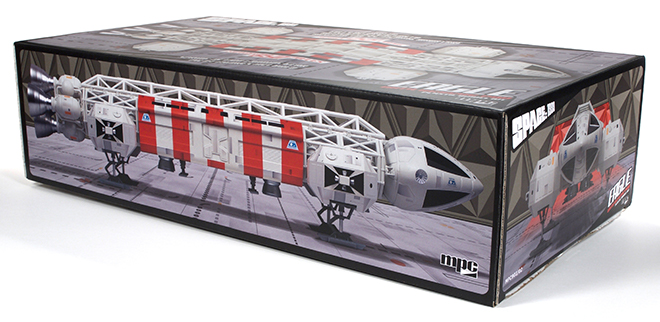
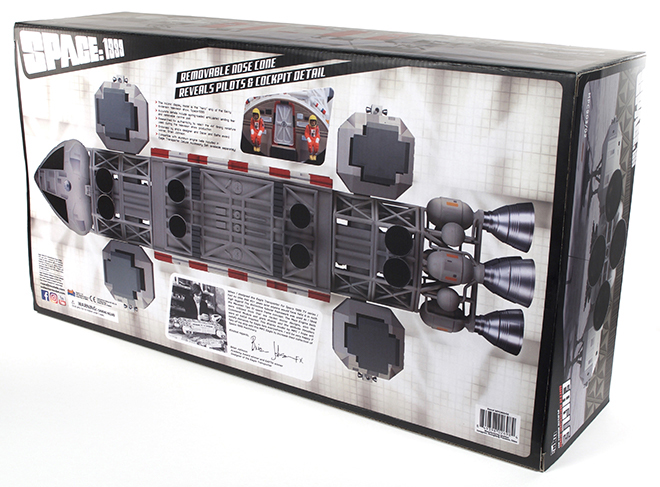
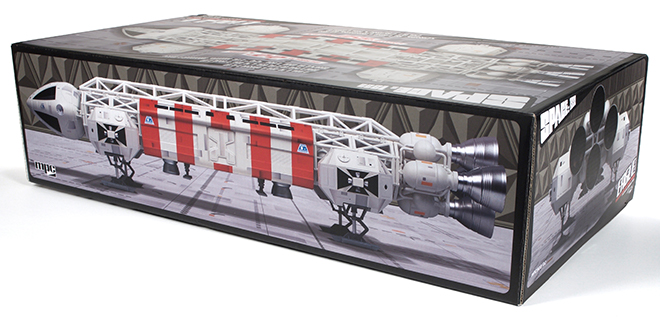
MPC Model Kits: Prebuilt Rescue Eagle Packaging
Last year’s release of our 22″ Prebuilt Space:1999 Eagle Display Model was an instant sell out. It was limited to just 500 pieces as we tired to judge the market for a fully painted and (mostly) assembled model. The response to it has been great, and as you’ve probably heard by now we are doing it again.
This time we will be releasing the model with a Rescue Pod which features its iconic red and white stripes. The weathering panels have also been changed up from last time as well. And we have bumped up our production number to 850 this time around. Pre-orders on the model have been great and we expect another sell out. We’ll see if there is still enough interest to do more later on. The model should arrive in late November or December. Here is a look at this version’s packaging.
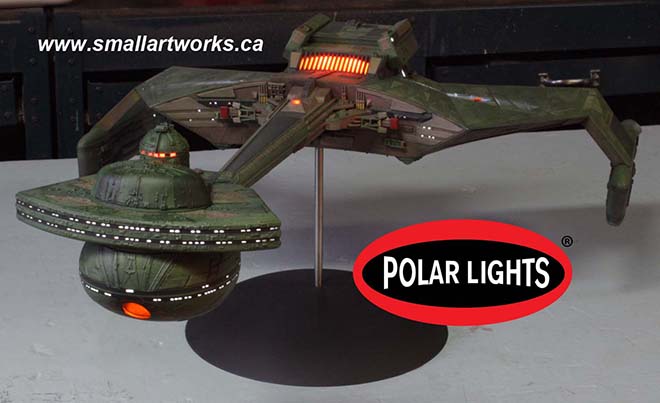
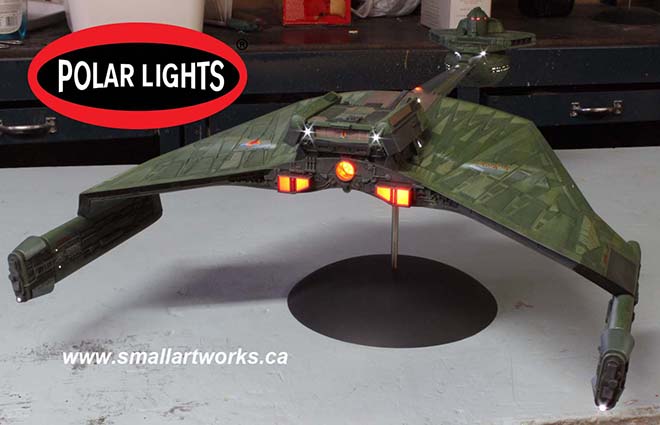
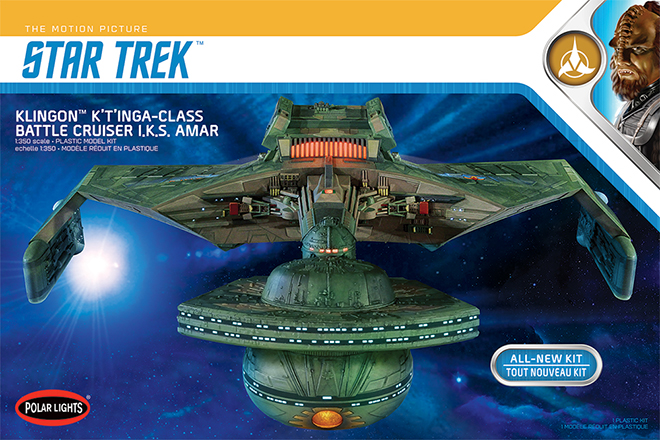
Polar Lights Model Kits: 1:350 scale Klingon K’t’inga update
UPDATE [11/8/2018] Klignon K’t’inga kits (and light sets) landed at our warehouse on Monday 11/5. It usually takes 1-2 weeks for kits to make it to retail once we receive them. So look for kits in just a matter of days!
Hi All. We just wanted to mention a few quick things about our all-new 1:350 scale Klingon K’t’inga model kit, and we won’t bury the lead. THE KIT IS ON THE WATER! That means it is currently on its way across the ocean to our warehouse. It should arrive there before the end of the month and reach retailers the first week of November. So, get your Halloween costume finished. By the time you finish your trick-or-treat candy, the kit will be here.
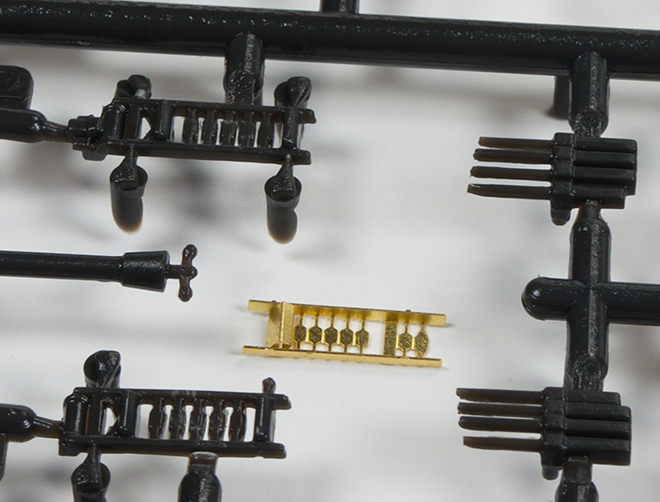
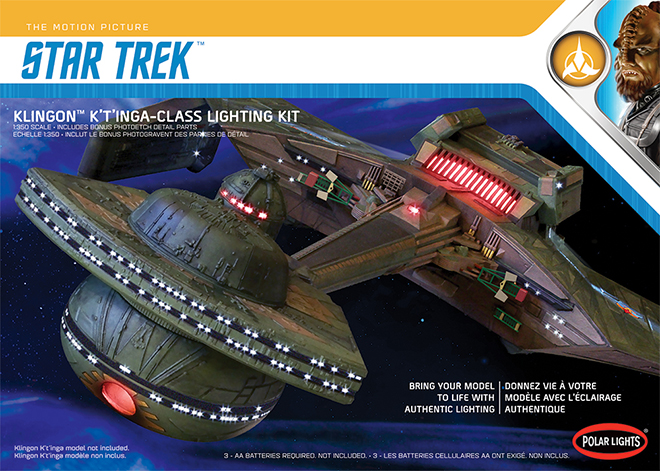
It has come to our attention that we haven’t really given much detail on one of the aspects of the K’t’inga’s Lighting Set. That is the photo-etch sheet that we have included in it. Many have asked what is included in that and why it would be needed. Well, there are several factors at play here.
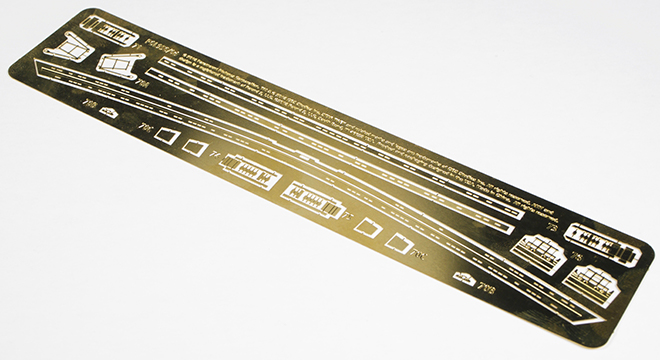
Some of the details on the studio model were too slight to properly replicate with injected styrene. We did the best we could with those parts in the kit, but the photoetch sheet allows us to offer parts closer to the original model. There were additional parts we wish we could have included, but they didn’t lend themselves to PE. In those cases, there is no better answer than to scratch build replacements. Modelers that are that particular will no doubt have the capacity to figure out how to do that.
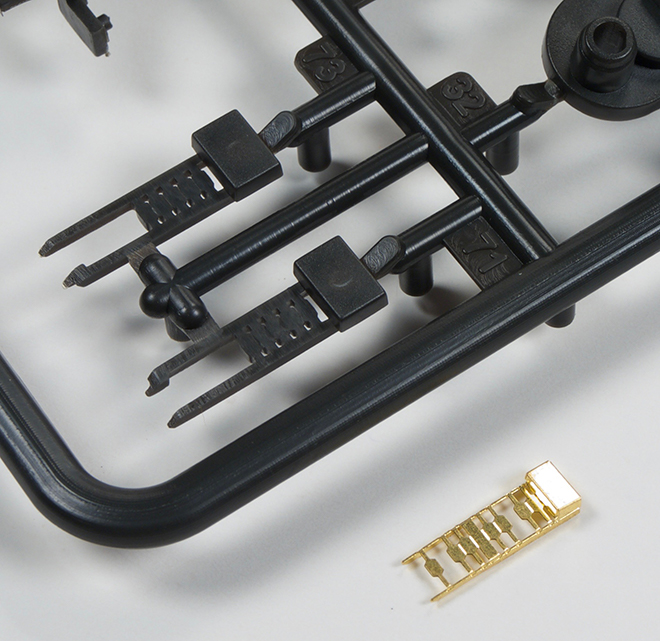
Two copies of this piece get stacked to create a more authentic replacement for part #76.
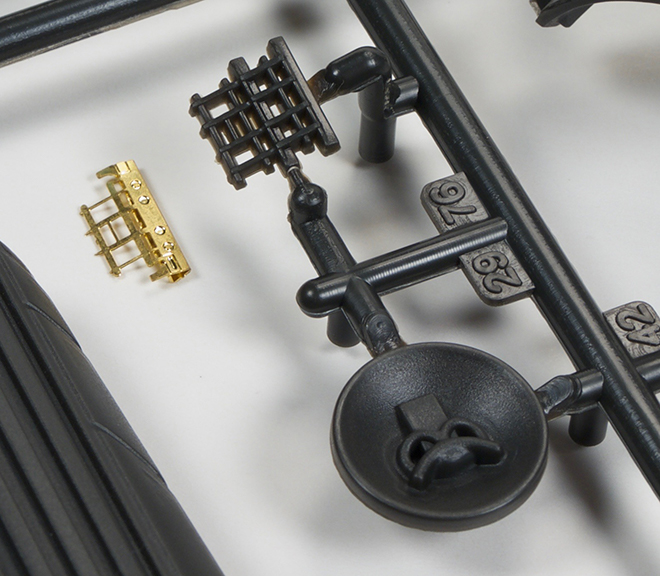
In a few cases, we didn’t have exact copies of kitbashed parts to copy when we started developing the kit. In those cases we worked form photographs and got as close as we could. Once copies of the real parts were found for reference, it was too late to change the part and stick to our release schedule. So the PE parts represent the real parts more closely.
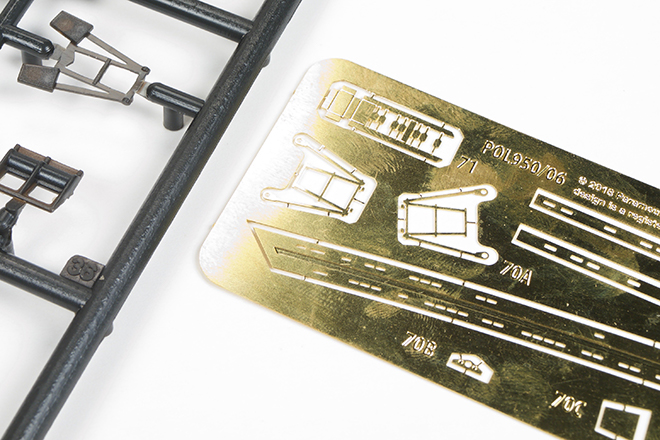
Another significant part of the sheet are window frames for the battle head. At 1:350 scale, (or 1/2 studio scale if you prefer) the windows on the cobra head and the bulb became very small. In fact, they are so small it is hard to inject them completely clean of flash. tool drafting also make them somewhat mis-formed in some places. We don’t mean to make it sound worse than they really are because the plastic parts aren’t terrible in this regard. They just aren’t as perfect as some will want. Now even the photoetch isn’t a perfect answer for the problem we wanted to address either because it WILL impact the accuracy of the model. The window frame strips are to be glued to the surface of the model which means they will protrude slightly unlike the studio model. So there isn’t a “perfect” answer, but we want to provide as many solutions as we can and let modelers decide which way they want to address it. Keep in mind that dealing with photoetch can be tricky for the uninitiated. It is intended to be used by experienced modelers.
lastly, we just want to mention that there is a an advance preview build going on that is hosted on the allscaletrek.com website.
You can find the threads for that here for the K’t’inga model kit.
and here for the Lighting Set.
They have also reviewed our recent release of the 1:1000 U.S.S. Grissom and Klingon Bird-of-Prey.
Coming off the Shelf – Cruising into Fall

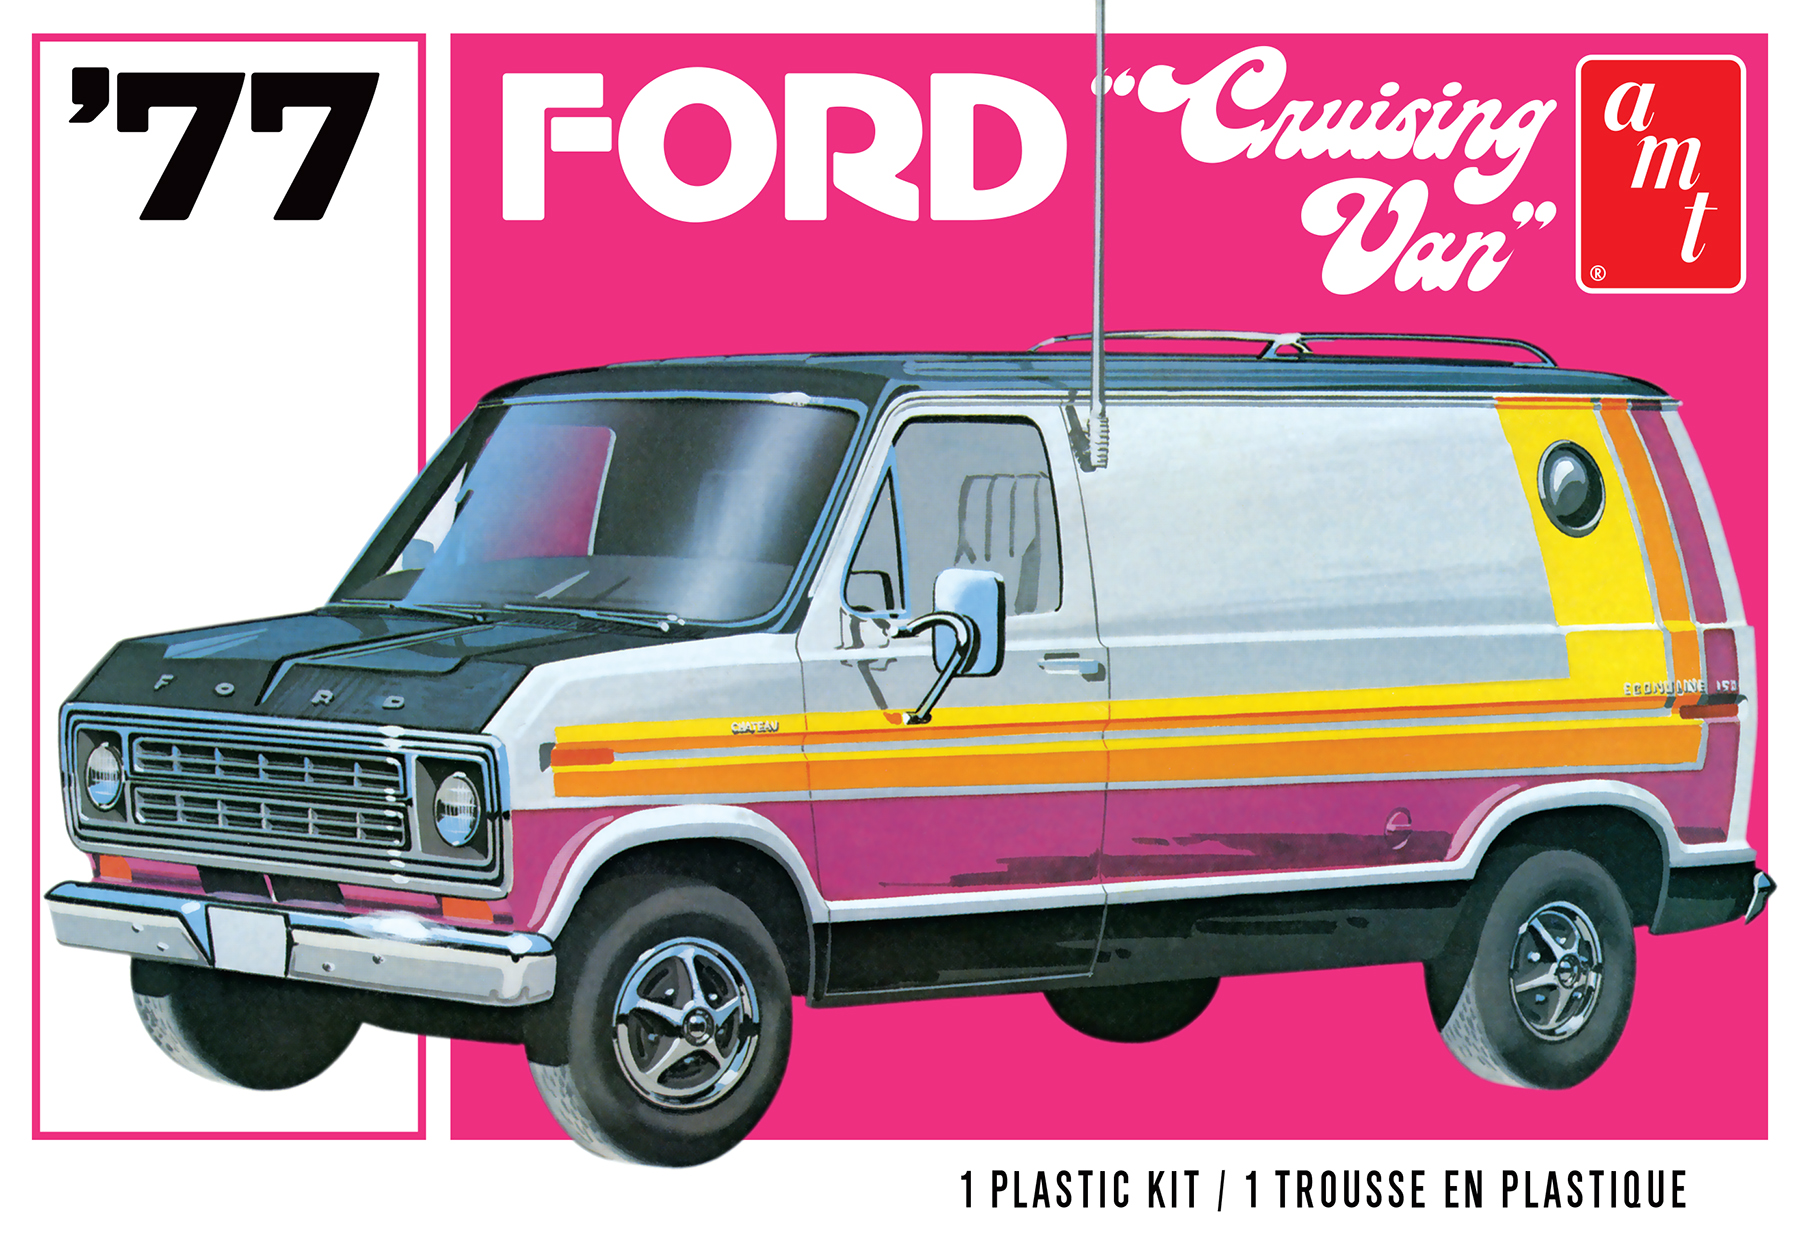
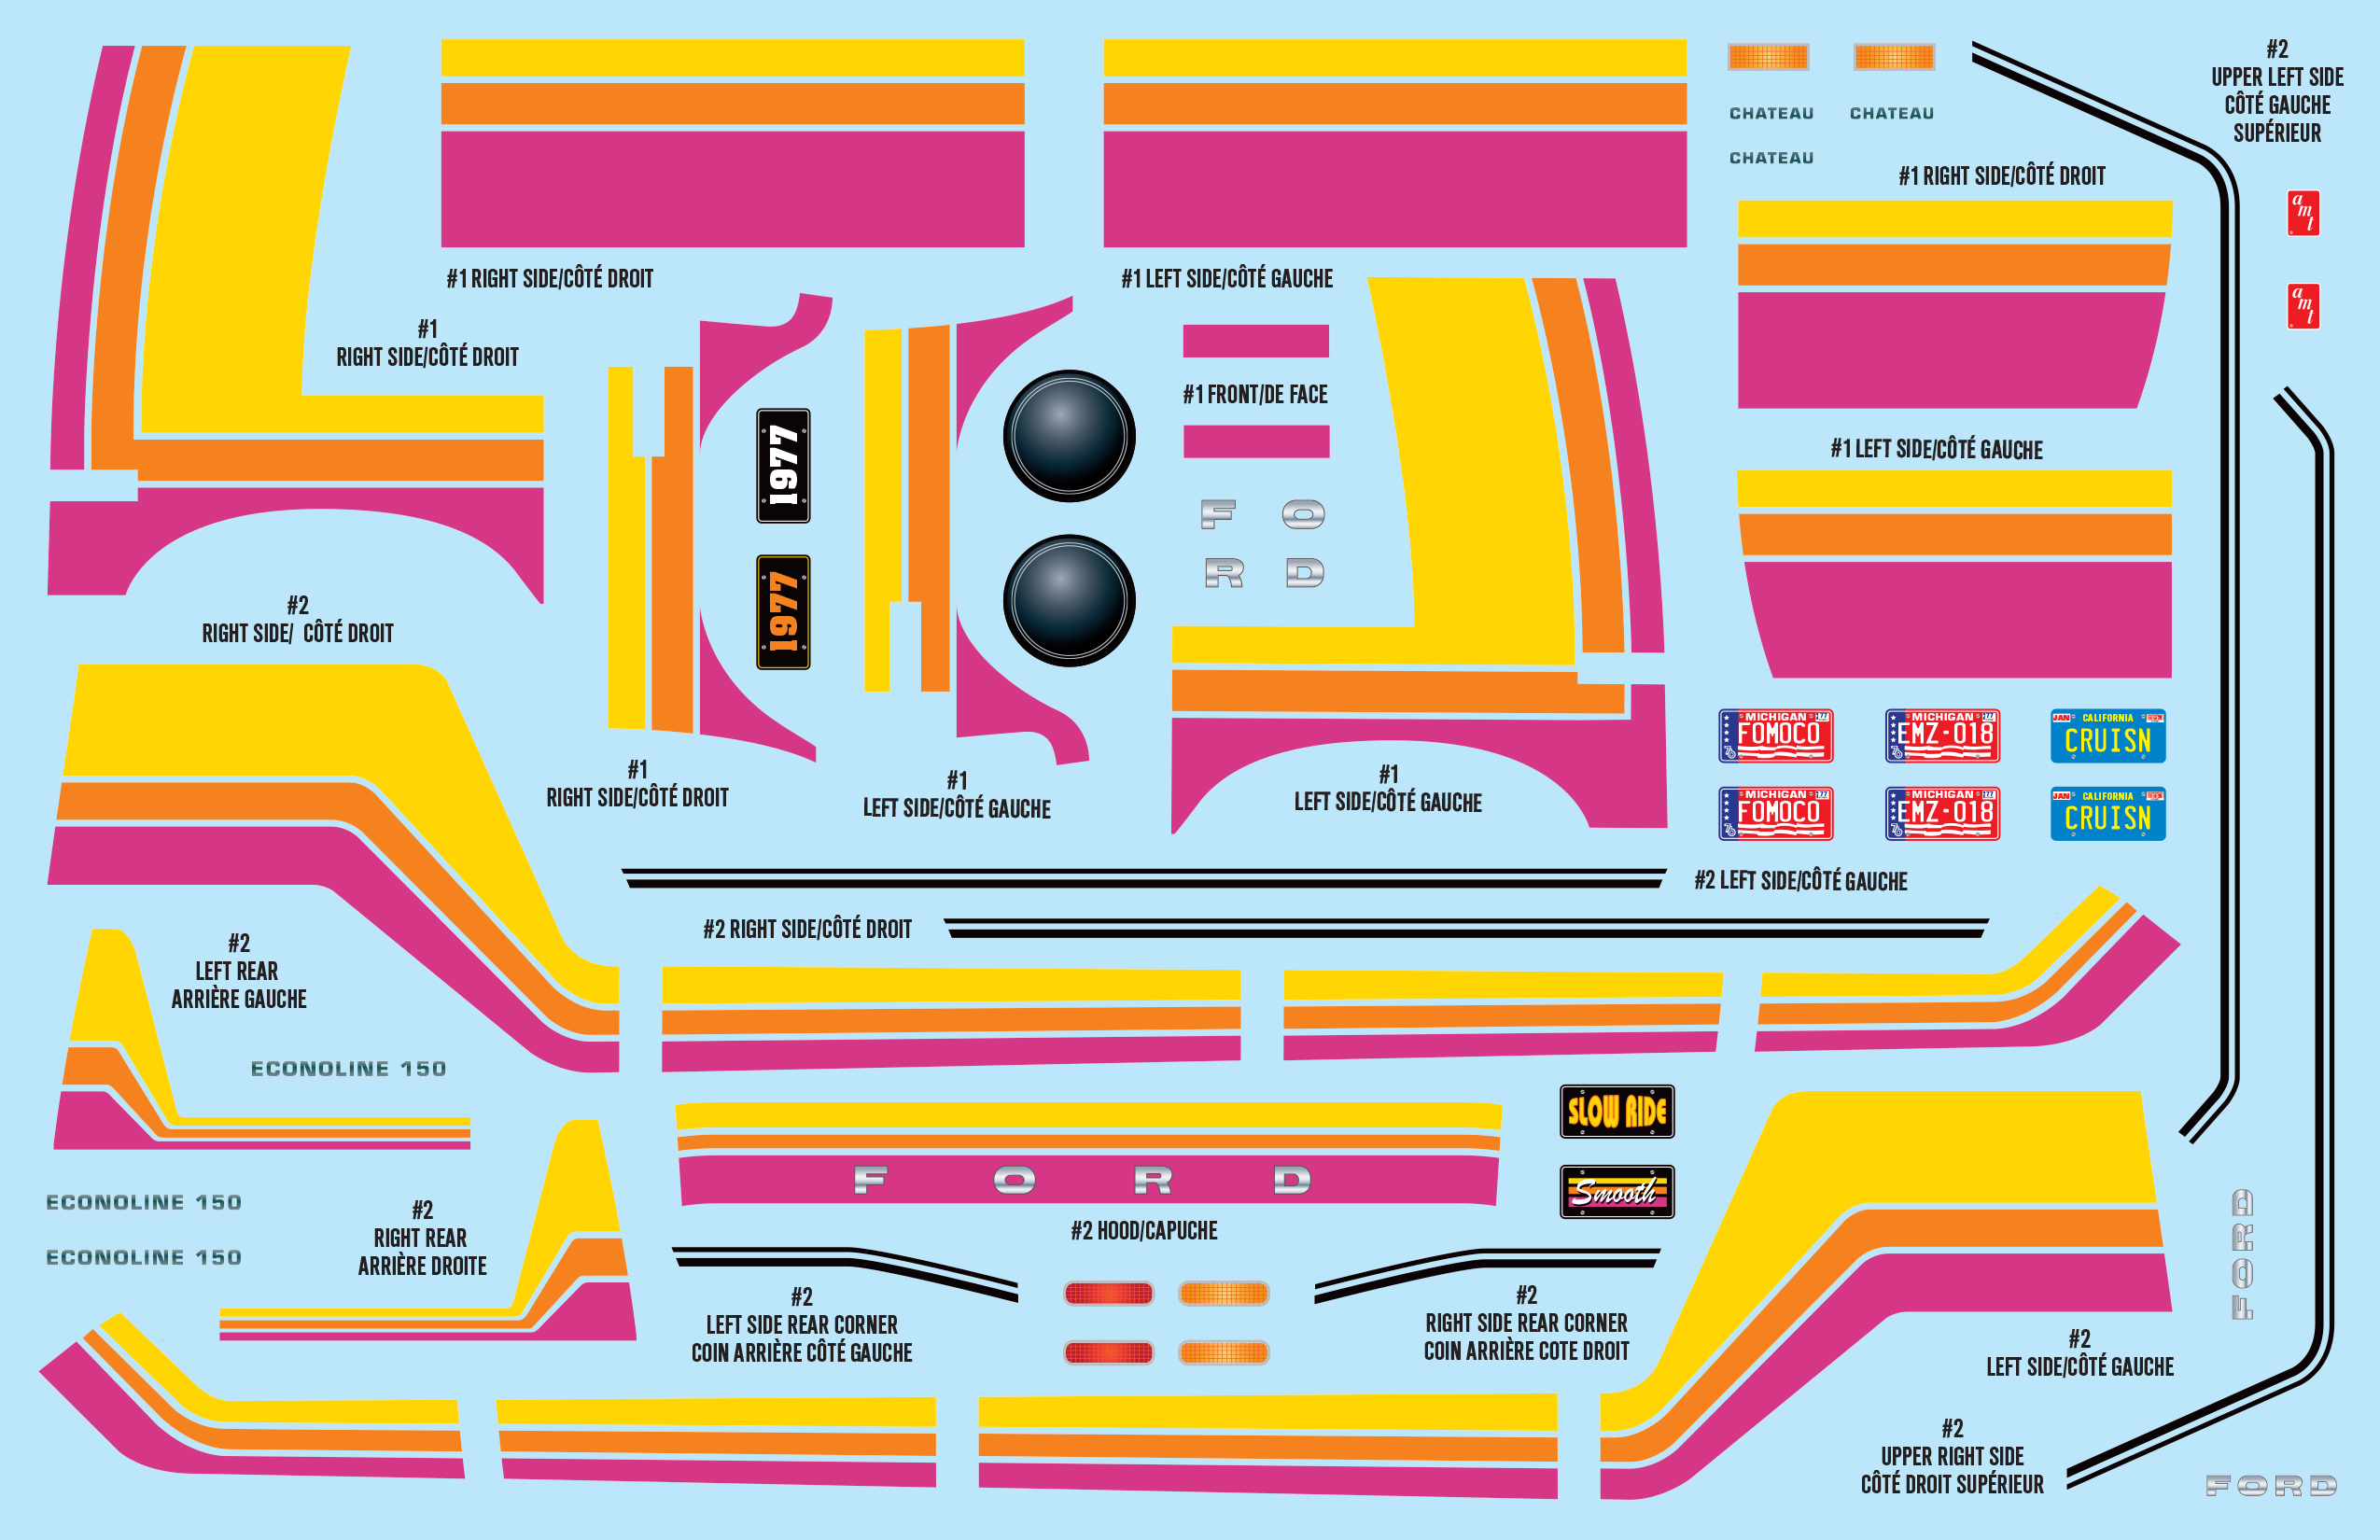
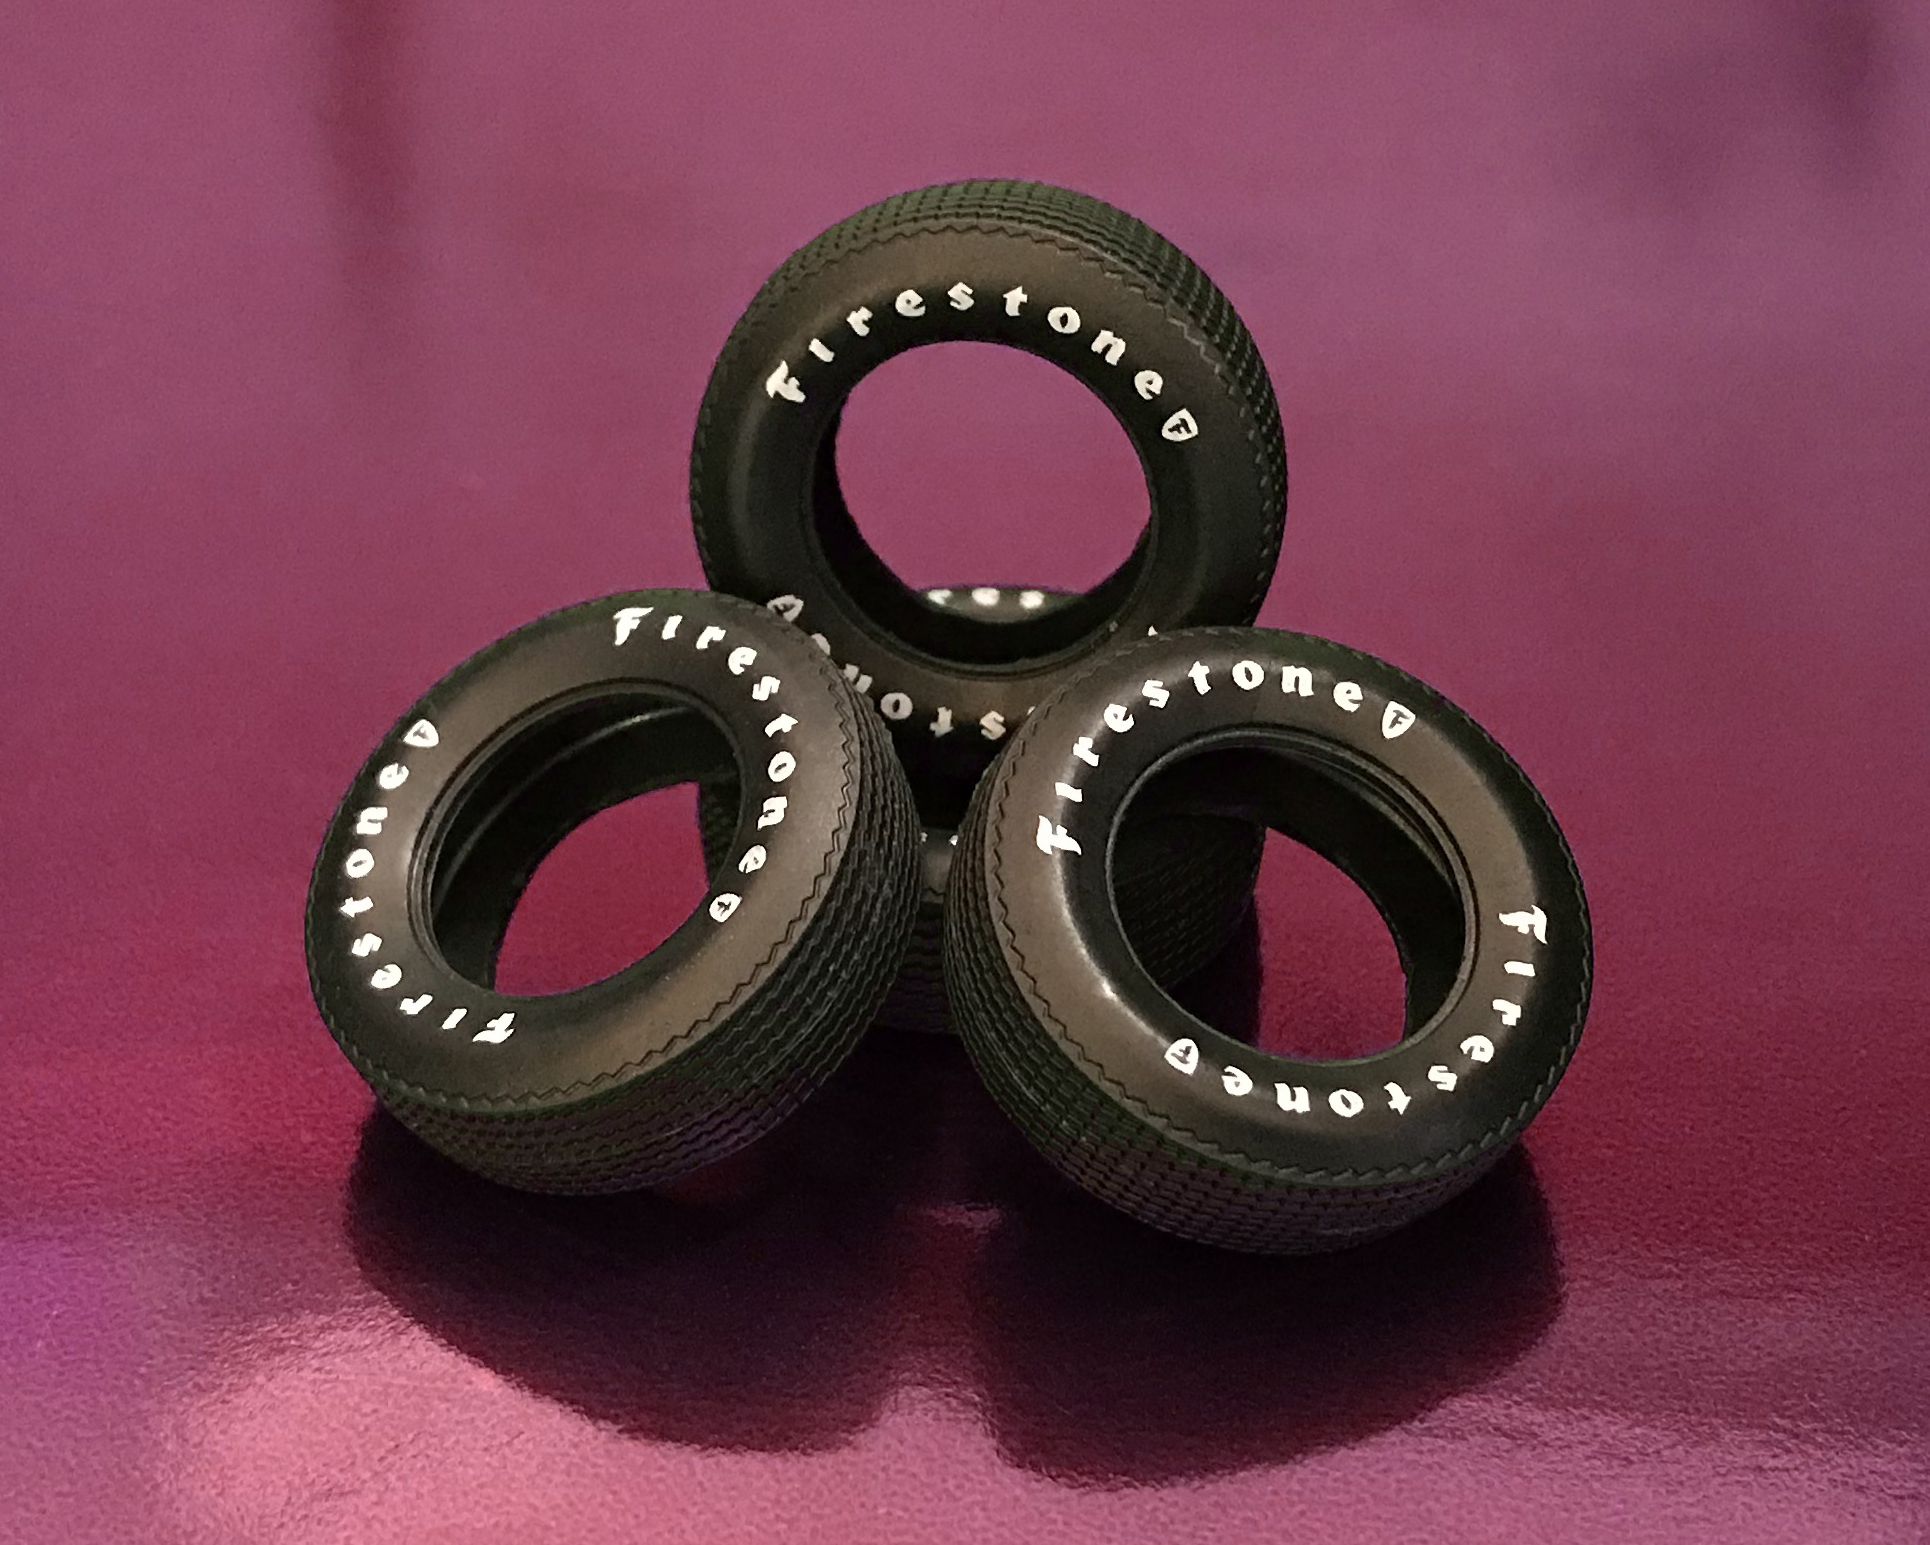
As the leaves begin to change and daylight grows shorter, the perfect time to line up your cold weather model kit projects begins now. Get things rolling with an AMT 70’s classic—one that screams for attention with it’s clean lines, vibrant decals and Firestone tires, the 1977 Ford Cruising Van. Shot in silver, the Cruising Van offers ALL NEW, pad printed Firestone tires and a large, expanded decal sheet—which now provides a second colorful option of in-your-face stripes, once offered for the real van, port hole window decals and additional detailed graphics which can only be found from the kats at AMT.
Fall is here, and so is the Cruising Van! Coming soon wherever kits are sold.
Polar Lights Models: Klingon K’t’inga buildup process Pt.7
Continuing our series of guest blogs covering our brand-new STAR TREK: The Motion Picture 1:350 Klingon K’t’inga model kit…
Finishing, The Final Frontier.
James Small, www.smallartworks.ca
Not really much to tell on this post, the last of the series on building the K’Tinga from Polar Lights, Round 2. The pictures pretty much speak for themselves. After all the main colour coats were done, it was time to weather the model, doing so with a dark green wash to tie the colours together, some airbrushing with a tiny hint of black scorching and streaks of zinc chromate. Then the decals were applied. Normally one would say you should apply the decals BEFORE weathering but in this case the decals are small and I didn’t want them to be obscured, lest the low lighting conditions used for the photography would lose the markings altogether.
The decals were test prints sent to me by Jamie in slightly past the “nick of time” we would have liked, but they worked out really well. The only challenging decals to apply are the set of four that make up the big Klingon symbol on the bottom of the ship. When you do this as you finish your kit, make sure you take your time planning them out, and they will need a lot of coaxing and setting solution. The front “splash” surrounding the torpedo tube had not been printed at that time, so I had to spray that one on from scratch by first masking off the area, spraying on some gold and then following up with a touch of clear orange to match the colour seen on the Klingon symbols.
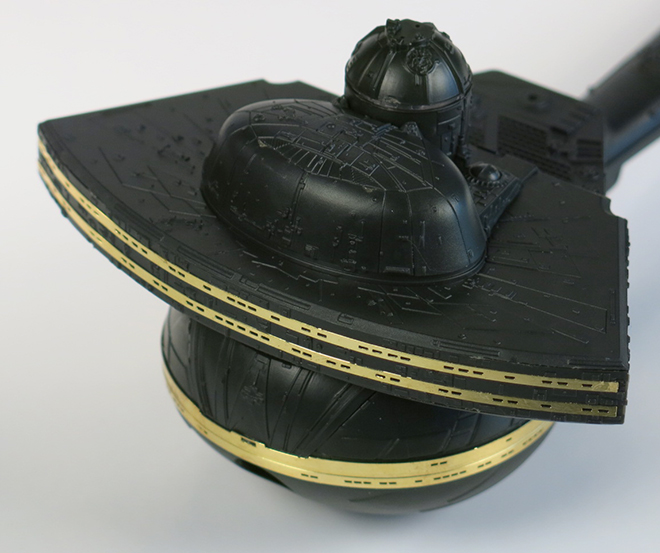
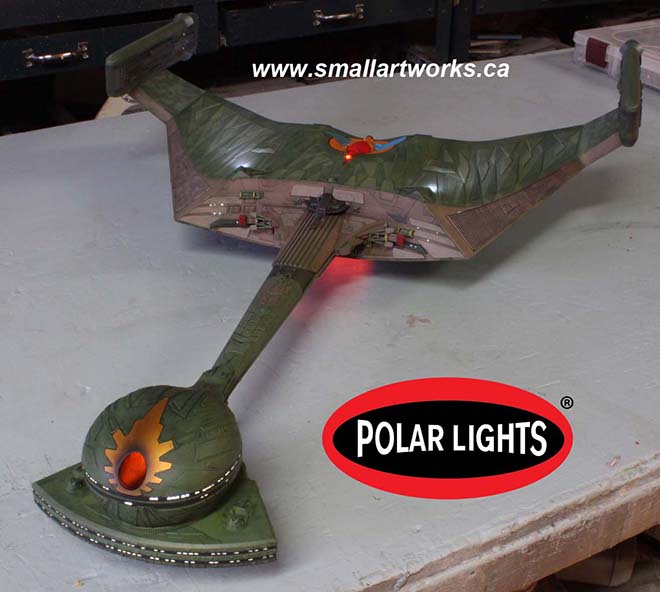
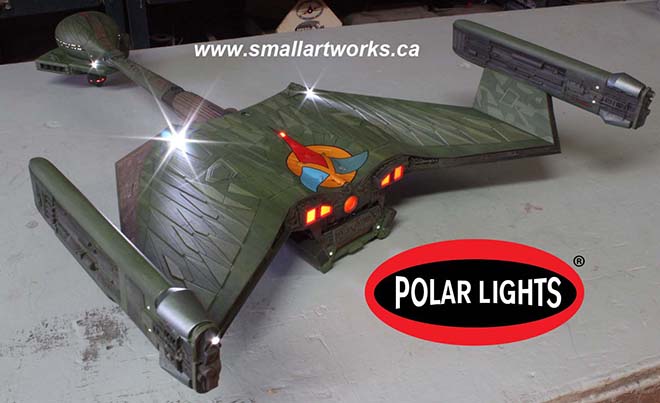
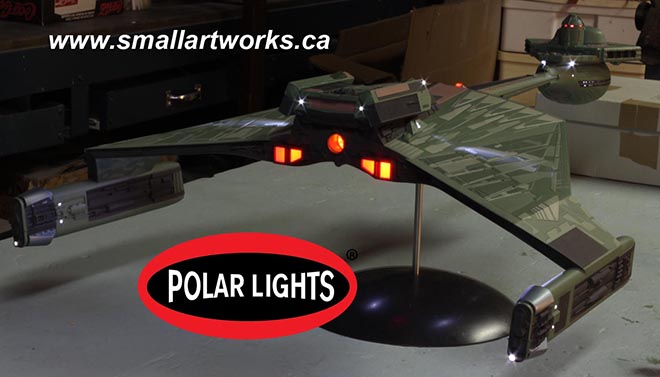
After all this was done, the model was finally finished and I began what would end up being one of the most challenging photo shoots I’d yet done for a model. It took me a full day to figure out the right balances of exposure, aperture for depth of field and lighting so it would all look wonderful on the box art. We also wanted to try to match the ominous look of the ship as seen in the film itself yet see all the details and retain proper colour balance. I had multiple light set-ups, bouncing light off the ceiling, walls, floor, some direct and some indirect, lights on stands, some attached to the ceiling, some on the floor across the room… it was a lot more complex than one might imagine for such a shoot and required a lot of time to figure out to get just the right look. Then I spent another day or two actually taking the shots. I took many dozens of shots testing it all before I could get it to look right. Because the model is so dark and required such long exposures at high resolution, microvibrations in the floor (even though concrete), in the air, whatever, maybe in the camera itself for all I know, made the camera move JUST enough to blur the image slightly. I also discovered that really long time exposures make a digital camera’s dead pixels (all digital cameras get them after even a short time of use, it’s a disease like tooth decay) really stand out like a klaxon! To account for the blurring, I had to do faster exposures with a wider aperture, and then stack shots so they could be stitched together by Jamie in Photoshop to cheat the depth of field. These challenges were exacerbated by the fact that I don’t really have professional photographic equipment, namely a more expensive camera (the Canon Rebel I have is a good camera but is after all, consumer grade) and a good solid tripod. Really good tripods that eliminate the slightest vibrations can cost a lot of money. Also, Jamie had very specific angles in mind for each shot, so it would follow his box art layout, and that took considerable time in some cases to set up and line up as well.
The build took far too long to do (I still have to paint the other two but I’m taking a short break from them to do something else for a while as I’m all K’Tinga’d out right now), the pix were done, the box art under way. I therefore present to you here and now the very first look (no, these are NOT the pictures used for the box art!) at the completed new 24” long K’Tinga kit which is right up there with the most comprehensive, most accurate sci-fi model kits on the market today!
We’ve tangled with solvents, paint and plastic. Now… it’s Chardonnay time. Cheers!
And as a special bonus, here is a look at the box faces for both the kit and the light kit!
Polar Lights Models: Klingon K’t’inga buildup process Pt.6
Continuing our series of guest blogs covering our brand-new STAR TREK: The Motion Picture 1:350 Klingon K’t’inga model kit…
Painting in Klingonese. The Grueling (But Still Fun) Part.
James Small, www.smallartworks.ca
“The Making of Jaws” pocket book printed back in the mid 1970’s has a funny line placed as a caption beneath one of the photos of the crew preparing to shoot a scene. The line has always stuck with me. I quote it a lot because I think it’s clever and is true of many things besides just film making. It reads, “It’s not the time it takes to take the takes, it’s the time it takes between the takes that take the time to take.” I was trying to find a way to adapt that to how you paint a model like this and fell short by a wide margin. The closest I could come up with is “It’s not the time it takes to paint the model, it’s the time it takes to prepare and mask the model that takes the time to paint.” Yeah. Really lame, I know. I’m not much of a meme generator. Hopefully I’m a much better model builder than a writer or I’ll have to go get a job at Wal-Mart.
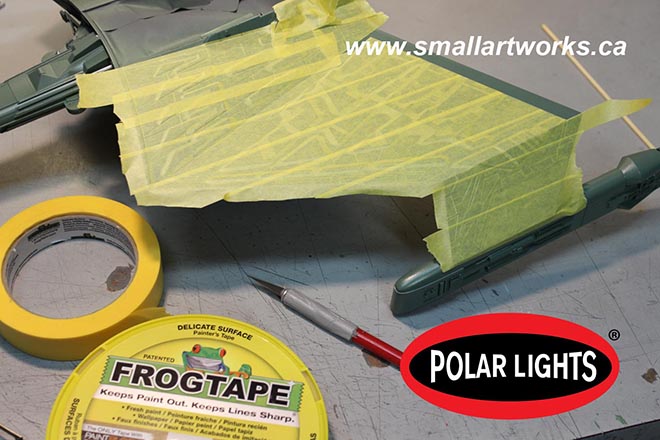
Anyway, the following shows what I consider by far to be the most grueling part of building this kit. It requires tremendous patience and even more masking tape. The tape itself is important. Make sure you don’t use some cheap-o no-name bargain tape. Use something that really works. I like to use “Frog Tape” which is readily available even here in the backwater town of Truro, Nova Scotia. It’s twice the price of standard painter’s tape but is better for preventing paint seepage under it than generic tape, but still a hell of a lot cheaper than the hobby tapes like Tamiya and so on, especially when you need to use a lot of it like on this model. It comes in two types. Regular (green) and the yellow stuff made for delicate surfaces. I used both as you will see. There are advantages and disadvantages to both. The green has a more aggressive adhesive, but the yellow type is semi-translucent and is less likely to peel off the paint you are masking over when you remove it. The hobby tapes are a lot thinner (meaning less wide) and people see that as a massive advantage. It’s easy to adapt the Frog Tape to do the same thing though. Simply lay a strip down onto a CLEAN, dry piece of glass and use a ruler and X-acto knife to cut strips to whatever width you like. Then just peel the tape off the glass when you’re ready to use it and put it in place.
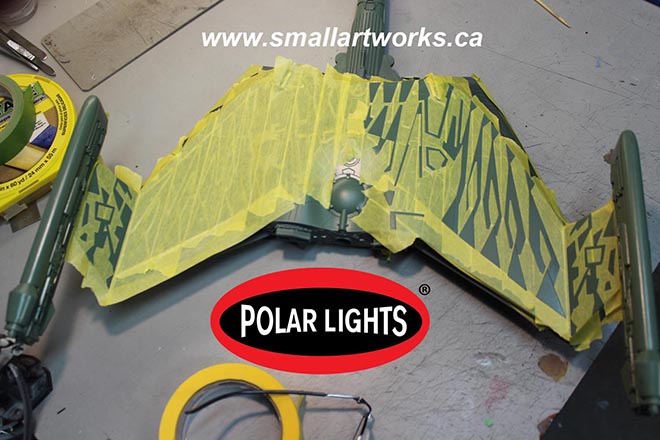
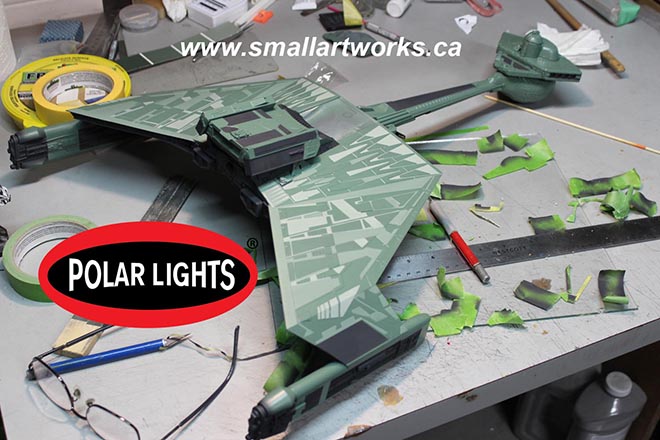
But with the green paneling that covers the bottom and top surfaces of the main body and “wings” of the K’Tinga, I opted to simply cover the whole thing in tape and then use a pointed bamboo Kebab skewer, (but toothpicks could work too) to push the tape down into the nooks and crannies and then cut out the sections that will be sprayed onto. Just make sure the edges are pressed firmly into place. Because there are three different green colours, it gets a little complicated and confusing, and is really hard to describe here so I’ll let the pictures do most of the talking.
The yellow Frog Tape is laid down onto the darkest green painted surface. Normally you’d want to paint the lighter colours first and then cover that with the darker colours, but in this case the darker green is the main colour so it was put down first over the primed and light-blocked hull (the production kit will be molded in black so light blocking will not be much of a problem!).
The long and tedious task of cutting out the panels to be sprayed first, the “medium” green colour, begins.
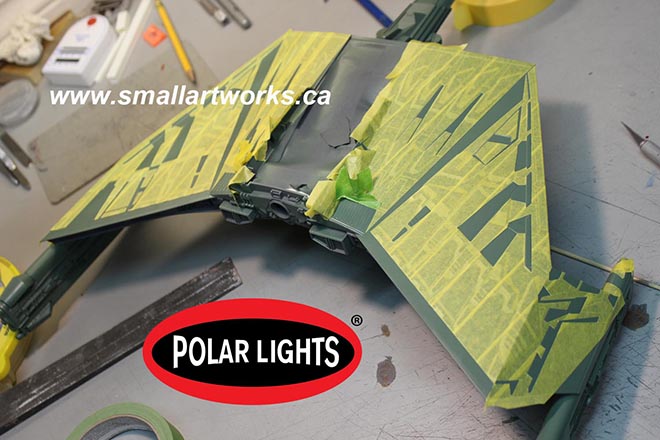
Same for the bottom.
Spraying the medium colour with an airbrush is done and then the tape is cut out and removed for the next (lightest) colour of green to be applied. All the colours were mixed by decanting various rattle can paints into a mixing cup in previously determined proportions to match the colour chips that Jamie gave me to follow. How those colours were determined was covered extensively in Jamie’s previous blogs posted or linked to on this page.
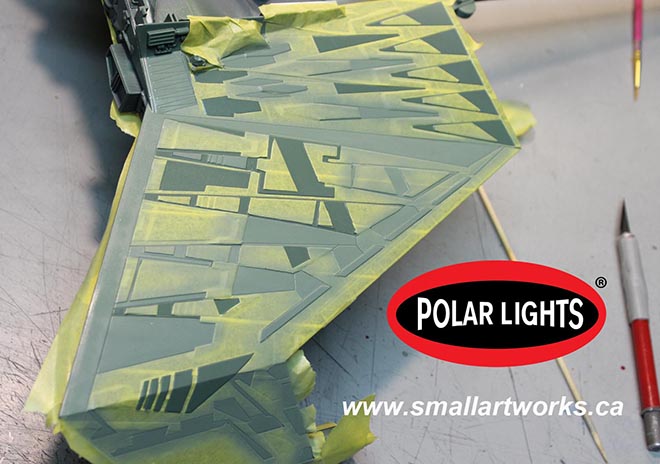
With the medium colour done and dry, it’s covered up again and then the panels that will receive the lightest green colour are cut out and sprayed.

The green colours all applied, all the masking is removed. This procedure took me several days as the alkyd paint needed to be fully dry for 24 hrs or more before the next colour could be applied, and the masking alone took many hours. All the paint was applied with an airbrush, done by decanting the paint from the rattle cans into cups, mixed to match the colour chips Jamie provided me with and sprayed onto the primed surfaces.
With the three layers of green out of the way, it was time to start laying down the other colours. This part was actually a lot more fun, as it was a lot easier, less time consuming and really started to flesh out the final look of the ship! This picture shows the model with the “light black” sprayed on. For this, I used 10 parts black Krylon primer (which is not true black to begin with but actually an extremely dark gray bordering on black.. difficult to describe!) mixed with 1 part white primer, and it seems to have the right effect. The nice thing about using primers is that it dries quickly, is less likely to react with the paints underneath and provides a nice silky matte finish.
The indescribable brown/tan/pink/oxide/mauve/taupe style colour… (I’m convinced that the VFX people said to themselves “Let’s see if someone forty years from now will be able to figure THAT one out when they try to build replicas of this ship!”) was painted on after the black, so all the green and black were masked off as one should expect and the pinkish stuff was sprayed on. Since there was also a lighter colour of pink to spray on, the same was done for it as was done for the green for various panels. I cheated in some areas and simply brush painted a few of them.
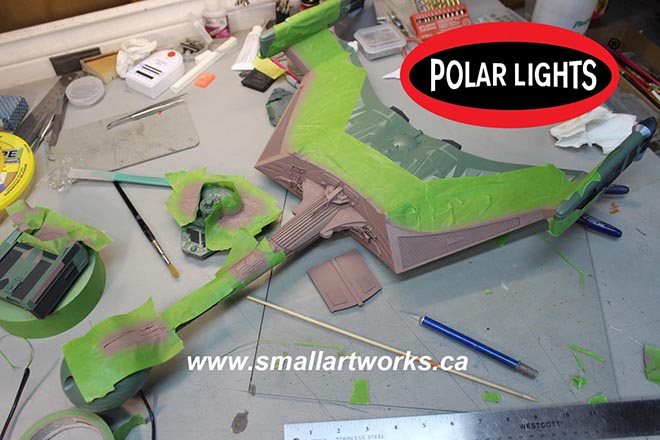
Starting to look the part, eh?
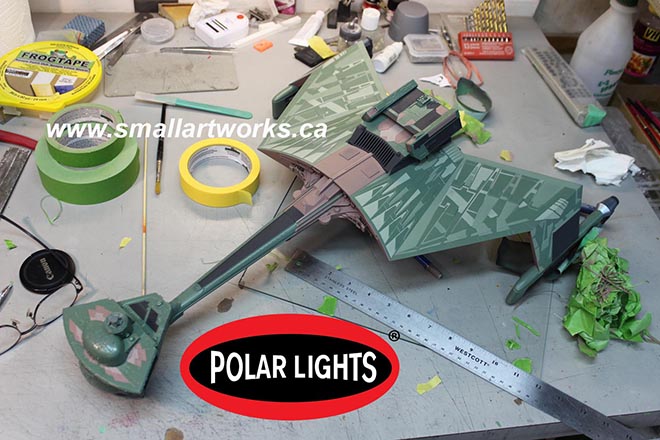
Now some of the smaller details are decorated using the old tried and true brush painting method using the small jars of easy to use hobby paints. There are some errors as seen here which will be touched up before proper photography.
The model is nearing completion. Lighting is tested and paint work evaluated. At this point I did some photography of the model in this state for some of the painting instructions that will be included with the kit. Jamie will work his Photoshop magic as required to perfect the shots as needed to make sure the model is accurately depicted.
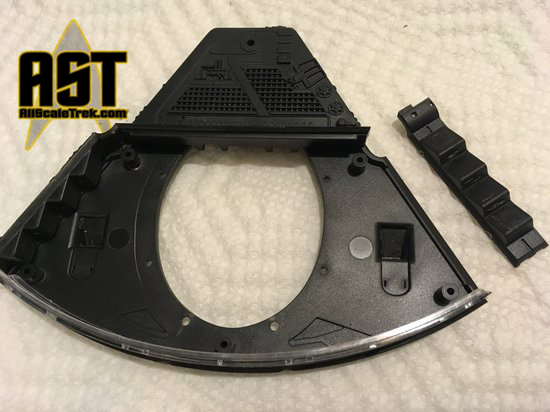
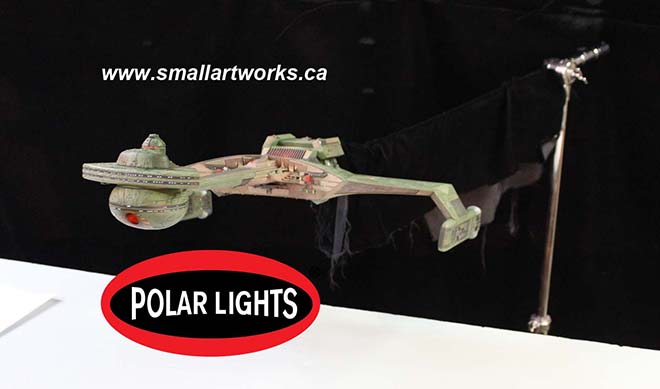
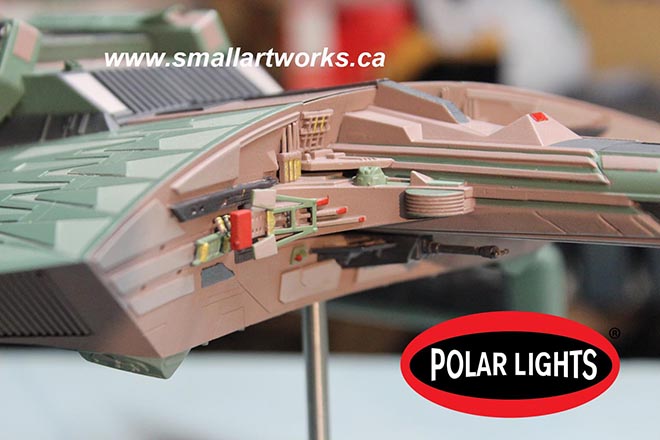
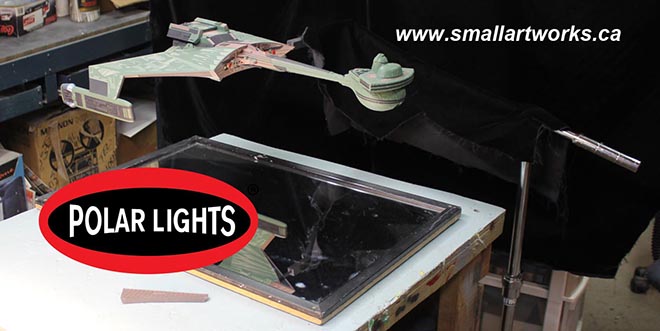
The mounting point modifications I made for this particular one can be seen here used as designed. In this case, the left grille, normally held in place with a magnet and seen here below the Polar Lights logo, is removed and the model mounted to a C-stand in front of a black velvet backdrop over a mirror to bounce light up onto the underside surface to give it a flat-lit appearance. It was shot using a 300mm lens from about 25 feet away, making the photos appear mostly orthographic so as to best show off the paint work in a blueprint-like format. The removable grille and other hatches designed into the modified kit as described previously allows the stand to be mounted into the model away from camera so as not to be in the way of any other parts of the it when photographed. This technique has become a staple for much of the photography I do for Round 2’s box art that Jamie uses to show how to decorate the kit for you, the builder. This makes finishing as clear as possible using actual photographs of the finished model in full colour instead of the usual crude grayscale diagrams that used to be done by kit makers in the past. Similar setups will be used after the model is completely finished with decals and weathering and dramatically lit for some VFX shots for the main box art photography.

Now you can see why I made all those modifications!
One more blog post to follow when the model is completely finished.
Jim did an excellent job matching the paint swatches I sent him, but everything turned out lighter in real life than I had guessed. I would never ask him to remask and repaint this ship. Luckily, we have the weathering stage to darken it up and the magic of Photoshop to get the look we want on the packaging. But did you see the light!?! Holy cow!!! -JH