Recommended Sites


Archive for the ‘Round 2’ Category
Lindberg Table Top Navy: HMS King George V and HMS Dorsetshire
First, for those of you I haven’t met my name is Chris Purvis. Last year I manned the booth at Wonderfest with Jamie. I work primarily on the Lindberg/Hawk line doing the military and historical kits (airplanes, naval boats, sailing ships, tanks, etc.). The occasional car or oddball kit will also end up on my desk. Before switching over to Lindberg in 2014, I worked on the Forever Fun line. Next month I will be celebrating 3 years with Round2. Also, I am a big nerd for movies and vintage sci fi, so if you want to get off topic in your comments go that direction. -ChrisP
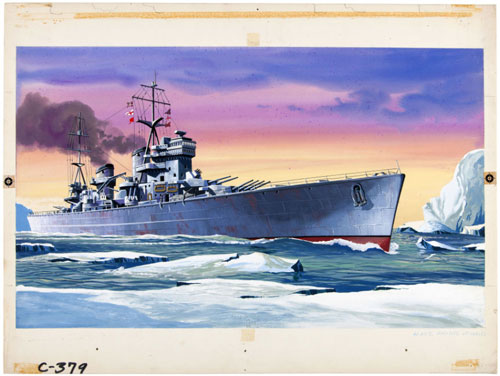
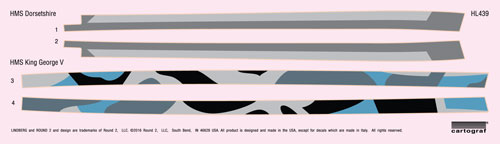
Available soon will be the 3rd 2-pack in the Lindberg Table Top Navy Series, the HMS King George V & the HMS Dorsetshire. The kit features two World War II British Battleships in 1:1200 scale. Like the previous ships in the series, they can be displayed as Full Hull or Waterline models.

Recently we’ve been able to acquire some of the original box art paintings used on old Pyro and Lindberg kits. The King George V box art is from a new scan of the 1959 painting. It is amazing to see some of the original detail and brush work put into these pieces of art.
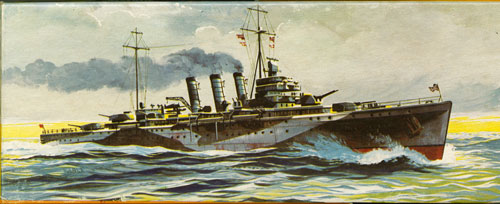
For the Dorsetshire I scanned the 1959 packaging. From my research I could not find any references to the ship ever have the depicted camouflage pattern. I altered the image to show this known hull scheme.
Before….

After…
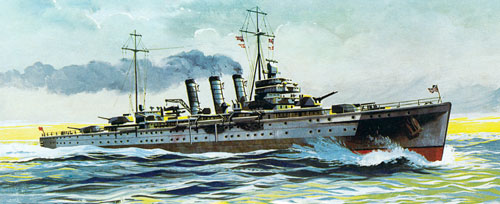
The kit will include that hull scheme for the HMS Dorsetshire as a decal, along with a dazzle camo option for the HMS King George V.
Round 2 Models: Wonderfest 2014 roundup
Another Wonderfest has come and gone once again. I have to admit that though this year’s show didn’t sneak up on me it seems like the time needed for planning for it gets pinched more and more every year. In such great haste, mistakes are bound to happen. Luckily they were small and no one got hurt. (What is it with me and Star Trek ship name spelling…?)
More than anything else show attendees want to see what we have coming next. In light of recent events (which I’ll get into later) I’ve decided it is best to wait on getting too far ahead of ourselves with product announcements. So, we focused mostly on things that are coming very soon, but we still slipped in a few things that we feel confident enough to talk about.
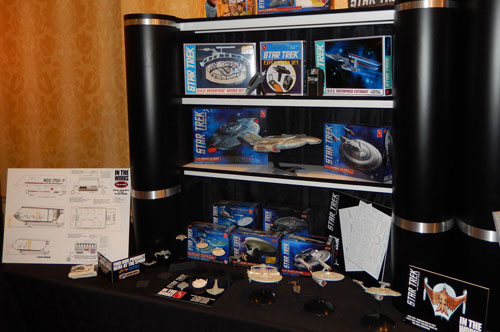
On the Star Trek front, we had…
The U.S.S. Reliant 1:1000 scale snap kit which will be out very soon. I received production samples the day I returned from the show. This means the kit is about 4-6 weeks from hitting store shelves.
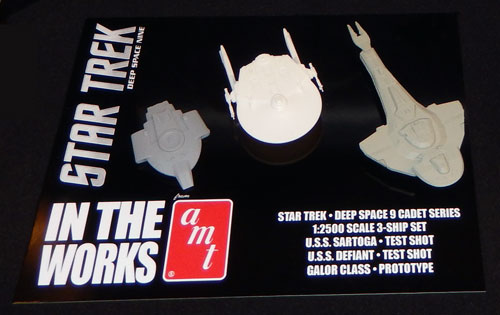
The next new kit on deck is a 3-ship Cadet Series set that focuses on Deep Space 9. It features the U.S.S. Saratoga, U.S.S. Defiant and Galor-class ships. As usual the set will include full decals for all three ships.
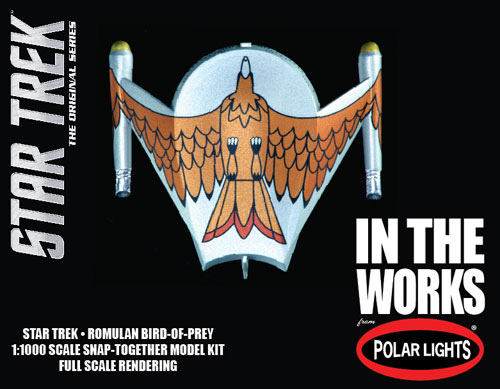
New to our 1:1000 scale ship lineup of will be the TOS Romulan Bird-of-Prey. The ship is a personal favorite of mine. We are just getting started on it, but we hope to have it out in about a year.
Also coming in 2015 will be a reissue of the U.S.S. Enterprise Cutaway. We are just now starting to examine the kit to see what changes we might make to it. I wouldn’t expect anything terribly extensive, but we’ll see if there is anything “logical” we should do to improve it from previous releases.
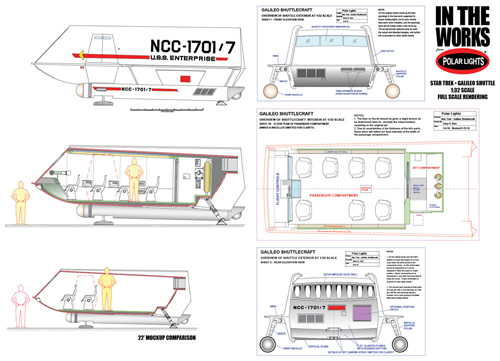
Lastly, though it may not look like much as far as our display goes, we’ve completed the overall plans for the Galileo shuttle kit. So we can now begin the mockup process.
Next, Space:1999…
We showcased our new reissue of the Moonbase Alpha kit. It features an all-new four-part vacuform base. I know dealing with the vacuform base in the past was kind of a hassle, so we’ve done what we can to make it as easy as possible to assemble and hide the seams. The new base was necessary to present the entire layout of the base including five all-new launch pads that feature optional docking extensions and new in-scale Eagle transporters. The travel tubes are included as separate pieces where the original release had them embedded as part of the base. New decal artwork rounds out the improvements. These are supplied for the launch pads as well as the computer terminals for the command center interior.
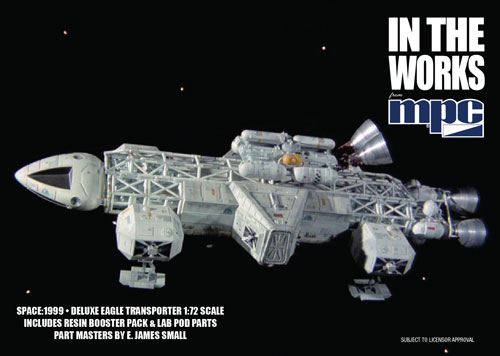
The next development for license is a Deluxe Eagle Transporter. This kit utilizes our existing Eagle kit, but now includes resin parts for the laboratory pod and booster pack.
For the Alien license…
We showed our RP of the resin XO Kane kit which was a little worse for the wear having been sent around the world and back. The #1 question we got at the show was “when will this be available?” We hope to announce a price and release date for the kit soon.
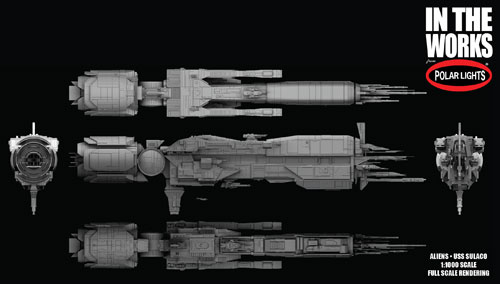
We also showed the CG work done by Angelo Bastianelli on the USS Sulaco. His work has since been approved by the licensor so we’ll be moving to the next step on the ship. I hope to get the kit to market in 9-12 months.
Best of the rest…
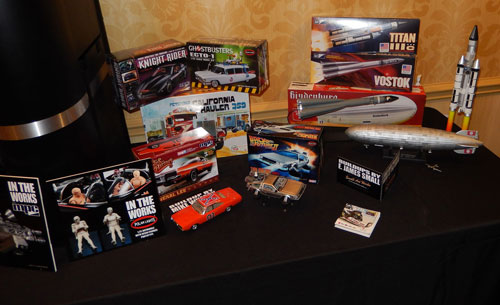
We presented our Back to the Future II Time Machine and all-new General Lee snap-together kits along with a reissue of the Hindenburg. All should be out later this summer. We gave a preview of new Lindberg reissue box art that shows our approach to using vintage art and design cues in a fresh way. Everything else on display is available now from your usual hobby retailer.
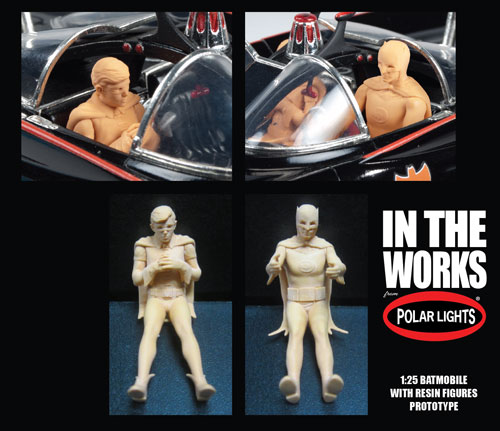
Along with the compliments on our product, we also fielded questions about a few projects that were conspicuously absent. After “When will Kane be available?”, the next most common question was “So, what happened to the Wicked Witch kit?” Please believe me when I say there isn’t purely one reason, but a pile of reasons that made us reconsider releasing the kit. The final decision was hotly debated here and was a painful one to make. Unfortunately the Witch wasn’t the only kit we have to talk about… Sadly, I had to inform those that asked that the King Kong kit which we’ve shown images will also be cancelled as will the Marvel Comics Thor kit and 1966 Batman & Robin 1:8 scale figures. None of these decisions was taken lightly and I can assure you every one was fought for to continue.
I’m loathed to end a blog post on such a down note, so back to other aspects of the show…
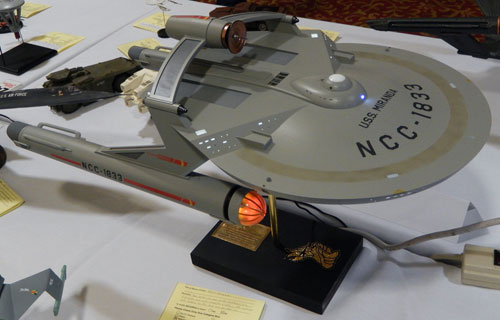
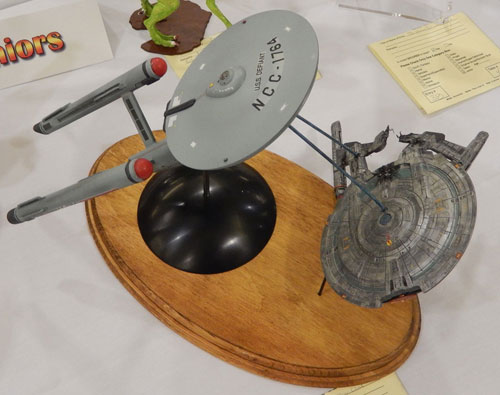
For the past three years Round 2 has presented awards for the “Best Use of a Round 2 Model Kit” in the Wonderfest model contest. This year’s competition had a record number of entries with well over 600. As usual, the level of quality in the buildups was amazing. We present our award for three categories Adult, Teen and Junior. This year’s adult winner was David Lewis who used one of our 1:350 scale TOS Enterprises to build his vision of a TOS-era Miranda-class ship. It was a beautifully built model that featured lights as well as interior details like an arboretum and dual shuttle bays. The junior division winner was Alex Tabor whose diorama presented his vision of the TOS U.S.S. Defiant making waste of a mirror universe Enterprise era ship. Unfortunately, we ran into the same problem we had in the past two years as no buildup was entered in the teen division that had used one of our kits. We’ll have to reconsider next year’s awards and probably do one award for junior/teen. Alex walked away with both junior and teen prizes which featured three 1:1000 scale Star Trek kits (child award) and a pile of kits including the Man In Space rocket set, 1:144 scale C-57D and an Enterprise-E (teen award). David walked away with a $100 coupon for autoworldstore.com. Congrats to the two of you. Also, I want to send a special shout out to Mark McGovern who we have build our own “amazing figure models” who took away the big award for Most Amazing Figure sponsored by Amazing Figure Modeler magazine. His work on the Absorbing Man was truly “amazing.”
As always, it is great to see everyone at the show. We always walk away with the clear message received that we are doing all right by everyone there. I personally have to say that it is my pleasure to be there. I always leave with a sense of renewed vigor for the tasks awaiting me when I return to the office.

New York Comic con is just around the corner!
New York Comic con is just around the corner – October 10-13, 2013!
Round 2 will be there – stop by and see us at booth 443. You won’t want to miss our new model kits, die-cast cars, slot cars, Forever Fun, Captain Action, and even the Wicked Witch of the West will be in display.
http://www.newyorkcomiccon.com/
Round 2 Model kits: Recreating the MPC Alien Box Art
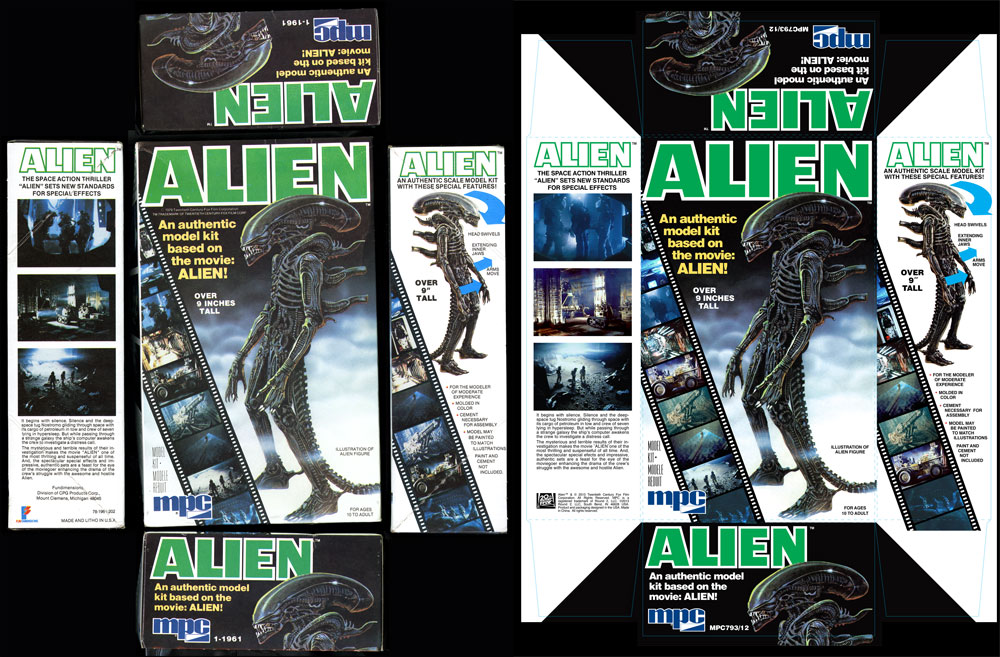
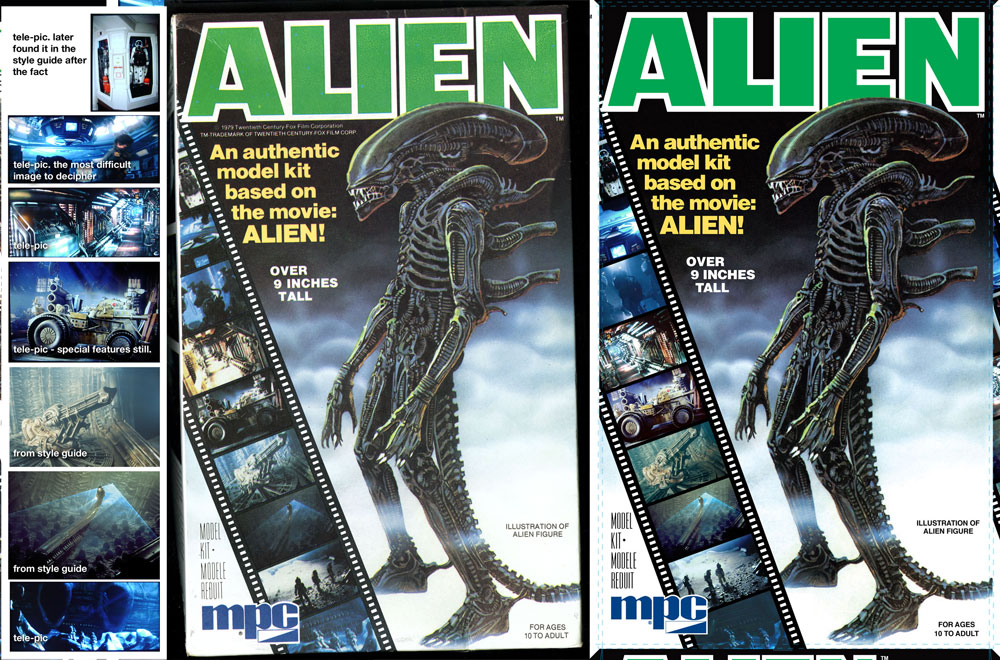
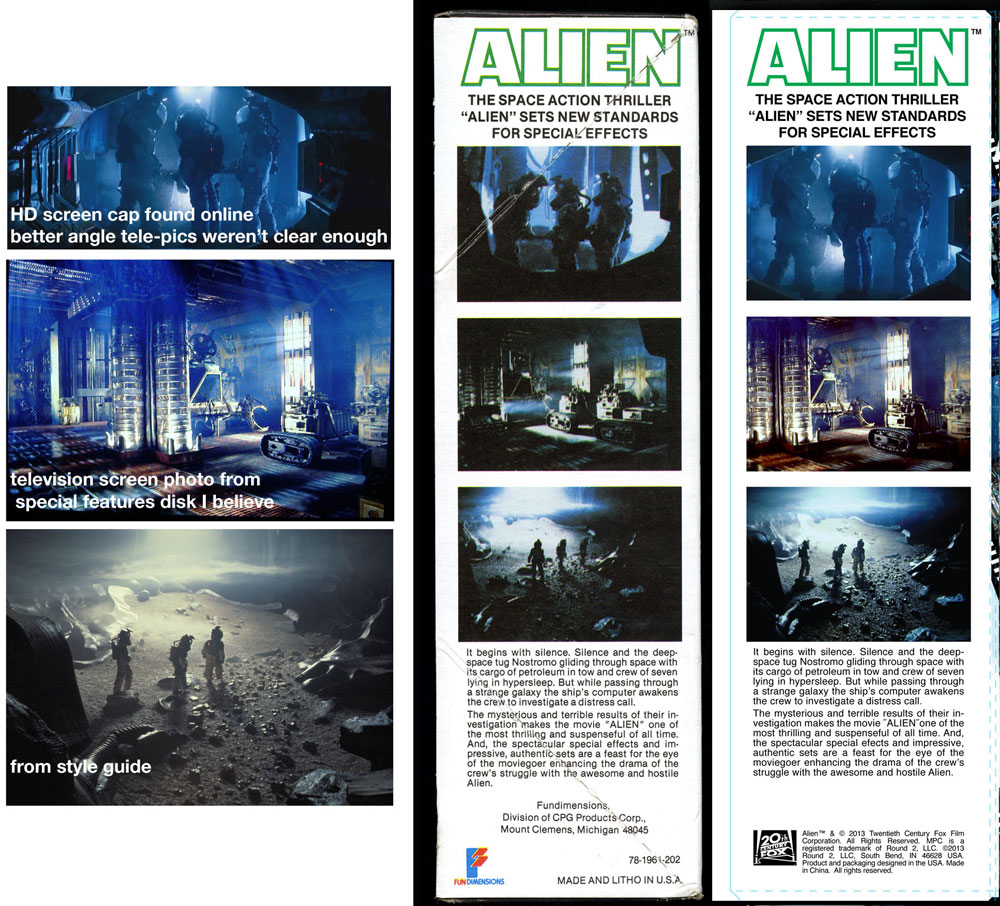
In the process or recreating the original MPC Alien box art, I had quite a time finding all of the images that were used originally. Modeler and historian, Mat Irvine, recently inquired about what the differences were. It was a fascinating hunt, so I figured I would reorganize my explanation and share it with you guys.
First, I’m showing the before and after images. The left side shows the original raw package scans of our vintage kit. The right shows our final production art. Whenever we reproduce a package we take a little bit of liberty to punch up the color slightly to account for fading. We replace any solid color with our best guess of the original CMYK values. In this case, the green in the word “ALIEN” was 100% cyan and %100 yellow. The scanner always captures values of magenta and black that was never on the original piece. Otherwise, we force black to become black, white to become white, etc. and generally touch up the image as needed to remove printing flaws or dirt.
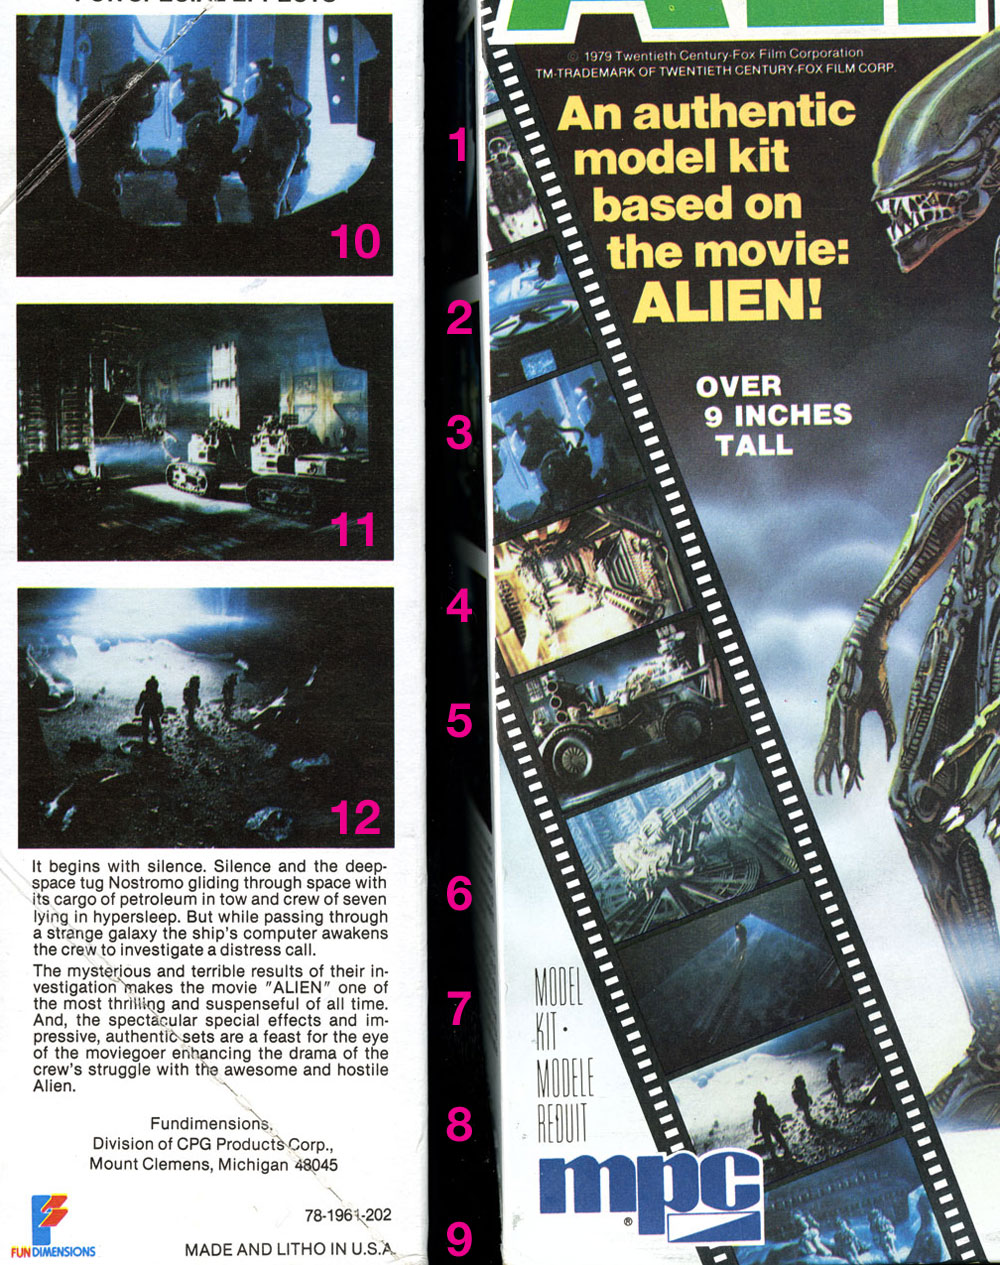
The challenge of this particular piece was the small inset images in the filmstrip on the front and side of the box. I knew that many of the images were familiar and figured I could find them either in the licensor’s style guide assets or could be found online. Since they were relatively small, even medium-res images would work well enough. I decided to hunt them all down rather than spend time doctoring up the small shots that when looked at closely really broke up due to the larger dot size that was used during printing back in the day. Upon close review, the images were rather muddy.
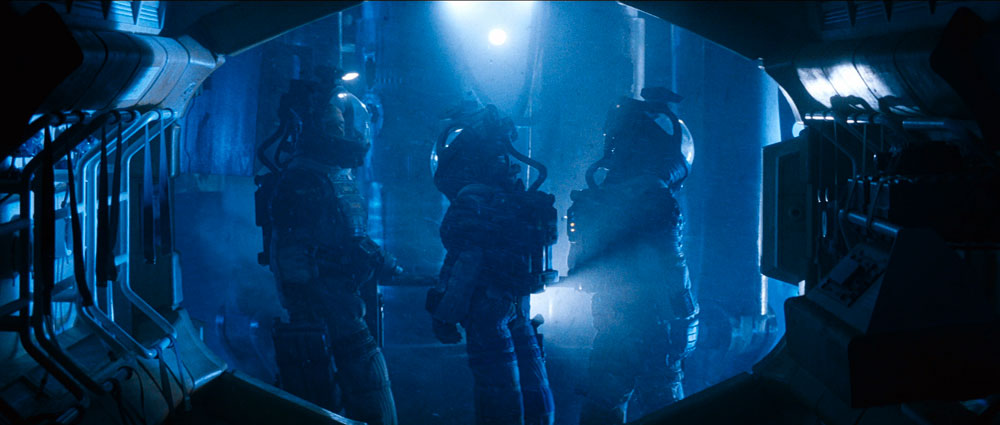
We’ve all seen the image of Kane walking the transom in the egg room and the shot of the Space Jockey. Images of the Nostromo corridor and pics of the trio in their EVA suits seemed familiar enough and seemingly didn’t pose a problem. I knew some shots were more obscure like those of the tractor on the front and the Nostromo storage bay on the side. I figured the rest would be discovered along the way with some deep digging. Little did I know what I was getting into. I’ll cover each one shot by shot starting with the easy ones…
#6 & 7 were the most straight forward as I found nice hi res pics in the style guide. And that’s where the “ease’ of the project would end.
#8 & 9 and maybe #10 seemed pretty familiar. I had to have seen them somewhere or another. As it turns out, “close” images could be found of #8 in the style guide. The positions of the figures weren’t quite a match, but upon reviewing the film, we never saw them in the film in that exact position either, because I watched it again… to find that shot and all of the others I was lacking. I defaulted to an HD screen grab found online to supply pic #10. I settled on using the style guide image for #8. I found myself resorting to more drastic measures for #9 and several others.
#5 & 11 I had never noticed in the film before. After watching again, I found them, but at different angles than what we see on the box.
#2 reminded me of the emergency helmets on the bridge of the Nostromo, but I’ll be darned if I could tell you where those suits show up on screen.
#4 was kind of tricky but #2 took the cake. The pic of the corridor is mirrored form what we see on screen. I eventually realized this and found a scene that was pretty darn close, but what the heck do we see in pic #2? Eventually, I realized the only way to figure that one out was to keep an eye out for anything resembling a perspective shot of something resembling a wagon wheel. I eventually figured it out. The image is a rotated shot of the ceiling in the bridge. I tracked down that shot eventually.
So how did I get the images I was missing? For DVDs we have an app for that, but the images are really small. Bluray is the way to go, HD with nice brilliant color, but we didn’t have a Bluray drive and pulling screengrabs from a Bluray is a complicated process. (which we eventually figured out after the fact) So, I basically paused the Bluray on my HD TV at home and took a photo of the screen. I had the lights out and camera on a tripod for stability. After some experimenting, I found decent enough results that they tightened up well enough for the packaging. In some cases, I tweaked the color balance a bit to more closely match the box. In the case of the tractor in pic #5, I found that buried in the image gallery (that I otherwise never would have gone through) on the special features disk. I found the suit in #1 there as well. I had a bit of egg on my face though when I later also found the suit pic in the style guide assets.
In some cases, there was no exact match and I settled for the best I could get. My theory is that since still photography from a handheld camera would have required a flash that we would have seen on screen. Therefore, my final hypothesis is that the shots on the box that don’t quite match were from cut footage of some kind. In the case of image #10, the characters are riding the elevator down, but in the film Kane is facing the opposite direction before the scene is cut. He never faces right with the elevator that low.
So there you go a great adventure in packaging design. Only the crazy few would dare go down this path. But, what the heck it was fun. In what other business do you have an excuse to watch a great sci-fi movie like ALIEN to make your paycheck?
The 4-H Car ….Assembly
- Before gluing parts together, always ensure that the contact points are clean and that the parts fit well. When applying the plastic cement, only apply to one of the parts. An excessive amount of plastic cement will not only prolong or prevent proper adhesion, but may also melt and deform the parts. Plastic cement must always be used as conservatively as possible. When gluing clear parts, such as windows or canopies, try to avoid plastic cement. This is because plastic cement can “fog” clear plastic even in areas where not directly applied. For clear parts, use white glue.
- Gaps between parts may become apparent after assembly. To remove a gap that is too large to overlook, it may become necessary to separate the parts, adjust their fit, and re-adhere. Another option is to fill the gap with modeling putty, or another substance which dries to hardness and can be smoothed and painted over. When applying putty, only the smallest amount is required. An excessive amount will be difficult to remove later and in the case of clear parts, may be impossible to remove without evident damage to the part beneath. Follow the instructions on the packaging and use a plastic tool to apply the putty, so as not to scratch the model.
- If an assembled part is not adhering properly in some places, it may not be necessary to separate the parts and re-adhere. Another option is to use a liquid plastic cement to re-adhere the parts. By applying a small amount of liquid glue to the outside of the gap, the glue is drawn into the gap by capillary action. It is important not to apply too much glue, for the reasons above, but also because too much glue may remain outside the gap and dry to hard, malformed bubbles. In general, less than a drop will suffice. When the glue has been applied, hold the parts firmly together until proper adhesion is assured.
Once two parts are glued together, it may be necessary to clamp them together until the glue sets. This may be done by holding the two parts firmly together with your hands, but you may also use a variety of tools to do the same job. Elastic bands, clothespins, plastic clamps, tape, and wire are all suitable materials. When applying the clamps, make sure that the pressure exerted on the parts is great enough to keep the parts together, but not nearly enough to deform or break them. Also make sure that whatever clamp you choose to use will not scratch the plastic.
Whether you are a competitive modeler (contest, 4-H, Boy Scouts, etc…) or building for fun the following links offer some great tips and tricks to help you.
http://www.ndsu.edu/fileadmin/4h/FamilyConsumerScience/FE101.pdf
http://www.scaleautomag.com/
Here we are assembling the engine. He used most of the parts from the Stingaree model, he choose to use use the larger exhaust headers found in the Royal Rail model to customize this model. Here he is trying to hold them in place while they dry.
The 4-H Project: Cleaning the model
Our first step was to clean all of the parts. Since we learned from our 2012 experience, we knew that for the paint to stick evenly all parts had to be clean. Dust and oil inhibit the adhesion of paints and glues, as well as detract from the final appearance of the model.

To remove dust and oil, we simply washed the pieces (still on the sprue) with warm water and a very small amount of detergent. We used the sink, however you may also wish to use a shallow basin and a strainer to ensure that you do not lose any small pieces down the drain. We let them soak for several minutes, agitating them occasionally. Taking the pieces out, you can leave them in the strainer to rinse thoroughly, the lay them out on paper towels and dry them thoroughly with a clean paper towel.
Some modelers suggest removing pieces and assembling prior to painting, however out 4-H leader suggests that is all items on a sprue will be the same color, you can paint them while still attached.
Small scissors or shears can be used to remove the parts from their respective sprues. Using a knife to remove parts is difficult, dangerous, and may damage the part. Only when the part is removed may you use a fine knife to remove any flash or excess sprue still attached, this is where we use the small nail clippers they are easy for him to handle alone and less dangerous than the sharp small knife.
Polar Lights models: Wonderfest is right around the corner
One of my personal highlights each year continues to be the annual Wonderfest show in Louisville, KY. This year’s show is coming up the weekend of May 18 & 19 and it seems to be shaping up to be another great one. Seeing all of the great product available and seeing the work of all of the great modelers out there is a rare treat. Most of all though, I look forward to seeing all of the familiar faces and the chance we get to have to talk about our kits, the hobby and what you guys think.
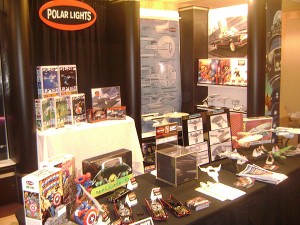
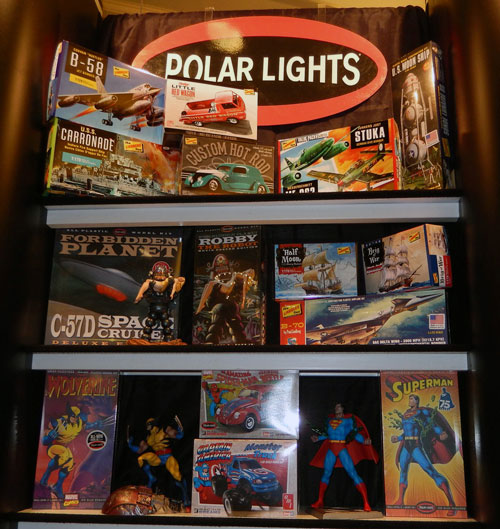
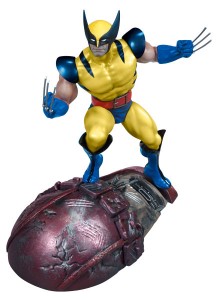
Even though we won’t be unveiling big news like the 1:350 TOS Enterprise, there will still be tons to talk about. We look forward to showing off our brand new buildups of our 1:144 C-57D, Robby & Altaira, Wolverine, the U.S.S. Enterprise bridge set and plenty more. We’ll give some info on development of the Galileo, Superman and all of the other all-new model kits we have brewing. We’ll have some surprising licensing announcements including hints at our plans for the ALIEN license. As always, we’ll have our annual survey ready to fill out to supply us with your feedback. We’ll be sure to fill in everyone that misses the show with our usual follow up youtube video of our booth and announcements.
We look forward to seeing everyone at the show!
http://www.autoworldstore.com/SearchResults.asp?Search=wolverine&Submit=Search
Polar Lights Model Kits- Robby the Robot Returns
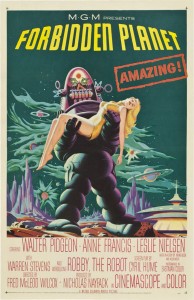
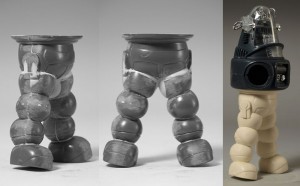
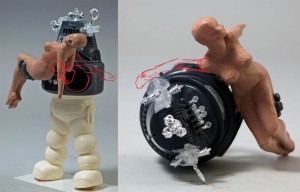
We announced our intention at Wonderfest last year to do give our Robby the Robot model kit a fresh spin to give a 3D representation of the iconic Forbidden Planet movie poster. So this June Robby the Robot returns as the Robby the Robot Movie Poster Edition. It seemed simple enough to take our existing Robby kit, add on a few new parts and boom; we would be off to the races. As usual, there really is no such thing as an “easy” task.
We knew we would need work with the parts we already have, so we knew we couldn’t work digitally in this case. We started out by hiring Tim Bruckner to tackle the sculpting duties. Tim has sculpted many licensed collectible statues and action figures. The difficulty before him was to use hard parts that we wanted to avoid retooling like Robby’s head and body and sculpt the needed Altaira figure along with new arms, legs and base for Robby. On top of that, he needed to stay as close as possible to the main reference, the movie poster, and translate a 2D painting into 3D that keeps all of the human body parts in proper proportion and get it to seat correctly on Robby. Our licensing agreement does not include likeness rights so we knew we needed to make sure the face stuck closely to the poster, and looked nothing like the actress. The Robby you see on the poster also strays a bit from the look of the real character. Ultimately we found that we needed to find that elusive sweet spot between the poster and what the “real” thing should look like in 3D. So with the parameters of our mission set before us, Tim began sculpting.
The first hurdle that was encountered was the fact that the movie poster shows no trace of Altaira’s right arm. It really isn’t something you notice when you look at it, because the mass of Robby’s body lends enough cover to make us assume that it must be there somewhere. Robby’s shoulder dome restricts the notion that the arm could drop straight down like the left one does. That left two possibilities. A) Her arm was tucked in between Altaira’s and Robby’s bodies, but her right hand could not land in her lap which would have been the natural position for it. B) Her arm had somehow landed up resting back over Robby’s shoulder. (Think it through, if Robby was lifting her unconscious body, how could her shoulder have ended up there?) We decided to proceed with notion A and see where that would lead us.
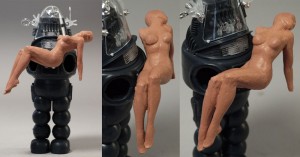
While we were figuring that out, creating Robby’s new wide stance was a simpler proposition. Old kit parts were utilized to create a mockup of the new part. They were cast up into solid resin soon enough.
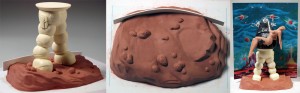
With the legs in hand, the base was begun. We wanted the new base to represent the rocky alien ground that he was standing on in the poster. We also wanted to finish off the full poster effect by including a cardboard backdrop that supplies the background. So a channel was implemented to situate the backdrop. We left it to the factory to supply some gravel/soil texture to the piece after tooling was cut.
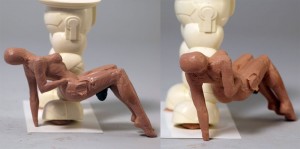
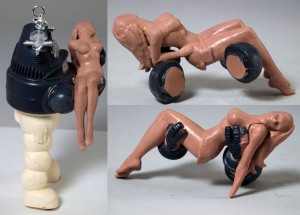
Getting back to the figure, another problem that arose during the process is that in the illustration, Altaira isn’t really resting on Robby’s arm. The right side of her torso is raised so that we can see it, but she is clearly being held up by Robby’s hand on her left side. This left a gaping hole in the model. We played with the idea that her right arm had been caught up under her and that was what was holding her up.
Building our model for the fair…
Well it is that time of year again and we are just starting our fair projects at home. Unfortunately we live in a 3rd floor apartment, which makes painting both inside and outside difficult. To minimize fumes and mess I began to look for options for building a miniature spray booth. I am not endorsing either of these, because I have not completed it yet, but I found 2 sets of instructions for completing this project.
It looks like the materials I will need to complete this project are
1) Plastic Storage Crate or Similar Size Cardboard Box depending on which set of instructions you choose..mine will depend on whichever box I can find.
2) An extractor fan – the second set of instructions uses the exhaust hood from a stove. This one seems simplest.
3) Flexible hose – like for a dryer vent
- Full instructions are available on the individual pages.
http://www.militarymodelling.com/news/article/homemade-spray-booth/3661/
http://www.interlog.com/~ask/scale/tips/booth.htm
This second set also includes some great ideas for cleaning, painting, and preparing your model. Once we get started I will share our photos.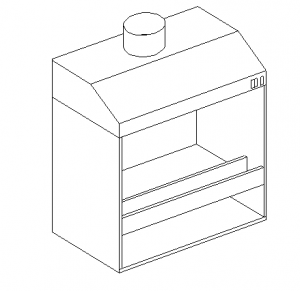
Polar Lights Model Kits: Back to Back to the Future
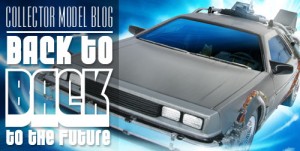
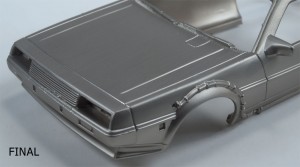
Polar Light recently decided it was time to get back to Back to the Future and bring back the 1:25 scale Time Machine this summer. We recently inspected a copy of the previous release examine the faux “stainless steel” finish was already present on the model’s body. After discussing with the factory about the possibility of repeating this finish on the new release, we were offered a slew of options to explore. (Be sure to click on the pics for close-up views)
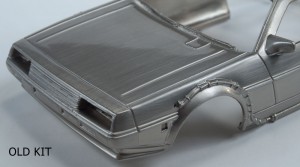
The original kit had what would looks to be a standard chromed body that had been sanded with steel wool before it had been gloss coated. While the look was a valiant and notable effort, it looked very toy-like. The sanded lines were too big and noticeable to be considered true to the scale and the gloss coat was excessive.
Our factory offered a few alternatives from various sources that used a couple different techniques for applying the chrome and sanding.
Example A looked the best. I had a nice fine and evenly distributed sanded finish, but the color was a bit dark more like pewter than silver. A couple of the highest details also had a bit of a bronze color showing through. This was the base color of the plastic. I assume this example had been used on another faux-pewter looking product as the crevasses looked darker as if it was antiqued.

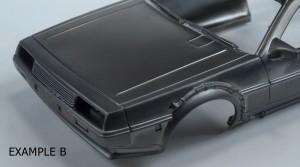
Example B looked similar to A, but it lacked the sanded lines. The finish was easy to mar and discolor with fingerprints. A significant amount of rubbing removed them, but the finish maintained a blotchy look overall.
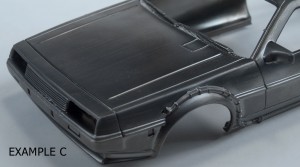
Example C looked like B, but had sanded lines added back in. They weren’t as evenly applied or as apparent as A. Some areas were missed and some were a bit heavy-handed.
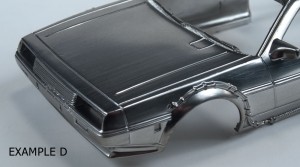
Example D looked like a departure form the first three. It looked like it went back to the chrome/silver look of the old one. In this case, the gloss level wasn’t as high, but the sand lines looked like they had been applied with coarser grit. There weren’t as many lines, but the ones that were there were too prominent.
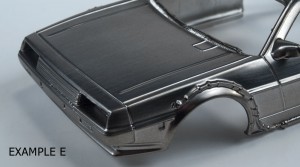
Example E also looked similar to the old kit, but didn’t have as high of a gloss level finish. The example came with a note saying “process warps body. Advise not to use.” And the body was warped (wider than it should have been) so we won’t be using this one.
This left us with a quandary. All told the quality and finish of example A was by far the best looking, but it was too dark. So we asked if it could be lightened to look more like silver. The result looked perfect… well, as perfect as we could expect for a 1:25 scale kit. The color is pretty spot on and the sanded lines are nice and even and aren’t too deep. It doesn’t use a heavy clear coat so all of the details show up nicely too.
We think this change is a significant improvement over the last release. Keep an eye out for the kit coming in June.