Recommended Sites


The 4-H model – Finishing
Ensure that all paint and glue on your model is perfectly dry. It is good practice to start applying decals the day after you finish assembly and painting. Ensure also that your model is free of contaminants and dust, so nothing may be trapped underneath a decal.
Cut out all the decals you wish to apply with a sharp knife. It is not necessary to cut out the decals perfectly; rather you should leave a few millimeters around each decal to avoid cutting it accidentally.
Fill a bowl or shallow cup with warm water. The water should be at least lukewarm to remove the decals from the paper they are printed on, but not scalding hot. Never use boiling water to apply decals.
Hold the paper the decals are printed on with a pair of tweezers. Make sure you are not gripping a part of the decal itself under the tweezers.
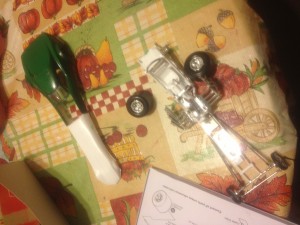
We actually held the paper next to the car and gently slid the graphic onto the car. It is helpful if you get the car wet prior to sliding the graphic to help in positioning it. This will allow you a few seconds to slide the image into the place you want it.
Hold the paper the decal is printed on close to the part you are applying the decal to. The edge of the paper must be lying on the edge of the part, so the decal is transferred immediately from paper to part. Using a clean, wet brush, maneuver the decal onto the part and position it accordingly. Ensure that all air bubbles and creases are removed from the decal by pushing them out with the brush.
Dry the decal by very gently by dabbing it with a clean paper towel. The decal should be left alone for an hour to allow it to dry completely. Until then, it may be accidentally repositioned. To reposition a partially dry decal, simply apply some warm water with the brush and maneuver it back into position.
A few things we have learned…
- Remember that whatever paint-removing solvent you use, it must not harm plastic.
We do have a minor issue under the car where the solvent degraded the plastic a little,but it is underneath…
- Keep all empty sprues when you have finished assembly. They are useful for stirring paint, or making tools that won’t scratch the model you are working on.
These are also helpful for applying glue and you can throw them away when done.
- Keep all unused decals. You may later find them useful for other models.
- Some parts are more easily painted while left on the sprue.This is true particularly of very small parts for the engine. He chose to leave some the original color and chrome but that is an artistic choice.
- A torn decal is not useless. Careful positioning of the damaged portions can restore the decal to a whole appearance.This is where wetting the model can be handy and allow you to slide the decal into position.
- If your paint is too thick to feed through the airbrush, try diluting it with a small amount of rubbing alcohol. The alcohol thins the paint while it is in the airbrush, but evaporates soon after leaving it.
- When applying solvents, paints and glues, do so in a well-ventilated area. Observe all warnings and instructions printed on all your materials and tools.
- Knives and other sharp tools must be handled by experienced and responsible persons only.
- Small parts may pose a choking hazard to small children and animals.