Recommended Sites


Archive for the ‘MPC’ Category
The 4-H model…or starting it…
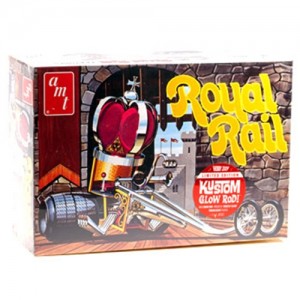
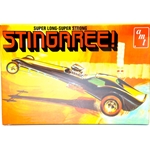
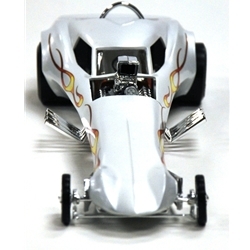
My son has selected the AMT Stingagree (http://www.autoworldstore.com/AMT_Stingaree_1_25_Scale_Model_Kit_p/amt38664.htm) which he will kitbash with pieces from the AMT Royal Rail (http://www.autoworldstore.com/AMT_Royal_Rail_ihobby_Exclusive_1_25_Scale_Model_K_p/amt630ihobby.htm). The Stingaree is described as a wild showrod-meets-dragster, which will be a perfect fit to kitbash with some of the wilder elements of the Royal Rail. But more on that later.
This year we are taking what we have learned over the last few years and combining the use of glue, paints, and decals to create a finished model – incorporating parts of another model.
In addition to the materials that are referenced above we have also purchased or at least gathered (and by we I mean I have purchased for my sweet 11 year old) the following items:
- Assorted paints (mostly greens – because he likes green)
- Plastic cement – several kinds including one especially for windows
- Tweezers and small nailclippers (these are great for trimming sharp bits from the sprue)
- Assorted elastic bands
- Modeling knife (this is my exacto knife – and used with my supervision)
- Small shears
- Masking tape – we do very little masking because the painting we do is pretty basic
- Paper towel
Some people would also include modeling putty and sand paper but we are also a little more basic. Now the rules say he could do any vehicle, spaceship, airplane, etc… but since this was the first year he has done a combination kit like this, I suggested something a little more basic. Our first few attempts were basic designs, snap together kits, then last year marked a new project where he had to both paint and glue.
The paint did not stick to the model, bubbled – badly. So when I started at Round 2 I set out to figure out just what had happened to avoid having it happen again.
1) So now that we have selected the model. This is not the kit he wanted, but we had to select one that was more advanced than some of his choices, and a little less exotic than others.
2) While we did not research these cars, we did visit the Auto World store to look for a model that we would like to do, that fit the requirements. We looked at the number of pieces, materials required to complete this project and the ability to modify this particular piece. Without the ability to see the step-by-step instructions – I think he made a good choice.
3) Next he had to look at the configuration. Configuration may include tires, accessories, the doors and windows open or closed, or even embellishments and exhaust pipes. In the case of the Stingaree, and the Royal Rail both offered many customization options.
The 4-H project – the continuing saga….
Okay so apartment living and modeling is proving to be a bit of a challenge. I tried to build the hood (and being mechanically challenged) this was no easy task. It did not work nearly as well as I had thought it would in my head. It did contain some of the fumes and over spray which is good since I did this on my balcony.
But I am getting ahead of myself. Since it is the older ones project and he is old enough to handle some tools safely I have had to step back and allow him to sink or swim. For the most part it has been really good. The one thing that we have done differently this year versus prior years is that we have washed all of the pieces very well. We had a painting issue last year where the paint basically bubbled up and ran off. So this year we took the whole tree and washed it using plain dish soap and hot water. I am hoping that this will be enough to save the paint job.
7 weeks until the fair and counting…
I will post some pictures of our progress next week…
Building our model for the fair…
Well it is that time of year again and we are just starting our fair projects at home. Unfortunately we live in a 3rd floor apartment, which makes painting both inside and outside difficult. To minimize fumes and mess I began to look for options for building a miniature spray booth. I am not endorsing either of these, because I have not completed it yet, but I found 2 sets of instructions for completing this project.
It looks like the materials I will need to complete this project are
1) Plastic Storage Crate or Similar Size Cardboard Box depending on which set of instructions you choose..mine will depend on whichever box I can find.
2) An extractor fan – the second set of instructions uses the exhaust hood from a stove. This one seems simplest.
3) Flexible hose – like for a dryer vent
- Full instructions are available on the individual pages.
http://www.militarymodelling.com/news/article/homemade-spray-booth/3661/
http://www.interlog.com/~ask/scale/tips/booth.htm
This second set also includes some great ideas for cleaning, painting, and preparing your model. Once we get started I will share our photos.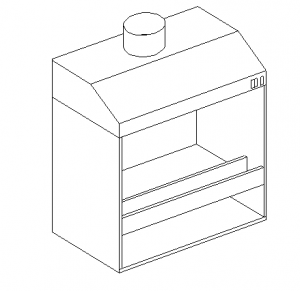
GLUING A SNAP KIT IS A SNAP! …Part 3
Continued…
Puny Human Pin Hulk?
Whether you use the base that comes with the Hulk or you’re planning to use something different, I suggest you plan on pinning the big guy. Pinning isn’t difficult and will make your model more stable on its feet. It starts by filling the hollow foot assemblies with a solid material that will hold the mounting pins. I used epoxy putty that I pushed into the foot halves before I assembled them. The assembled feet could be filled with plaster of Paris just as well, but make sure all the water in the plaster has time to evaporate before you close up your model.
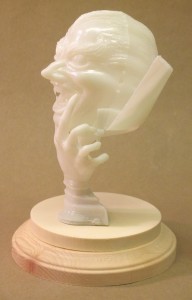
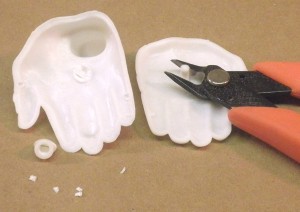
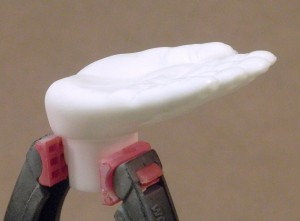
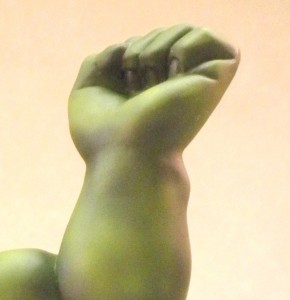
It hadn’t occurred to me to include pinning in this article when I was building my Hulk, so I will illustrate the procedure for pinning with another MPC snap-fit kit, the Vampire Glo-Head, Fig. 5. Round 2 has taken pains to make the model more stable than it was when originally issued, but I wanted to make sure it wouldn’t fall over at model contests. After the hand halves were joined, I filled the hollow interior with epoxy putty and sanded the bottom smooth.
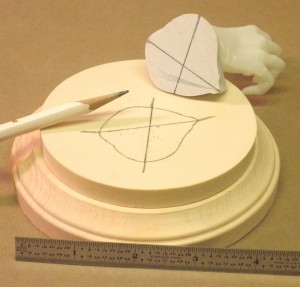
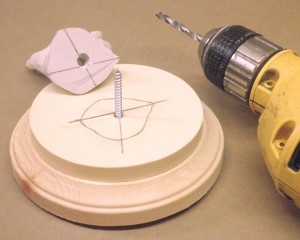
Then I needed to locate the hole in the resin and wood bases on which I would mount the model. This hole also had to line up with the epoxy plug in the base of the hand so it would sit in the proper position on the resin base. While I held the hand in position, I penciled four alignment marks around it, extending the marks onto the resin base. Then I connected the marks with the aid of a straightedge, locating the centers of the holes, Fig. 6. They were drilled into the hand and base; for this model, I used a big screw for the pin, Fig. 7. A section of sprue or a dowel would work also. I used this technique to pin Spider-man to his base as well.
If you’re reading this article in the first place, I presume you probably weren’t going to leave your Hulk unpainted. His upper body and feet assemblies were designed to be trapped by the trouser halves. It’s easy to paint the trouser parts and Hulk assemblies separately and then join them together.
The fit of the Hulk’s upper body to the top of his trousers isn’t the greatest, and the seams along the trouser halves are prominent. However, they appear where seams on real trousers do, so they don’t have to be eliminated for a realistic appearance. The pieces of the test shot I assembled had to be glued and clamped carefully to prevent them from coming apart. The gap between the Hulk’s torso and his trousers can be filled fairly easily (I brushed several layers of white glue in there) and the paint on the trousers touched up.
A Model of a Different Color
Everything I’ve had to say about gluing the snap-fit Incredible Hulk applies to the Amazing Spider-man – and all other snap-fit models, for that matter. Spidey was designed so the red and blue parts of his costume could be snapped together unpainted. The design itself is ingenious, but it makes life harder for the modeler who wants to assemble the model with glue.
I tried and failed to remove the mounting tabs from the hands and feet assemblies, thinking I could paint them separately from the body and attach them after painting. It would have been much easier to simply assemble Spider-man entirely (which I eventually did) and then paint him. This required a lot of masking, but the results were well worth the effort.
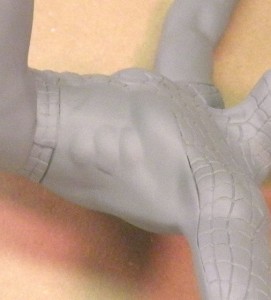
The hardest part was to get the red and blue sections to fit smoothly. I sort of cherry picked the areas where one section would have prominence over the other. And the usual seams reared their ugly heads under a coat of primer, Fig.8. I had to be careful not to fill the incised web pattern when filling gaps. Where I did fill the webbing, I tried to resculpt it with hobby knives and even a fine routing bit in a rotary tool – that proved unnecessary as we’ll see.
Painting the web pattern may seem daunting, but I found a few ways to make it easier. Over a good base of white primer, I painted the red areas of Spidey’s costume with an airbrush, using Testors Model Master Guard Red. This is a very bright red and dries to a gloss finish. To paint the webbing, I mixed a bit of liquid detergent with some Hunt’s black ink in a small cup. The soap broke the surface tension of the water-based ink so it wouldn’t puddle on the gloss red paint. Using a fine, pointed sable brush made it fairly easy to apply the ink into the incised webbing.
I found it best to plan ahead when applying the ink so that I could avoid grabbing a wet spot while holding the model. I began painting the back of Spidey’s boots – these were areas where I could practice painting the webbing without my mistakes being too noticeable (rubbing alcohol cleaned stray ink marks off the gloss red paint). I tended to hold the figure around the waist, so the next areas I painted were the arms, then the head, and finally the torso.
The ink dried rapidly; to prevent my finger oils from marring it or the red paint, I wore rubber gloves while I worked. I saw that the intensely black ink looked the same in the molded webbing as it did on any parts of it I had inscribed. Even flat surfaces where the webbing got filled looked okay; on its own the ink reinstated the detail very well.
Time to Celebrate!
– Because I’m done with this article and a couple of fine models. I was very impressed with the final appearance of these snap-fit kits. Their engineering made me take some different approaches to those I’d have made with glue kits, but the results were otherwise the same. I hope you enjoy building your models as much as I did mine.
ROUND 2, LLC, ACQUIRES LINDBERG & HAWK MODEL KIT BRANDS
Round 2 to Produce Popular Land, Air, Sea & Space Models – Adding to AMT, MPC & Polar Lights
For Immediate Release
SOUTH BEND, Indiana – 03/18/2013 – Round 2, LLC, is pleased to announce the acquisition of the Lindberg and Hawk Models brands and assets from J. Lloyd International. With the transaction, Round 2 adds these two well-recognized and historic plastic model kit names to their existing trio of AMT, MPC and Polar Lights mode kit lines, licensed from Learning Curve Brands, Inc. in 2008 and purchased outright in 2012.
Consumer trust and excitement has been building over Round 2’s efforts with the initial three brands since 2008. Now, with the assets of five major model companies in its stable, Round 2 solidifies its position as a top producer and fierce competitor in the plastic kit sector of the hobby industry. Thomas Lowe, President and CEO of Round 2 states, “The addition of Lindberg and Hawk results in a combined product catalog for Round 2 that is so diverse, it will include virtually every type of model kit genre imaginable and in a wide range of scales. Whether you’re looking for cars, trucks, aircraft, ships, sci-fi, space exploration, anatomy and figures or even crazy monsters, we now have it all! We’ve made plans to hit the ground running with these brands and are ready to go. As we progress into the future, we will be working with the vintage Hawk and Lindberg tooling to resurrect more exciting kits that haven’t seen the light of day in decades, just like we have with AMT and MPC. We’ll also be happy to put the 1934 Ford Pickup tooling back under the original AMT brand, from where it originated.”
Lowe continues, “Like our customers, we love model building. Lindberg and Hawk models are sure to excite modelers of all ages. From the connection with history to a hunger for an understanding of how various machines, both human and mechanical function, the kits created by the original brands have always offered a wide variety of subject matter for model makers, and we plan on continuing that long standing tradition.
About Round 2
Round 2, LLC is an innovative collectibles company located in South Bend, IN. The team at Round 2 is dedicated to producing detailed, high quality collectible and playable items appealing to the young and young at heart. Round 2 brands include Polar Lights®, AMT® and MPC® model kits, Auto World® slot cars, Forever Fun™ seasonal products and the licensed brands American Muscle®, Ertl Collectibles® and Vintage Fuel™ die cast.
For more details on all the product lines produced by Round 2, visit our website at: www.round2corp.com
AMT, Polar Lights, MPC and Round 2 and design are trademarks of Round 2, LLC. ©2011 Round 2, LLC, South Bend, IN 46628. All rights reserved. ###
-END-
GLUING A SNAP KIT IS A SNAP! …Part 2
You can turn a snap-fit kit into a competition quality model if you know a few tricks.
By Mark McGovern
Continued…
Keeping a Model in Trim
After cleaning the flash off the halves of one of the Incredible Hulk’s hands, I snapped them together, as you can see in Figure 1 (this was a test shot, which is why the plastic is white). You can see quite a seam showing between the parts. My aim when I build a model is to create the appearance of the subject in miniature. Since no Hulk in his comic book, television, or movie incarnations has ever been shown with seams running around his body, I did everything I could to eliminate them.
With most glue kits, and certainly snap-fits, the parts can be made to fit better simply by removing the locators molded into them. I used sprue cutters for this job because the snap-fit locators were so large, Fig. 2. A curved #10 hobby knife blade was helpful for cutting in tight places.
If you hold your kit part up to a strong light so you can look along its edges, you’ll see that they’re not flat. The may be rounded or have lots of irregularities, where what’s needed are flat surfaces that will be fused together by the plastic cement you’ll use. Sanding the part edges flat is the first step in assuring a good fit; I used 150-grit sandpaper to do this.
The best fit comes with a little more work. I held the hand halves together in front of the light and checked for gaps. The light showed them clearly; by sanding the point where the parts were touching, I was able to close most of the gaps. At some points, I penciled arrows on the outsides of the parts to show me just where to sand. When I felt I had the best fit I could get, I glued the parts and clamped them. By the way, sanding the mating surfaces has the additional benefit of adding “tooth” to the edges, which gives the cement more surface area to grip; this ensures a stronger bond between the parts.
Stuck on Modeling
There’s really no single material that’s best for every plastic modeling job, so I keep a variety of paints, glues, etc. on my workbench to fill various needs. I used liquid cement for this assembly and tube glue for the larger ones, like the upper body. After the liquid cement had fused the hand halves, a thin line of melted plastic was left in the seam. A little scraping and sanding (with progressively finer grades of wet-or-dry sandpaper, ending with 400-grit) pretty well removed the melted plastic and the seam, Fig.3.
With the exception of the Hulk’s trousers, I followed these procedures for the entire model. Round 2 wanted the fists used only so those assemblies, along with the head, were cemented to the upper body and arms with tube glue. The gaps between these assemblies were filled with two-part epoxy putty because it sets slowly enough to be blended and sculpted. This made it possible to blend the hands into the wrists and head into the neck for a natural (?) appearance. A little more sanding with the 400-grit wet-or-dry sandpaper completed the job. Fig. 4 shows the results under paint.
To be continued….
GLUING A SNAP KIT IS A SNAP! …Part 1
You can turn a snap-fit kit into a competition quality model if you know a few tricks.
By Mark McGovern
I’ve been a competitive model builder for years and, I’m sorry to say, I tended to look down on snap-fit models. My assumption was that the parts would fit poorly because they were made to snap together. Then I was asked to assemble Round 2’s reissues of the MPC snap-fit models of the Incredible Hulk and the Amazing Spider-man, doing the best assembly and paint jobs I could on them. I found out that, with a little adjustment of my building techniques, I could produce models that were every bit as nice as more complex glue kits. Here’s what I learned.
Every Journey Begins With a First Step
It’s a good idea to begin any modeling project by checking the instruction sheet to make sure that all the kit parts are there in the box. The suggested assembly sequence shown will familiarize you with how the parts are supposed to go together. With that knowledge you can decide whether to follow the instructions exactly or deviate from them if you’re going to alter the model to suit your own taste.
Then the parts can use a good bath in soap and water. This will remove the mold release agents, your finger oils, and any other substances that could interfere with paint or cement adhering to the plastic. The parts can be dried with rags or paper towels and then you’re ready to start building.
To be continued…
Drag Racing’s Legendary past is a classic story in any scale
In any sport there is period of time you can look at and pinpoint the moment when the sport hit the big time. For drag racing, it was the late 1960s into the mid 1970s. That was when the sport experienced the perfect combination of extraordinary technological breakthroughs, record-breaking speeds, ground-breaking designs and a collection of legendary characters who were always ready to push the limits. It was that intoxicating mixture which took drag racing from a regional sport to one that captured the imagination of the nation.
In the late 1960s, model kit building was an extremely popular hobby. Millions of model kits were manufactured each year to keep up with the demand. Model Products Corporation (MPC), a fledgling model kit company based in Michigan, took notice of America’s attention to drag racing and began to produce 1:25 scale model kits of these cars. Everything from funny cars and rail dragsters to pro stockers and gassers lined store shelves. Names like “Grumpy Jenkins,” “Mr. Norm” and “Dyno Don” adorned the packaging. AMT, Monogram and Revell also produced drag racing models kits, but by the 1980s, model building began to wane and the tooling for most of these models was put into storage.
Today, vintage drag racing subject matter has become extremely popular in model kit and die cast circles. Many famous cars have been produced over the years, but it wasn’t until May of 2012 when Round 2, LLC announced the launch of their “Legends of the Quarter Mile” program that things really heated up. The Legends line was conceived to put a spotlight on the famous names and cars that put drag racing on the national map. Because of the diverse brands and categories under the Round 2 umbrella, “Legends” 1:18 scale die-cast replicas and 1:64 scale slot cars and drag sets are manufactured under the Auto World brand. Vintage model kits are also being reintroduced in 1:25 scale under the MPC and AMT brands.
The release of Harry Schmidt’s Blue Max Mustang Funny Car as a 1:18 scale replica signaled the beginning of a wildly successful program that has captured accolades from racing fans and hobbyists alike. Several original teams and drivers have contacted Round 2, asking to have their cars immortalized in this exciting series!
It was well before the first release, when work began to reintroduce several of the most popular drag racing model kits ever made under the “Legends” line. Some had been unavailable for decades and had been commanding big money on the collector market. The original tooling had to be scrutinized and in many cases, parts recreated. The artwork used to produce the decals in the original kits was long gone. Archival photos and other reference material was used to freshly replicate all the logos, badging and other markings in creating new, more detailed and accurate decal sheets. It was a challenge to find several of the original drivers. Some had moved on to other businesses and others had unfortunately passed away.
Late in 2012, Round 2’s MPC brand reissued Arnie Beswick’s “The Super Judge” GTO and Connie Kalitta’s Bounty Hunter Funny Car model kits in the Legends of the Quarter Mile program. These deluxe 1:25 kits are available for the first time in decades and have additional extras added, like the additional window parts in the Beswick GTO molded in clear orange, replicating the real car’s tinted backlight. You’ll notice the attention to detail with the kits’ extremely popular pad-printed tire lettering and a connection to the past with the vintage box artwork.
The latest Legends model kits include a special edition of AMT’s Ohio George Montgomery 1933 Willys Gasser and Carl Casper’s famed Young American front engine rail dragster, complete with bonus items and packaging that will delight any modeler or kit collector. For the Young American, Round 2 worked with Carl Casper himself to acquire a fantastic photo of the 1:1 car doing a wild pre-run burnout, to use on the packaging. It was a photo taken only seconds after the original one was used on the original release of the kit back in the 1970s. MPC’s team turned another photo Carl provided into a bonus card to include in the kit, featuring the specs of the car and a list of famous wins.
For the latest Legends of the Quarter Mile news, updates and offers, check out www.autoworldhobby.com/Legends. Get Legends of the Quarter Mile products at hobby stores, racing and die-cast related stores and www.autoworldstore.com.
Round 2 Models: Muscling Through Packaging
A lot of our development team’s time is spent on our product packaging. It is a key marketing and sales tool and in some cases, it makes the kit much more desirable. If you read our blog regularly, you are probably familiar enough with our products to know what to expect from us in this regard. I figured I would show you some of the steps we go through and what we encounter as we work.
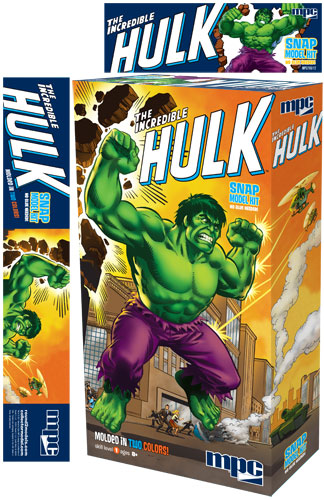
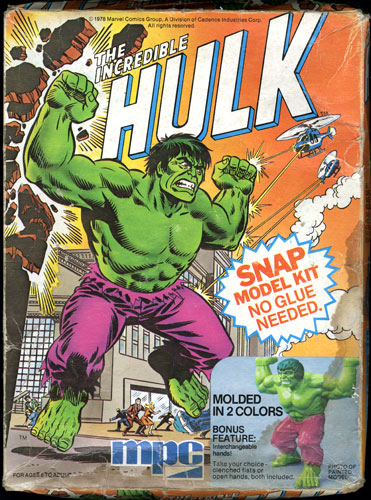
For this example, I’ll be using our upcoming release of the Incredible Hulk. In the case of this kit we started with what we had, a tattered copy of the kit released in 1978. The plan was to ditch the old packaging style completely and shift it more towards an Aurora style long box but keep a modern sensibility about it. Comparing the proportion of the art board to the long box style, I found we could center more in on Hulk and let the rest of the scene actually wrap around one side of the box to give the effect of “okay, here is the Hulk. He is mad” then as you turn to the side of the box, you get the reveal of “oh, this is what he is mad about”.
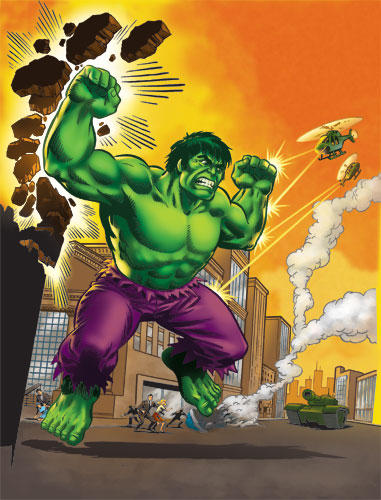
In order to start, the old box featured a giant violator that covered a major part of the background. An image of the buildup cut into Hulk’s knee. All of this is besides the fact that our box is nice and worn with plenty of cracks and stains in the image. The decision was made to break it down to just the line art and recolor it as I had done on the Spider-man and Captain America kits. This would give it the updated look I mentioned. The instruction sheet featured the same line art in pure black and white so I figured this would be a great head start. The problem was that the art on the instructions did not perfectly match the box lid. It wasn’t a complete redrawing but a few embellishments had been made to the artwork. A few lines were thicker here or there.
Once I broke it all down and mixed and matched the parts of the line art I wanted from the two illustrations, I set to filling in the gaps created by the violators. The only clue I had to the contents were an overturned car and smoke coming from it and who knows what else. There were also a few building tops peaking up from the behind the legal line on the instruction sheet. I found the look of the TV news style helicopters to be a little ridiculous and decided to embrace that a little bit. I decided to shift their color scheme to a more military look and drew in one of General Ross’ “Hulk-buster” tank on the ground to give him something to really get angry about. Filling in the rest of the cityscape background was logical to complete the rest of the scene.
So here it is, a sneak peak at the upcoming Incredible Hulk packaging. (All images are currently under licenor review and are subject to change) we will feature a build along article by Mark McGovern covering both the MPC Incredible Hulk and Spider-man kits on our website when we approach the release dates.


Round 2 Models: 2011 iHobby Recap

Hi guys. It’s been too long (again). I wanted to take a few minutes to give you a 2011 iHobby recap. This was the national hobby industry show where companies of all kinds displayed their wares with everything form trains to remote controlled vehicles to models. We always have a big display of all of our hobby lines of 1:18 scale American Muscle die cast cars, Auto World slot cars and of course our Round 2 Models line.
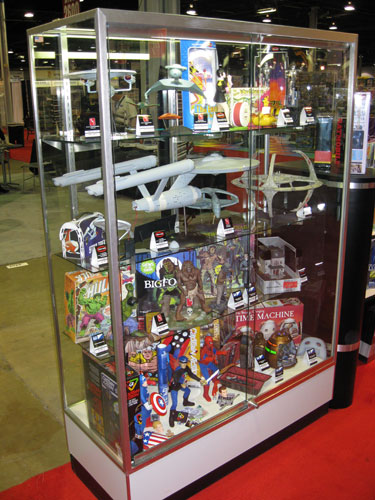
I’m sure more details are available elsewhere, but I’ll give a real quick recap of our automotive products before delving more deeply into our sci-fi/genre stuff. Our display case was filled with a ton of great buildups and box proofs and mockups. On display were…
1:25 1966 Batmobiles of all three varieties, the snap, glue and deluxe versions were all on display. The snap and glue versions are available now. The deluxe version will be out by December.
’76 AMC Gremlin X is being brought back as the first in our line of Original Art Series where we are scanning original box art for our packaging.
Munster Coach and Drag-U-La individually sold kits. Each includes a cardboard backdrop. Drag-U-La is part of our Katch the Kat program that offers chase variant body colors.
The Meyers Manx buildup arrived bruised and beaten (thanks to a customs inspection) but John and a friend or two helped put it back together again. The kit is also part of the Katch the Kat program and also includes a cardboard backdrop.
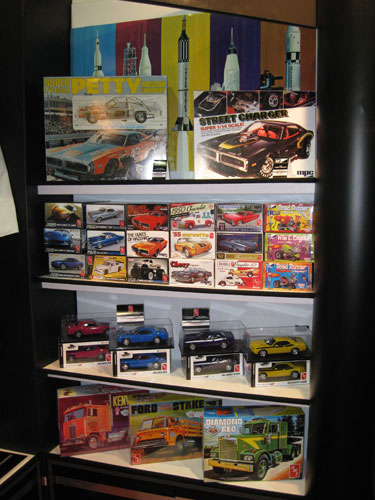
1:16 Street Charger is being brought back for a limited run under our 1 Run of Fun program. After one production run of the kit, the tooling will be backdated to turn it back into the Petty Charger kit that modelers have been asking about for a while.
Chevy 100th Anniversary collector’s tins bring back the ’51 Chevy Fleetline and ’57 Chevy that will be struck from the Mueller-era Pro Shop version of the tool. The kit features an opening trunk. The kit includes detailing foil, engine wire and photo-etch parts.
The Dirty Donny Vantasy Chevy Van offers several decal mural options.
The Diamond Rio Tractor was on display continuing our line of popular big rig kits.
Buildups of the Dark Shadows Vampire Van and Looney Tunes Roadrunner & Coyote vehicle kits made an appearance along with the Chevy Caprice as well as our new tire sets.
Looking ahead to 2012, the Hot Curl and his pals will be back riding the waves. The AMT version of the Ghostbusters Ecto-1 will be coming back as will the Monkeemobile, Arnie Beswick’s Super Judge GTO, Superwagon and Vantom Ford Van. The AMTronic makes a comeback as well. It will come in reproduction packaging and include the original cardboard backdrop and clear green and crystal clear window options.
Outside of kits, one exciting product was Auto World’s new line of men’s apparel including classy button up shirts and vintage looking racing jackets. I’ll need to see what I can do to get one emblazoned with a Polar Lights logo. I think everyone that saw them wanted one. They will be available exclusively through autoworldstore.com.
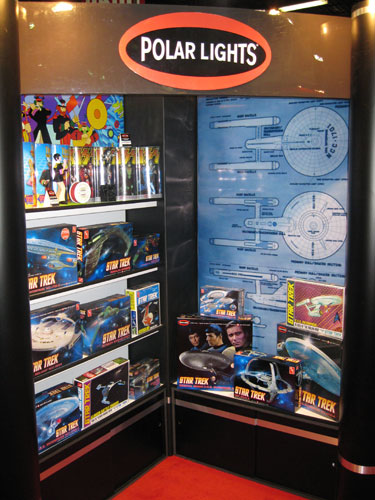
Across the booth, our lineup of Polar Lights model kits was on display.
U.S.S. Enterprise 1701-C will be available in December. A printout of the battle damage decal sheet was on display as well.
2 piece Adversary Set will be offered with glow in the dark engine parts and window decals for the Ferengi Marauder. Like the cadet series model kits, these little ships will not include bases. This set will be out early in 2012.
The Klingon Battlecruiser with all of its revised parts was on display. The version of the kit in cardboard packaging will be out by Christmas.
The Yellow Submarine kit will be out in early 2012 in a tin package. Reproduction box and prebuilt versions will follow later in the year.
The Yellow Submarine figures and KISS figures will be available as prebuilt models in 2012.
A lunchbox tin collector’s edition of the 1:1000 scale Enterprise will be out in early 2012. The box graphics will be reminiscent of vintage Star trek lunchbox decoration.
A big hunk of gray resin had its unveiling. Most things look good. Some things need work. For more info sign up for our 1701 Club to get updates. We have around 350 spaces left to reserve your kit.
Romulan Warbird previously of the 3 piece Adversary Set gets its own release. New window decals and dome base will be added to the kit.
Deep Space 9 will be a late 2012 kit. It will be injected in clear plastic for lighting and also include window decals for those that don’t want to bother. We are looking into another extra add on for inclusion in the kit. More on that whenever our plan for it is finalized.
MPC Hulk and Spider-man kits will make their way back to modelers workbenches. Most people that saw them confessed to having never seen them before. They must have had very short releases back in the day. Though some parts seem wonky, they are nice sculpts overall. They will come injected in color with spots of prepainting. They are snap together kits so they will be great for kids.
Bigfoot is another snap together kit. He, along with the Strange Change Vampire and Strange Change Mummy model kits, will be part of our 1 Run of Fun program and these three kits were made here in the US. They arrived in our warehouse last week so look for them on store shelves soon.
Dark Shadows Barnabas is available now and The Werewolf will be available soon if he isn’t out already.
Psycho House will be another in our line up of pre-built models.
Strange Change Time Machine will be out in 2012.
Also on display was our Captain Action lineup. Or first release of was represented, as was a preview of our second release, Thor and Loki.
Our iHobby display of Polar Lights model kits might not have offered many surprises but check us out at Wonderfest where we hope to have several new projects to announce.
Prepping for then working the booth at iHobby is always a lot of work. I’m still dragging a few days later. But, it is always good to get a chance to talk to modelers and get a sense of their excitement for the product. That is reward in itself.