Recommended Sites


Posts Tagged ‘model kits’
AMT’s Trojan Horse Mustang Funny Car Is Back!
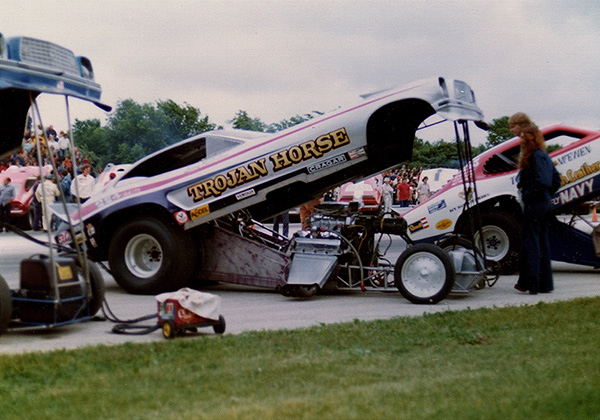
Larry Fullerton’s Trojan Horse funny car was always one of the favorites on the track and his Mustang II FC has been considered one of the most beautiful cars on the strip. When AMT originally issued the kit, the decals failed to capture the fantastic colors and his signature Trojan Horse mural accurately. Additionally, at the time, AMT also supplied the kit with unusually tall front tires that were not proportionally correct. With our Retro Deluxe re-issue coming out later this year, we’re correcting those details by supplying a more accurately-sized set of front tires, plus an all new and expanded decal sheet. We’ve also re-tooled the front and read body sections, and this time the front headlights are recessed to match the 1:1 car.
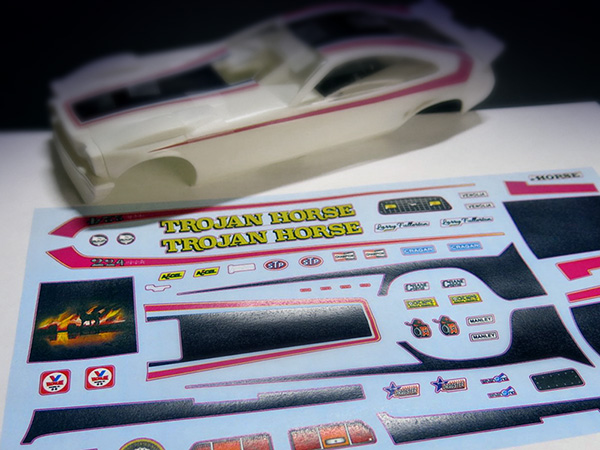
The decals now include the body side paint scheme (although you’ll still need to paint the rear body section to match), detailed front grille and rear taillight decals, additional sponsor marking to duplicate various versions of the car and a much improved trojan horse mural. Below is a printout of the new decal set, along with the kit’s body showing a little test-fitting of some of the body markings.
Star Trek Models: My Enterprising Journey pt. 3
Here we are with Michael Scarola’s third part of his build process of our classic AMT U.S.S. Enterprise kit.
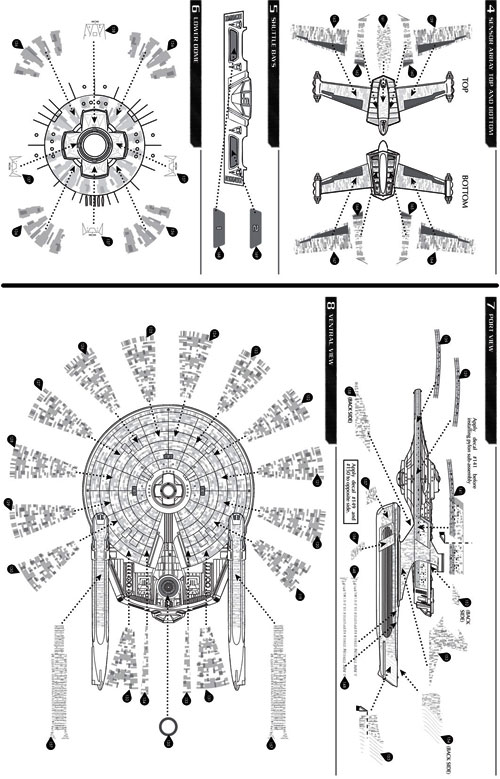
My Enterprising Journey: Building the Classic AMT 18” Enterprise – Part 3
There have been many discussions and articles that talk about the color of the TOS Enterprise studio model. On screen it appears anywhere from white to blue to green-gray to silver. It’s been revealed by Richard Datin that the studio model was actually a light gray with a hint of green. Datin chose the WalMart Concrete color chip as a near perfect match to the Enterprise’s hull color.
I started my research with a WalMart Concrete color chip and found Tamiya JN Grey appears to be a little too green. I had access to Gary Kerr’s actual paint samples of the hull color and the color that appears on the leading edge of the dorsal and also a sample that was matched to the Master Replicas TOS Enterprise.
The mixture I came up with is 3 parts Tamiya JN Grey, 1 part Sky Grey & 4 parts Flat White. It looks neutral with a color shift towards green when viewed under indoor lighting and it even appears to shift a bit blue at times. It’s right in the ballpark of the 3 samples and is very close to Gary Kerr’s hull color, only lighter, which is a good thing for the smaller scale AMT kit.
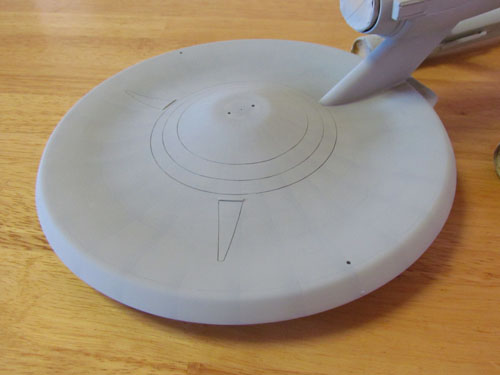
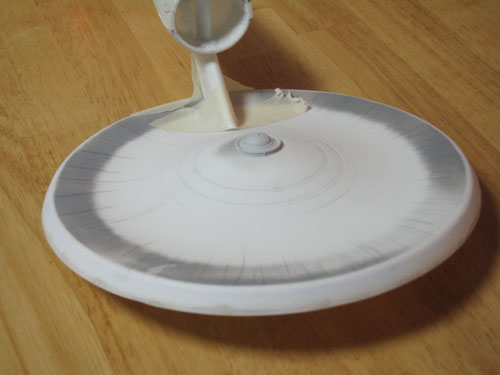
After the main hull color was painted I drew on the saucer grid with a pencil using the scaled blueprints, a straight piece of styrene sheet and a compass.
I mixed a darker shade of gray to pre-shade the grid lines and toned it down with the hull color.
I mixed some Testors Acryl US Navy Blue Grey, Pale Green and Flat White for the leading edge of the dorsal and used Testors Acryl Neutral Gray for the darker colors. The nacelle grills are painted Tamiya Chrome Silver and the ends of the Intercoolers and Control Reactor are Testors Acryl Neutral Gray lightened with white. For the triangles on the bottom of the saucer and the darker areas on the undersides of the front of the nacelles I mixed a darker, more neutral, variant of the hull color.
Weathering and decals…
Dark gray and green pastels are used for most of the weathering and rust colored pastel chalk for the ‘rust ring’ on top of the saucer.
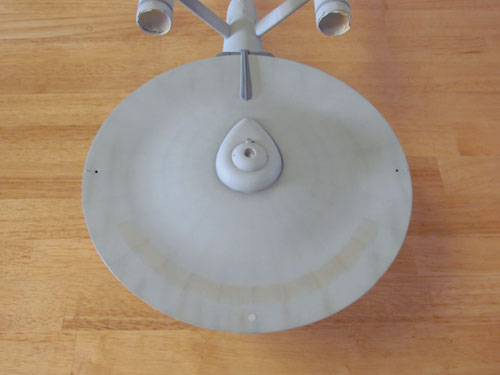
I did my best to represent most of the look of the weathering of the 11 foot studio model while toning it back a bit for this smaller project.
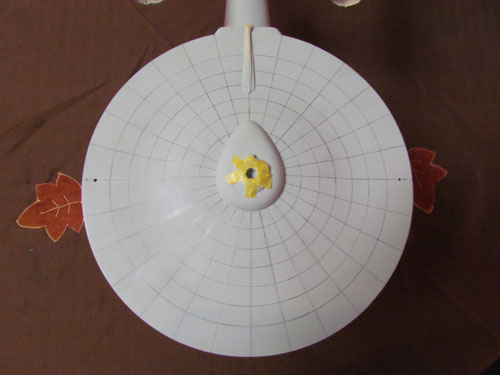
The decals that come with the Round 2 kit are very accurate. I did, however, separate the saucer’s U.S.S. ENTERPRISE/NCC-1701 decal into pieces. The ‘U.S.S. ENTERPRISE’ seemed to sit a bit too close to the ‘NCC-1701 and the spacing of the ‘U.S.S. was a bit too much compared with the 11 foot studio model. In addition I also separated the NCC-1701 into individual decals. This eliminated the clear film and due to the grid on the saucer I was able to place them according to the studio model’s placement. Other than this, the decals actually are very accurate. The below image shows the placement of the decals on the top of the saucer.
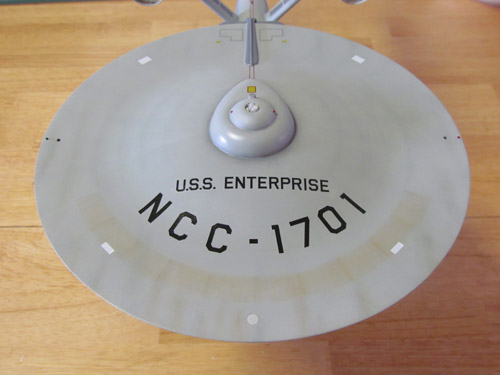
I sprayed Future floor polish over the model before applying the decals and sealed them with Testors Create FX acrylic flat clear, with a few drops of semi- gloss clear added to keep the surface from appearing chalky.
All in all I had a lot of fun working on this project. This is my first time building the AMT 18” TOS Enterprise and I’m glad I started with the Round 2 release. The smooth top of the saucer and the wonderful decal sheet really improved this classic kit.
I’d like to thank Jamie Hood and everyone at Round 2 for giving me the opportunity to share my build.
Michael Scarola
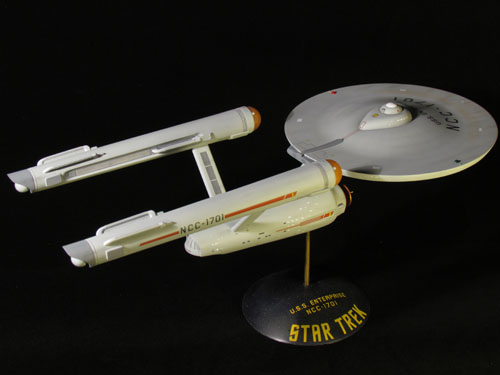
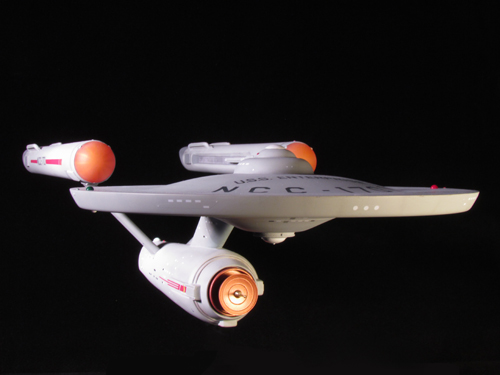
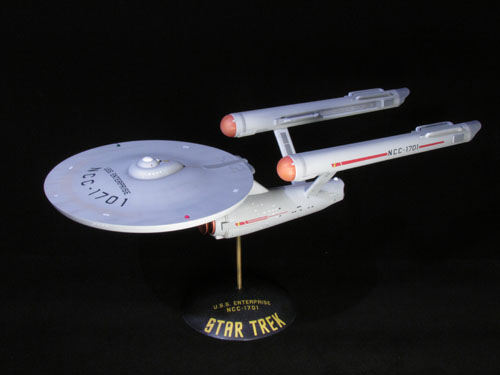
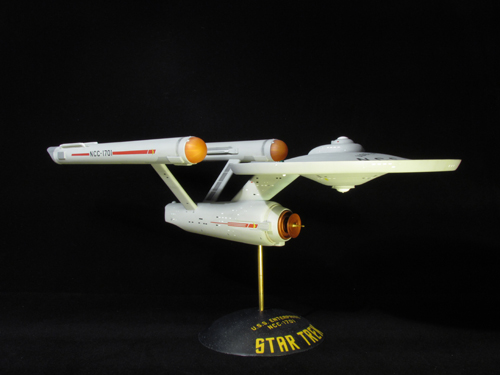
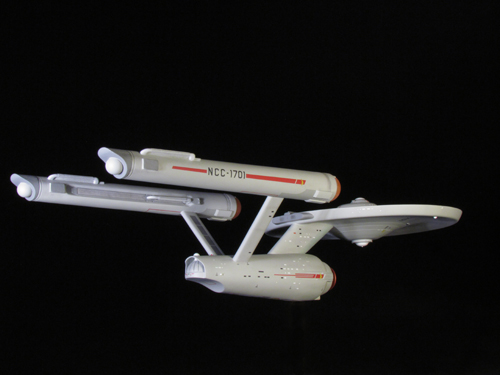
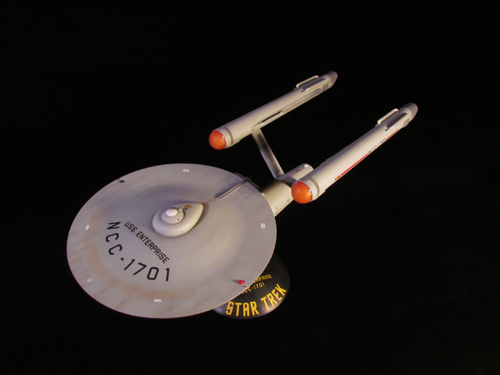
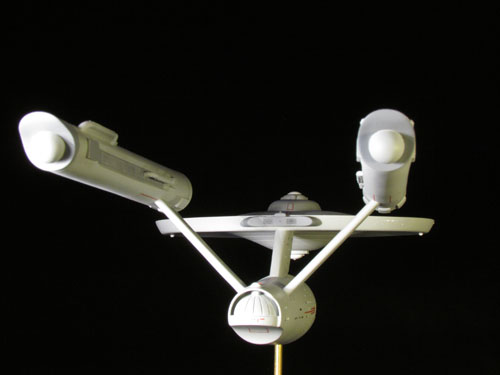
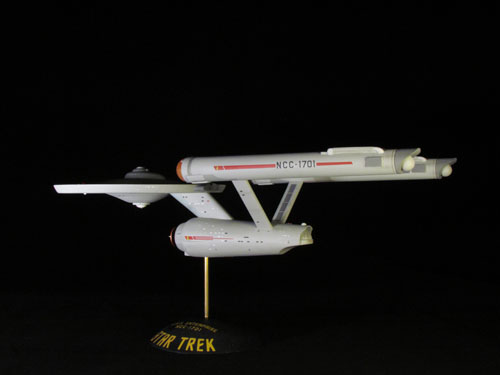
Take a bow, Mike. Great job. Have a gander at these beauty shots of the finished model.
AMT Model kits: 1964 Belvedere Lawman NEW PARTS!
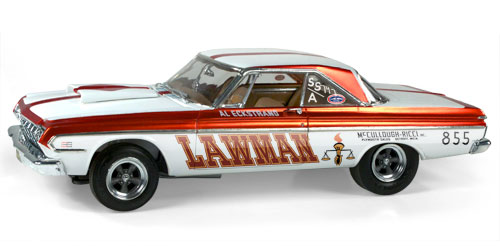
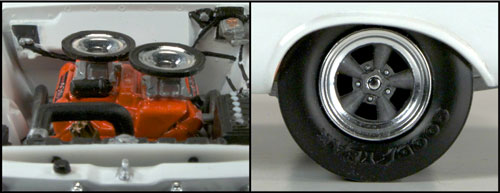
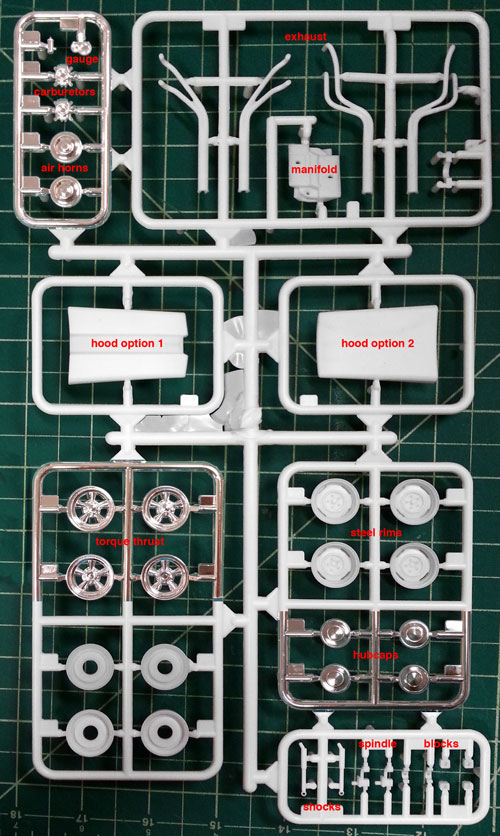
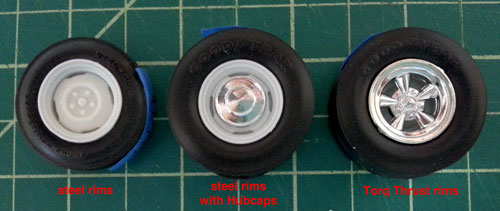
The long-rumored and anxiously awaited 1964 Belvedere 426 Super Stock Lawman will soon be here! With the release comes a few parts from new tooling. The shining features of the new tooling are the 2 all new sets of rims: a stock steel rim with an optional chrome hubcap and a Torq Thrust rim. New front spindles, rear blocks, and shocks will be included that enable the suspension to be raised or lowered, to achieve the proper wheel stance of the drag racer. The new parts will also include: racing headers, dual chrome air horns, intake manifold, chrome tachometer with oil gauge, and 2 different hood scoop options.
Accompany the new parts, the Lawman will have highly accurate decal sheet, updated instructions, chrome parts and vinyl drag slicks. The packaging will feature a full color tray and a new painting from Brad Leisure.
Star Trek models: My Enterprising Journey Pt. 2
Here we are with Michael Scarola’s second part of his build process of our classic AMT U.S.S. Enterprise kit.
My Enterprising Journey: Building the Classis AMT 18” Enterprise – Part 2
The work continues…
Now that the saucer’s details and shape were worked out it was time to move onto the secondary hull. I started by lengthening the hull. The 3 main parts were glued together and the rear section, in front of the pylons, was cut off and the hull was stretched approximately 1/16”.
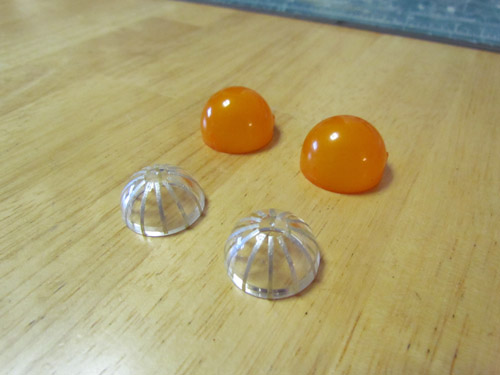
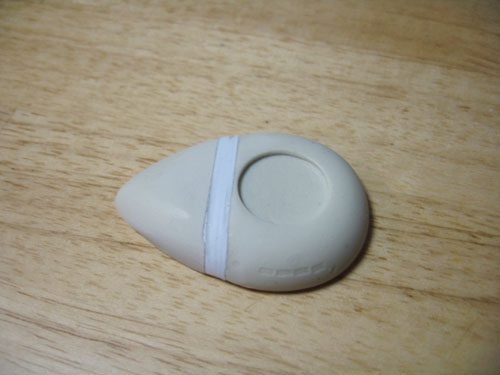
I used one of the AMT kit’s nacelle domes to make new landing bay doors by simply cutting it in half and scribing in some vertical lines.

Sheet styrene was added to the curve of the hull next to the hanger bar doors to achieve the proper shape. The front of the hull was built up with putty and the ribbed details on the deflector forks were added using pieces of .5 mm styrene rod placed side by side as well as some half round styrene rods above and below.
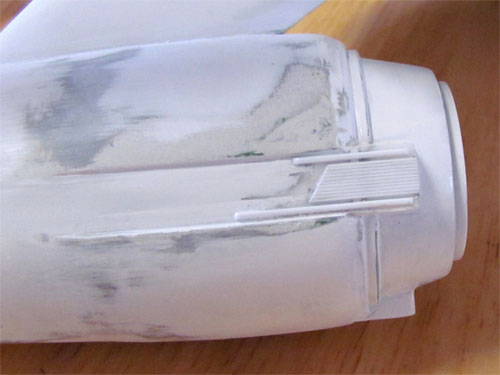
I combined the rear of the kit’s deflector housing with the front of a resin housing from JT-Graphics. The outer housing itself was puttied and re-shaped.
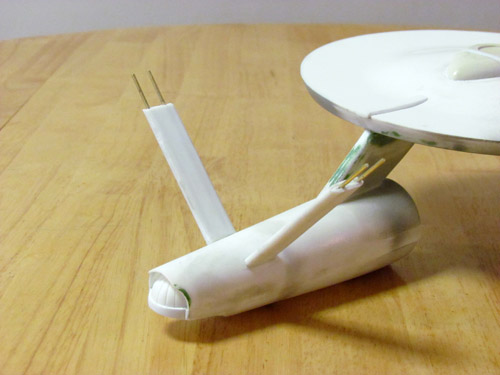
The nacelle pylons were narrowed and shortened to match the blueprints. They were attached at an angle slightly less then 90 degrees using a template I made from the blueprints. I strengthened the pylons with sheet styrene and 1/8” brass rods.
The kit’s nacelles were used and also modified. I cut off the grooves behind the bussard domes since I was using resin bussard domes from JT Graphics, which already these details. To create the taper of the studio model’s nacelles I drew a line with a pencil from the front corner of each half that goes to 2.5 mm at the rear.
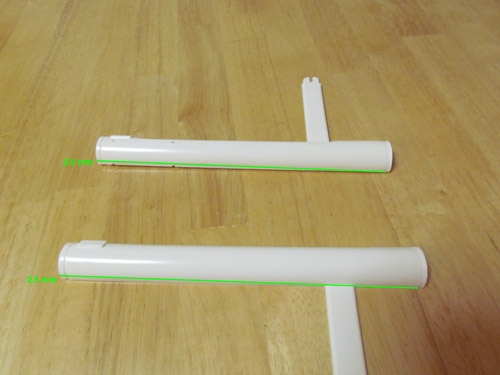
The above image illustrates where the cuts were made. Unfortunately I didn’t take a picture of the actual kit parts so I used nacelle halves from an older kit for figure 12’s illustration. It’s basically long skinny triangles that needed to be cut away. In order to make sure the inner trenches stayed centered on each nacelle the cut on both parts has to be made on the same side, as indicated in the picture. The 2 halves were heated with a hair dryer and rolled on a flat surface to create the taper towards the rear. When I glued the halves together I sanded, for what felt like days, to get them round and even.
I used a set of correctly sized end caps from Federation Models that come with their Surya resin kit. The bussard domes from JT-Graphics have inserts to simulate the fan blades but have other details that weren’t actually on the studio model. Instead I used a set of clear domes I had on hand and added the fan blades with some 1 mm masking tape, painted silver.
I used a set of JT-Graphics Intercoolers and Federation Models Control Reactors and rear vents to round out the nacelle’s details.
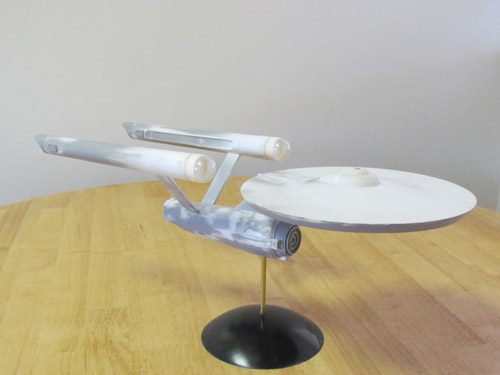
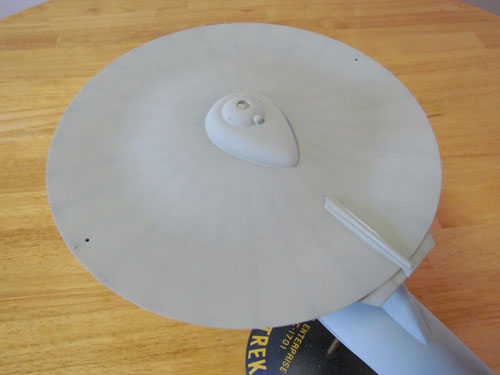
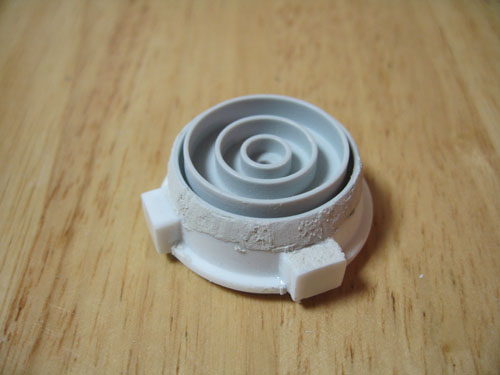
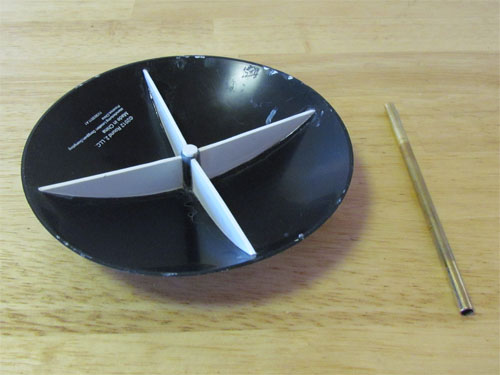
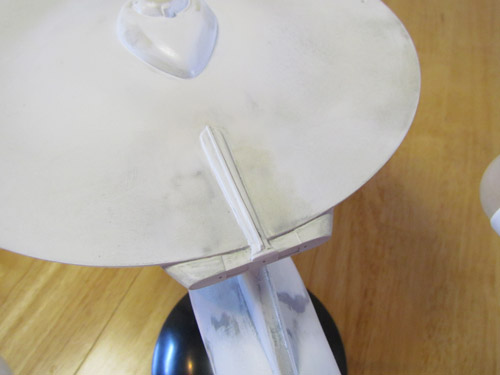
The above image shows the model almost completed sitting atop a Round 2 Dome Base, attached with a brass rod. I reinforced the dome base with 1 mm styrene sheet on the bottom. This keeps the Enterprise from swaying.
Having worked through all these modifications I was now ready to take a breath. The next round of fun would involve the hull color. With the Enterprise’s hull color being a big topic of debate over the years I knew it would take more then simply opening up a bottle of paint.
In my next and final installment I’ll cover the painting, weathering and the decals…
Michael Scarola
Lindberg Model kits: New Attitude, New Logo!
![]()
Since acquiring Lindberg, one of our main goals at Round 2 has been to do right by the rich history of the brand and the people that grew up building Lindberg kits. We are celebrating that history by bringing back many of the vintage illustrations and feel of the old packaging while giving Lindberg a new look, improved tooling, new instruction sheets, and more versatile, historically accurate decals. We want to revitalize the brand and put out products that we can be proud of and putting right what once went wrong! With this new attitude comes a new logo.
In 2013 we brought back the vintage yellow rectangle logo that everyone knows and remembers. We wanted the new logo to be reminiscent of that logo but have a fresh feel, representing a tribute to Lindberg’s past while moving into the future.
And a trip down memory lane…..
![]()
Round 2 Models: Please welcome a special guest
Hi guys. A while… a long while now… ago I was approached by a new, but respected modeler by the name of Michael Scarola. He was working on modifying a couple of our sci-fi kits and was pulling out all of the stops to make his buildups as accurate as the kits were iconic. We chatted a bit and we decided to have him document his process on the builds and post the results on our blog. We have had these in the can for some time now, but I’ve just come across a sliver of time to schedule them to publish.
Mike did some magnificent work to transform our classic 18″ AMT Star Trek U.S.S. Enterprise and our 12″ MPC Space:1999 Eagle. We’ll be starting with posts about his Enterprise model to coincide with our recent re-issue of the kit that commemorates the 50th anniversary of the television show. You should find the kit available now along with our re-issue of the Klingon Bird-of-Prey. Each series of articles will be three parts with some follow-ups showing beauty shots of his finished models. Off we go with part 1 of “My Enterprising Journey”. Enjoy!
My Enterprising Journey: Building the Classis AMT 18” Enterprise – Part 1
Round 2 has been doing a wonderful job bringing back classic models that we love. The classic AMT 18” TOS Enterprise has been released several times over the past few decades but Round 2’s release breathed new life into it. To start, the original box art was a real treat and the best part is under the lid. The raised grid from the earlier releases was removed from the saucer’s top and a new, and very accurate, set of decals is provided.
Onto the build!
My original intent was to build this kit mostly out of box with the addition of a few resin parts. I started by downloaded a set of blueprints from Charles Casimiro which I sized to the AMT saucer’s diameter. I figured once the saucer matched the blueprints all the rest would start falling into place. The profile of the dorsal (neck) matched the blueprints and I found that the secondary hull and warp nacelles also sized up nicely. At this point I decided to attempt to go all out and try and make this build resemble the 11 foot long Enterprise studio model that was seen in original Star Trek throughout the whole series.
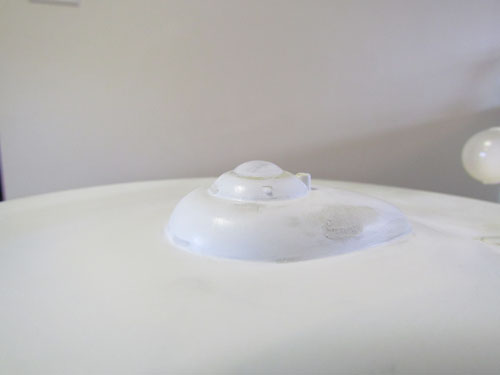
I started by removing the bridge and B/C deck structure from the top of the saucer. I replaced it with a part from Don’s Light & Magic (DLM), which I lengthened by 4 mm.
I re-shaped the Linear Accelerator using a razor saw and various files.
A new bridge dome was made using a spare nacelle dome from a Polar Lights 1/1000 TOS Enterprise kit.
The bottom of the saucer proved to be a bit of a challenge. I glued strips of 1 mm styrene inside the saucer’s edge so I would have enough plastic to re-shape the outer edge’s contour.
This was done using a razor saw, sanding sticks and lots of sanding. The 3 raised circular lines on the cone were removed and filled in as well as the 3 dimples by melting bits of plastic with liquid cement. The stepped area along the outer edge was removed and I added styrene sheet on the inside center of the cone and sanded down the raised area where the planetary censor attaches. The rest of the work involved sanding the bottom until it was even which seemed to go on forever. To scribe the 3 rings into the cone I used a compass cutter.
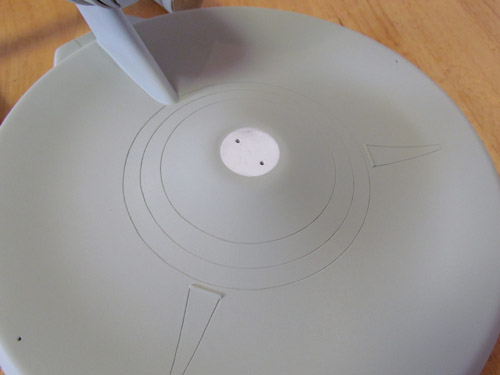
The above pic shows the completed work on the bottom of the saucer with the ‘triangles’ scribed in. For the navigation lights I used pieces of clear sprue from a Polar Lights 1/1000 TOS Enterprise kit. They are made to go in like pegs when the model is finished
The kit’s saucer does make an excellent platform to add details and modifications. The overall shape of the saucer is somewhat close to the studio model and just takes a bit of elbow grease to start looking the part. From the time I started my research this seemed like the most logical part to start on for the build.
In my next installment I’ll cover the secondary hull, nacelles, nacelle pylons, bussard domes and the base…
Michael Scarola
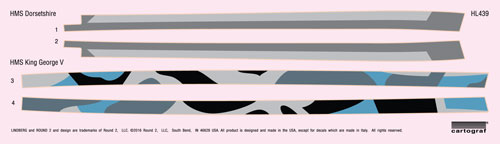
Lindberg Table Top Navy: HMS King George V and HMS Dorsetshire
First, for those of you I haven’t met my name is Chris Purvis. Last year I manned the booth at Wonderfest with Jamie. I work primarily on the Lindberg/Hawk line doing the military and historical kits (airplanes, naval boats, sailing ships, tanks, etc.). The occasional car or oddball kit will also end up on my desk. Before switching over to Lindberg in 2014, I worked on the Forever Fun line. Next month I will be celebrating 3 years with Round2. Also, I am a big nerd for movies and vintage sci fi, so if you want to get off topic in your comments go that direction. -ChrisP
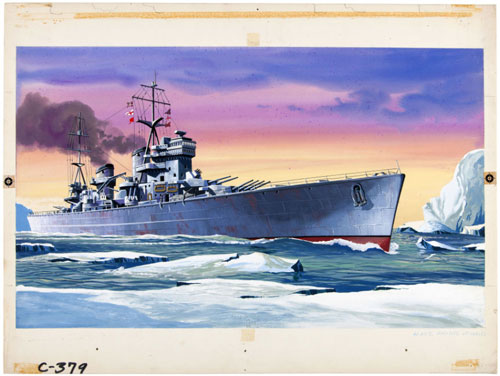
Available soon will be the 3rd 2-pack in the Lindberg Table Top Navy Series, the HMS King George V & the HMS Dorsetshire. The kit features two World War II British Battleships in 1:1200 scale. Like the previous ships in the series, they can be displayed as Full Hull or Waterline models.

Recently we’ve been able to acquire some of the original box art paintings used on old Pyro and Lindberg kits. The King George V box art is from a new scan of the 1959 painting. It is amazing to see some of the original detail and brush work put into these pieces of art.
For the Dorsetshire I scanned the 1959 packaging. From my research I could not find any references to the ship ever have the depicted camouflage pattern. I altered the image to show this known hull scheme.
Before….
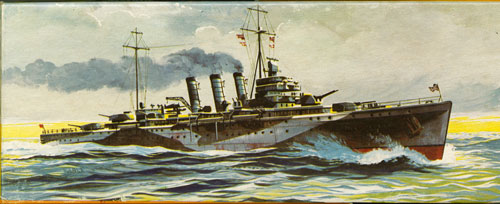

After…
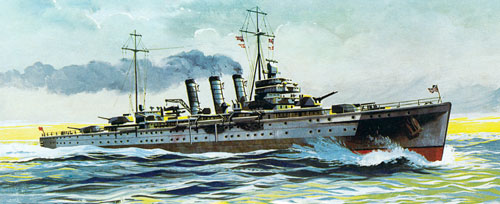
The kit will include that hull scheme for the HMS Dorsetshire as a decal, along with a dazzle camo option for the HMS King George V.
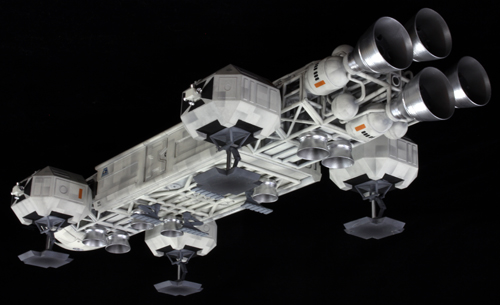
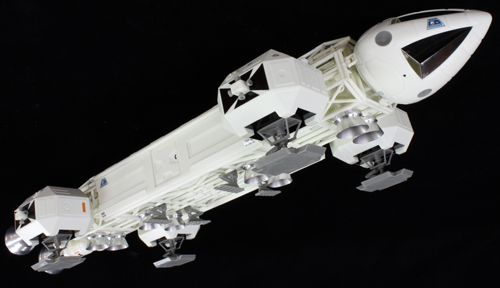
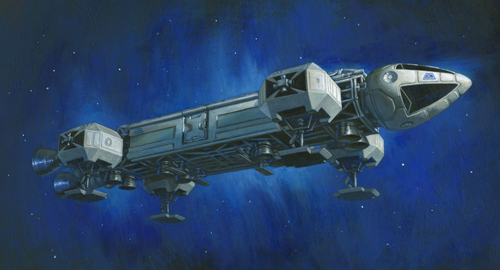
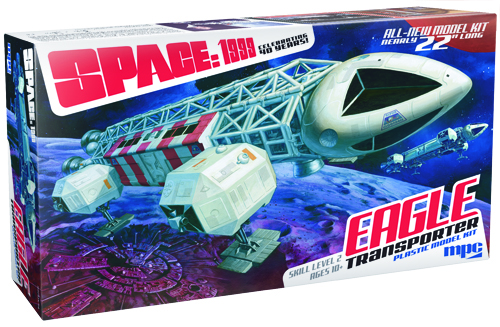
Space:1999 Models: 22″ Eagle update
UPDATE: Kits are due to ship from China by the end of November. No promises that they will land in modelers’ hands by Christmas, but may still reach many of you by the end of the year.
Nearly everyday I get an email or note requesting more info on our exciting new MPC Space:1999 Eagle kit. Quite a bit has happened since my last post and I’m overdue on an update. So here you go. Let’s see… where to start…
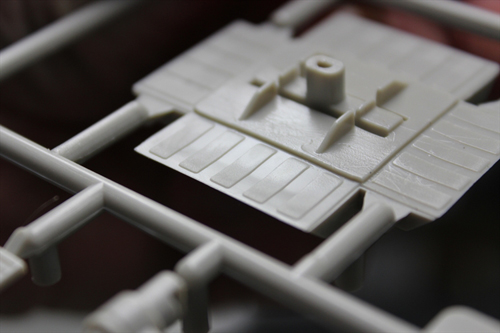
The parts- We’ve received two rounds of test shots. You may have seen comments from Jim Small or Jay Chladek online about the first set of those. I’ll admit I’m holding back a little bit on this one in order to save something for Sci-Fi Fantasy Modeler’s Eagle special where I’ll be contributing an article. Btw, to pre-order your copy click right here! I’m doing my best to balance the distribution of info between here and there.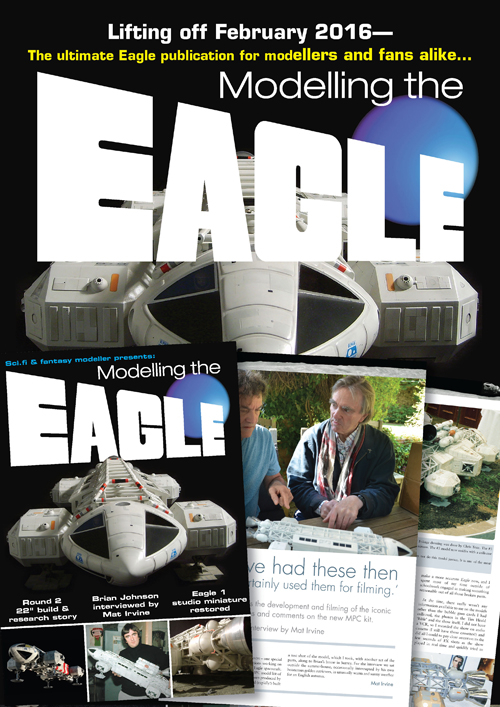
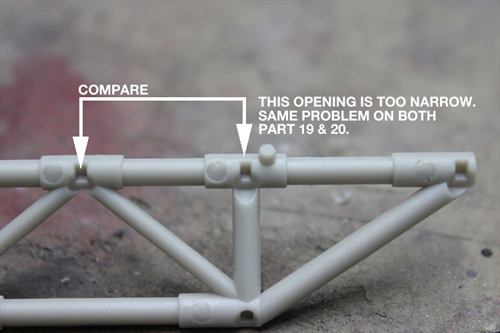
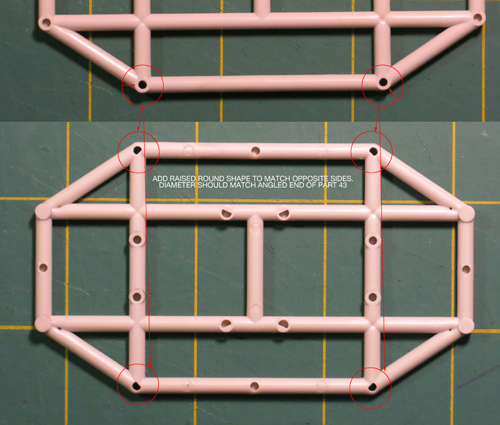
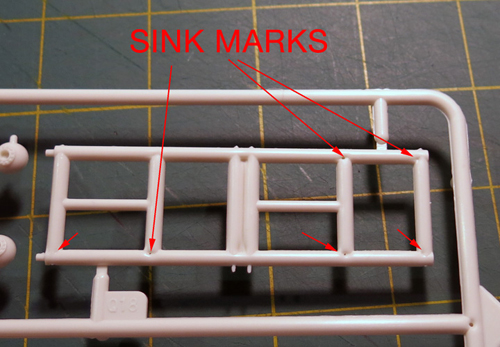
I guess I’ll start by saying that beyond flaws in the surfaces of parts caused by the tooling process that there was not a whole lot to be addressed. There were minor fit issues here and there with pins missing, sink marks etc. All were to be expected in a preliminary test shot. Other than that, the kit really assembled nicely once I wrapped my head around a few of the sub assemblies. It is one thing to see all of the parts and understand how the end product is supposed to look and see what assembly “theories” worked out and which didn’t. Even not noticing very slight differences between some of the frame tube parts caused problems in my first attempt. Keep in mind none of the parts get numbered until the next step. A few lessons were learned, but all for the better and the initial build went together satisfactorily.
I always ask for 10-12 initial test shots for plenty of testing and distribution to consultants and select media outlets. Most might think “ooh, 12 sets!” Well, they go pretty fast once you start handing them out. I kept three. One got assembled, one was used to retrace steps in the build to document trouble areas in the parts and one was kept intact for our archive. Three got sent to Jim Small to use for our buildup. That allowed extra parts for immediate replacement for the build and the ability to build a rescue pod in addition to the standard passenger pod. He was also due a copy as a consultant on the project. Our other consultants Daniel Prud’homme and Chris Trice were also sent one copy each. A set was sent to Sci-Fi Fantasy Modeller for upcoming issues. Two sets were sent to Mat Irvine to take along for his SFFM interview with Brian Johnson. One set was awarded to Jay Chladek for winning in the JerseyFest model competition. Let’s see… ten fingers and couple toes… Yep, that was all of them.
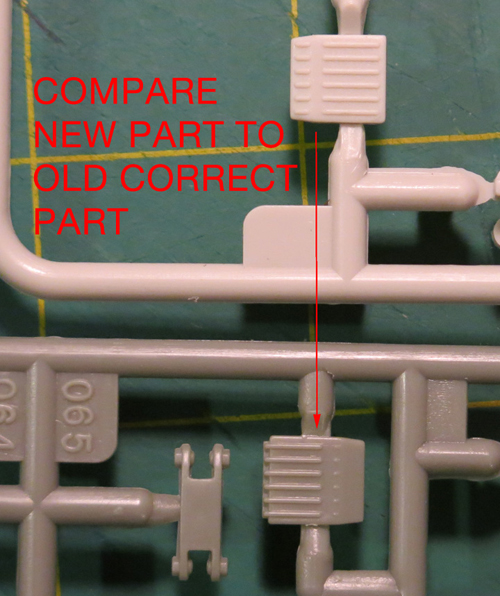
Back to the parts themselves, I mentioned we received a second round (only two sets this time) and most of the problems were resolved, but they never all get taken care of even at this stage. There were still about ten points to correct. The biggest problem to overcome was sink marks in the tops of the landing footpads. The parts were originally solid, but had to be broken into two parts each. This required a bit of rearranging other parts on that particular sprue to make room for the second sizable piece. The change resulted in more problems. In some cases, the factory’s work takes us a step backwards and this case was no different.
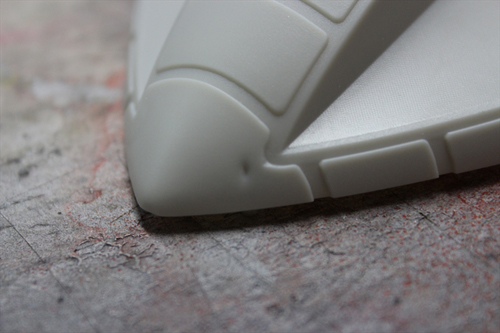
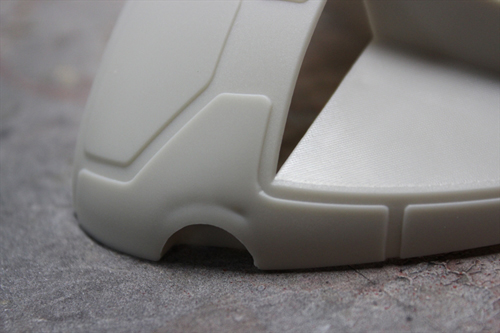
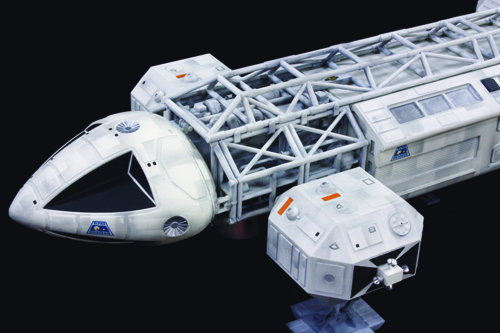
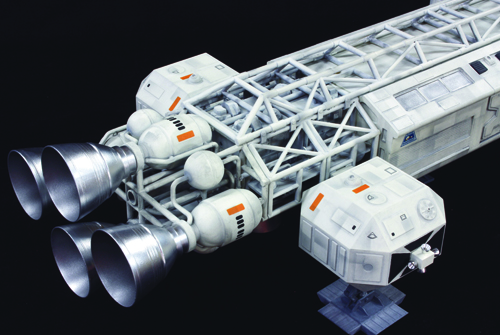
One of the features of the kit is that we are injecting it in two colors, “eagle” white and gray with windows supplied in clear plastic. This means that if one wants to, he can build the ship without having to paint it. I’m of the mind that is looks a little toy-like in this state, but adding the metal engine bell accessories helps, and just a little chalk dust added to the corners and crevasses would supply a superb look without painting in full. Here is a pic of Jim’s “naked” build with the larger metal bells installed.
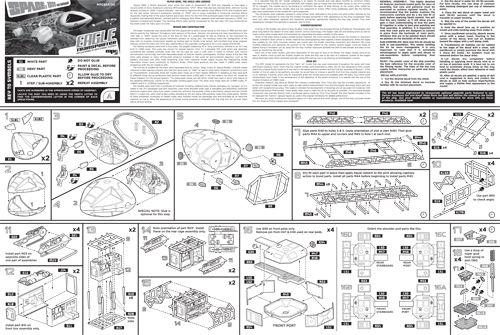
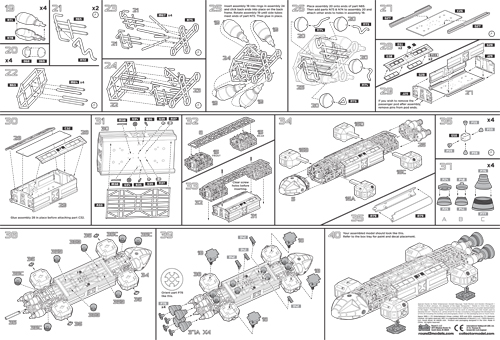
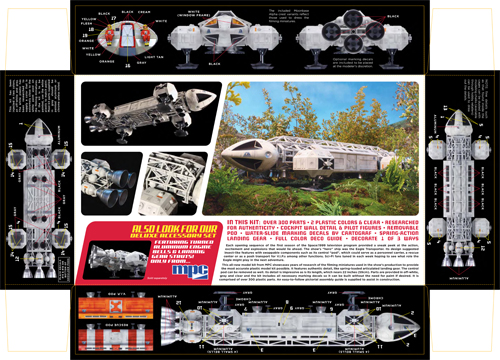
Packaging- By the time test shots arrived, we were racing the clock to get everything finished. The instruction sheet needed to be revised to take practical assembly into account, decals had to be test fitted and refined, the test shot needed to be built into a respectable model for the packaging and publicity and I had the extra task of finishing the box lid illustrations. In most of the designs I was considering, I had a second Eagle in the background. I decided to paint that one separately and would later drop it in as needed in photoshop. This served two purposes. The angle I used for it lent itself better on the box ends. So I would need it larger than it appeared on the box face. Secondly, it allowed me a practice painting to exercise my languishing skills and to check my planned technique. If I couldn’t manage this “baby Eagle” as I like to call it, I was sure to fail at the much larger painting. I’ll post more on the illustrations and process on those another day, but I have to say I felt a bit wounded by some of the comments I saw out there when one of our distributors released a sales image of the box face. Everyone is entitled to their opinion and let’s face it you guys love this ship more than I do even in the very intimate role I’m playing in this. I know very few people could have known the hundreds of hours spent on the design, art and package. In the final push, I spent every waking hour for three straight days working on the larger painting. Time heals all wounds though and I feel much better now. Btw, usually when working on freelance gigs and even when I’m doing semi-mindless photoshop here at Round 2 I listen to podcasts more than music. One thing I used to pass and measure the time on this project was finding “books on tape” for free on youtube. My “reading list” was… 2001: A Space Odyssey (I get it now), Starship Troopers (I was struck by how closely the movie stayed to the book while still failing in its portrayal of the material), the first 1/3 to ½ of Stranger In A Strange Land unabridged edition (I didn’t really grok it so I moved on), 1984, A Brave New World and Treasure Island. I feel very well read now…
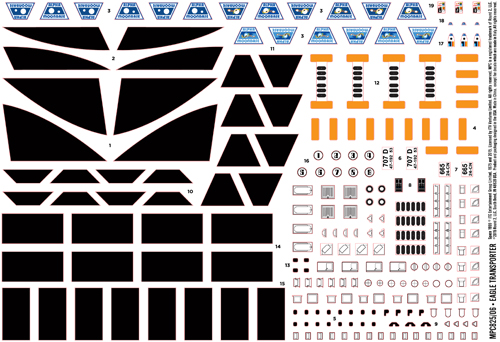

Other stuff- I was very hesitant to reveal all of the news I made in my last Eagle post because it all felt too good to be true and that any of the deals I mentioned could fall apart at any moment. And I’m sorry that I have to report that one of them did… for the moment. It seems the ability to move decals from Italy into China for pack-in is disastrously problematic without the proper red tape taken care of. This is something that is being worked through presently and we full expect to be able to use Cartograf decals in upcoming Polar Lights, MPC and AMT kits by mid 2016, but unfortunately it just can’t happen in time to include them in this release of the Eagle. We currently and will continue to include them in our Hawk and Lindberg branded kits. The move to change to Cartograf has sent a clear message to our current Chinese decal suppliers and stepped up attention to quality has been ensured. I have tested proofs of the Eagle decals and they performed admirably and responded to the use of setting solution. More updates on the inclusion of Cartograf decals will come when definitive info becomes available.
On the plus side, Mat Irvine’s interview with Brian Johnson seems to have gone off without a hitch. Since the interview Brian has delivered a special behind the scenes treat for Eagle connoisseurs, a rare photo of the Eagle model crew along with a full listing of everyone that worked on them!
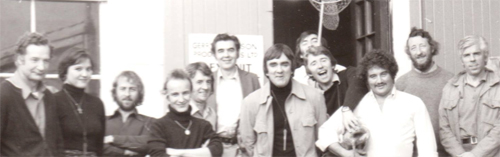
Pictured from left to right: Alan Barnard, Sallie Beechinor, Terry Reid, Guy Hudson, Brian Eke, Cyril Forster, Brian Johnson, Andrew Kelly, Terry Pearce, David Watkins, David Lichfield, Terry Schubert
Not pictured: Harry Oakes- DoP, Frank Drake- Cam Op, Les Bowie- Pinewood FX, Alan Bryce- Pinewood FX, Fiona Latto- Sec, Martin Bower- models
AGM Aeronautical General Models- Larry Barr & Wag Evans- 2nd 44” filming Eagle
Mary Robbins (Anderson), Nee Curtis- Sec 2nd Series 1999
Wrapping up- Okay, that’s about all comes to mind at the moment. Have a happy Thanksgiving!
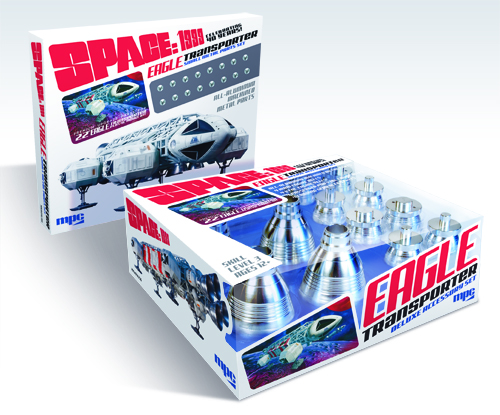
Oh… you ask when will the kit come out? It is November and that was the release date we’ve published, isn’t it? Yes, well, despite our best intentions November is not to be. Currently, it looks like kits should arrive in the nick of time before Christmas. No promises as always, but the honest truth is that is how it looks at the moment. I’ll post an update when I hear they are being loaded onto a boat. Until then… build a deluxe 12” Eagle Deluxe Edition or Moonbase Alpha. As always, Happy modeling!
Polar Lights Model Kits: U.S.S. Reliant Aztec decals
Hi guys-
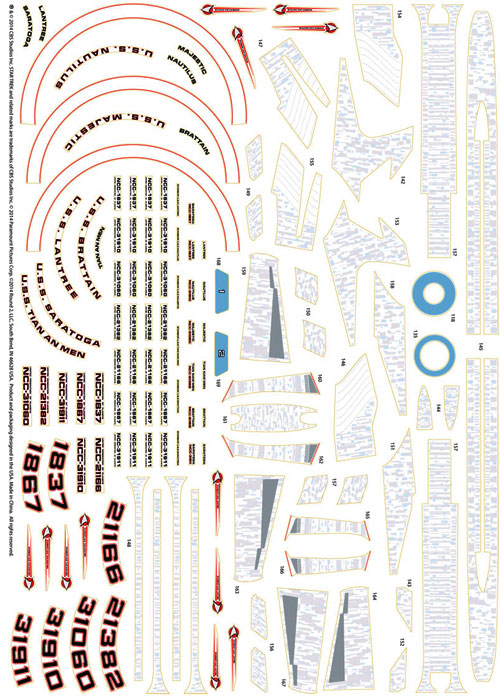
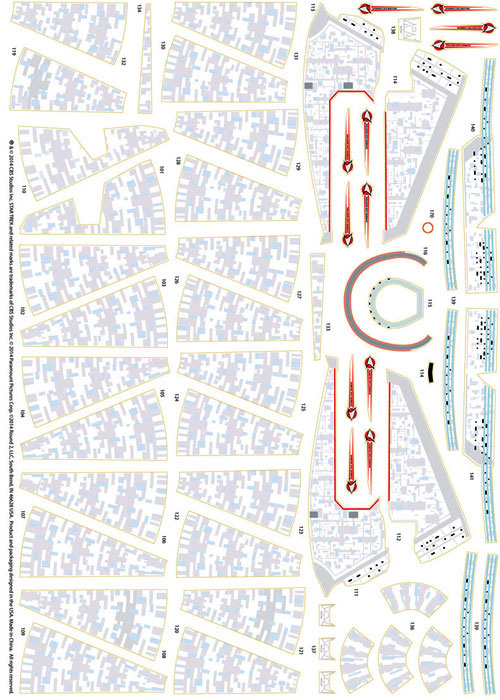
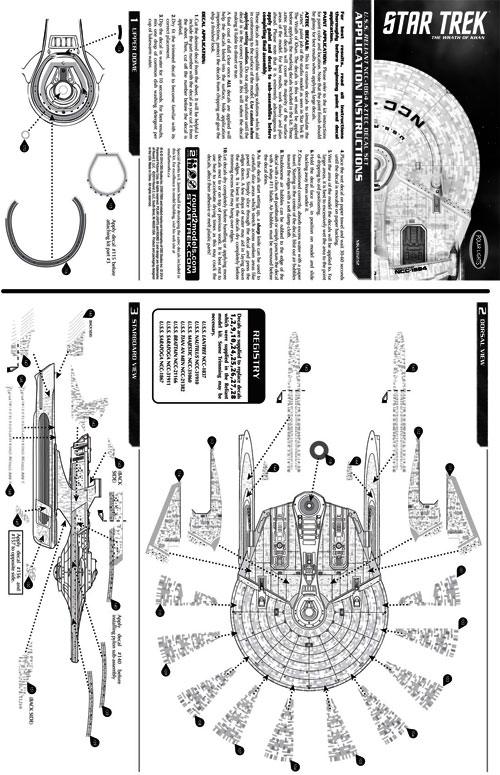
I promised this post a while back. I know we are running behind on getting the U.S.S. Reliant decals out to market, but they should be here by the end of August.
The images below show you what to expect so you can plan ahead so you can start building while waiting for the decals. as expected, it s a our usual aztec wrap and we’ve added in several alternative names and registries as well. A preview of the instructions gives you a better idea of how they are broken up and placed on the model. I’ve pumped up the contrast of everything I am previewing here so you can see it at the relatively low resolution that our blog system restricts me to.
Round 2 Models: And the winner is…

Believe it or not, I’m still here working away on Round 2 Models of all kinds. Just like you I wish I could have posted sooner than this. Many people have been clamoring for a 1701 Club update. Of course so much time and work has gone by that I have a lot to write about. So much so that as I’ve been writing it, I’ve come to the realization that I will probably have to find a way to break it up into two reports. Besides the 1701 Club, many people are waiting with baited breath to hear what ship won the poll I talked about in my last blog post. More on that in just a bit…
I have a sliver of time this week where I think I can write up several blog posts showing progress on some of the projects I mentioned at Wonderfest. I’ve already got some test shots on the Motion Picture Cadet kits, a few versions of the Wolverine kit digital files and I’ve have reviewed he mockup for the Robby the Robot kit featuring Altaira. I should also be seeing the 1:144 C-57D mockup soon. I look forward to sharing some behind the scenes looks at these kits similar to what I’ve been sharing in 1701 Club updates. I’m not sure I’ll have time to get quite as in-depth as those reports have been, but there will still be plenty to share. Once I get them written, I’ll schedule them to release once or twice a week.
Back to the poll results… as you may know, we recorded video footage of this year’s Wonderfest presentation just like we did last year. We had hoped to get it finished and posted some time ago (like before the poll went live) but as things usually happen, other fires got in the way. That isn’t to say we haven’t been working on it all along. Modelman Tom is well known for his Youtube model kit reviews and he has been putting in all kinds of time on our video to make it extra-special and much more entertaining than last year’s edition. As production on the video has wrapped up, the poll has also come to a close. So like a Reese’s peanut butter cup, two great things have come together. So as they say… WITHOUT FURTHER ADO… Check out the 2012 edition of our Wonderfest presentation video to find out the poll winner!
http://www.youtube.com/watch?v=cIbgnXVOZDU
After you’ve viewed it, give us some feedback and let us know what you think.