Recommended Sites


Polar Lights Models: 1966 Batmobile Snap Kit Update
Monday, February 7, 2011

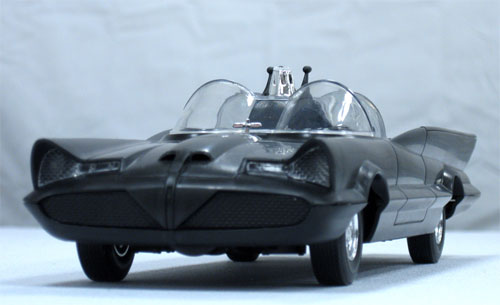
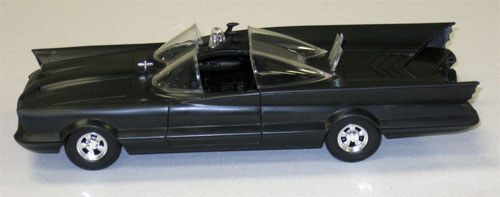
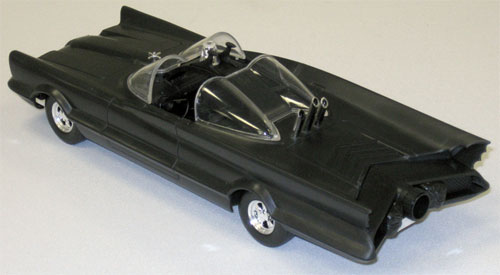
After a month of work, our factory has revised the tooling of our new 1966 Batmobile snap kit. The first test shots had their share of problems that was to be expected from a brand new tool. There is still work to do. The body still needs some blemishes worked out and more polishing. There are still a few fit and assembly issues to work out but all in all, the kit is really starting to shape up.
So here it is folks, for all intents and purposes, this is what it looks like. Like I said, we’ll still do some refining here and there. I also forgot to go ahead and glue in some parts that weren’t snapping. So fear not about the missing fire extinguisher. You know it’ll be there.


I love it! Not too wild about the beacon but the rest looks great! I’ll be pouring over these pics for the next few months until the kit comes out. GREAT work Jamie! Your #1 fan!
It really captures the coolness of The Batmobile.
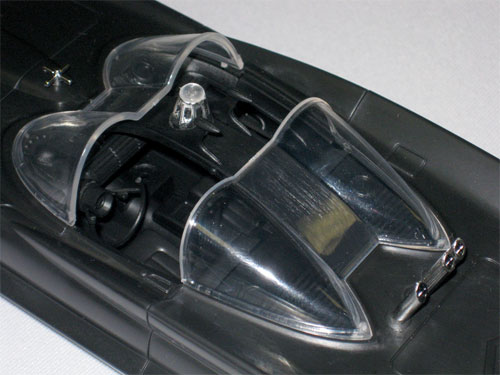
The rear canopies looks a little too extended and pointed in the back but other more expert fans would know for sure.
I also like how unpainted, it looks like a sixties kit. This is how Aurora should have done it back then.
Thanks Jamie!
Okay, now for some feed back about what I can see in the pics.
1. The rear canopy is missing the pivot stops at the bottom of the leading edge. Most builders won’t care and for those who do it’s a fairly easy fix.
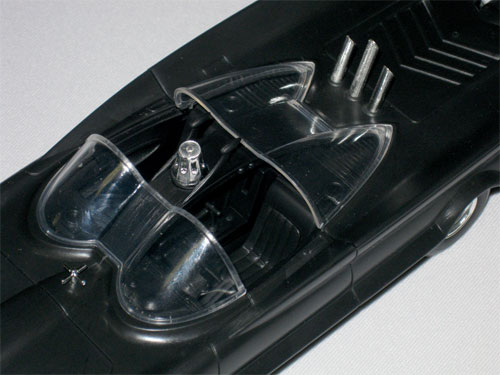
2. The police beacon has the wrong taper and not enough light windows. Again, not something most builders will care about and the aftermarket should do okay with replacements.
3. The most glaring problem is the door panel trim where it widens out for the inner door handle. This should be more of a straight edge rather than a curved sweep.
4. By copying the Mattell chassis the interior floor will have an incorrect depth as well as anything that attaches to it like the seats and console and i’m not wild about the look of the Bat-thrust lever on the console.
5. I can’t be too sure because of the angle of some of the pics but the fuel filler door may be a tad too far back on the wing.
NONE of these (with the exception of the chassis depth) are major problems for the skilled builder and overall looks to be a winner.
Again…Great job Jamie! I can’t wait for these babies to hit the shelves!
Your #1 fan!
Excellent…….good work.
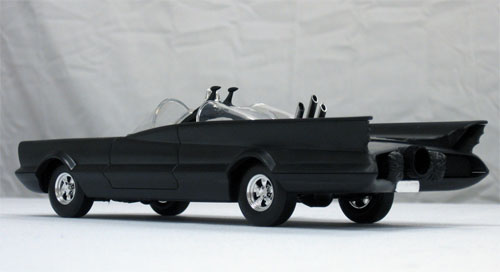
Lots of nice features. The rocket tubes look particularly nice. I can’t even spot the mold seams. The Bat-chutes are very nicely done too. The seats look really good as well although they need to fill the seat frames a little better, and the cushions and frames could both be a little taller. Yhey should rise to just above the level of the package shelf. This could probably be fixed by adding a couple millimeters to the bottom of the seats. I also like the rollbar support. That’s a feature PL has that beats out all the others. Looks like the right hieght and thickness.
Best of all are the wheels and wheel bats. Very nicely rendered Rader wheels.
Well…my comments about what I LIKED about the kit above, is apparently ALL I liked about the kit. After a week or so of pouring over these photos I find that there’s very little to like about this kit. I don’t understand why, with the resources available, Polar took the short route and copied so much from the Mattell car.
Nearly the entire interior is incorrect. And why in heavens name is the canopy STILL wrong??? Back when Johnny Lightning did the Lincoln Futura as a diecast, they had the canopy right! Revell had the canopy nearly right and so did G.A.D.M.!!
I just don’t get it. Why polar lights…why!?!?
Am I missing something here? “Bats”, your first post was great praise for the kit. Your second post pointed out some “flaws” which you acknowledged are easy fixes, then you wrote (post #6 on this page) and said that there’s very little to like about the kit.
Am I misunderstanding something in your comments?
No misunderstanding. With all due respect to Jamie, I had a week to look over the pictures and after my initial excitement I was able to look more objectively at the kit. It IS a great looking kit of this iconic car. However, from a DETAIL standpoint there are alot of little things that are shall we say…off. I am a little OVERLY passionate about this particular piece as having been a fan all my life and been researching this car for over thirty years. We all know accuracy is the name of the game in car modeling. The trick is to build the most lifelike model possible.
The Trek fans have gotten highly accurate models in recent years and I congratulate them. However most of the car subjects,at least the original Polar lights (not the repops) have suffered from lack of detail, incorrect details and misshapen parts.
The best examples I can give are the NASCARS that came out a few years ago. The Petty Charger for example didn’t even have a symmetrical body. One side of the rear window was higher than the other. It was a small difference but it was there. The Torino Talladega’s were warped. Every one of them I built had to be heated so the nose section could be re-positioned to slope downward. The Herbie kit they did was the nicest original subject they did even though it’s engine cover was incorrect for the year of Beetle it portrayed and the 1/25th scale Mach 5 was not 1/25th scale although the tires were.
I know they can’t give us a perfect 100% accurate model, but compared to other major kit manufacturers I don’t think the original subjects that are being modeled by Polar Lights are recieving fair attention to details. As stated above, the Enterprise and other Trek kits are amazing right out of the box. Polar continues however to give us car modelers sub standard details.
Years back Revellogram released the highly anticipated 1969 Dodge Charger kit. Many modelers complained about the incorrect body. What did Revell do? They emmediately began re-tooling the body to fix it’s flaws and even made the offer to replace the body to anyone who bought the incorrect kit.
I contacted Polar lights once about the incorrect engine cover on Herbie. They thanked me for my interest in thier kits…that was it. I didn’t expect them to rush to fix it because I had said it was wrong but I did expect a different response than a “form letter”
During a phone call to the company on an unrelated matter I mentioned it to them and they put the actual sculptor of the kit on the phone with me. He swore up and down the kit was 100% correct and called me a jerk for bringing his sculpting into question! It was a simple matter of the deck lid being from a 1966 beetle and Herbie is a 1963. Again, not that big of a deal. I just brought it to thier attention because that’s how kit makers get better.
If everyone keeps thier mouth shut or praises the company even though the product is wrong they will go on thinking there is no problem. Polar has this blog so they can learn about thier products and the community that buys them. Was I a little too harsh in my earlier statement? Definitely. However…why should the Trek kits continue to exceed expectations while the car subjects continue to suffer? A kit should be fun to build and I for one get so tire of opening a box and seeing a kit that I have to fix half of to get it to look right. Something i’ve never had to do with a Tamiya.
THESE ARE ONLY MY OPINIONS.
I want to say something before anything gets “heated”. (we’re not there yet and I’m glad)
I respect the opinions of anyone that buys our product and enjoys building models. You all see and know more about every product that is out there than I do. I can’t speak for any other company as to how they go about their business. We do the best we can to get product as correct as we can and get it out on schedule. More often than not we find that a balance between “perfection” and “overdue” needs to be struck. That’s where we are at. I’ve tried to correct everything so that most details that may still be incorrect are at least correctable. From what I’ve seen, most die hard modelers want to put more into a kit than to just follow the directions anyway. Other points that are inaccurate are because injection molding won’t allow for a more accurate part. Some parts like the beacon just can’t be achieved with the injection process without very complex (expensive) dies. Could it be a little closer? Maybe, but we can’t delay the kit for another 3 months to make it better.
Sorry, I’m trying not to sound defensive… At some point, I’ll post some of the stuff that I had fixed including stuff that was caught and changed very late in the game that if not fixed would have been truly laughable.
Jamie, I apologise if you’ve taken any of my comments personnaly. As I have stated in other forums you can only work with what you are given. YOU have done a great job in bringing us this kit. My ire is with the sculptors who have continually either ignored or misunderstood your direction. I know you have had all the necessary information available to make this kit as close to the real thing as possible. But if the people actually doing the “hands on” don’t do it right it is hardly your fault.
I’m just saying after all this time I personnally could wait another year to see it done right.
There ARE a number of good features about this kit and i’m sure your final revisions will make it even better.
I’ve upset the apple cart enough and I will leave now. Good luck Jamie in all your future projects and thank you for listening.
I have many pics of the steel body Batmobile when it was flat black w/ white pin striping and for an injection kit, you guys have done a pretty good job, a few flaws, but I think this kit has captured the Batmobile well. Even though I have built a 1/25th in resin, I’ll still get one for the shelf. Nice job guys!
I’m kinda late to the discussion here but I just got around to checking for an update. Reading Bats’ posts I have to agree. Why not do it right? I’ll add to that, after personally waiting 40+ years for a decent kit of this car, I’d rather wait another two years to get the proportions correct than have it incorrect in three months. This isn’t just another Camaro.
Compare this photo: https://www.collectormodel.com/wp-content/uploads/2011/02/snap-batmobile-update-01.jpg
To this photo: http://www.1966batmobile.com/sideview6.jpg
The model’s proportions look top-heavy and the stance is too high and level. The Rader wheels definitely look too small. The fins look like they start too low and the rear edges don’t look angled enough. The rear pan/quarters don’t appear to have the right curve at the bottom behind the wheels. And it may be an illusion due to the undersize wheels but the canopies look too big.
“From what I’ve seen, most die hard modelers want to put more into a kit than to just follow the directions anyway.” That is a true statement but correcting those proportions is about the same as scratchbuilding the body. Why should I buy a kit if I’m going to have to scratchbuild it anyway? That’s a headache. Model building should be fun and not a headache. Maybe — hopefully — it’ll look better when I get it in my hands. Right now the pics have me less than enthused about this, pretty anti-climactic after such a long wait.
Thanks, Jamie, for your updates and for listening to our feedback.
To be fair to Jamie and Round2, this is a “SNAP KIT”! So gentlemen, please remember your age!
They are usually intended for the beginner/younger modeler in the 8+ year group. This skill category would be considered a model assembler. They are learning to build and develop their skills and can only relate to the fact that these kits look similar to the original. So this kit is perfectly correct for that level of builder.
I’m buying two specifically for my young grand kids to help get them get started into modeling. (My 4 year old grand-daughter can build these kits!)
I am 57 years old and waited many years for a more accurate kit of the ’66 batmobile but my advanced building skills allow me to take a kit like this and make it identical to the real thing if so desired. I.e., I am a Model Maker/Builder and I am currently in the process of doing just that with the old Revell Futura Kit.
Round 2 will be providing in the future two glue kits aimed at the older more advanced builders so for those that may want a more accurate kit, maybe your comments would be better suited for those future kits.
Jaime/Round 2, I want to thank you for all of the fantastic kits you have reintroduced and the new ones you have and will be introducing! They have brought back found memories of my childhood and are now allowing me to share those memories with my adult kids and grand children! Keep up the good work!
RTB- If the snap and glue kits molds were designed from the same master then any incorrect details will be carried over. This is where the consternation comes in. We’ll know better about the glue kit soon since I personally know the gentleman working on a test buildup of the kit.
With what i’ve heard from him so far is that nothing on the kit is as bad as people are saying. According to what’s been written about it so far the only real concerns are minor fit problems at this stage wich are sure to be worked out in the kits final form.
Stay tuned.
RTB, I know I’ll be buying at least one copy of the glue kit. Like Bats said, there’s just one set of dimensions shared by the snap and glue kits. If the proportions are really as far off as they look in the photos, then I’ll probably just live with it but I’ll be disappointed. Correcting the overall proportions would be a BIG job. Yes, I’m confident that I have more than enough modeling skill to correct any kit or even to scratchbuild it. But I really don’t have the luxury of large blocks of time to put that much time into this or any project. That is why we buy kits — so we don’t have to scratchbuild this stuff.
Perhaps I’ll wind up buying one of these, a Futura kit from “that other company” and a resin kit to kitbash it all into a Batmobile. My frustration is that in this day and age, there’s no excuse for any of that to be necessary. Maybe it’s just an optical illusion due to the focal length of the lenses used to shoot the photos so, as I said in my original post, hopefully it’ll look better after I get it into my hands. But based on the photos posted here, the proportions look really off.
I’m a car guy and not a comic guy but I did read the comic books in the early ’70s when I was a kid. As I look at the photos again, I feel more like I’m looking at a comic book version of the car and not the Futura Batmobile.
The body is a direct reduction of the Mattell laser scanned #1 car. Keep this in mind while looking at ANY photos of the car- Standard aspect ratios for television sets have changed over the years. Watching the Batman movie on some of these newer televisions can really throw you off due to this change. I have personally worked on and created many different aftermarket parts using original period photos as well as screen grabs from the movie/show. What I found was, due to the picture trying to fill my widescreen monitor the aspect ratio of the picture (and everything in the scene) was thrown way out of kilter. This caused me to create parts that never looked right when done. Not because i’m a crappy modeler but because my reference material kept changing shape due to the difference between the aspect ratios.
Also there is the fact that scale reduction can and does sometimes alter perception. Trust me on this one…the body is right. The ONLY thing I could possibly say against the body is the creases at the wheel wells where they transition to the beltline. I feel they are a little too sharp. A touch of putty will fix that in moments.
At any rate, having personally researched this car for better than 20 years I can assure you…once again, that the body is right. The little things that may or may not be right are easily fixed as well.
It is also perfect 1/25th scale at nine inches in length. The Futura kit from “those other guys” is not properly proportioned at all, and the first re-release isn’t even symmetrical.
Thanks, Bats! I know of your involvement with the real car and am green with envy.
The first time I saw the old Batman show was on a 1959 DuMont black & white console TV and I’ve seen it on many other TVs since then. I know how to set my aspect ratio correctly and have to restrain myself when I go somewhere and someone has their 16:9 TV set to stretch 4:3 programs because I have no tolerance for anyone who enjoys watching a funhouse mirror. Additionally I am a photographer and I know how to control perspective distortion using longer or shorter focal lengths, something that can be done accidentally by an amateur snapshot of a model. I have also seen the #1 Batmobile in person (can you see a car “in person”???) a few times and, being a modeler, I soaked up the details in anticipation of eventually building one.
That said, I was comparing the photos here to the photos on your site on the same monitor. I, too, think the crease in the concave area of the quarter panels is too sharp but I also think it’s too straight and too diagonal. Examining photos of the #1 car shows that there’s a downward curve to that crease near the back end of the fins and it also seems to curve back from the leading edge of where the fin meets the door, making the extensions added by the Barris crew to both ends of the fins evident by having less sharpness than the original Ghia bodywork. The original Ghia section of that crease looks closer to horizontal on the real car than it does on the model. Look here: http://www.1966batmobile.com/rearmen.jpg and http://www.1966batmobile.com/rear66.jpg Then look here: https://www.collectormodel.com/wp-content/uploads/2011/02/snap-batmobile-update-03.jpg That’s gonna take more than “a touch of putty” to fix but it’s not a deal-breaker. I still wonder why, with lasers and computer technology involved in creating this, such things would need to be corrected.
The proportion issue I was talking about, however, will be very difficult to fix unless, like I said, it’s an illusion due to the photography of the model. A real car is obviously much bigger than a camera but the same camera is larger than a 1:25 model. That means that the proportion of the subject to the lens’ focal length differs considerably between the real car and the model with the model appearing to be shot through a very long lens, causing the perspective to appear compressed. For example, see how perspective makes the real car seem to taper to the rear but the model does not: http://www.1966batmobile.com/front4.jpg vs. https://www.collectormodel.com/wp-content/uploads/2011/02/snap-batmobile-update-08.jpg (BTW, I just noticed that these two photos expose an incorrectly placed hood opening seam.) If you know your way around a camera, it’s possible to compensate for focal length when shooting a very small subject like a model. When I invariably do build one, I’ll shoot some photos of it myself and post them somewhere, then we’ll see how it compares to the real thing. Maybe on the 1966 Batmobile forum???
Speaking of the Batmobile forum, you can see a nice writeup about the Batmobile here- http://1966batvehicles.yuku.com/topic/4347/MMP-Polar-Lights-1-25th?page=5 Enjoy!
Thanks for the link, Bats!
It does look good in those pics but I’d love to see a low-angle shot to see the fins from the side like we’re used to seeing them. I spotted that the incorrect hood opening I pointed out in my last post has been corrected and that’s a good thing. The worst thing seems to be the gasser-like stance but that’s usually fixable on most kits. The front suspension looks horrible and will need a lot of work if it’s going to look believable. There’s waaaay too much distance between the ends of the A-arms and the wheels. I’ve never seen the Futura’s spindles but I’ve never seen anything like that on any real car. The spindles would just snap and the steering geometry would make the car undriveable. AMT did a better job on that part of kits as far back as the ’60s on kits like the ’58 Chevy and ’56 Ford. I’ll investigate the latter as a potential donor for more accurate parts. I might as well research it and do it correctly as long as I’ll be correcting the stance and re-engineering the wheel bats to rotate with the wheels.
Am I a tough customer with a high expectations and a lot of nit-picky complaints? I’ve been building AMT and MPC automotive kits for close to 40 years now. I’ve corrected a lot of just-plain-dumb inaccuracies and lived with many more over the years. I’ve also seen the detail and accuracy of AMT (and now MPC) kits go up and up. Kits like the ’60 Starliner and ’68 El Camino are phenomenal. Then, upon hearing that this long-awaited subject was finally going to be produced, how could I not hope or even expect it to be as phenomenal as those kits that were produced over a decade ago?
Thanks again, Jamie, for putting up with my feedback. I’m sure most people will be happy with the kit as-is and it will be a big seller. Just be glad there were no blogs your customers could comment on when AMT called those bizarre things in the ’68 Road Runner kit “taillights.” 😉
The “gasser” stance is only there due to the chassis not being glued to the body. The writer of the review wanted to be able to switch accesories for as many photos as possible. This is why the nose appears high in some shots.
Hey Round 2 a GREAT follow-up kit to this beauty would be
the 60’s TV show Batcopter!
http://coreldraw.com/cfs-filesystemfile.ashx/__key/CommunityServer.Components.PostAttachments/00.00.07.97.48/Batcopter.jpg_2D00_675x550.jpg
Would be in scale with the new 60’s batcar.
Inaccuracies aside, I actually started building this kit. I was doing fine until I got to the tailights.
Maybe it was just my copy but parts 7 and 8 are molded in black. Shouldn’t these be clear? The clear taillights (parts 104 and 105) end up behind these parts making their presence a little pointless.
Are the taillights just alternate parts or am I missing something?
I finally dropped thirty bucks at the local hobby shop for the pre-painted snap kit. I got anxious after decades of wishing and thought the instant gratification of a quick build would justify dropping that kind of cash on it just to see how well the Batmobile got translated into styrene.
I have yet to find a part that snaps like traditional snap-together kits. Rather than having hook-like tabs that snap into location, the parts just have large tabs that press fit with friction and can be removed fairly easily. I’m opting to glue because there are a lot of small parts that I don’t want to lose. The body proportions and contours look better than they do in the photos here. I’ll post pics comparing it to the original when I get the whole kit put together. I’ve only started working on it. There are several things about the kit, however, that are seriously disappointing.
To my surprise, the biggest disappointment is the wheels. Of all the visual elements of the car, the Rader wheels should be the easiest to research since they were the only off-the-shelf part of the car, yet the shape of the kit parts is completely wrong. Unfortunately there haven’t been good Rader wheels available in other kits to grab them from (Ed Roth’s Mysterion had them but they’re not great either), although that should not be necessary on a correctly-done kit. The kit wheels’ spokes have a sharp, inward curve that is not present in the real wheels. http://i27.photobucket.com/albums/c161/hughbond/BatRader.jpg I’m hoping that once the bat spinners are added that the inaccuracy of the wheel’s shape will be less noticeable though, now that I’ve seen the wheels up close, the incorrect shape is glaringly apparent in other people’s photos of completed kits.
The headlights angle up at a 45-degree angle instead of forward. http://i27.photobucket.com/albums/c161/hughbond/IMGP4208.jpg It’s correctable (again, a correct kit does not need correction) but, because the headlights are deep inside a concave portion of the body, it would be a royal pain. I’m choosing to paint the screen covers solid, opaque black and live with it like that since this is a simple, quick, throw-together build for me. When and if I do the glue kit, I’ll take the plunge and correct this, especially if photoetched headlight screens become available.
The concave hollow in the hub of the steering wheel is cup-shaped instead of funnel-shaped. The decals are designed to go on a funnel shape. Was there supposed to be a part to insert before applying decals? As a result, there’s no surface for the decals to adhere to. The steering wheel also had a surprising amount of flash to clean off considering this is a new tool.
The details on the dash on the driver’s side (the compass and gear indicator area from the Futura) are vague lumps that rely on freehand detail painting and poor-fitting decals in a very visible area. http://i27.photobucket.com/albums/c161/hughbond/BatDash.jpg Assuming the glue kit will use the same tooling, this area is the part that will demand to be re-built from scratch.
Possibly the most ingenious thing is the strange floor inserts that produce rows of parallel seams in the floor to distract your eye from the ugliness in the steering wheel and dashboard. I chose, however to flock the floor to look like carpet and happily the seams disappeared underneath it. http://i27.photobucket.com/albums/c161/hughbond/IMGP4222ModifiedinGIMPImageEditor.jpg
The plastic the kit is molded in is that coarse, dull, off-black plastic that many Japanese model kits were made from, not the smooth stuff those of us who grew up on American kits are used to. The body, which came pre-painted, has what looks like sanding scratches under the paint. http://i27.photobucket.com/albums/c161/hughbond/IMGP4226.jpg http://i27.photobucket.com/albums/c161/hughbond/IMGP4229.jpg I assume these are an artifact of the process of shaping the original master of the body and this is the first kit I’ve encountered with scratches like this in 35+ years of model building. They’re really not an issue for a serious build but to me it does indicate the lack of attention to detail in the production of this kit. If it’s an indication of the surface we’ll see on the glue kit, get ready for a lot of priming and sanding if you want a good, smooth, glossy black finish. On the other hand, pictures of the real Batmobile from 1966 show a horribly flawed finish so, if you want total accuracy, just shoot it as-is.
So far my impression of the kit is that while it would have been awesome in 1978, it’s sub-par for 2011. Maybe I’m spoiled by all the excellent automotive kits that have been tooled up in the last twenty years. Given the nature of The Batmobile, the centerpiece of this kit should be the interior and many of the interior items have been reproduced with great accuracy but the oddball floor, poor steering wheel and dash blobs detract from that. If this was just another ’57 Chevy, any of these things would be more forgivable. But considering this is the Batmobile, a unique vehicle, the most famous car ever built, and for 45 years modelers everywhere have been waiting for a 1:25 kit to finally be produced, and that it’s finally happened after years of supremely accurate automotive kits raised the bar very high, this kit is pretty disappointing.
Jamie, with all due respect, do you have practical experience building models – especially automotive – or are you a CAD-CAM guy who got the gig designing this stuff? You seem like a nice guy with a lot of enthusiasm, especially for the sci-fi/comic stuff. Was this kit aimed solely at the sci-fi/comic crowd with no regard for the crossover appeal for the hardcore automotive modeler? Thanks again for taking my feedback.
@Arronax – I noticed the same thing about the taillights. I’m wondering if the glue kit will have photoetched mesh as an option for the grilles. If not, perhaps the aftermarket will come up with photoetched parts and then the taillights will be ready and waiting. From what I see in the snap kit, there’s plenty of opportunity for the aftermarket to make parts that correct the things that leave me scratching my head.
Maybe a better Bat expert could fill us in, too. Were those taillights near the parachute packs original to the Batmobile or a later Barris fix? I always thought the taillights were inside the ends of the fins (as seen here: http://www.1966batmobile.com/rearmen.jpg ) but I’ve seen the lights behind the rear grilles in later pictures ( http://www.1966batmobile.com/cwrr.jpg ).
Patrick- Sorry to hear you are disappointed with our Batmobile snap kit. To address your question about my practical experience. I’ve got more experience building cars than sci-fi kits. I’ve got no experience with CAD. I’m sorry if you found the kit lacking the precision you expected. There were many more serious problems with the kit along the way than the ones you mentioned so I had to prioritize the issues when developing the kit. There were limitations that prevented us from making it a “perfect” kit. Hopefully you will find that it is better than other Batmobile replicas.
btw, the “tail lights” weren’t accurate to the car. They were a misinterpretation by the factory. Just a case of bigger fish to fry than having them removed. The glue kit won’t include photoetch grills but the deluxe kit will.
I finished it tonight. I’ll shoot some photos that match the angles with the distances and focal lengths scaled to treat the model the same as the real car. I still think the fins are a bit tall in proportion to the rest of the car so that’s why I want to do a fair comparison in which the camera will bend the shapes similarly.
While I totally stand by my criticisms of the steering wheel, dash top and wheels, the completed kit does look very good, especially considering the lack of effort I put into it. It sucks that you had ANY fish to fry. Right is right, correct is correct, wrong is wrong. When I plunk down thirty bucks for a curbside snap model, I don’t expect a box of wrong but I guess that’s acceptable business these days when everything gets outsourced.
I was under the impression from previous posts here that you did CAD work on the model, sent that info overseas and they mastered it, tooled it and manufactured it. Perhaps “CAD” is the wrong terminology. 3D modeling perhaps? I’d be fascinated to read a post on here explaining how the process really works and how you fit into it. If you’ve already done that, I missed it but please link me to it so I can read.
I’m already thinking of how to sloppily fold Bare Metal Foil over the edge of the photoetched grilles to achieve this look: http://www.1966batmobile.com/cwrr.jpg The more I research it, the worse the Batmobile looks! Tell me again why I want to build a model of it???
Here are some photos of my completed model matched to photos of the original.
http://i27.photobucket.com/albums/c161/hughbond/sideview4.jpg
http://i27.photobucket.com/albums/c161/hughbond/rear66.jpg
http://i27.photobucket.com/albums/c161/hughbond/DriversSide.jpg
http://i27.photobucket.com/albums/c161/hughbond/1966all-f.jpg
It looks pretty good overall though I see some proportion and contour issues in a few places. The fins are a bit heavy and lack the slight downward droop to the rear like the original. The headlight hoods meet the bumper farther back. The rear edge of the windshield canopy is too vertical. The beacon is a bit large. None of it is enough to call it bad or awful, maybe a grade of B+ overall. By far the worst part, the thing that ruins the look of it is the wheels, which have a rim diameter of 9/16″. That multiplies out in scale to be 14″. The Batmobile wore 15×7 rims. The kit tires, however, seem to have the same overall diameter in scale as the 1966 tires, making the sidewall excessively thick. The difference is really obvious in the photos. The rear wheel arch is also much smaller in scale than the original. This underscale stuff down low makes the slightly heavy fins look heavier.
Some significant body mods to the rear wheel arches are required if you want the body to look right. Then there’s the issue of the wheels, which are pretty awful. Rummaging through my parts box I found a pair of Rader wheels mastered over 45 years ago for the Ed Roth Mysterion kit. They lack lug nut detail but the diameter is right (5/8″ which is a bit over 15″ when multiplied out), the rims, which are deeper, look to be the correct depth and the spokes have the characteristic Rader shape.
http://i27.photobucket.com/albums/c161/hughbond/IMGP4274.jpg
At the time I’m posting this, Mysterion kits list on ebay for about $30 each including shipping. Luckily I have a pair of them already because each Mysterion kit (now out of production) only came with two each, otherwise it would cost $60 in addition to the cost of the deluxe kit when it comes out plus the added build time correcting the rear wheel opening and dash top to have a scale Batmobile that looks respectable. That’s not even getting into the front suspension issues I mentioned when I saw the early glue kit pics. It’s gonna take A TON of work to make things right that could have been done right by Round 2 in the first place.
So now the question is, how bad do I want a Batmobile on my shelf?
We sent no CAD information to the factory. They started by developing the kit in CAD on their end. I plan to post some of the horror stories encountered while developing this kit at some point. There were a ton of them.
I’ll bet! Sounds like a nightmare. It’s really too bad that such a highly anticipated, historic kit had to come together in such a “fish to fry” sort of way. I was under the impression that you did the initial design digitally, sent it to them and they made it a reality. Perhaps Round 2 really needs to keep creative control with the people who are most familiar with the subject.
I mocked up my Batmobile with those more correct Raders just to see how it looked. The wheels and tires were really mounted on the car for the photo but I Photoshopped the wheel bats onto them because I didn’t want to remove them from the original kit wheels. The tires are very incorrect 1/24 scale Goodyear radials but they handily fit the rims. I think it does a lot to make the model look right. They’re in the bottom of the three pics. I’d be very interested to hear your opinion.
http://i27.photobucket.com/albums/c161/hughbond/sideview4b.jpg
I also spotted a photo in Hot Rod Deluxe of a Ford Thunderbolt and remembered that the Thunderbolt kit by *those other guys* is another source of 1/25 Raders that are probably better than the ones from the Mysterion. It’s currently in production, therefore a cheaper, easier source that I’ll definitely investigate. I’ve been a chronic “kitbasher” for 30+ years so my mind is always working in that direction. 😉
Any word on what the price point will be for the Batmobile deluxe edition kit?
Thanks for allowing me the opportunity to give some brutally honest feedback. I hope you can pass it along to the Round 2 bigwigs to show them that they need to improve the process for future products.
Patrick- A lot of hard lessons were learned during the development of this kit. I would do a lot of things differently…
As for the size of the wheels. I’m glad you found a worthy replacement.
I’m not sure what the price point will be for the deluxe kit as we have no control over what retailers will charge. It should be in the $50-60 range.
I hope the fact that we haven’t censored your reaction or comments says something about how receptive we are to our consumers. Though we can’t go back and correct everything. Rest assured we hear you and will use the lessons learned to do better next time.
That’s all I can ask for! Thanks Jamie!
these “’66” batmobiles are very nice. from the prepainted snap kit right up to the “deluxe” edition with photo-etched parts. however, in Australia, even the snap kit is frightfully expensive & as a result is still missing from my collection (i only build star cars) & i have a small collection of batmobiles. the only other one i’m missing is the tumbler (also expensive here if you can get it). sadly, by the time i could afford one, they’ll more than likely be off the market. Also, have you guys considered doing the animated batmobile?
i guess i’ll just convert my Lincoln Futura kit. 🙁