Recommended Sites


Archive for June 7th, 2019
Space: 1999 Models: New 1/72 scale Eagle kit Pt. 2
Continuing our guest series reviewing the new 1/72 Eagle test shots.
Also, we have posted photos on our facebook page of every entry that was eligible for our award at Wonderfest USA last weekend. We also posted a short video of the four adult finalists.
Enjoy!
Developing a Spine in Today’s World.
By E. James Small
One of the things I personally worried and spent a lot of time thinking about when contemplating the shortcuts needed to take the fantastic MPC 22” Eagle and shrink it down to 1/72 scale was how the new model’s SPINE was going to be molded. We didn’t want it to look like previous versions made at similar scales that had flat backsides of the tubing and still be strong enough to support the finished model. Also it had to be ACCURATE in proportion as well as easy to build. Parts count and tooling real estate had to be kept to a minimum to keep costs as low as possible. Tooling draft, which means that the two halves of a solid steel mold must be able to be pulled apart without trapping plastic parts in undercuts that would otherwise provide full detail, has always been a problem for all injection kits. That standard had to be improved upon so that the new model would still represent the original HERO miniatures and not look like a cheap toy. Previous offerings of die cast and injection molded models and toys all had those problems. Therefore, how to do it better?
This is one of those times when I wish I could satisfy my personal ego and take credit for such a simple yet ingenious solution as shown in this picture.
Nope, can’t do it. I had nothing to do with it. The design credit goes entirely to Round 2’s graphic artist and product developer Jamie Hood! In fact it’s one of those Homer Simpson “DOH!” moments when Jamie showed me his idea and I thought to myself “DUH! Why the bloody hell was that never done before? It’s such an OBVIOUS solution to the problem! Why couldn’t I think of that? Why did nobody else think of that decades before?
And, no doubt, all of you reading this, now having seen it will also say the same thing and think; “Why would you do otherwise?”
OK, ask that question of everyone else who made an injection molded Eagle model. Let them wallow in the failure that has been overcome in this new kit! Get it? Yeah, easy to understand once you see it done, not so easy to come up with that simple solution if you’ve not already seen it! Jamie is fairly reticent to take credit for a lot of stuff he does, including the many illustrations he does on kits you do and don’t even know about, so I’m gonna do it for him. Everyone please give him a virtual round of applause for his work! He does a lot that nobody hears or reads about!
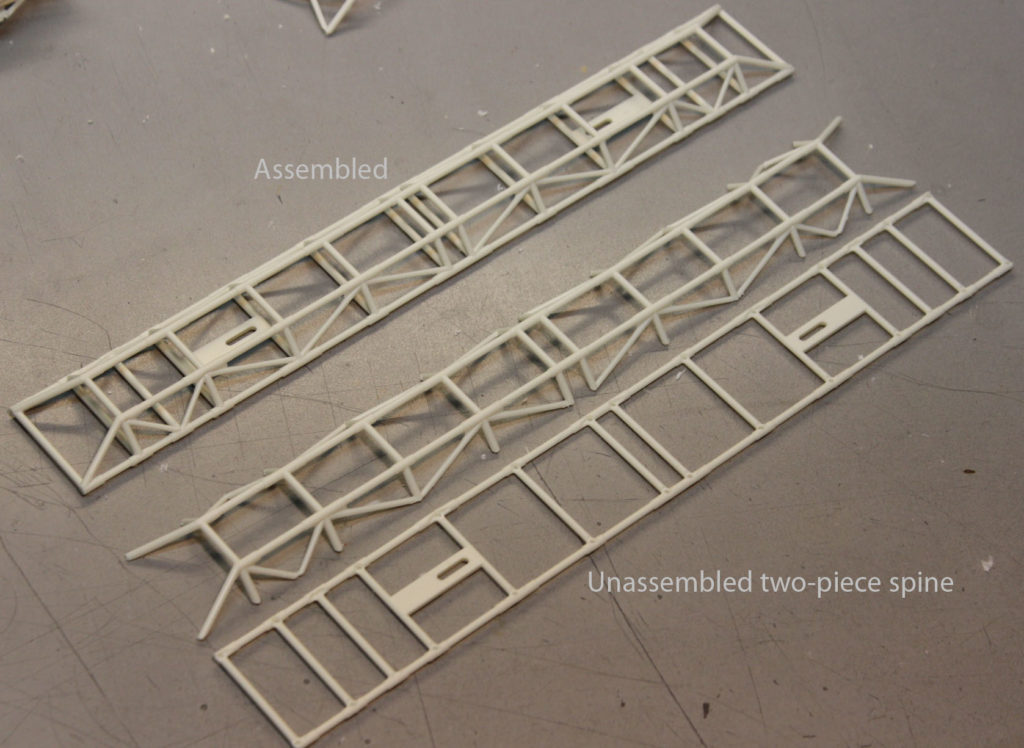
“OK”, you ask, “Why wasn’t that done on the 22” model”…? Well, even with Jamie’s ingenious design that even the factory didn’t figure out, there are some flaws on this smaller model that was overcome with more parts on the larger and more expensive version. You must understand the limitations of injection molding, especially the aforementioned draft. The worst of them is slight “webbing” around the tops of the triangular bracing at the top longerons of the spine. Yes, those are necessary molding shortcuts that are needed to keep parts count and tooling down for a smaller scale and lower cost kit. As a builder you can either ignore them or take the time with a #11 Xacto blade and carefully carve them out. The point is, the model will still look “right” whether you choose to do that cleaning up or not, as shown in the photo you see here. No significant cleanup was done in the examples shown.
Ladder and frame. That’s all there is to it. Now you see what it takes to develop a good solid spine in today’s plastic world!