Recommended Sites


Archive for March 26th, 2013
GLUING A SNAP KIT IS A SNAP! …Part 3
Continued…
Puny Human Pin Hulk?
Whether you use the base that comes with the Hulk or you’re planning to use something different, I suggest you plan on pinning the big guy. Pinning isn’t difficult and will make your model more stable on its feet. It starts by filling the hollow foot assemblies with a solid material that will hold the mounting pins. I used epoxy putty that I pushed into the foot halves before I assembled them. The assembled feet could be filled with plaster of Paris just as well, but make sure all the water in the plaster has time to evaporate before you close up your model.
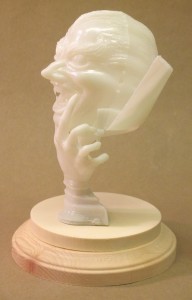
It hadn’t occurred to me to include pinning in this article when I was building my Hulk, so I will illustrate the procedure for pinning with another MPC snap-fit kit, the Vampire Glo-Head, Fig. 5. Round 2 has taken pains to make the model more stable than it was when originally issued, but I wanted to make sure it wouldn’t fall over at model contests. After the hand halves were joined, I filled the hollow interior with epoxy putty and sanded the bottom smooth.
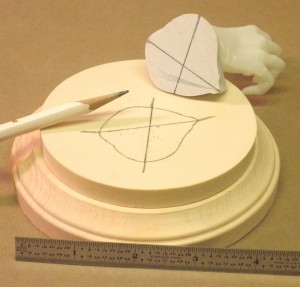
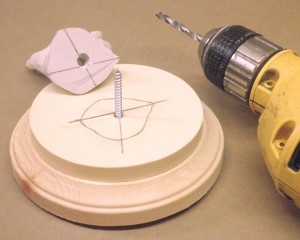
Then I needed to locate the hole in the resin and wood bases on which I would mount the model. This hole also had to line up with the epoxy plug in the base of the hand so it would sit in the proper position on the resin base. While I held the hand in position, I penciled four alignment marks around it, extending the marks onto the resin base. Then I connected the marks with the aid of a straightedge, locating the centers of the holes, Fig. 6. They were drilled into the hand and base; for this model, I used a big screw for the pin, Fig. 7. A section of sprue or a dowel would work also. I used this technique to pin Spider-man to his base as well.
If you’re reading this article in the first place, I presume you probably weren’t going to leave your Hulk unpainted. His upper body and feet assemblies were designed to be trapped by the trouser halves. It’s easy to paint the trouser parts and Hulk assemblies separately and then join them together.
The fit of the Hulk’s upper body to the top of his trousers isn’t the greatest, and the seams along the trouser halves are prominent. However, they appear where seams on real trousers do, so they don’t have to be eliminated for a realistic appearance. The pieces of the test shot I assembled had to be glued and clamped carefully to prevent them from coming apart. The gap between the Hulk’s torso and his trousers can be filled fairly easily (I brushed several layers of white glue in there) and the paint on the trousers touched up.
A Model of a Different Color
Everything I’ve had to say about gluing the snap-fit Incredible Hulk applies to the Amazing Spider-man – and all other snap-fit models, for that matter. Spidey was designed so the red and blue parts of his costume could be snapped together unpainted. The design itself is ingenious, but it makes life harder for the modeler who wants to assemble the model with glue.
I tried and failed to remove the mounting tabs from the hands and feet assemblies, thinking I could paint them separately from the body and attach them after painting. It would have been much easier to simply assemble Spider-man entirely (which I eventually did) and then paint him. This required a lot of masking, but the results were well worth the effort.
The hardest part was to get the red and blue sections to fit smoothly. I sort of cherry picked the areas where one section would have prominence over the other. And the usual seams reared their ugly heads under a coat of primer, Fig.8. I had to be careful not to fill the incised web pattern when filling gaps. Where I did fill the webbing, I tried to resculpt it with hobby knives and even a fine routing bit in a rotary tool – that proved unnecessary as we’ll see.
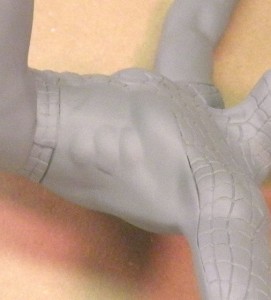
Painting the web pattern may seem daunting, but I found a few ways to make it easier. Over a good base of white primer, I painted the red areas of Spidey’s costume with an airbrush, using Testors Model Master Guard Red. This is a very bright red and dries to a gloss finish. To paint the webbing, I mixed a bit of liquid detergent with some Hunt’s black ink in a small cup. The soap broke the surface tension of the water-based ink so it wouldn’t puddle on the gloss red paint. Using a fine, pointed sable brush made it fairly easy to apply the ink into the incised webbing.
I found it best to plan ahead when applying the ink so that I could avoid grabbing a wet spot while holding the model. I began painting the back of Spidey’s boots – these were areas where I could practice painting the webbing without my mistakes being too noticeable (rubbing alcohol cleaned stray ink marks off the gloss red paint). I tended to hold the figure around the waist, so the next areas I painted were the arms, then the head, and finally the torso.
The ink dried rapidly; to prevent my finger oils from marring it or the red paint, I wore rubber gloves while I worked. I saw that the intensely black ink looked the same in the molded webbing as it did on any parts of it I had inscribed. Even flat surfaces where the webbing got filled looked okay; on its own the ink reinstated the detail very well.
Time to Celebrate!
– Because I’m done with this article and a couple of fine models. I was very impressed with the final appearance of these snap-fit kits. Their engineering made me take some different approaches to those I’d have made with glue kits, but the results were otherwise the same. I hope you enjoy building your models as much as I did mine.