Recommended Sites


Archive for the ‘Star Trek’ Category
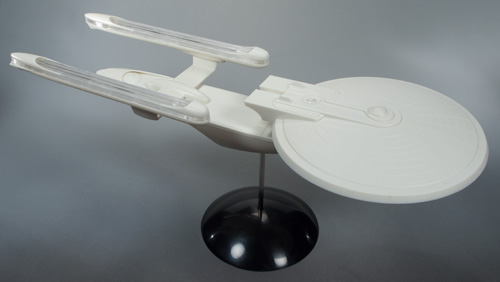
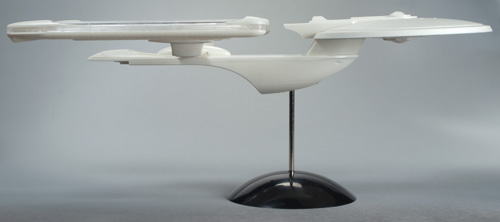
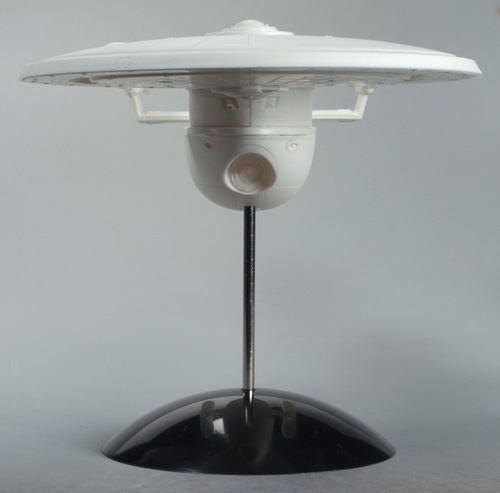
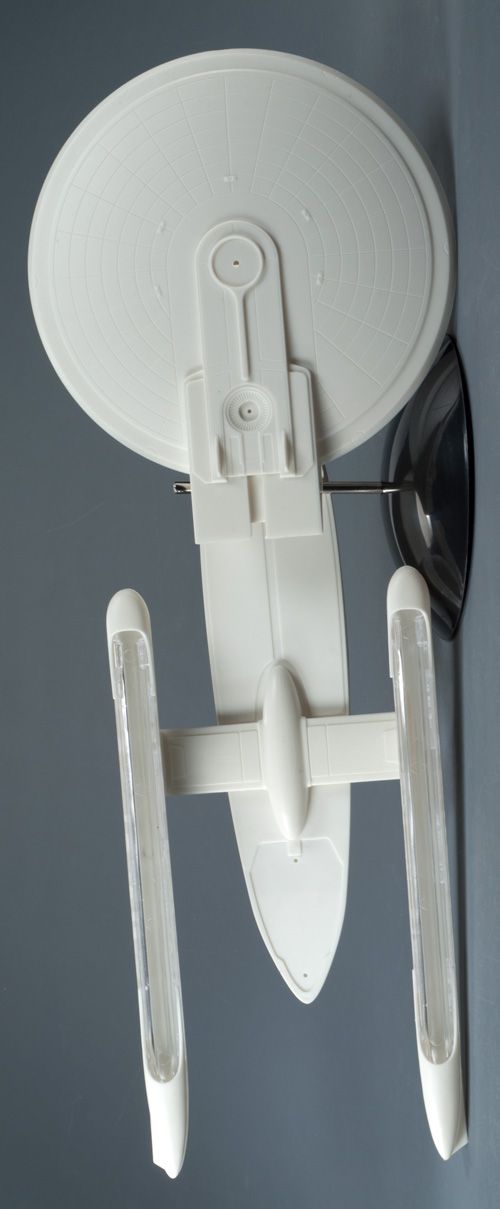
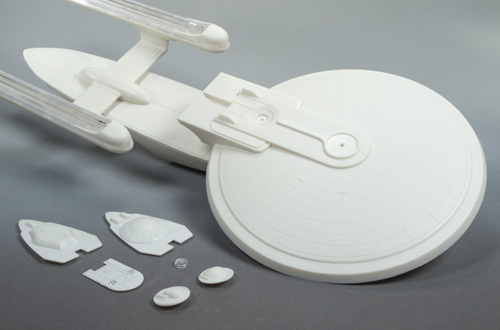
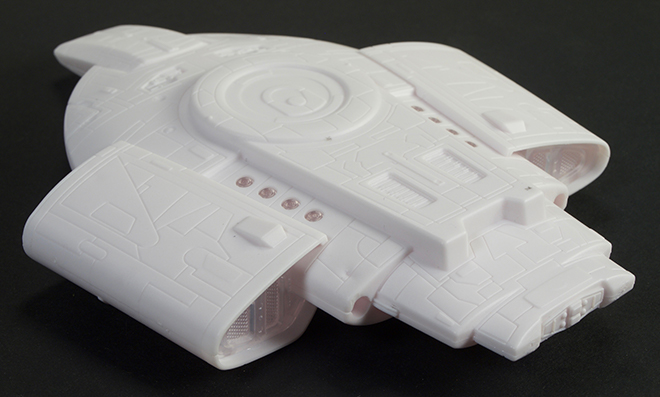
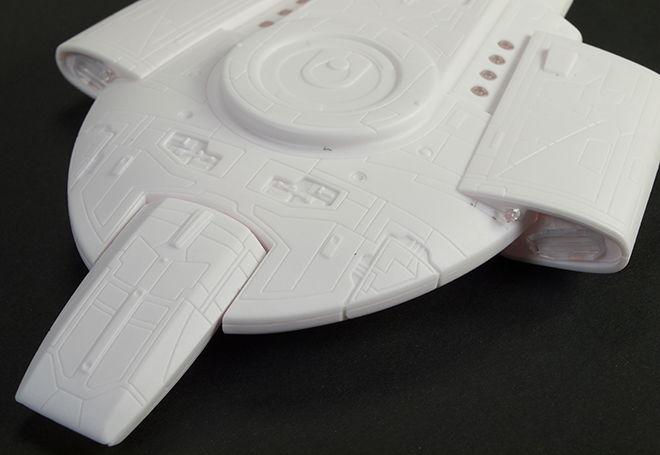
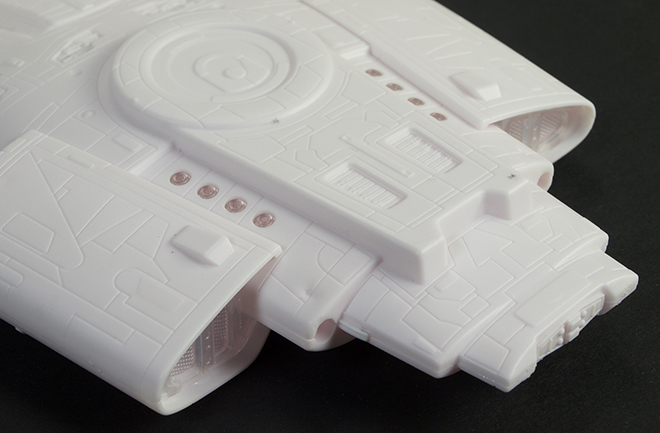
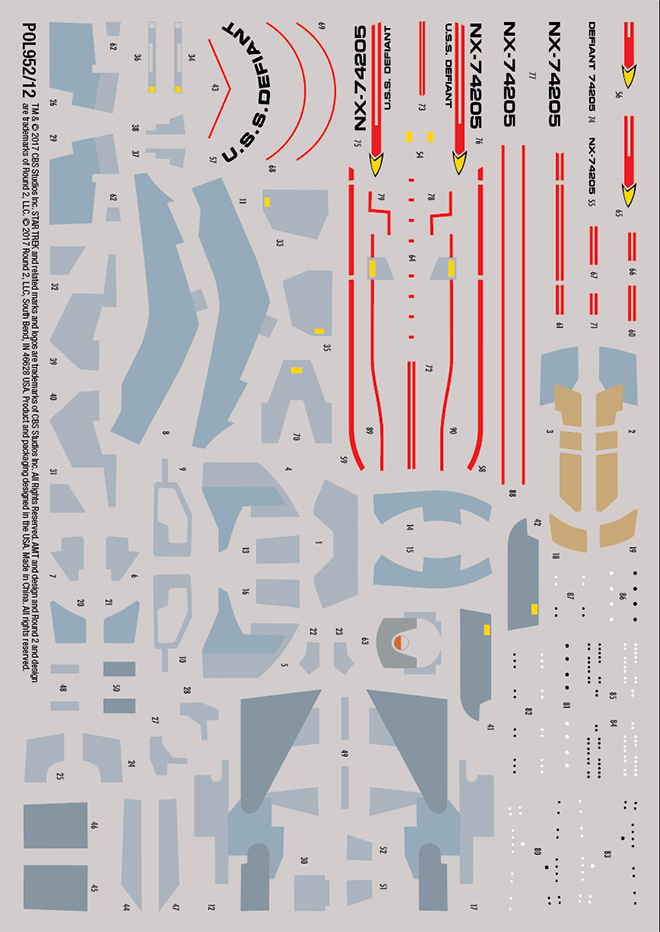
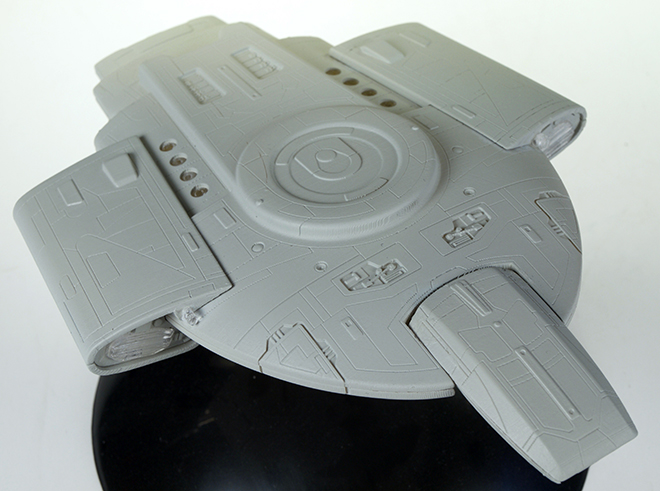
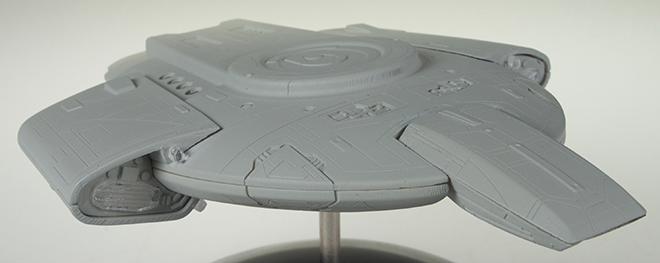
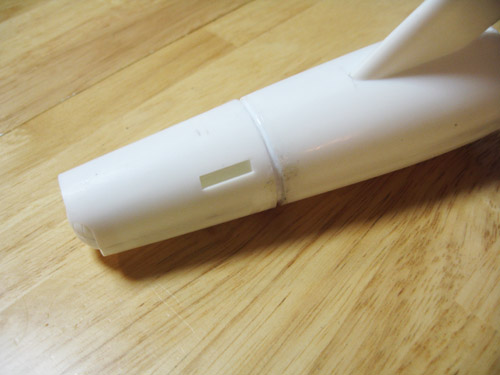
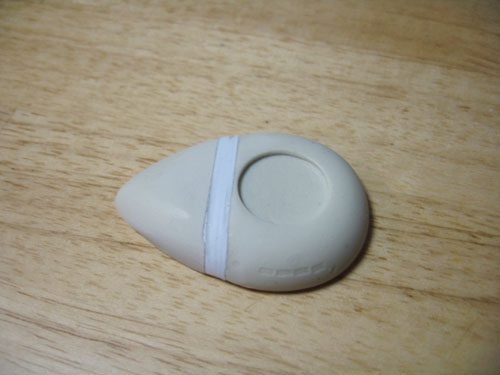
Star Trek Model Kits: U.S.S. Defiant kit update
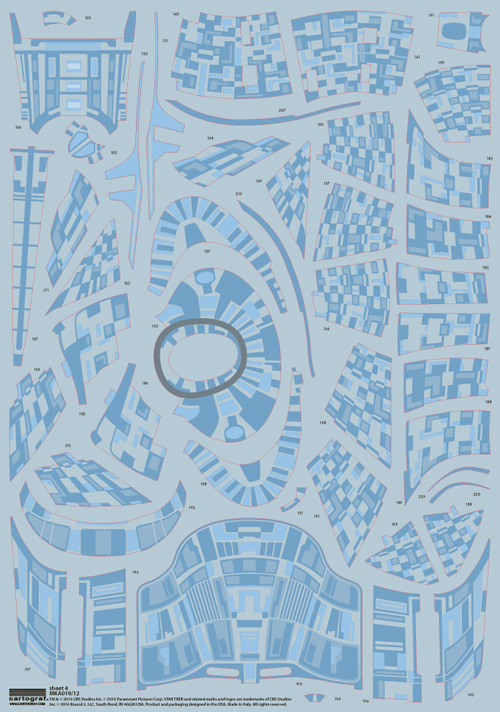
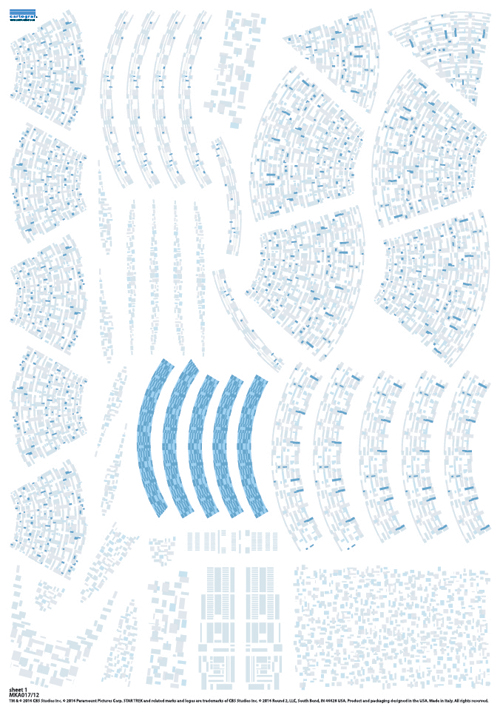
Things rarely go according to plan. I was hoping to show the mockup for our NEXT new Star Trek kit this week, but delays at the factory are preventing that this time. Good news though that we already have test shots for our all-new U.S.S. Defiant snap kit! So here’s a quick look. I’m also showing a look at the decal sheet. Unfortunately, we couldn’t fit the additional registries some have been asking about. (Updated) We are also including a cap (not shown in pics) to seal the base hole for those that choose to use a different mounting method.
We are pretty far along with this kit with packaging underway. Jim Small may be showing off some pics of our buildup soon on social media. We’ll be sure to share those pics on our Facebook page.
Everything shown here is subject to licensor review.
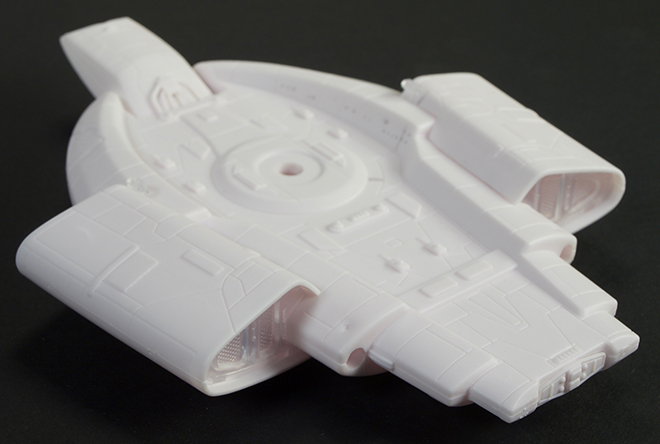
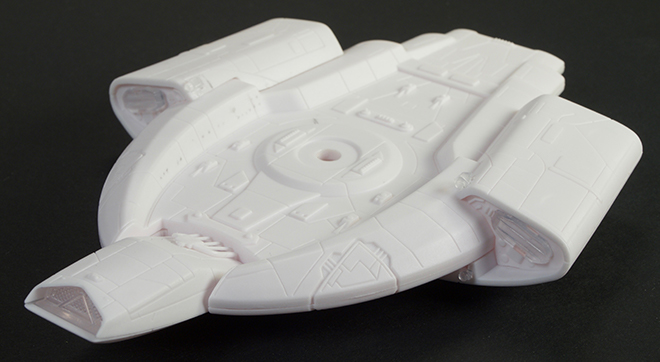
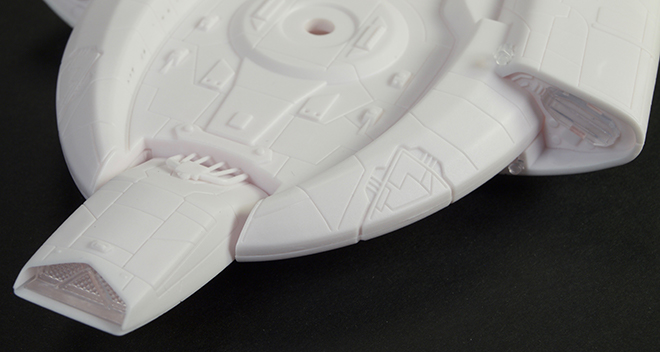
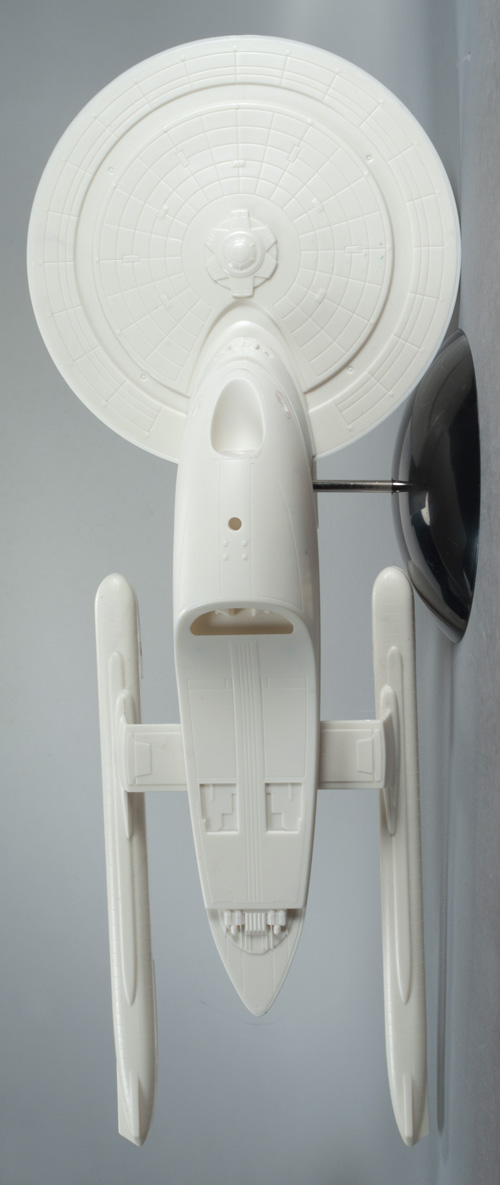
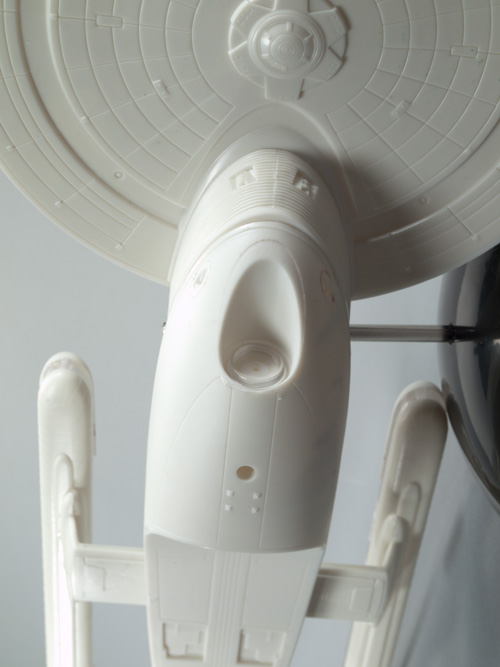
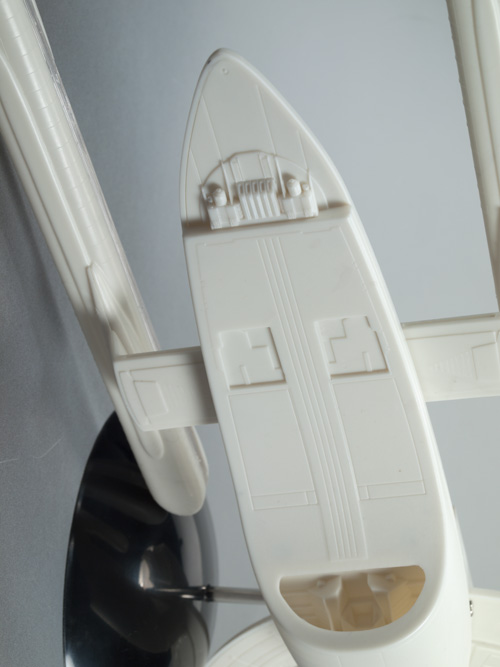
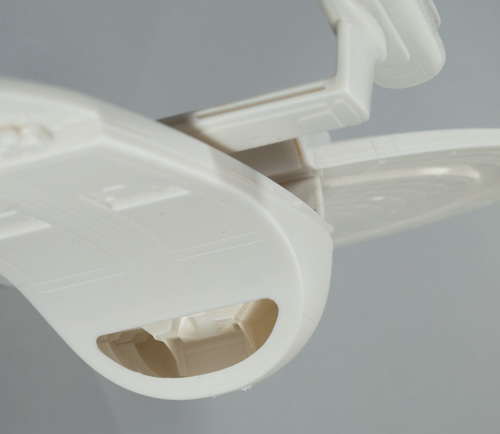
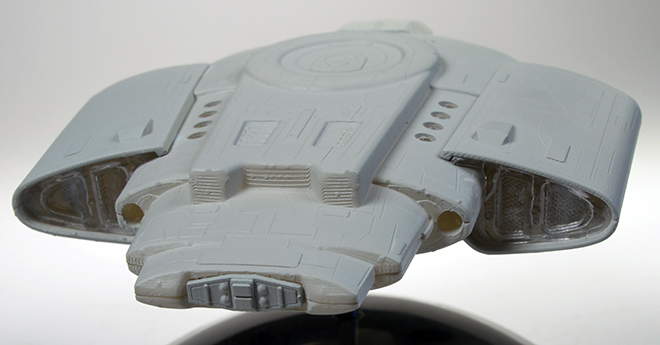
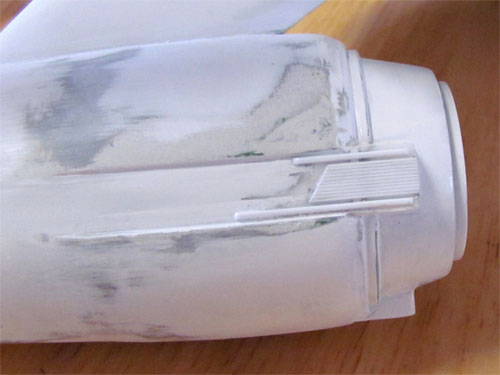
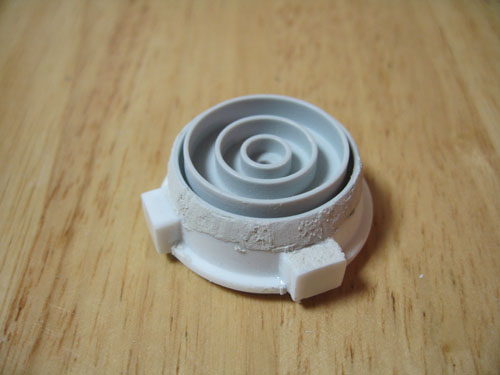
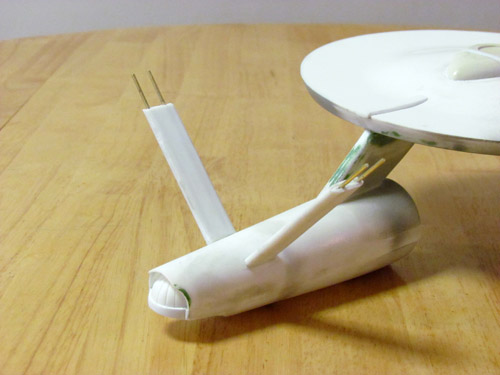
Star Trek Model Kits: U.S.S. Defiant update
When we offered a re-issue of the AMT U.S.S. Defiant from STAR TREK: Deep Space Nine a few years ago it turned out to be a nice solid seller for us. It offered a substantially-sized kit at the odd scale of 1:420. However, the sweet success was short lived. After just a few production orders for us, the tooling was catastrophically broken. It was going to cost us the price of a new kit to fix it. So we decided to do just that!
It took us a while to get to it, but when it came to deciding on our next 1:1000 release, the Defiant seemed to be the perfect choice. As a kit, the subject is simple from the tooling standpoint. We aren’t just making a smaller version of the old AMT kit though. We are making sure that this one is nicely accurate even if it is smaller. 1:1000 puts the overall length at about 6 5/8” long based on an established length of 170 meters. (Yeah, I know the ship was infamous for changing size to meet the need of the shot.) We had Angelo Bastianelli draw up the CAD model which was based on the filming miniature.
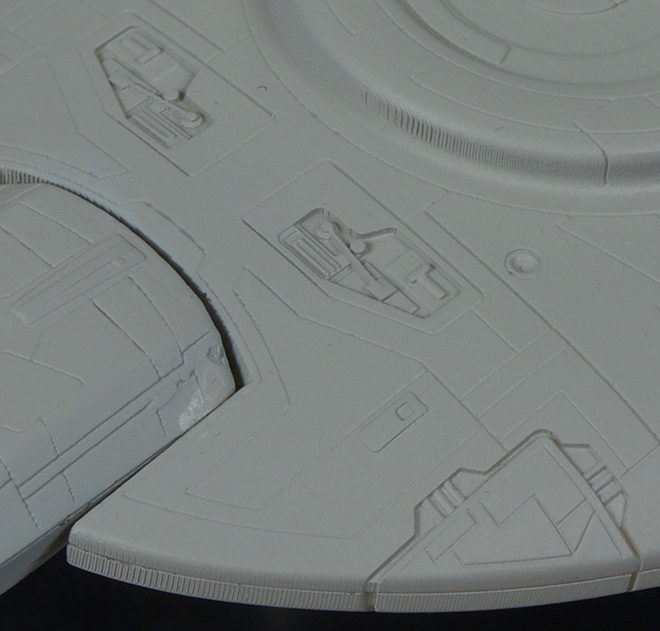
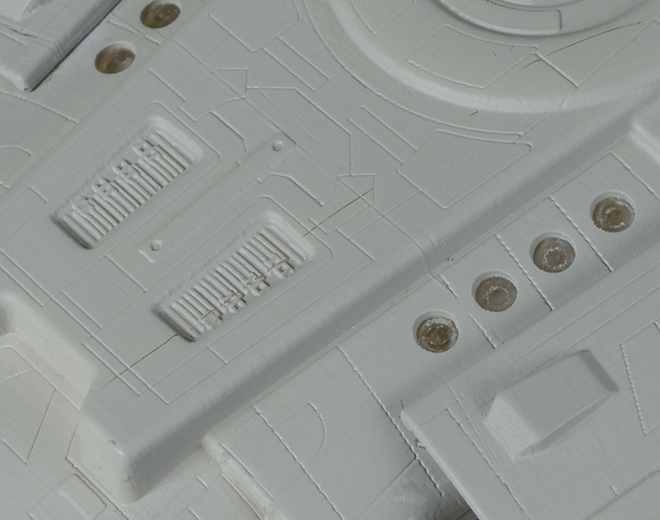
The mockup looks great. It features some pretty fine engraved panel lines which the factory states they can match in production. We’ll see how it looks when we see test shots. They captured some nice greebly detail in just the right spots. The kit will include clear parts as needed unlike the older kit where things like Bussard collectors were merged into opaque bulkhead parts. The forward-facing weapons on the nacelle cowls, front “mouth” (did they refer to is as a deflector? It obviously isn’t a “dish”) and round exhaust vents on the back are also clear.
I have to admit I like most of ST:DS9 less than other incarnations of Star Trek. I was one of the viewers the show lost by the time the stakes were raised around the Dominion War. But I have to admit the more I look at this mockup the more I appreciate this ship. If the details translate into the test shots, this will be a great looking little kit!
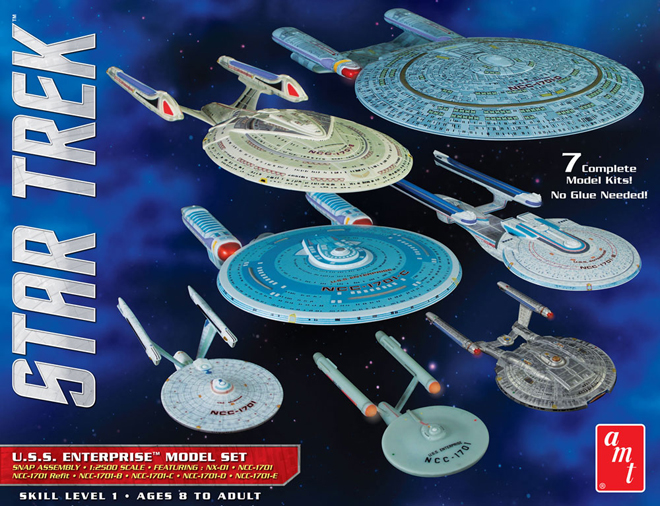
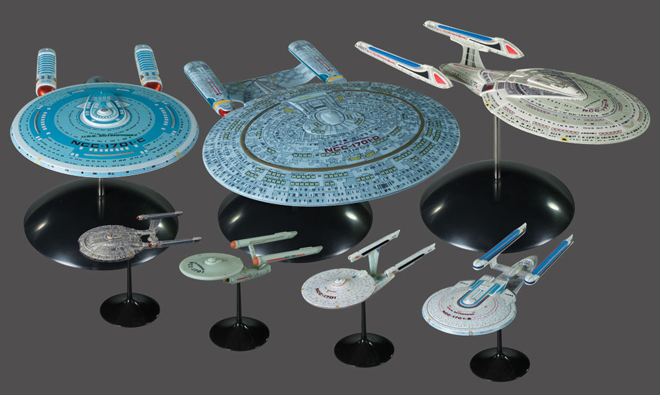
Star Trek Model Kits: 1:2500 scale Enterprise Box Set
Here’s a quick update on another exciting Star Trek kit that should be arriving on hobby store shelves before summer. The U.S.S. Enterprise Box Set should arrive on store shelves in April.
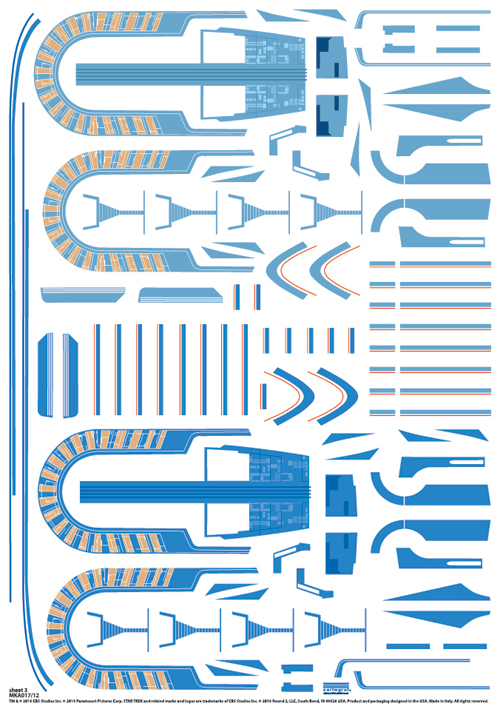
This set features snap-together kits of all seven ships from Enterprise to The Original Series and on through Star Trek: Nemesis. The NX-01 is all-new for this release for the first time in 1/2500 scale. Display bases are included for every ship in the set. One last minute change from our previous announcements about the set is that instead of pressure sensitive decals, such as those that come in Gundam figures, we will now include standard water-slide decals for every ship. The decals come on five large sheets that are packed edge to edge with technical markings as well as aztec paneling. Each ship comes molded in its appropriate base color leaving only a few spots of paint to be needed for completists.

In an upcoming blog I’ll feature our new 22″ Eagle with cargo pod and touch on the packaging for that to lead up to a full reveal of the new kit’s packaging.
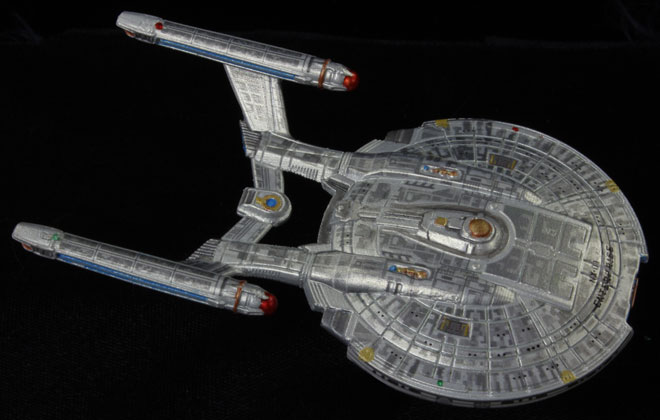
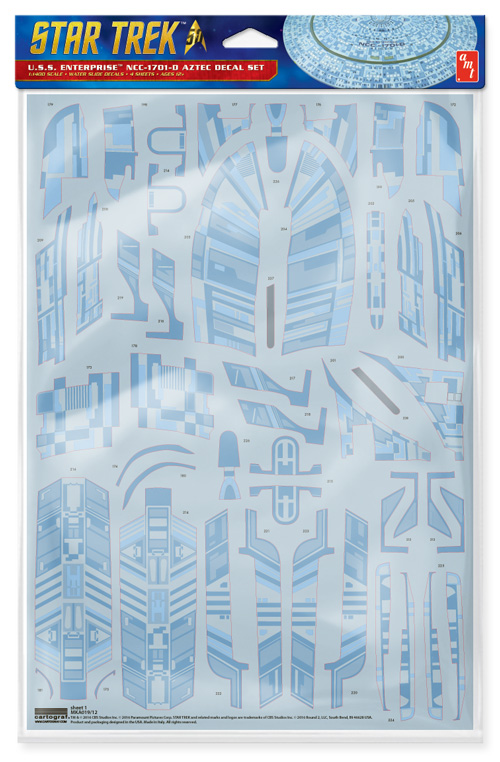
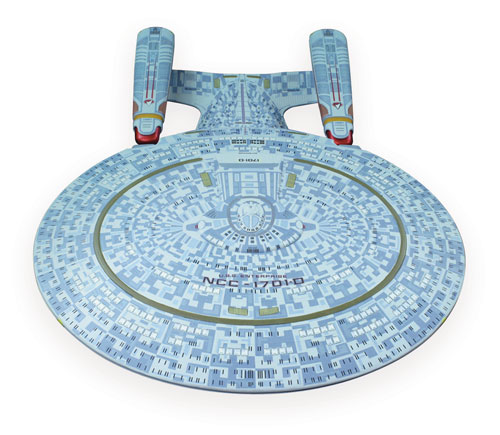
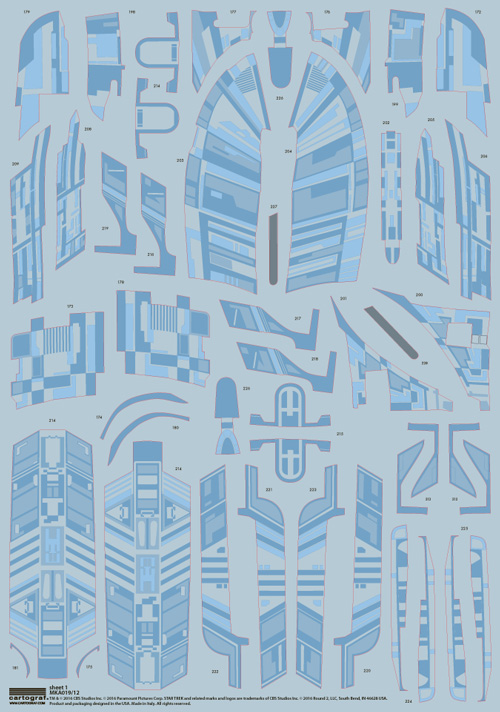
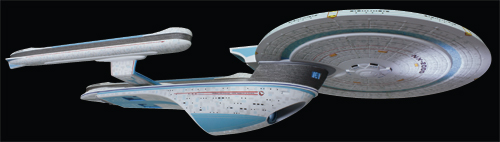
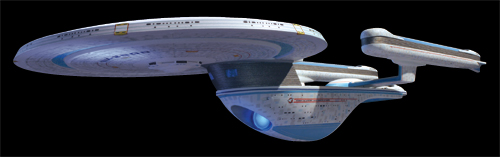
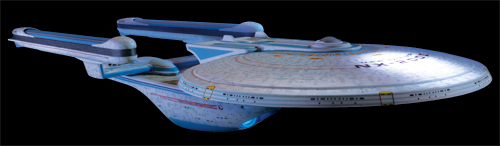
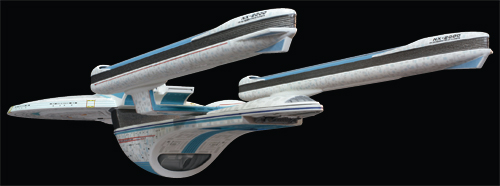
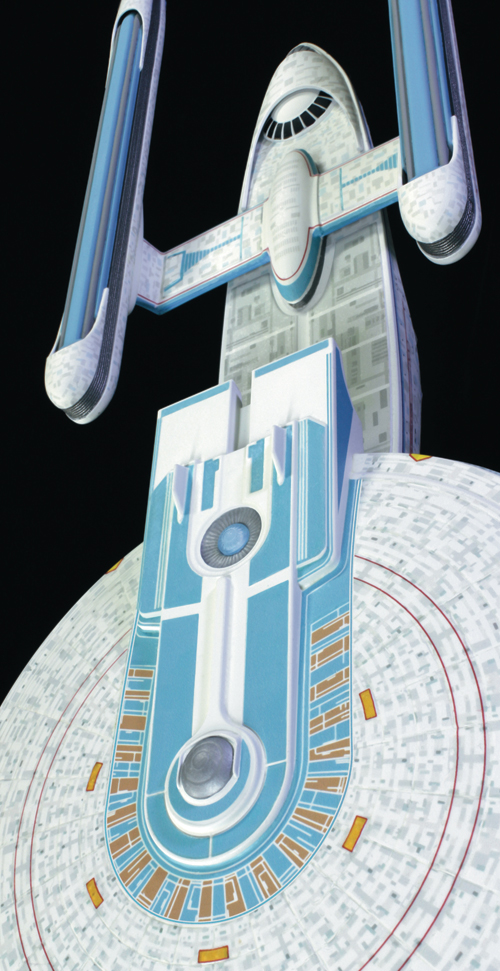
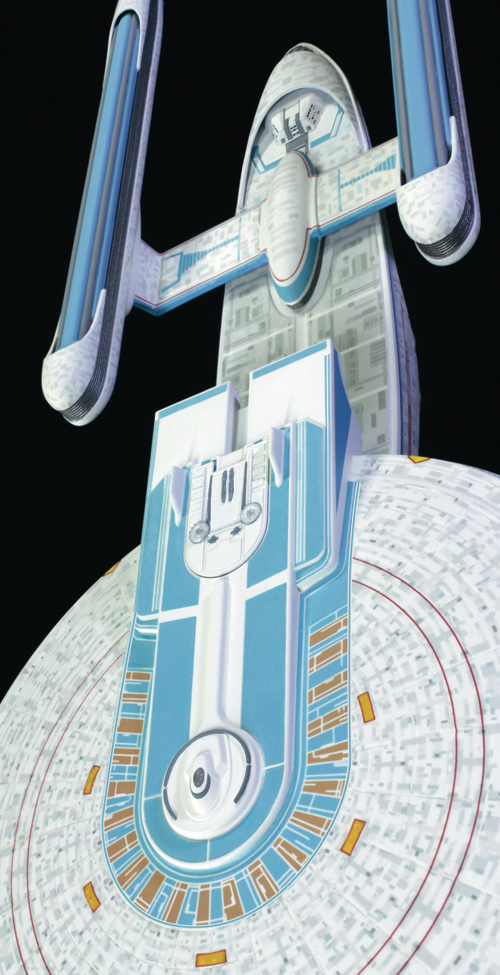
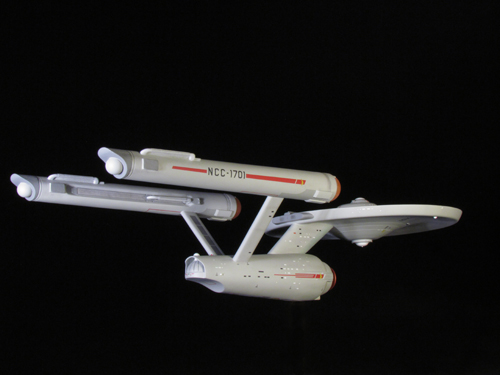
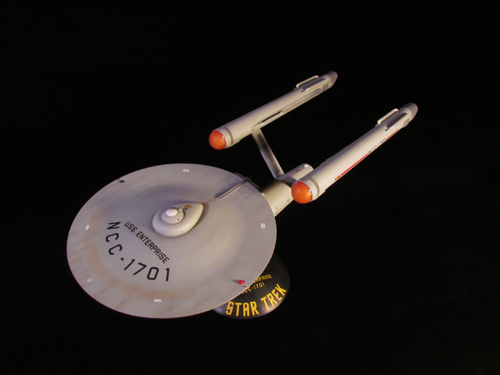
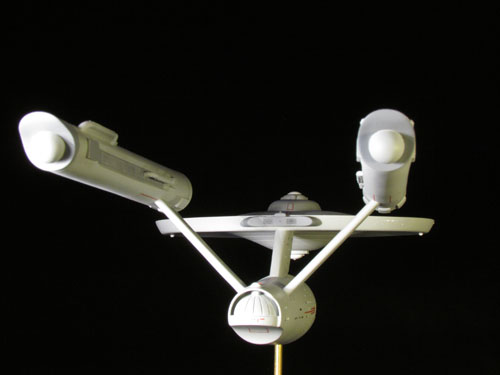
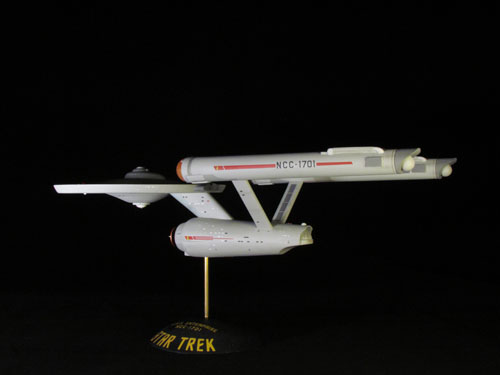
Star Trek Model Kits: U.S.S. Enterprise D & Aztec Decals sneak peek
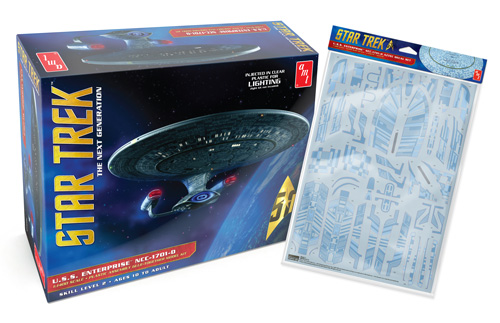
Here is a preview of 2 upcoming Star Trek releases, the AMT955 1:1400 U.S.S. Enterprise NCC-1701-D kit and the Aztec decal set for that kit. They will be sold separately.
The U.S.S. Enterprise NCC-1701-D model kit will be coming out first. This all-plastic model kit is 18 inches long when fully assembled, and features a removable saucer section and dome base with metal support rod. This special edition is molded in clear plastic, which allows the modeler the option of lighting the kit. (Light kit not included.) Also included are standard marking, pennant, registry, and lifeboat decals; and complete instructions.

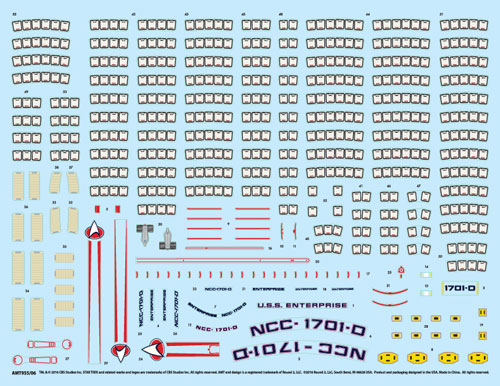
The 1:1400 U.S.S. Enterprise NCC-1701-D Aztec decals will be released shortly after the base kit. The set will include 4 – 9.25 x 13.25 inch decal sheets and placement instructions. If you pick up the Enterprise D kit make sure you don’t miss out and keep you eyes out for the Aztec decals!


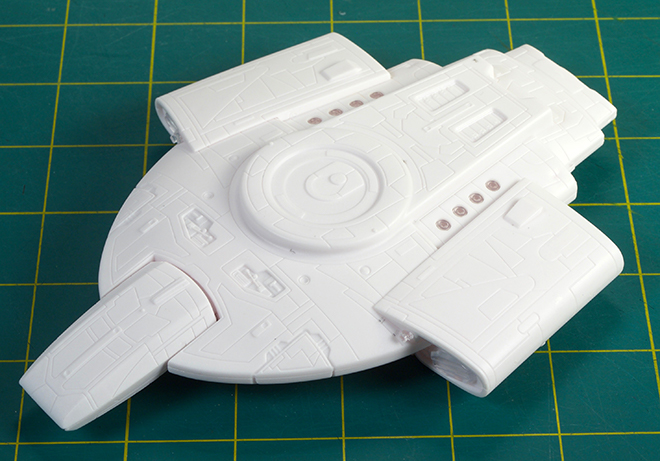
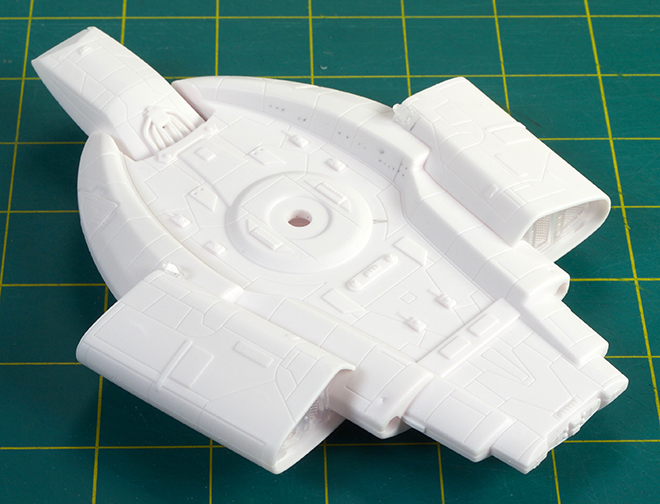
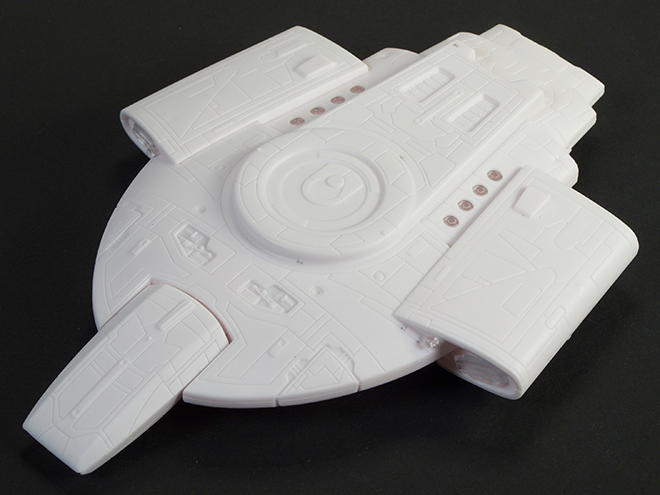
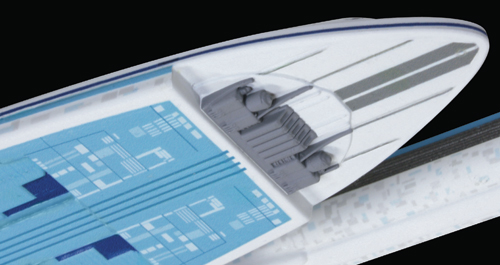
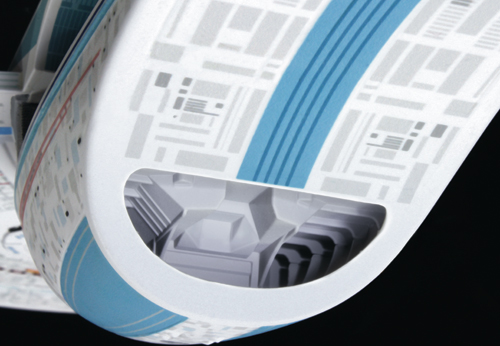
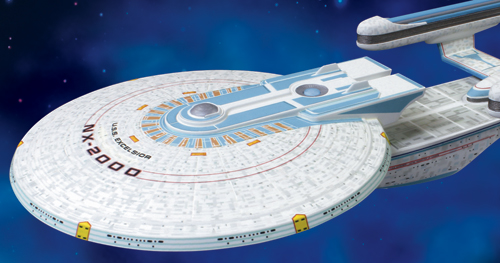
Star Trek Model Kits: U.S.S. Excelsior buildup
I promised a while back to show some photos of the buildup from our upcoming release of the U.S.S. Excelsior kit from Star Trek. I was kindly reminded of that, so here I am to honor my word.

As you know the fan-favorite ship was featured in two films Star Trek III: the Search For Spock…
and in Star Trek VI: The Undiscovered Country…
Between the films the original shooting miniature made and appearance in the debut episode (among others) of Star Trek: The Next Generation…
Along the way certain details changed and our kit includes parts to build either the NX-2000 or NCC-2000 version.
Another smaller miniature was later built for an episode of Star Trek: Voyager which featured a few additional variations in paint scheme.
Later still, a CGI version of the Excelsior-class ship was used for some memorable episodes of Star Trek: Deep Space Nine.
The CG model was faithful in shape to the earlier appearances, but the color of the “strongbacks” was shifted. As an additional bonus to add to our aztec decal set, we have included alternative registries and names of the key Excelsior-class ships as well as the deeper blue strongbacks as featured in DS9.
Without further ado, here are a slew of pics of our buildup.
And here is a look at the decal art for the sheet included in the kits as well as what to expect in the Aztec decal set.
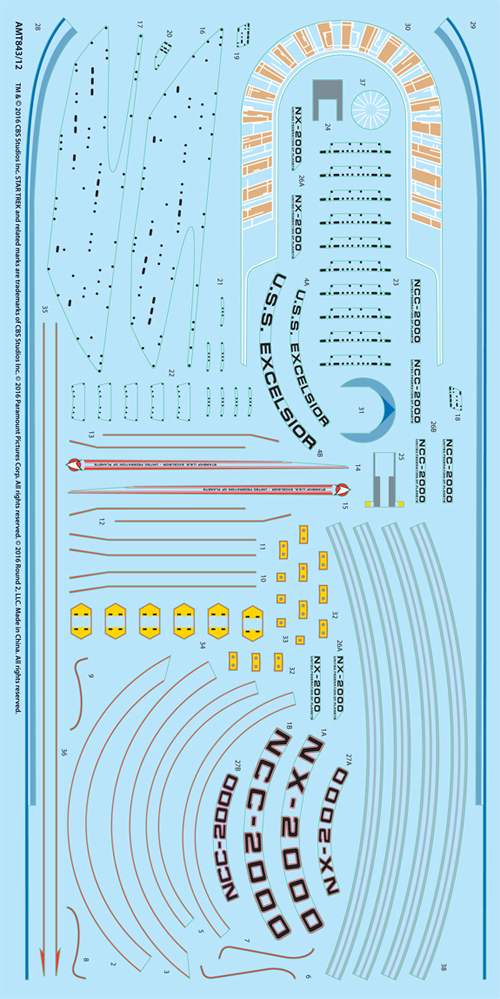
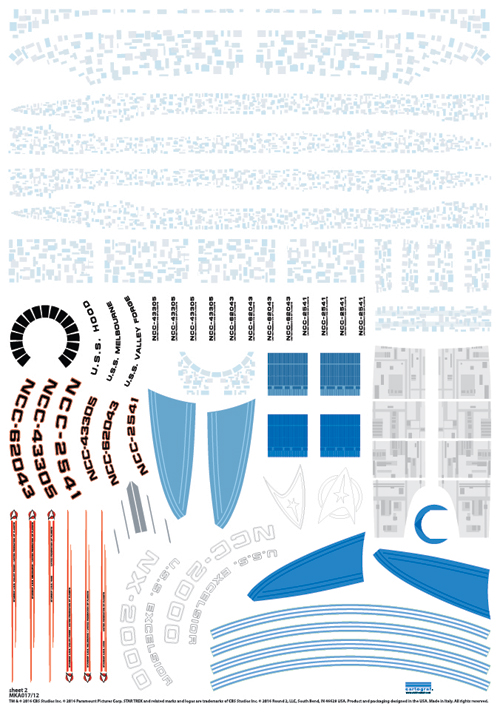
Ask your retailer for AMT843 U.S.S. Excelsior and MKA017 U.S.S. Excelsior Aztec Decal Set. Both should be out by the end of August.
A quick word about our friendly competition’s entry into Star Trek modeling… I hope they fair better than George Kirk did in his voyage into the new frontier…
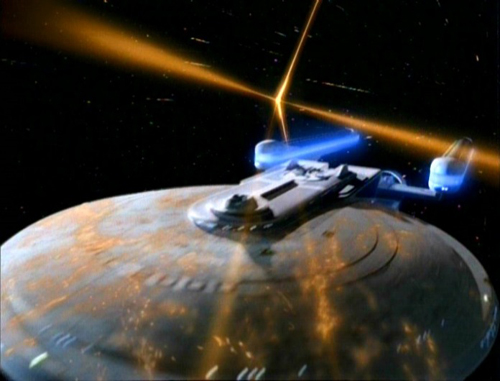
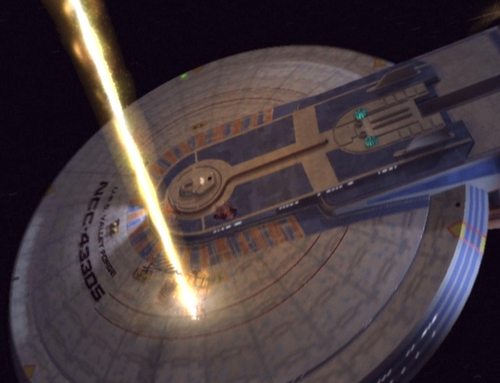
Star Trek Models: 1:350 scale developments
UPDATE: It now looks like a strong possibility we will have test shots of the new saucer parts at Wonderfest. See you there…
It has been a while since we’ve talked about upcoming sci-fi releases. I’ll spill the beans on a few things, but focus on what we have in the works for our 1:350 scale kits that should arrive later this year to commemorate the 50th anniversary of STAR TREK: The Original Series.
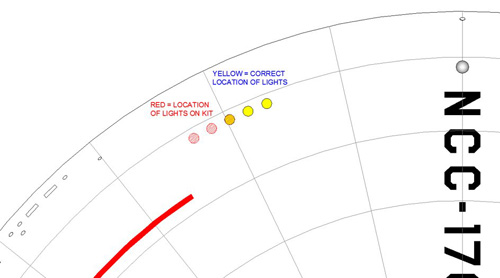
Part of the fun of fandom is holding the great debates… DC or Marvel…? Star Wars or Star Trek…? Chicken or egg…? When developing our 1:350 TOS Enterprise kit, it was “engraved panel lines or no engraved panel lines…?” In order to serve what we considered to be the widest range of modelers, we opted to engrave the panel lines on the upper and lower saucer. We did so knowing that it might upset some, but would satisfy others that didn’t have the skill or tools to install them in pencil like the filming miniature had. We have decided it is time to reverse course and offer the saucer without the panel lines. We will be releasing the saucer as an accessory piece so everyone that already has untouched kits can supplement them with these replacements and save the time and effort from filling and sanding them. Along with that change, we have corrected the position of two sets of windows that were off by a few degrees, but got by us. The “toothy” surface texture will also be removed so the saucer should now be as smooth as a baby’s bottom.
Some may say “Well, if you are doing that, you may as well include them in the kit that way now.” To which we say “Yes, indeed.” And while we are at it, we will be updating the color reference to reflect new-found information gleaned by the team of experts that are restoring the Enterprise filming miniature. Our go-to Star Trek guy, Gary Kerr, has played a key role in the restoration and is dutifully documenting the untouched/unseen areas of the miniature to determine the exact paint colors that were used. We’ll finish off the offering with an updated 50th anniversary scheme on the packaging. We plan on giving the Pilot parts accessory pack the same treatment and everything should be out by the end of the year. Additionally, we’ve heard the demand for more light kits and a new batch is on a boat as I write this. Expect them on store shelves within a month. If you have been on the lookout for a set, let your retailer know you want a copy (item number is MKA007).
There is a slim chance that we may have a test shot of the saucer on display at Wonderfest. We should have a preliminary look at the 50th anniversary packaging at the show as well. As usual, we look forward to seeing everyone at the show. It is a personal highlight of mine every year to get a chance to meet the builders that enjoy our products so well. We will once again be sponsoring two prizes in the model competition. We will present awards for what we deem to be the best use of a Round 2 model (any brand or subject) in the junior/teen and adult categories. The junior/teen winner gets a selection of kits from all of our brands. The adult winner will receive a gift certificate to autoworldstore.com which despite the name does deal in sci-fi kits as well. Good luck to all who enter. see you at the show!
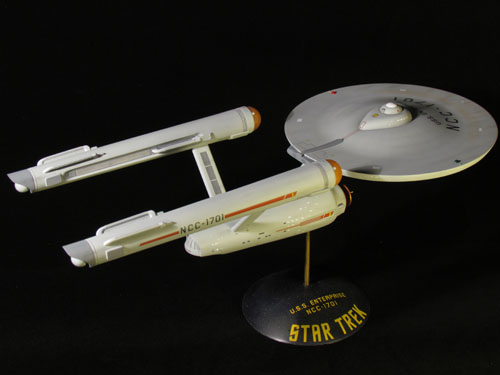
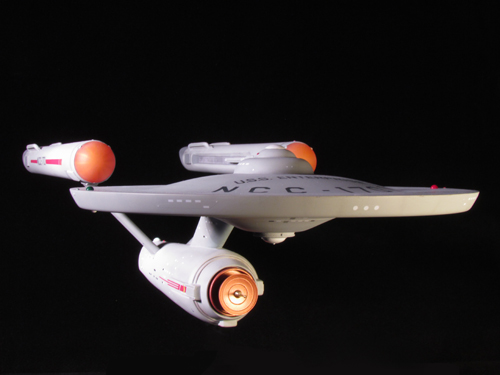
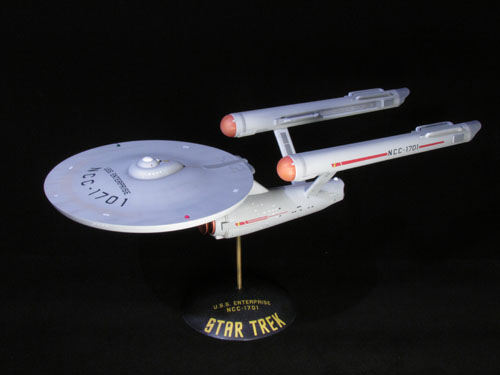
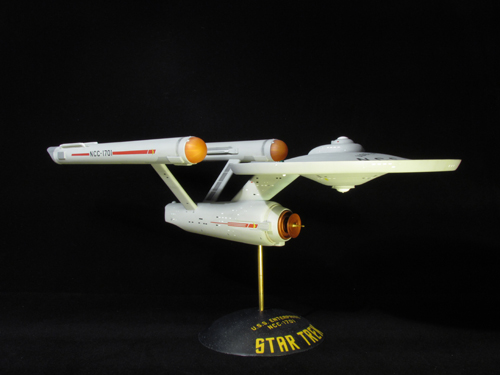
Star Trek Models: My Enterprising Journey pt. 3
Here we are with Michael Scarola’s third part of his build process of our classic AMT U.S.S. Enterprise kit.
My Enterprising Journey: Building the Classic AMT 18” Enterprise – Part 3
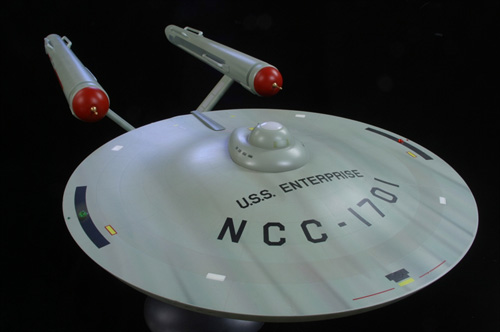
There have been many discussions and articles that talk about the color of the TOS Enterprise studio model. On screen it appears anywhere from white to blue to green-gray to silver. It’s been revealed by Richard Datin that the studio model was actually a light gray with a hint of green. Datin chose the WalMart Concrete color chip as a near perfect match to the Enterprise’s hull color.
I started my research with a WalMart Concrete color chip and found Tamiya JN Grey appears to be a little too green. I had access to Gary Kerr’s actual paint samples of the hull color and the color that appears on the leading edge of the dorsal and also a sample that was matched to the Master Replicas TOS Enterprise.
The mixture I came up with is 3 parts Tamiya JN Grey, 1 part Sky Grey & 4 parts Flat White. It looks neutral with a color shift towards green when viewed under indoor lighting and it even appears to shift a bit blue at times. It’s right in the ballpark of the 3 samples and is very close to Gary Kerr’s hull color, only lighter, which is a good thing for the smaller scale AMT kit.
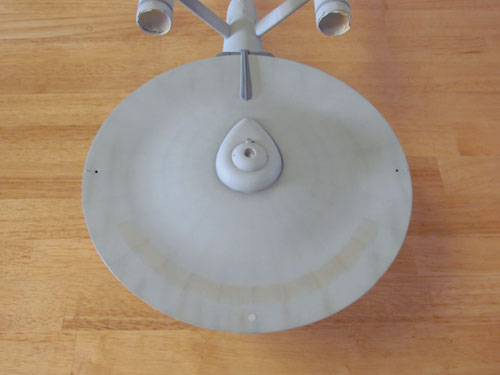
After the main hull color was painted I drew on the saucer grid with a pencil using the scaled blueprints, a straight piece of styrene sheet and a compass.
I mixed a darker shade of gray to pre-shade the grid lines and toned it down with the hull color.
I mixed some Testors Acryl US Navy Blue Grey, Pale Green and Flat White for the leading edge of the dorsal and used Testors Acryl Neutral Gray for the darker colors. The nacelle grills are painted Tamiya Chrome Silver and the ends of the Intercoolers and Control Reactor are Testors Acryl Neutral Gray lightened with white. For the triangles on the bottom of the saucer and the darker areas on the undersides of the front of the nacelles I mixed a darker, more neutral, variant of the hull color.
Weathering and decals…
Dark gray and green pastels are used for most of the weathering and rust colored pastel chalk for the ‘rust ring’ on top of the saucer.
I did my best to represent most of the look of the weathering of the 11 foot studio model while toning it back a bit for this smaller project.
The decals that come with the Round 2 kit are very accurate. I did, however, separate the saucer’s U.S.S. ENTERPRISE/NCC-1701 decal into pieces. The ‘U.S.S. ENTERPRISE’ seemed to sit a bit too close to the ‘NCC-1701 and the spacing of the ‘U.S.S. was a bit too much compared with the 11 foot studio model. In addition I also separated the NCC-1701 into individual decals. This eliminated the clear film and due to the grid on the saucer I was able to place them according to the studio model’s placement. Other than this, the decals actually are very accurate. The below image shows the placement of the decals on the top of the saucer.
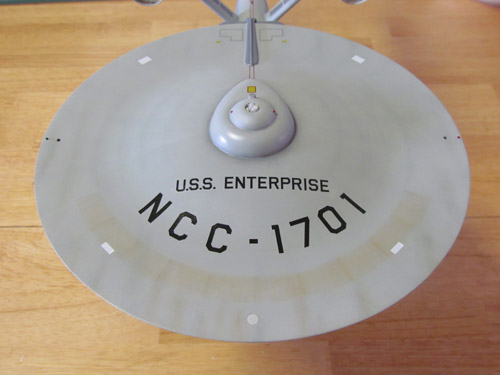
I sprayed Future floor polish over the model before applying the decals and sealed them with Testors Create FX acrylic flat clear, with a few drops of semi- gloss clear added to keep the surface from appearing chalky.
All in all I had a lot of fun working on this project. This is my first time building the AMT 18” TOS Enterprise and I’m glad I started with the Round 2 release. The smooth top of the saucer and the wonderful decal sheet really improved this classic kit.
I’d like to thank Jamie Hood and everyone at Round 2 for giving me the opportunity to share my build.
Michael Scarola
Take a bow, Mike. Great job. Have a gander at these beauty shots of the finished model.
Star Trek models: My Enterprising Journey Pt. 2
Here we are with Michael Scarola’s second part of his build process of our classic AMT U.S.S. Enterprise kit.
My Enterprising Journey: Building the Classis AMT 18” Enterprise – Part 2
The work continues…
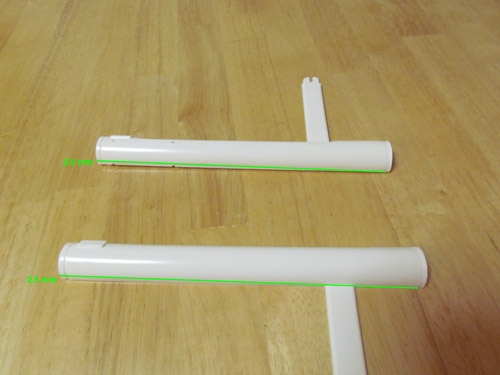
Now that the saucer’s details and shape were worked out it was time to move onto the secondary hull. I started by lengthening the hull. The 3 main parts were glued together and the rear section, in front of the pylons, was cut off and the hull was stretched approximately 1/16”.
I used one of the AMT kit’s nacelle domes to make new landing bay doors by simply cutting it in half and scribing in some vertical lines.

Sheet styrene was added to the curve of the hull next to the hanger bar doors to achieve the proper shape. The front of the hull was built up with putty and the ribbed details on the deflector forks were added using pieces of .5 mm styrene rod placed side by side as well as some half round styrene rods above and below.
I combined the rear of the kit’s deflector housing with the front of a resin housing from JT-Graphics. The outer housing itself was puttied and re-shaped.
The nacelle pylons were narrowed and shortened to match the blueprints. They were attached at an angle slightly less then 90 degrees using a template I made from the blueprints. I strengthened the pylons with sheet styrene and 1/8” brass rods.
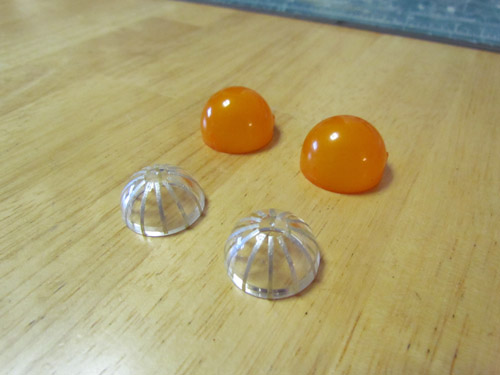
The kit’s nacelles were used and also modified. I cut off the grooves behind the bussard domes since I was using resin bussard domes from JT Graphics, which already these details. To create the taper of the studio model’s nacelles I drew a line with a pencil from the front corner of each half that goes to 2.5 mm at the rear.
The above image illustrates where the cuts were made. Unfortunately I didn’t take a picture of the actual kit parts so I used nacelle halves from an older kit for figure 12’s illustration. It’s basically long skinny triangles that needed to be cut away. In order to make sure the inner trenches stayed centered on each nacelle the cut on both parts has to be made on the same side, as indicated in the picture. The 2 halves were heated with a hair dryer and rolled on a flat surface to create the taper towards the rear. When I glued the halves together I sanded, for what felt like days, to get them round and even.
I used a set of correctly sized end caps from Federation Models that come with their Surya resin kit. The bussard domes from JT-Graphics have inserts to simulate the fan blades but have other details that weren’t actually on the studio model. Instead I used a set of clear domes I had on hand and added the fan blades with some 1 mm masking tape, painted silver.
I used a set of JT-Graphics Intercoolers and Federation Models Control Reactors and rear vents to round out the nacelle’s details.
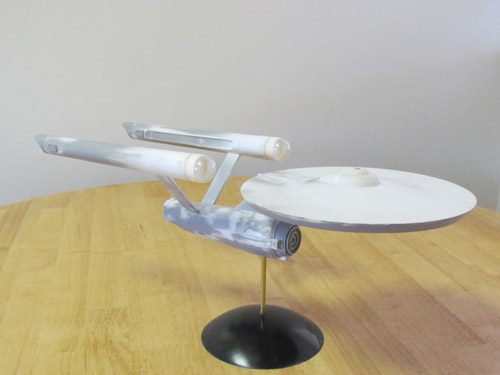
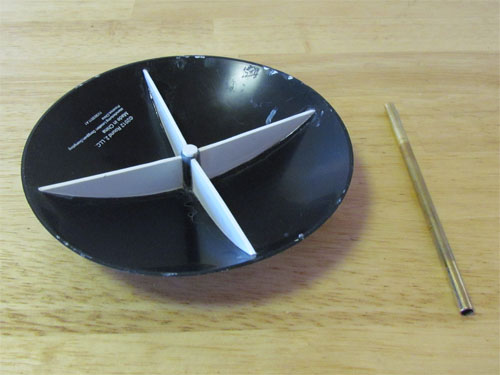
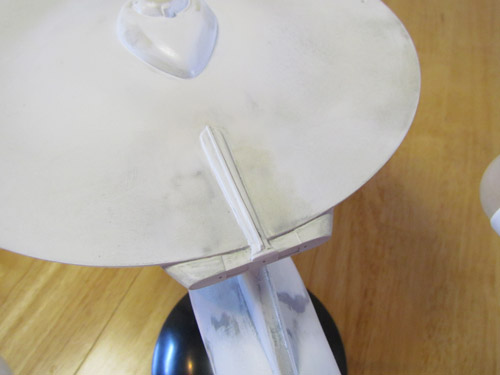
The above image shows the model almost completed sitting atop a Round 2 Dome Base, attached with a brass rod. I reinforced the dome base with 1 mm styrene sheet on the bottom. This keeps the Enterprise from swaying.
Having worked through all these modifications I was now ready to take a breath. The next round of fun would involve the hull color. With the Enterprise’s hull color being a big topic of debate over the years I knew it would take more then simply opening up a bottle of paint.
In my next and final installment I’ll cover the painting, weathering and the decals…
Michael Scarola
Round 2 Models: Please welcome a special guest
Hi guys. A while… a long while now… ago I was approached by a new, but respected modeler by the name of Michael Scarola. He was working on modifying a couple of our sci-fi kits and was pulling out all of the stops to make his buildups as accurate as the kits were iconic. We chatted a bit and we decided to have him document his process on the builds and post the results on our blog. We have had these in the can for some time now, but I’ve just come across a sliver of time to schedule them to publish.
Mike did some magnificent work to transform our classic 18″ AMT Star Trek U.S.S. Enterprise and our 12″ MPC Space:1999 Eagle. We’ll be starting with posts about his Enterprise model to coincide with our recent re-issue of the kit that commemorates the 50th anniversary of the television show. You should find the kit available now along with our re-issue of the Klingon Bird-of-Prey. Each series of articles will be three parts with some follow-ups showing beauty shots of his finished models. Off we go with part 1 of “My Enterprising Journey”. Enjoy!
My Enterprising Journey: Building the Classis AMT 18” Enterprise – Part 1
Round 2 has been doing a wonderful job bringing back classic models that we love. The classic AMT 18” TOS Enterprise has been released several times over the past few decades but Round 2’s release breathed new life into it. To start, the original box art was a real treat and the best part is under the lid. The raised grid from the earlier releases was removed from the saucer’s top and a new, and very accurate, set of decals is provided.
Onto the build!
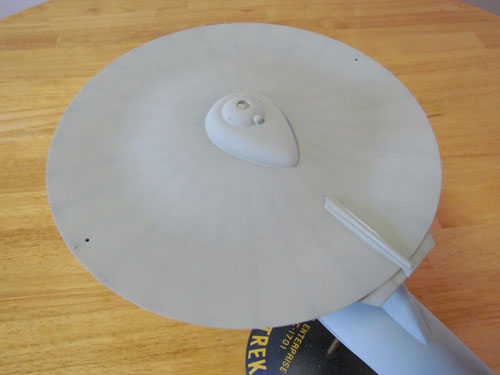
My original intent was to build this kit mostly out of box with the addition of a few resin parts. I started by downloaded a set of blueprints from Charles Casimiro which I sized to the AMT saucer’s diameter. I figured once the saucer matched the blueprints all the rest would start falling into place. The profile of the dorsal (neck) matched the blueprints and I found that the secondary hull and warp nacelles also sized up nicely. At this point I decided to attempt to go all out and try and make this build resemble the 11 foot long Enterprise studio model that was seen in original Star Trek throughout the whole series.
I started by removing the bridge and B/C deck structure from the top of the saucer. I replaced it with a part from Don’s Light & Magic (DLM), which I lengthened by 4 mm.
I re-shaped the Linear Accelerator using a razor saw and various files.
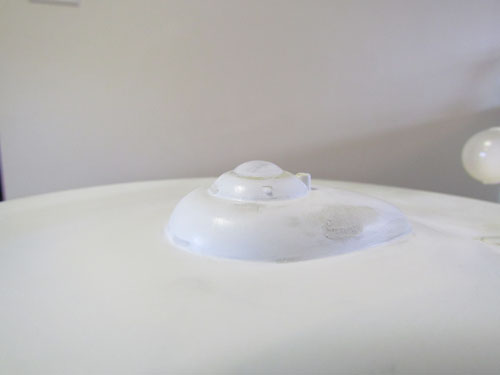
A new bridge dome was made using a spare nacelle dome from a Polar Lights 1/1000 TOS Enterprise kit.
The bottom of the saucer proved to be a bit of a challenge. I glued strips of 1 mm styrene inside the saucer’s edge so I would have enough plastic to re-shape the outer edge’s contour.
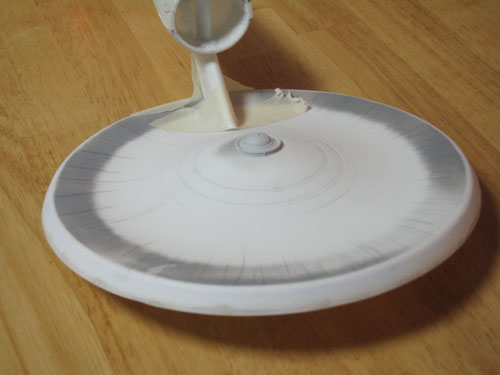
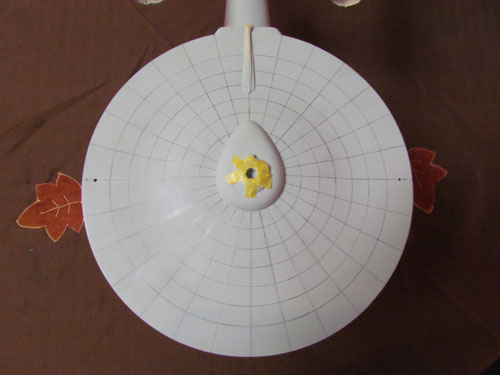
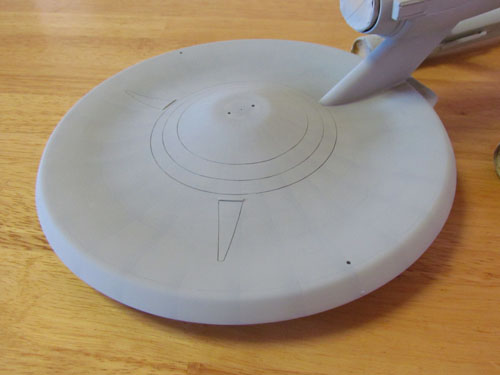
This was done using a razor saw, sanding sticks and lots of sanding. The 3 raised circular lines on the cone were removed and filled in as well as the 3 dimples by melting bits of plastic with liquid cement. The stepped area along the outer edge was removed and I added styrene sheet on the inside center of the cone and sanded down the raised area where the planetary censor attaches. The rest of the work involved sanding the bottom until it was even which seemed to go on forever. To scribe the 3 rings into the cone I used a compass cutter.
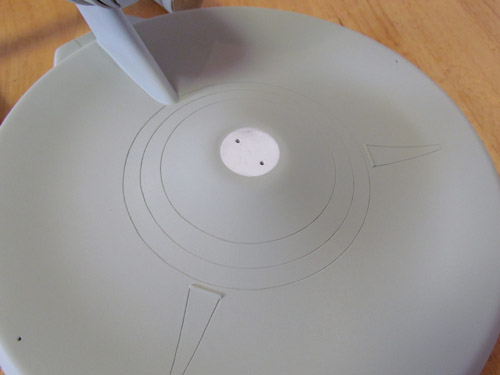
The above pic shows the completed work on the bottom of the saucer with the ‘triangles’ scribed in. For the navigation lights I used pieces of clear sprue from a Polar Lights 1/1000 TOS Enterprise kit. They are made to go in like pegs when the model is finished
The kit’s saucer does make an excellent platform to add details and modifications. The overall shape of the saucer is somewhat close to the studio model and just takes a bit of elbow grease to start looking the part. From the time I started my research this seemed like the most logical part to start on for the build.
In my next installment I’ll cover the secondary hull, nacelles, nacelle pylons, bussard domes and the base…
Michael Scarola
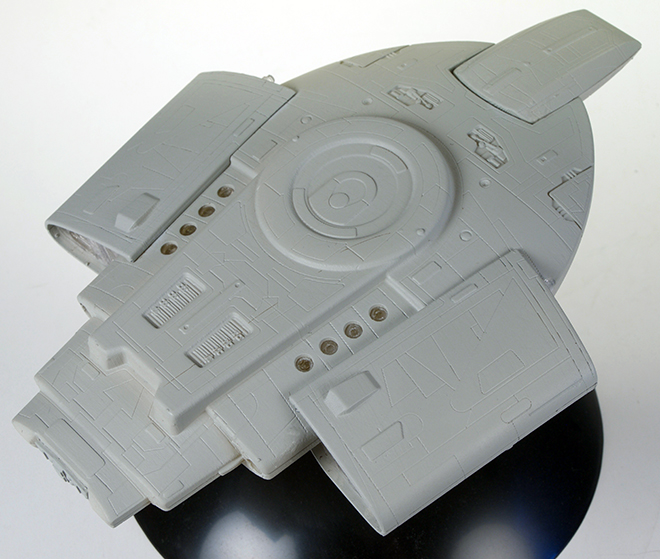
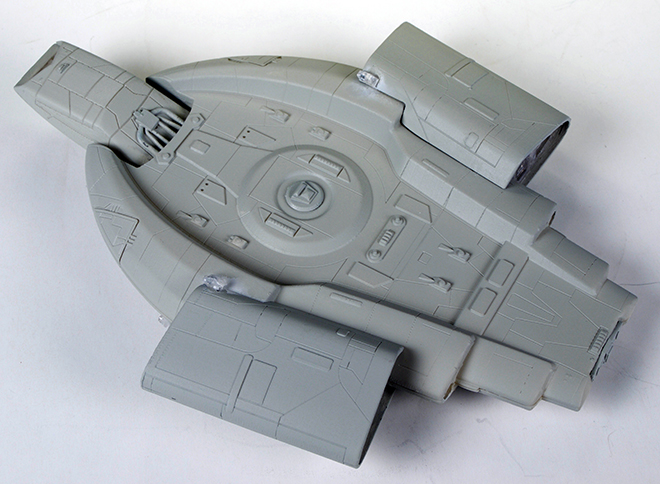
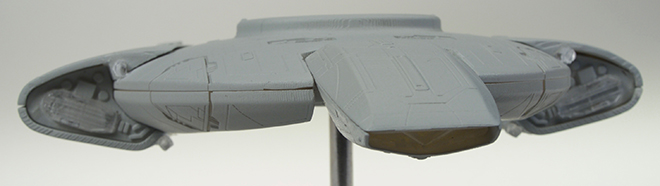
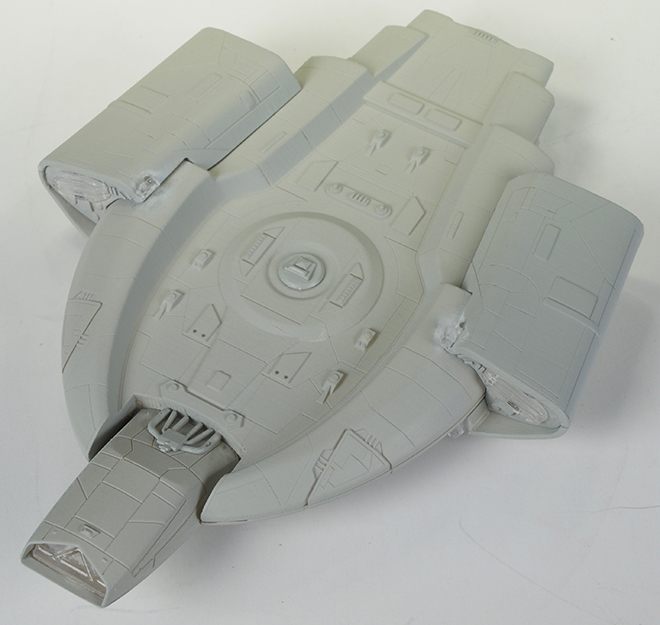
Star Trek Model Kits: U.S.S. Excelsior update
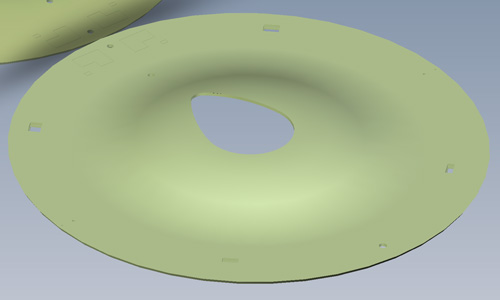
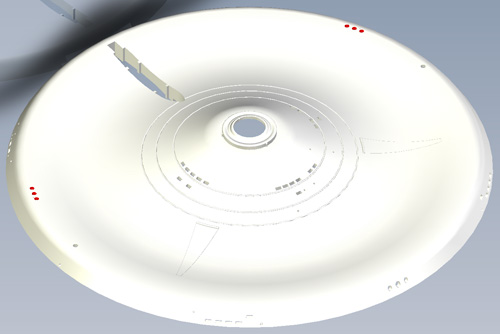
This time I’m coming back around to the Star Trek U.S.S. Excelsior model kit that should be coming by summertime. I received the first test shots a couple weeks ago and they look pretty good for the most part. There are always bugs to work out of course. The main thing about this particular set is the rough surface texture left from the RP that was used to make the electrodes that cut the tooling. Most of that work will be done by hand at the factory. The staff over there will need to take special care not to impact the nice delicate engraved panel lines we have on parts of the lower hull.
We made quite a few improvements on this version compared to the old AMT kit you might remember. In the end over half the kit was retooled including the entire lower hull. We used Gary Kerr’s notes and research on the aft weapon array and interior detail to get extremely close to the look of the filming miniature.
The parts are subject to licensor review.