Recommended Sites


Archive for the ‘Hawk/Lindberg’ Category
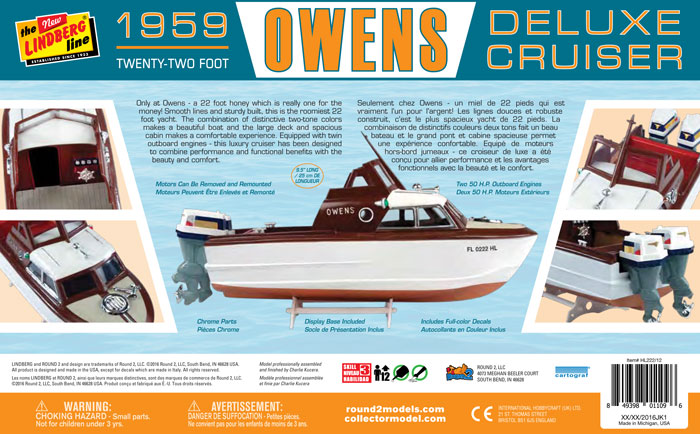
Lindberg Model kits: 1959 22ft Owens Deluxe Cruiser Boat!
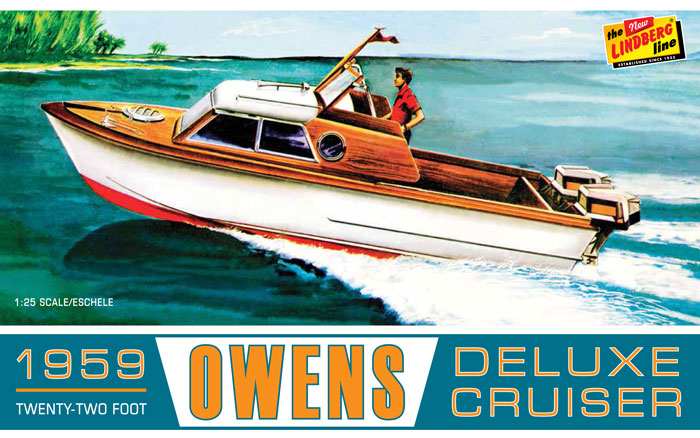
Following the release of the 1959 Century Coronado, we have the 2nd boat found hidden in the Lindberg tool collection — the 1959 22ft Owens Deluxe Cruiser with Twin 50HP Outboard Motors! With smooth lines and sturdy built, this is the roomiest 22 foot yacht. The combination of distinctive two-tone colors makes a beautiful boat and the large deck and spacious cabin makes a comfortable experience. Equipped with twin outboard engines – this luxury cruiser has been designed to combine performance and functional benefits with the beauty and comfort.
Like the Coronado the Owens boat also is connected to another famous designer, Raymond Loewy. Raymond Loewy was know for creating logos for Exxon, Shell, BP, TWA, Nabisco, Quaker, and the U.S. Postal Service. He created the USCG stripe as seen on Lindberg’s US Coast Guard Patrol Boat. Most notably he redesign the glass Coke bottle, replacing the embossing with white letters and changing the contours to create the iconic shape we know today.
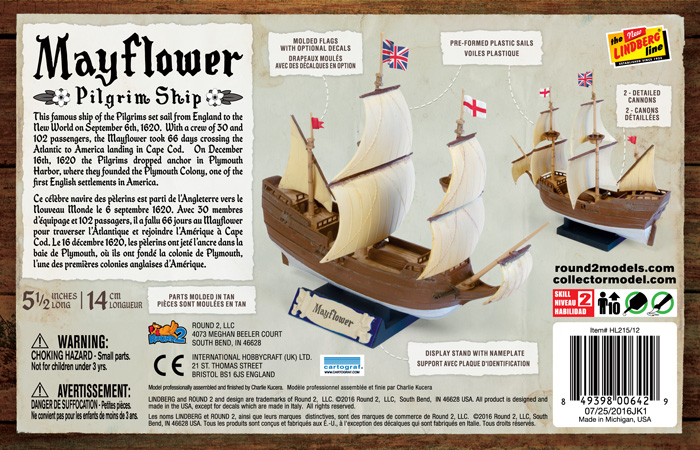
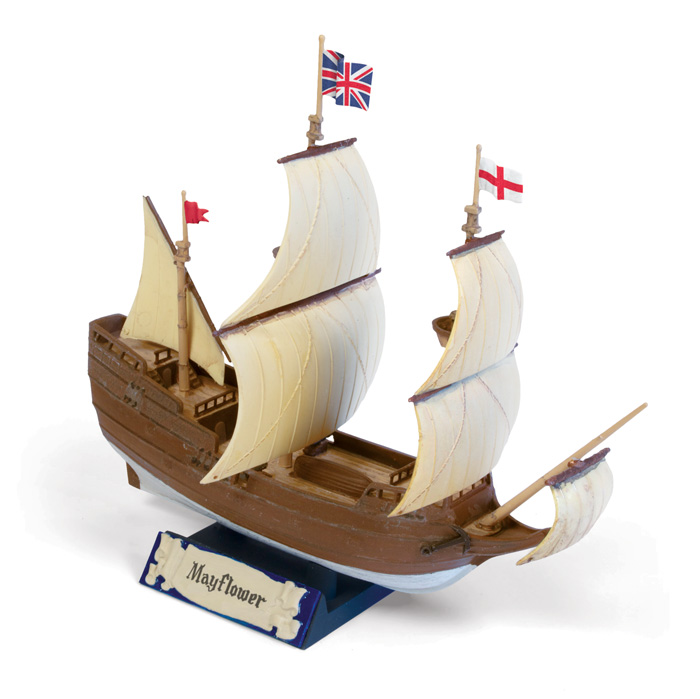
Lindberg Model kits: 1620 Pilgram Mayflower!
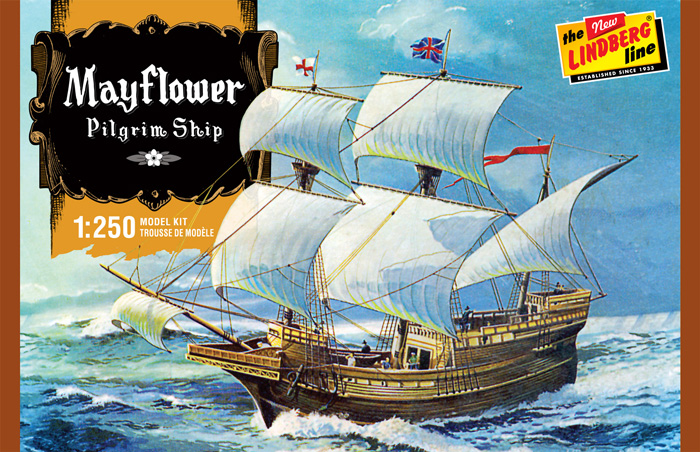
This month set sail with the Pilgrims on the Mayflower. Build this 1:250 replica of the famous ship that establish the first English settlement in the new world. The Mayflower is joining Lindberg’s growing fleet of small scale sailing ships. At 5.5 inches long the kit is packed full of detail with molded flags, preformed sails, decorative hull and wood grain deck.
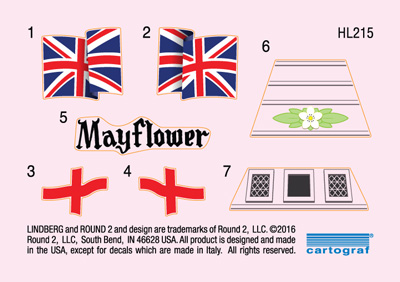
The Mayflower includes new packaging featuring the 1963 boxart, easy-to-follow instructions, display base with nameplate and Cartograf decals. The new decal sheet includes flags, name for display and stern decoration.
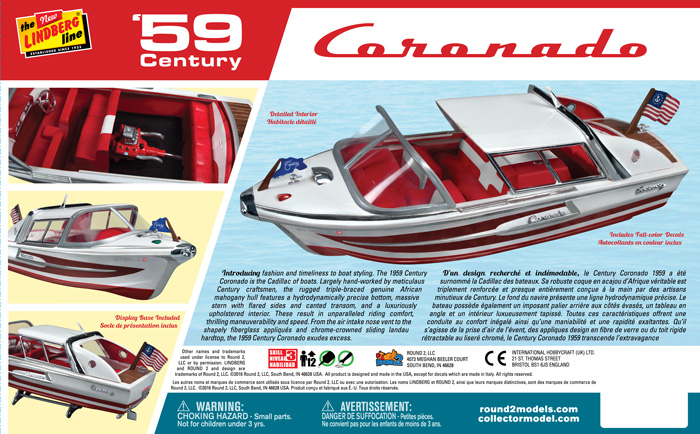
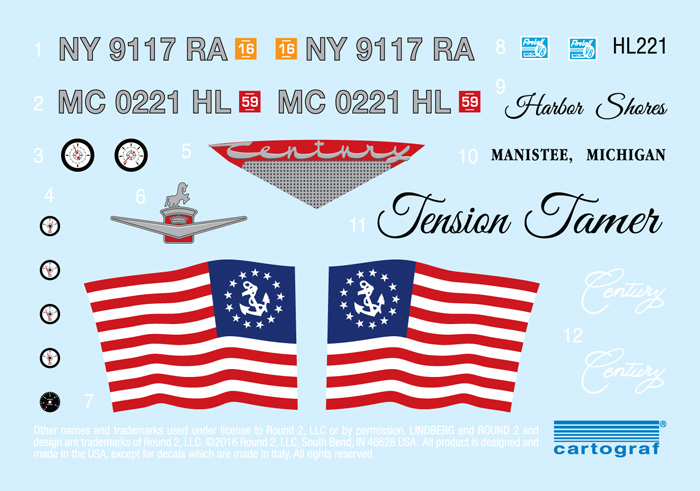
Lindberg Model kits: 1959 Century Coronado Boat!
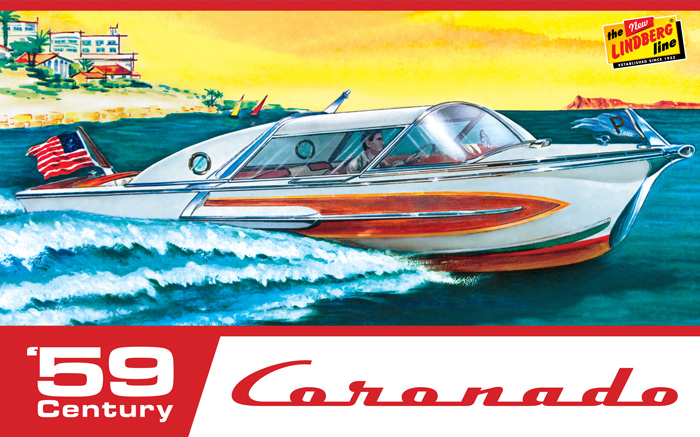
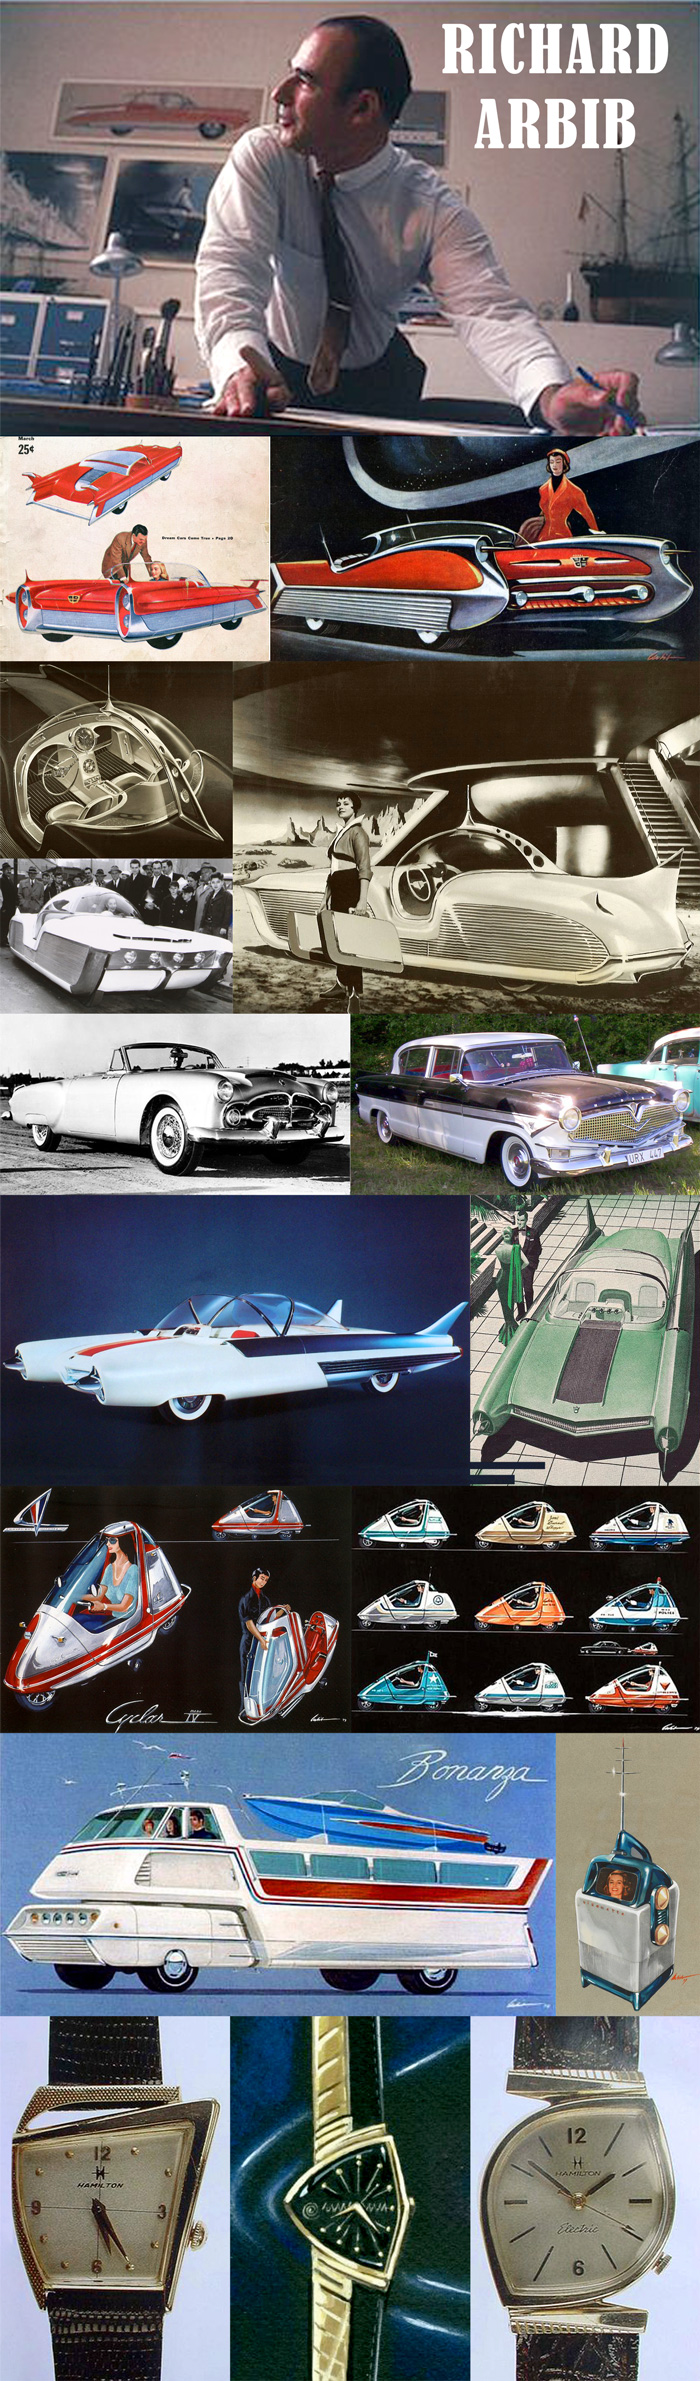
For those fans of mid-century chrome and bubble tops Lindberg has a kit for you. We found a few boats hidden in our tool collection that haven’t been seen since the 1960s and the first one to be released is the 1959 Century Coronado. The 21-foot Coronado was the flagship of Century’s line of runabouts and was known for its luxury and styling. The boat was designed by Richard Arbib, mostly notable for his watch and automobile designs, including the 1957 Hudson Hornet. If you would like to know more about the Coronado and see some pictures check out “The Cadillac of Boats”on WoodyBoater.com. Also check out some of the articles at Forgottenfiberglass.com or CarStyling.ru about Richard Arbib’s car designs.
Features include: full color decals, vintage boxart, display base, chrome parts, plastic flags, sliding canopy, and a removable engine cover.

Above: Richard Arbib’s Coronado designs and photos of the real thing. Below: More of Arbib’s designs including the 1957 Hudson Hornet, the 1952 Packard Pan-American Roadster, the 1954 Ford Atmos, and the 1956 Astra-Gnome.
Lindberg Model kits: 1:32 Customizable Show Rods! A Brief History
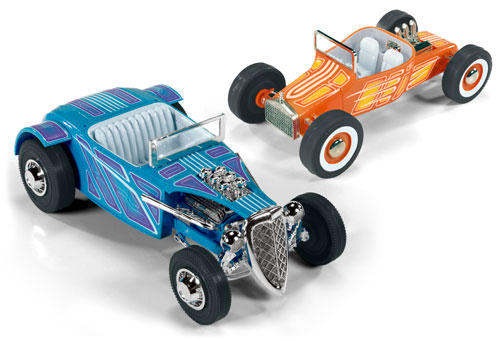
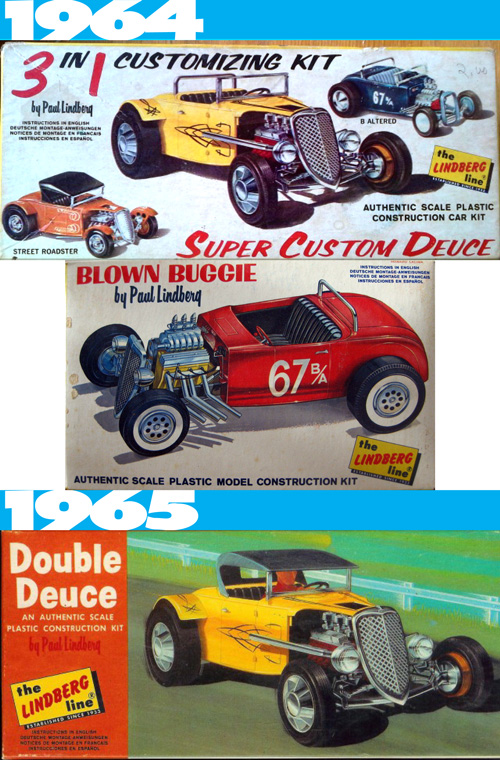
We have a 2-pack of 1:32 Customizable Show Rods that will be coming out soon under the Lindberg model kit line. The pack includes a 1930s roadster and a 1920s rear-engine bucket that include a slew of interchangeable parts, so you can customize to your heart’s content. These fun little kits were originally released separately in 1965 as part of a series of 4 kits. The Roadster was released as the Super Custom Deuce, a 3-in-1 kit including Street Roadster and B Altered variations, and as the Blown Buggie. The Bucket was released as the Kookie Contender, a 3-in-1 including Scoopster and Rear Mill Bucket variations, and as the Tuned Tinker. Over the next 11 years Lindberg put out 6 more versions of each kit. Notable releases include the hard to find Glo-Karts in ’72, Rainbow Rods in ’73, and the blue jean themed Jumpin’ Jeans in ’75. Because who doesn’t want their hot rod covered in denim?
Now for the FIRST TIME EVER the new release will include chrome parts! The rest of the parts come injected in bright, bold colors. The kits will each include 2-3 options for grilles, headers, carburetors, front suspension, and hubcaps. Additional parts include a soft top, scoops, blowers, tires, front & rear fenders, rear bumper, tail lights, and roll bars. The large decal sheet is all new featuring funky show rod patterns and multiple options for customizing. Given all the options for these kits I am excited to see what modellers will do with them.
Roadster…
Bucket…
1970s…
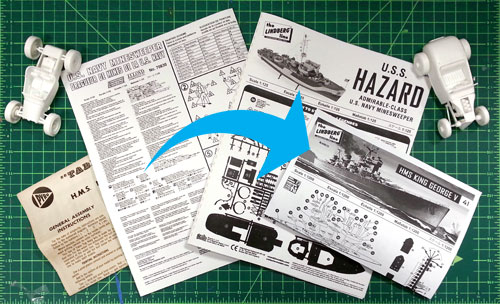
Lindberg Model kits: New Instruction Sheets
One of the great features in the new Lindberg and Hawk releases are the improved instruction sheets. We want modellers to have fun with our kits and the instructions are a large part of that experience.
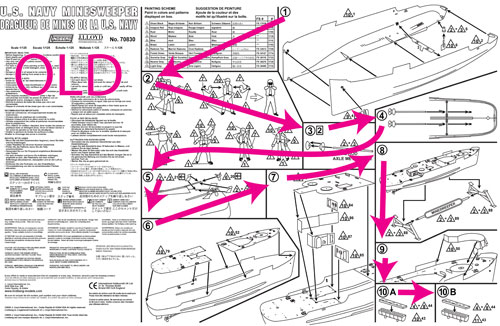
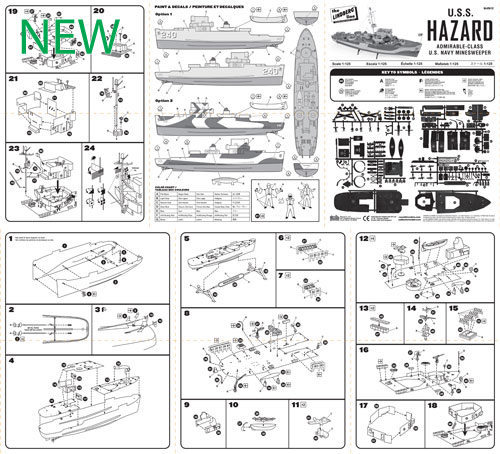
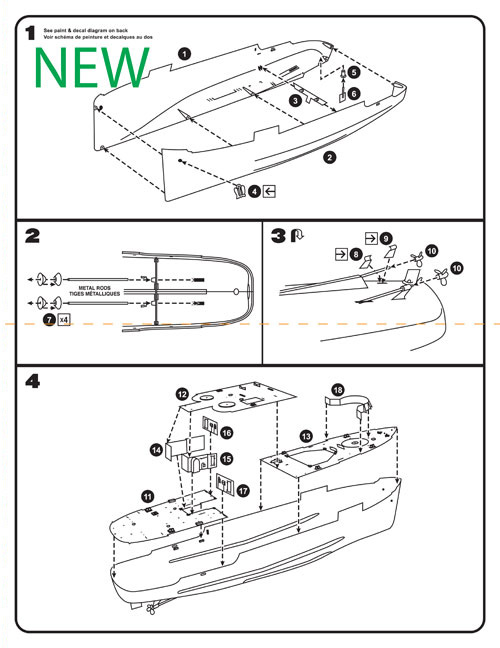
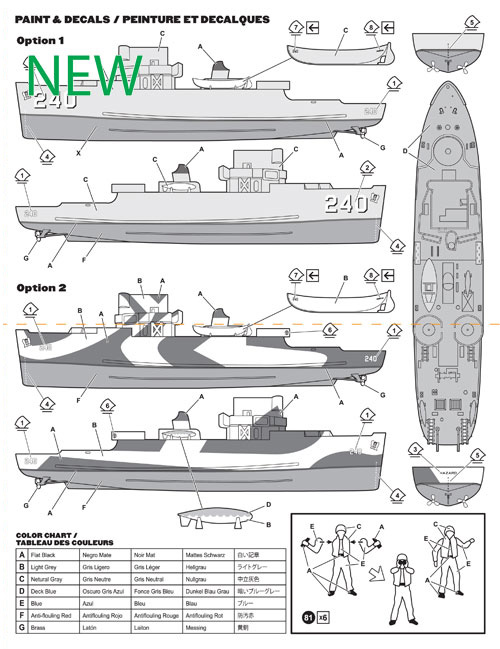
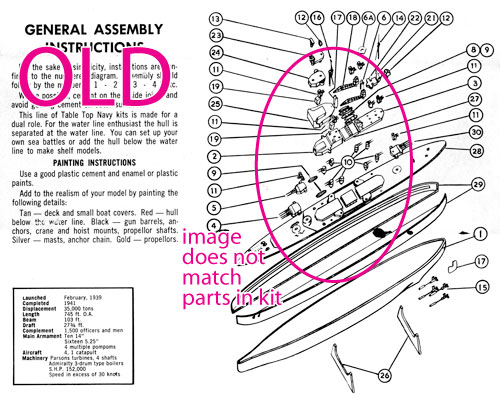
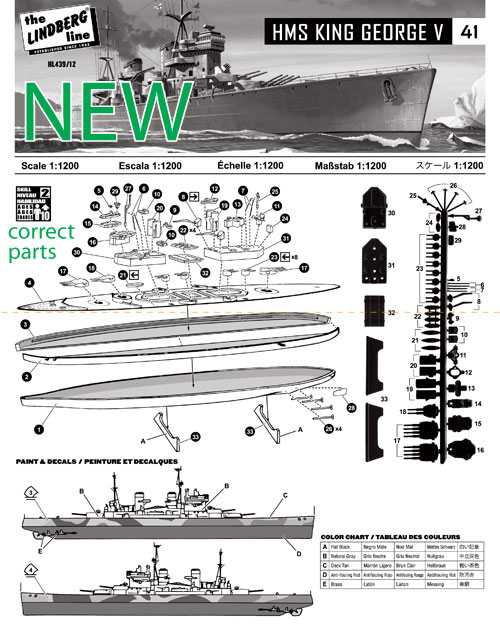
Many of the previous iterations included excessive amounts of text, steps that jumped around the page, and sometimes in sequences that made little sense. See the old and new version of the HL429 USS Hazard Navy Minesweeper. Or in some cases, such as the HL439 Tabletop Navy 2-Pack: HMS King George V & HMS Dorsetshire, the vintage instructions contain errors that have been overlooked for year. The parts in the kit were different than what was pictured in the original instructions. I have found several instances where tools were modified but the instruction sheet stayed the same.
In our new releases you will see instructions with clean line art, steps ordered in a more clear and thoughtful manner, an extended layout allowing for more detailed paint and decal diagrams, and an overall better look. Let us know what you think of the improvements.
Lindberg Model kits: New Attitude, New Logo!
![]()
Since acquiring Lindberg, one of our main goals at Round 2 has been to do right by the rich history of the brand and the people that grew up building Lindberg kits. We are celebrating that history by bringing back many of the vintage illustrations and feel of the old packaging while giving Lindberg a new look, improved tooling, new instruction sheets, and more versatile, historically accurate decals. We want to revitalize the brand and put out products that we can be proud of and putting right what once went wrong! With this new attitude comes a new logo.
In 2013 we brought back the vintage yellow rectangle logo that everyone knows and remembers. We wanted the new logo to be reminiscent of that logo but have a fresh feel, representing a tribute to Lindberg’s past while moving into the future.
And a trip down memory lane…..
![]()
Lindberg Model kits: Mystery Sword Tool
As we dive deeper in to the Lindberg/Hawk tooling collection there is occasional a tool that we can find no information on. This one is stumping me more than normal. We have a MYSTERY SWORD!
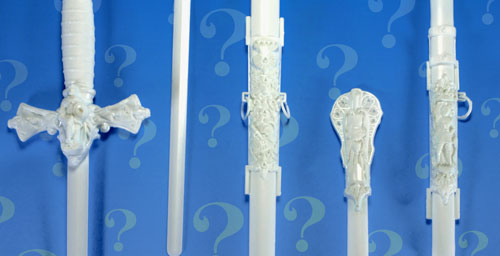
At first glance the tool looks like one of the 1:1 gun kits from Pyro (also released by Life-Like). Part of it looked like a rifle barrel however the gunstock was missing. Test shots revealed that it was a sword. It is very decorative with an eagle-shaped pommel, armor on the chape, a knight and lion head on the scabbard, a knight and axes on one side of the cross-guard, and an AOUW Shield on the other. There are several places where gems would attach. So far in our research I have found Lindberg and Hawk kits previously released under O-lin, Pyro, Life-Like, Eagle/Eaglewall, Palmer, IMC, and a few others. I can not find any sword model kits release under Lindberg or any of those brands.
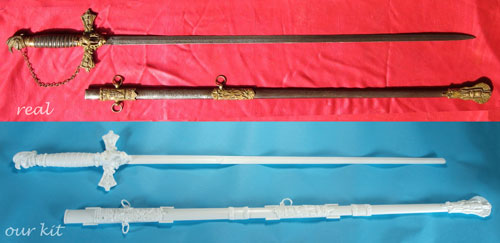
While I have not found any evidence of the model being released as a kit I have found the real life sword it was patterned after. And here. The AOUW on the cross-guard is for the Ancient Order of United Workmen, a fraternal organization founded by John Jordan Upchurch, a Mason, after the Civil War in 1868. Swords like this would have be used during ceremonies and given to a member of the society often with his name scribed on the blade. This info, while interesting, has not help me track down the origin of the kit. So I call out to you, modellers, and your vast knowledge of vintage kits. If this seems familiar or you know any of its history, let us know in the comments.
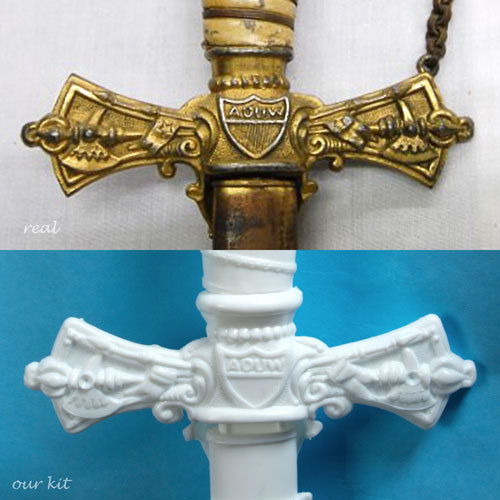
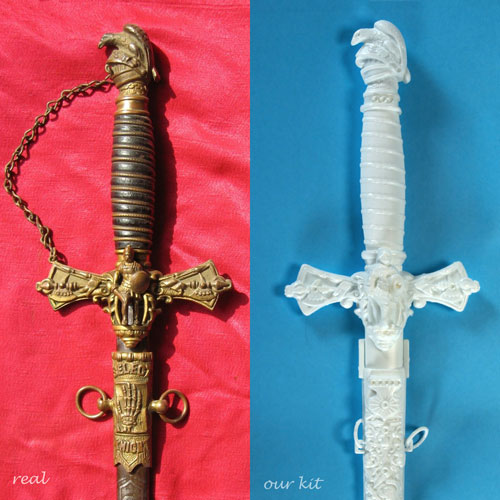
UPDATE 3/4/2016
Thanks to Craig Bennett for this. The sword was released as Palmer Jeweled Renaissance Sword & Scabbard. I am not sure what year. The box design is done in the style of some of the cannons. I found this small image.

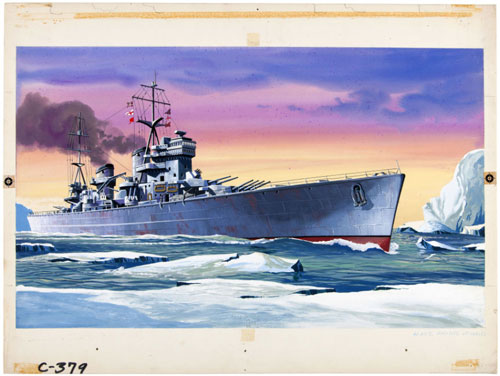
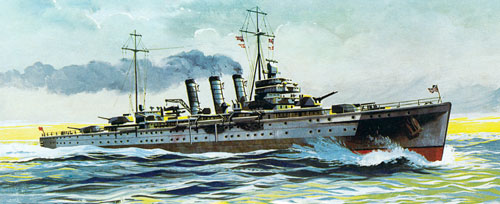
Lindberg Table Top Navy: HMS King George V and HMS Dorsetshire
First, for those of you I haven’t met my name is Chris Purvis. Last year I manned the booth at Wonderfest with Jamie. I work primarily on the Lindberg/Hawk line doing the military and historical kits (airplanes, naval boats, sailing ships, tanks, etc.). The occasional car or oddball kit will also end up on my desk. Before switching over to Lindberg in 2014, I worked on the Forever Fun line. Next month I will be celebrating 3 years with Round2. Also, I am a big nerd for movies and vintage sci fi, so if you want to get off topic in your comments go that direction. -ChrisP
Available soon will be the 3rd 2-pack in the Lindberg Table Top Navy Series, the HMS King George V & the HMS Dorsetshire. The kit features two World War II British Battleships in 1:1200 scale. Like the previous ships in the series, they can be displayed as Full Hull or Waterline models.

Recently we’ve been able to acquire some of the original box art paintings used on old Pyro and Lindberg kits. The King George V box art is from a new scan of the 1959 painting. It is amazing to see some of the original detail and brush work put into these pieces of art.
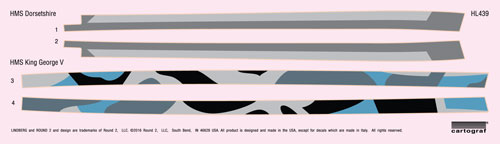
For the Dorsetshire I scanned the 1959 packaging. From my research I could not find any references to the ship ever have the depicted camouflage pattern. I altered the image to show this known hull scheme.
Before….
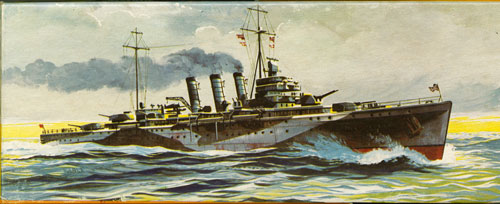

After…
The kit will include that hull scheme for the HMS Dorsetshire as a decal, along with a dazzle camo option for the HMS King George V.
New York Comic con is just around the corner!
New York Comic con is just around the corner – October 10-13, 2013!
Round 2 will be there – stop by and see us at booth 443. You won’t want to miss our new model kits, die-cast cars, slot cars, Forever Fun, Captain Action, and even the Wicked Witch of the West will be in display.
http://www.newyorkcomiccon.com/
The 4-H Car ….Assembly
- Before gluing parts together, always ensure that the contact points are clean and that the parts fit well. When applying the plastic cement, only apply to one of the parts. An excessive amount of plastic cement will not only prolong or prevent proper adhesion, but may also melt and deform the parts. Plastic cement must always be used as conservatively as possible. When gluing clear parts, such as windows or canopies, try to avoid plastic cement. This is because plastic cement can “fog” clear plastic even in areas where not directly applied. For clear parts, use white glue.
- Gaps between parts may become apparent after assembly. To remove a gap that is too large to overlook, it may become necessary to separate the parts, adjust their fit, and re-adhere. Another option is to fill the gap with modeling putty, or another substance which dries to hardness and can be smoothed and painted over. When applying putty, only the smallest amount is required. An excessive amount will be difficult to remove later and in the case of clear parts, may be impossible to remove without evident damage to the part beneath. Follow the instructions on the packaging and use a plastic tool to apply the putty, so as not to scratch the model.
- If an assembled part is not adhering properly in some places, it may not be necessary to separate the parts and re-adhere. Another option is to use a liquid plastic cement to re-adhere the parts. By applying a small amount of liquid glue to the outside of the gap, the glue is drawn into the gap by capillary action. It is important not to apply too much glue, for the reasons above, but also because too much glue may remain outside the gap and dry to hard, malformed bubbles. In general, less than a drop will suffice. When the glue has been applied, hold the parts firmly together until proper adhesion is assured.
Once two parts are glued together, it may be necessary to clamp them together until the glue sets. This may be done by holding the two parts firmly together with your hands, but you may also use a variety of tools to do the same job. Elastic bands, clothespins, plastic clamps, tape, and wire are all suitable materials. When applying the clamps, make sure that the pressure exerted on the parts is great enough to keep the parts together, but not nearly enough to deform or break them. Also make sure that whatever clamp you choose to use will not scratch the plastic.
Whether you are a competitive modeler (contest, 4-H, Boy Scouts, etc…) or building for fun the following links offer some great tips and tricks to help you.
http://www.ndsu.edu/fileadmin/4h/FamilyConsumerScience/FE101.pdf
http://www.scaleautomag.com/
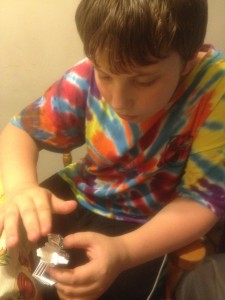
Here we are assembling the engine. He used most of the parts from the Stingaree model, he choose to use use the larger exhaust headers found in the Royal Rail model to customize this model. Here he is trying to hold them in place while they dry.