Recommended Sites


Archive for the ‘AMT’ Category
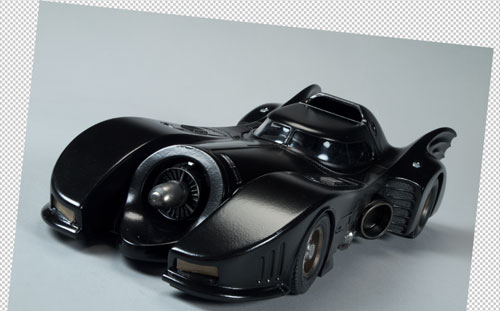
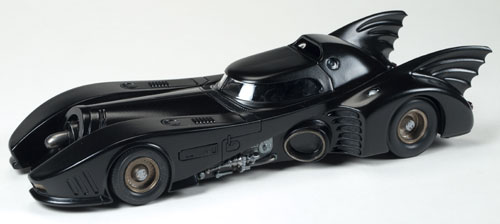
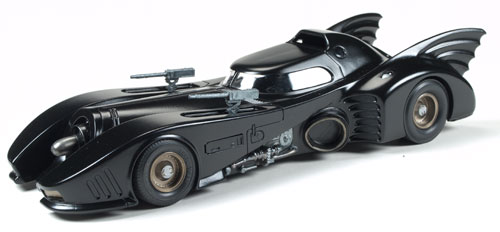
Round 2 models: 1989 Batmobile
Hi guys. I know it has been a while since I have posted. My only excuse is my usual one of just not being able to find the time. Still, I feel guilty for not finding at least something quick to show you. So, I’m going to try to at least do a quick post every couple of weeks. It will be a sign of life at least. Wonderfest is coming up and I didn’t want to miss making the point that we’ll be there once again to meet face to face to talk about any of the sci-fi products we offer.
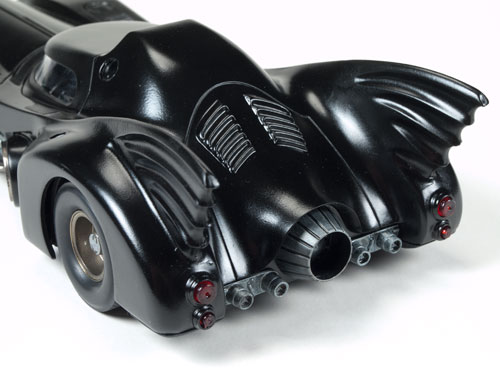
I recently got in a time pinch (can you believe it?). Our usual go-to car modeler, Mike Wherry, got buried in a small rush of buildup work and I was in need of a buildup of the AMT1989 Batmobile which will be coming out later this summer. I gave the kit a quick look and did a little poking around on the net to see what others had done with it. Eventually, I got to the point where I thought to myself, “Ya know. it isn’t a really complex kit. The car is all shades of black with some steel accents. Maybe I could build it myself and I could have it done in a couple weeks.” So I did.
When I was a kid, I usually built cars and I left the hobby behind after getting frustrated with assembling engines that I never truly understood and with getting runs in the body paint. My younger brother on the other hand loved to chop tops and do mods to his cars. I couldn’t compete, so I built a couple jets and a couple of my dream cars before moving on to other things. The first Burton Batman film came out in the summer after my senior year in high school, and as a Batman fan I was a completist. So I bought and built an ’89 Batman kit when they first came out. So, as I was thinking about this build, I had vague memories of that one in mind. I remembered having to fill the seams in the tail fins and that there was a pull out turbine engine (only to relearn later that the pull-out feature was added to the Batman Returns edition which I would later buy). As you may know, I rarely build models to completion, but I fully understand the concepts and techniques used to build and finish them. The materials available these days and my ability to airbrush would give me a huge advantage over my younger attempt.
How did it go, you ask? Well enough for what I needed it for. I ran into the same problem I had as a youngster in that I got a little impatient with the spray paint (in this case a Testors lacquer). The first coat went down the best, but it didn’t cover 100% and my seams were still showing through. The second coat had runs and orange peel, so I sanded a bit and hit it again and a bit of orange peel remained, and some details started filling in, but it covered well enough and figured I could help the surface irregularity in Photoshop when I used it on the packaging. I’m sure that more practice with a rattle can would have gone a long way. If I had all the time in the world, and really wanted to do an outstanding job, I would have decanted the paint and ran it through my airbrush to get much better control.
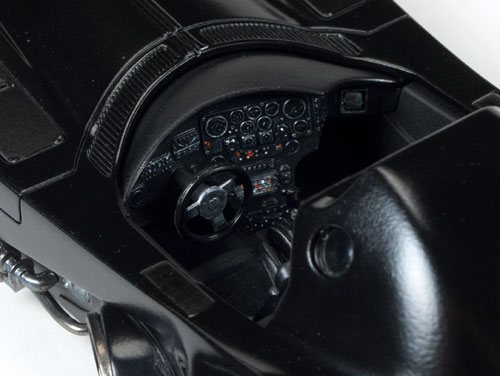
The interior turned out well enough though. I left the seat unpainted black plastic as I felt the sheen and color looked like vinyl or black leather. I hit some bits with flat black for contrast and try brushed the dials lightly enough to have them stand out, but not look heavy handed. I decided to hide most of the chrome to make it look more like the real thing. It was good enough to do the job, but I have nothing on the skills of someone like Mike Wherry.
It wasn’t until I was finished with my build that I realized that the last model I ever built and painted to completion was the same kit. Two builds nearly 25 years apart, and having done none (in styrene at least) in between. Anyway, I figured I would share the fruits of my labor. I’ll see if I can dig out my old build. I’m sure I’ve still got it in a box somewhere.
The first pic shows an unaltered pic of the buildup. The second shows how I plan to incorporate it into the box lid (pending licensor approval). The rest of the pics show a few other angles of the buildup.

New York Comic con is just around the corner!
New York Comic con is just around the corner – October 10-13, 2013!
Round 2 will be there – stop by and see us at booth 443. You won’t want to miss our new model kits, die-cast cars, slot cars, Forever Fun, Captain Action, and even the Wicked Witch of the West will be in display.
http://www.newyorkcomiccon.com/
Warp Drive & Transporters: How ‘Star Trek’ Technology Works
The original “Star Trek” television series featured technology that had first appeared decades earlier in science fiction stories. Pulp heroes had been wielding ray guns, flying faster than light and teleporting from place to place since the 1930s. But perhaps the true inspiration of Star Trek’s superscience is the revolutionary physics discoveries of the early 20th century. Relativity, discovered by Albert Einstein and quantum physics, pioneered by Max Planck revealed a universe far different than ordinary human experience might suggest.
Although Einstein’s theory forbids matter to accelerate past the speed of light, the demands of sci-fi storytelling require that people be able to travel between the stars in a reasonable amount of time, usually hours, or at most, days. Enter the space warp drive , or as it was called in “Star Trek’s” pilot episode, “hyperdrive.”
Warp drive in Star Trek works by annihilating matter (in the form of deuterium, a kind of hydrogen gas) and antimatter in a fusion reaction mediated by dilithium crystals. This produces the enormous power required to warp space-time and drive the ship faster than light.
To see more visit:
http://www.space.com/21201-star-trek-technology-explained-infographic.html
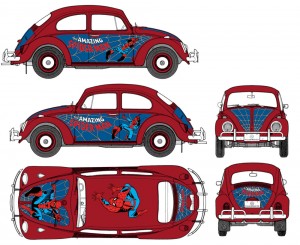
Spider-Man VW Beetle
Two all time classics join forces as Polar Lights presents Marvel Comics’ Spider-Man VW Beetle. This intricately detailed 1:24 scale snap-together kit features Spider-Man stickers to appeal to young modelers and several optional parts for the VW modeling enthusiast. Part options include steering wheels, bucket seats, bumpers, mirrors, exhaust systems, wheels and more. The hood and trunk open to show the spare tire and complete engine assembly.
4-H update
Okay so it appears we did not do as well as we had hoped. He had missed a step in the directions, the ALL pieces had to be painted, even those that were purposely not painted for artistic appearance. It was upsetting but a great learning experience. I am happy with the way it turned out and there is always next year
The 4-H Car ….Assembly
- Before gluing parts together, always ensure that the contact points are clean and that the parts fit well. When applying the plastic cement, only apply to one of the parts. An excessive amount of plastic cement will not only prolong or prevent proper adhesion, but may also melt and deform the parts. Plastic cement must always be used as conservatively as possible. When gluing clear parts, such as windows or canopies, try to avoid plastic cement. This is because plastic cement can “fog” clear plastic even in areas where not directly applied. For clear parts, use white glue.
- Gaps between parts may become apparent after assembly. To remove a gap that is too large to overlook, it may become necessary to separate the parts, adjust their fit, and re-adhere. Another option is to fill the gap with modeling putty, or another substance which dries to hardness and can be smoothed and painted over. When applying putty, only the smallest amount is required. An excessive amount will be difficult to remove later and in the case of clear parts, may be impossible to remove without evident damage to the part beneath. Follow the instructions on the packaging and use a plastic tool to apply the putty, so as not to scratch the model.
- If an assembled part is not adhering properly in some places, it may not be necessary to separate the parts and re-adhere. Another option is to use a liquid plastic cement to re-adhere the parts. By applying a small amount of liquid glue to the outside of the gap, the glue is drawn into the gap by capillary action. It is important not to apply too much glue, for the reasons above, but also because too much glue may remain outside the gap and dry to hard, malformed bubbles. In general, less than a drop will suffice. When the glue has been applied, hold the parts firmly together until proper adhesion is assured.
Once two parts are glued together, it may be necessary to clamp them together until the glue sets. This may be done by holding the two parts firmly together with your hands, but you may also use a variety of tools to do the same job. Elastic bands, clothespins, plastic clamps, tape, and wire are all suitable materials. When applying the clamps, make sure that the pressure exerted on the parts is great enough to keep the parts together, but not nearly enough to deform or break them. Also make sure that whatever clamp you choose to use will not scratch the plastic.
Whether you are a competitive modeler (contest, 4-H, Boy Scouts, etc…) or building for fun the following links offer some great tips and tricks to help you.
http://www.ndsu.edu/fileadmin/4h/FamilyConsumerScience/FE101.pdf
http://www.scaleautomag.com/

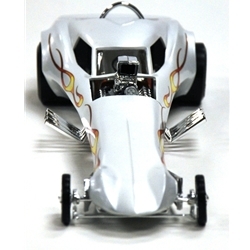
Here we are assembling the engine. He used most of the parts from the Stingaree model, he choose to use use the larger exhaust headers found in the Royal Rail model to customize this model. Here he is trying to hold them in place while they dry.
The 4-H Project: Cleaning the model
Our first step was to clean all of the parts. Since we learned from our 2012 experience, we knew that for the paint to stick evenly all parts had to be clean. Dust and oil inhibit the adhesion of paints and glues, as well as detract from the final appearance of the model.
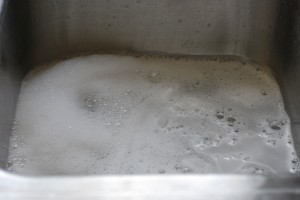
To remove dust and oil, we simply washed the pieces (still on the sprue) with warm water and a very small amount of detergent. We used the sink, however you may also wish to use a shallow basin and a strainer to ensure that you do not lose any small pieces down the drain. We let them soak for several minutes, agitating them occasionally. Taking the pieces out, you can leave them in the strainer to rinse thoroughly, the lay them out on paper towels and dry them thoroughly with a clean paper towel.
Some modelers suggest removing pieces and assembling prior to painting, however out 4-H leader suggests that is all items on a sprue will be the same color, you can paint them while still attached.
Small scissors or shears can be used to remove the parts from their respective sprues. Using a knife to remove parts is difficult, dangerous, and may damage the part. Only when the part is removed may you use a fine knife to remove any flash or excess sprue still attached, this is where we use the small nail clippers they are easy for him to handle alone and less dangerous than the sharp small knife.
The 4-H model…or starting it…
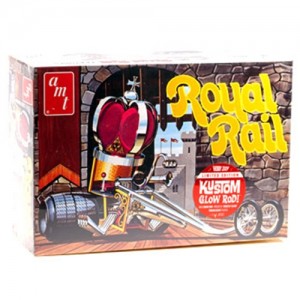
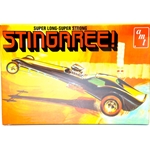
My son has selected the AMT Stingagree (http://www.autoworldstore.com/AMT_Stingaree_1_25_Scale_Model_Kit_p/amt38664.htm) which he will kitbash with pieces from the AMT Royal Rail (http://www.autoworldstore.com/AMT_Royal_Rail_ihobby_Exclusive_1_25_Scale_Model_K_p/amt630ihobby.htm). The Stingaree is described as a wild showrod-meets-dragster, which will be a perfect fit to kitbash with some of the wilder elements of the Royal Rail. But more on that later.
This year we are taking what we have learned over the last few years and combining the use of glue, paints, and decals to create a finished model – incorporating parts of another model.
In addition to the materials that are referenced above we have also purchased or at least gathered (and by we I mean I have purchased for my sweet 11 year old) the following items:
- Assorted paints (mostly greens – because he likes green)
- Plastic cement – several kinds including one especially for windows
- Tweezers and small nailclippers (these are great for trimming sharp bits from the sprue)
- Assorted elastic bands
- Modeling knife (this is my exacto knife – and used with my supervision)
- Small shears
- Masking tape – we do very little masking because the painting we do is pretty basic
- Paper towel
Some people would also include modeling putty and sand paper but we are also a little more basic. Now the rules say he could do any vehicle, spaceship, airplane, etc… but since this was the first year he has done a combination kit like this, I suggested something a little more basic. Our first few attempts were basic designs, snap together kits, then last year marked a new project where he had to both paint and glue.
The paint did not stick to the model, bubbled – badly. So when I started at Round 2 I set out to figure out just what had happened to avoid having it happen again.
1) So now that we have selected the model. This is not the kit he wanted, but we had to select one that was more advanced than some of his choices, and a little less exotic than others.
2) While we did not research these cars, we did visit the Auto World store to look for a model that we would like to do, that fit the requirements. We looked at the number of pieces, materials required to complete this project and the ability to modify this particular piece. Without the ability to see the step-by-step instructions – I think he made a good choice.
3) Next he had to look at the configuration. Configuration may include tires, accessories, the doors and windows open or closed, or even embellishments and exhaust pipes. In the case of the Stingaree, and the Royal Rail both offered many customization options.
The 4-H project – the continuing saga….
Okay so apartment living and modeling is proving to be a bit of a challenge. I tried to build the hood (and being mechanically challenged) this was no easy task. It did not work nearly as well as I had thought it would in my head. It did contain some of the fumes and over spray which is good since I did this on my balcony.
But I am getting ahead of myself. Since it is the older ones project and he is old enough to handle some tools safely I have had to step back and allow him to sink or swim. For the most part it has been really good. The one thing that we have done differently this year versus prior years is that we have washed all of the pieces very well. We had a painting issue last year where the paint basically bubbled up and ran off. So this year we took the whole tree and washed it using plain dish soap and hot water. I am hoping that this will be enough to save the paint job.
7 weeks until the fair and counting…
I will post some pictures of our progress next week…
Building our model for the fair…
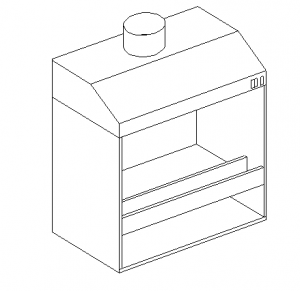
Well it is that time of year again and we are just starting our fair projects at home. Unfortunately we live in a 3rd floor apartment, which makes painting both inside and outside difficult. To minimize fumes and mess I began to look for options for building a miniature spray booth. I am not endorsing either of these, because I have not completed it yet, but I found 2 sets of instructions for completing this project.
It looks like the materials I will need to complete this project are
1) Plastic Storage Crate or Similar Size Cardboard Box depending on which set of instructions you choose..mine will depend on whichever box I can find.
2) An extractor fan – the second set of instructions uses the exhaust hood from a stove. This one seems simplest.
3) Flexible hose – like for a dryer vent
- Full instructions are available on the individual pages.
http://www.militarymodelling.com/news/article/homemade-spray-booth/3661/
http://www.interlog.com/~ask/scale/tips/booth.htm
This second set also includes some great ideas for cleaning, painting, and preparing your model. Once we get started I will share our photos.