Recommended Sites


Archive for the ‘AMT’ Category
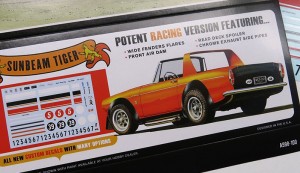
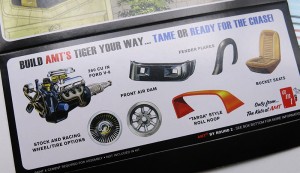
New Don Greer Art For AMT’s Reissue of the Sunbeam Tiger
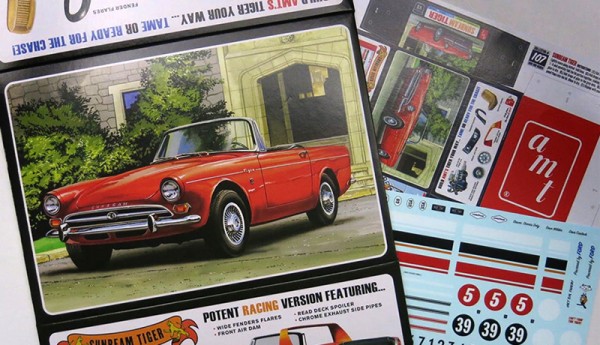
As many of you may have noticed, we’ve recently been fortunate enough to once again work with one of the original Kats from AMT – Don Greer. Don’s art graced many of the original AMT releases and we had him help us with the new release of the Sunbeam Tiger. With two new beautiful paintings, one stock and one in racing form, along with illustrations of the kits features (along wth all new decals), this new version will be one hot import!
Star Trek models: My Enterprising Journey Pt. 2
Here we are with Michael Scarola’s second part of his build process of our classic AMT U.S.S. Enterprise kit.
My Enterprising Journey: Building the Classis AMT 18” Enterprise – Part 2
The work continues…
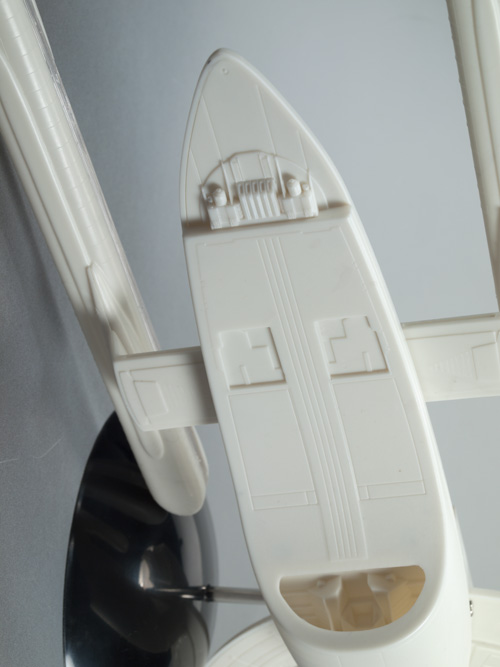
Now that the saucer’s details and shape were worked out it was time to move onto the secondary hull. I started by lengthening the hull. The 3 main parts were glued together and the rear section, in front of the pylons, was cut off and the hull was stretched approximately 1/16”.
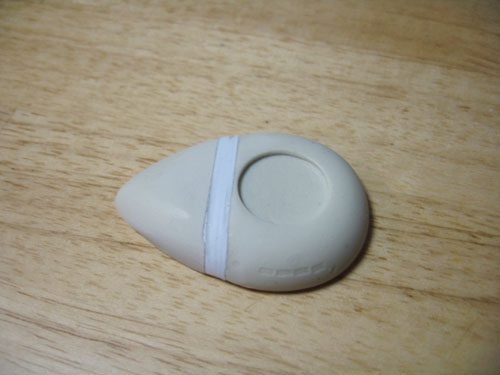
I used one of the AMT kit’s nacelle domes to make new landing bay doors by simply cutting it in half and scribing in some vertical lines.

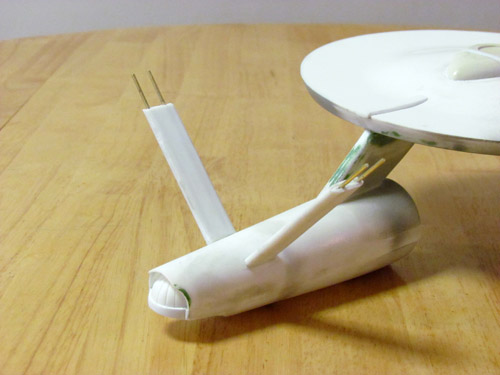
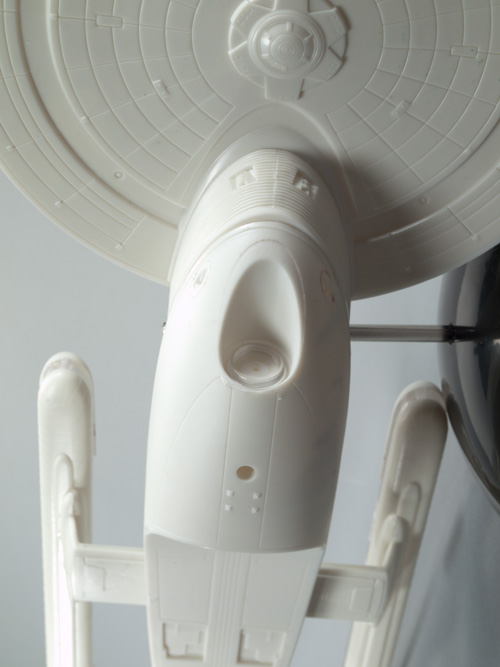
Sheet styrene was added to the curve of the hull next to the hanger bar doors to achieve the proper shape. The front of the hull was built up with putty and the ribbed details on the deflector forks were added using pieces of .5 mm styrene rod placed side by side as well as some half round styrene rods above and below.
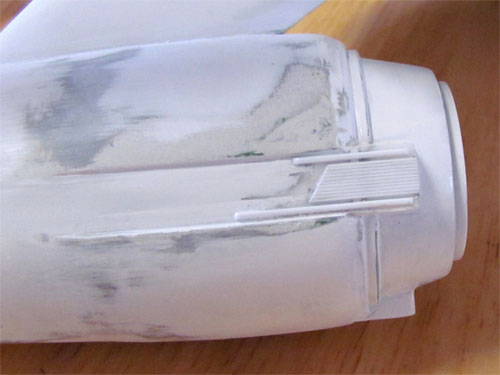
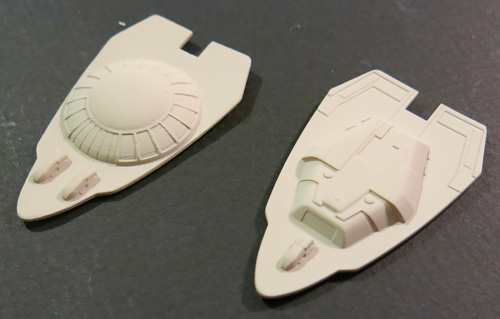
I combined the rear of the kit’s deflector housing with the front of a resin housing from JT-Graphics. The outer housing itself was puttied and re-shaped.
The nacelle pylons were narrowed and shortened to match the blueprints. They were attached at an angle slightly less then 90 degrees using a template I made from the blueprints. I strengthened the pylons with sheet styrene and 1/8” brass rods.
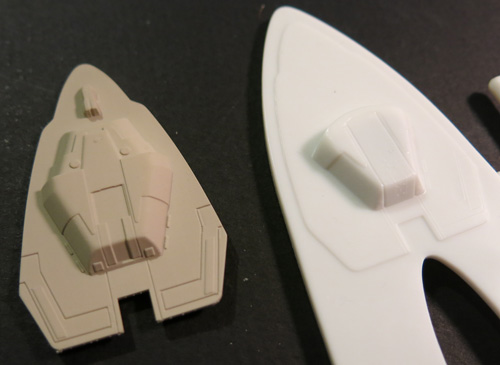
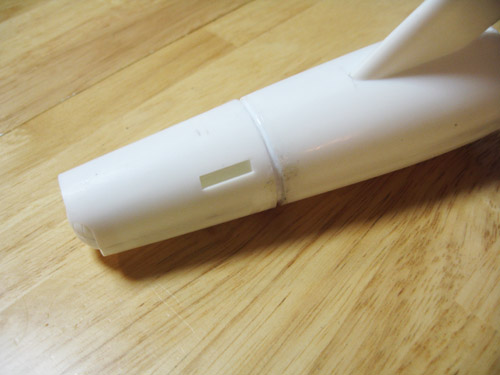
The kit’s nacelles were used and also modified. I cut off the grooves behind the bussard domes since I was using resin bussard domes from JT Graphics, which already these details. To create the taper of the studio model’s nacelles I drew a line with a pencil from the front corner of each half that goes to 2.5 mm at the rear.
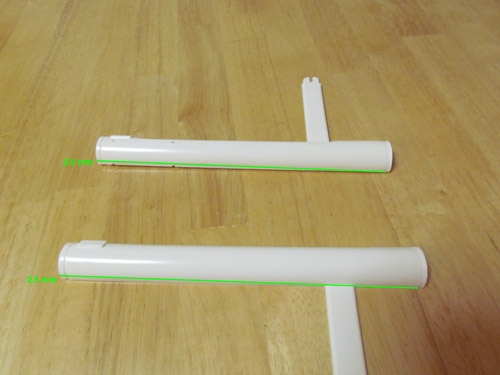
The above image illustrates where the cuts were made. Unfortunately I didn’t take a picture of the actual kit parts so I used nacelle halves from an older kit for figure 12’s illustration. It’s basically long skinny triangles that needed to be cut away. In order to make sure the inner trenches stayed centered on each nacelle the cut on both parts has to be made on the same side, as indicated in the picture. The 2 halves were heated with a hair dryer and rolled on a flat surface to create the taper towards the rear. When I glued the halves together I sanded, for what felt like days, to get them round and even.
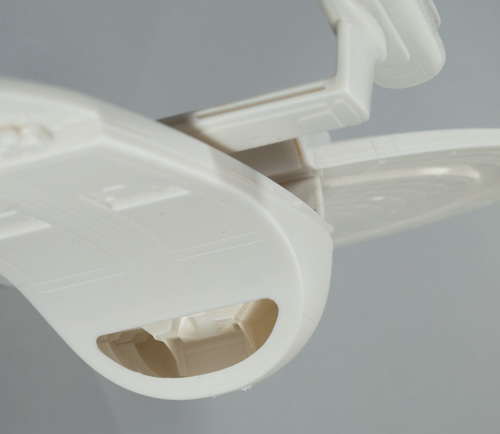
I used a set of correctly sized end caps from Federation Models that come with their Surya resin kit. The bussard domes from JT-Graphics have inserts to simulate the fan blades but have other details that weren’t actually on the studio model. Instead I used a set of clear domes I had on hand and added the fan blades with some 1 mm masking tape, painted silver.
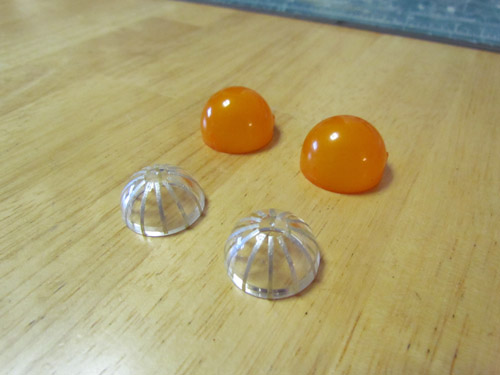
I used a set of JT-Graphics Intercoolers and Federation Models Control Reactors and rear vents to round out the nacelle’s details.
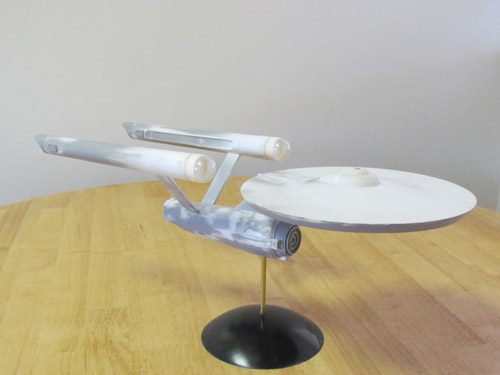
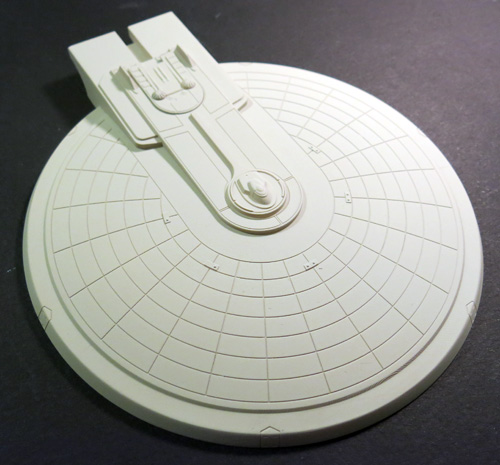
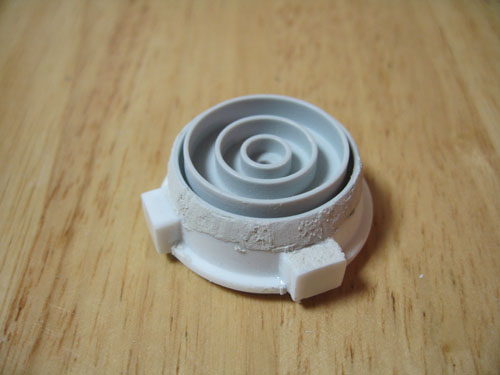
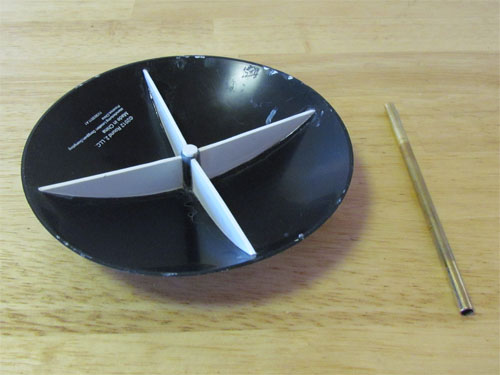
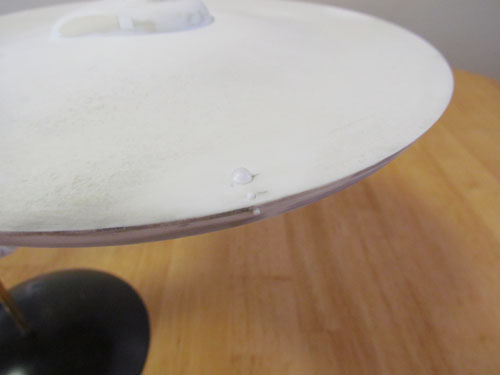
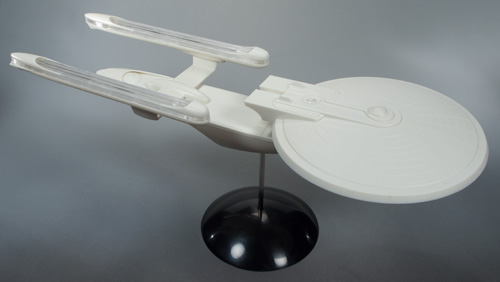
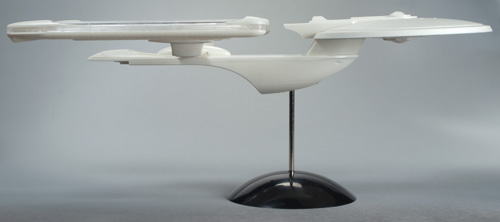
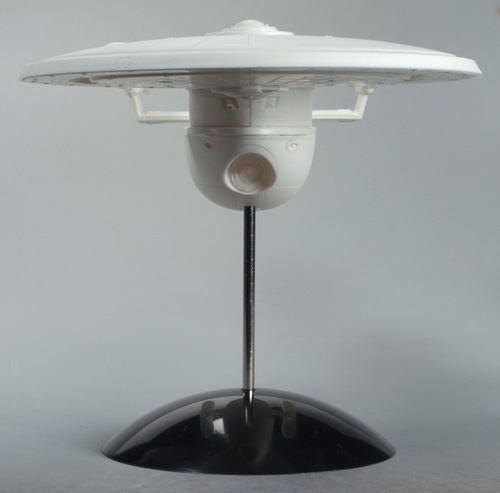
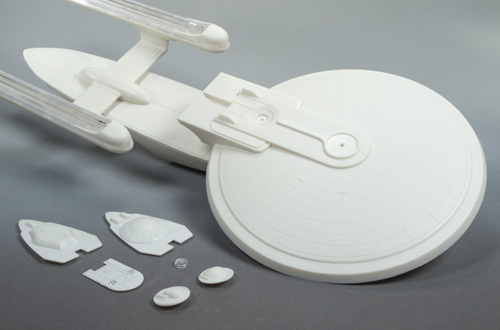
The above image shows the model almost completed sitting atop a Round 2 Dome Base, attached with a brass rod. I reinforced the dome base with 1 mm styrene sheet on the bottom. This keeps the Enterprise from swaying.
Having worked through all these modifications I was now ready to take a breath. The next round of fun would involve the hull color. With the Enterprise’s hull color being a big topic of debate over the years I knew it would take more then simply opening up a bottle of paint.
In my next and final installment I’ll cover the painting, weathering and the decals…
Michael Scarola
Coming off the Shelf – An Introduction

Beginning next month, in an effort to spread the word about our classic AMT/MPC automotive/big rig model kit lines, I’ll be posting a monthly sneak preview of a selected kit which is scheduled for release in the not so distant future. As you may or may not know, our main focus in the model kit segment of Round 2 is to take vintage kits that have not been released in many years, sometimes decades, and bring them back to life – as they originally existed, packaging and all. This process begins by literally taking the vintage kits “off the shelf” and opening the box up to see what’s inside. Thus, the theme of this blog.
We do this because we truly care about the model kit culture. Where it’s been, where it is now, and where it’s going. We do this, in hopes of giving all the faithful modelers out there a chance to relive their past experiences . To be young again. And to all the new modelers out there. Welcome. Hope you enjoy the previews to come.
Round 2 Models: Please welcome a special guest
Hi guys. A while… a long while now… ago I was approached by a new, but respected modeler by the name of Michael Scarola. He was working on modifying a couple of our sci-fi kits and was pulling out all of the stops to make his buildups as accurate as the kits were iconic. We chatted a bit and we decided to have him document his process on the builds and post the results on our blog. We have had these in the can for some time now, but I’ve just come across a sliver of time to schedule them to publish.
Mike did some magnificent work to transform our classic 18″ AMT Star Trek U.S.S. Enterprise and our 12″ MPC Space:1999 Eagle. We’ll be starting with posts about his Enterprise model to coincide with our recent re-issue of the kit that commemorates the 50th anniversary of the television show. You should find the kit available now along with our re-issue of the Klingon Bird-of-Prey. Each series of articles will be three parts with some follow-ups showing beauty shots of his finished models. Off we go with part 1 of “My Enterprising Journey”. Enjoy!
My Enterprising Journey: Building the Classis AMT 18” Enterprise – Part 1
Round 2 has been doing a wonderful job bringing back classic models that we love. The classic AMT 18” TOS Enterprise has been released several times over the past few decades but Round 2’s release breathed new life into it. To start, the original box art was a real treat and the best part is under the lid. The raised grid from the earlier releases was removed from the saucer’s top and a new, and very accurate, set of decals is provided.
Onto the build!
My original intent was to build this kit mostly out of box with the addition of a few resin parts. I started by downloaded a set of blueprints from Charles Casimiro which I sized to the AMT saucer’s diameter. I figured once the saucer matched the blueprints all the rest would start falling into place. The profile of the dorsal (neck) matched the blueprints and I found that the secondary hull and warp nacelles also sized up nicely. At this point I decided to attempt to go all out and try and make this build resemble the 11 foot long Enterprise studio model that was seen in original Star Trek throughout the whole series.
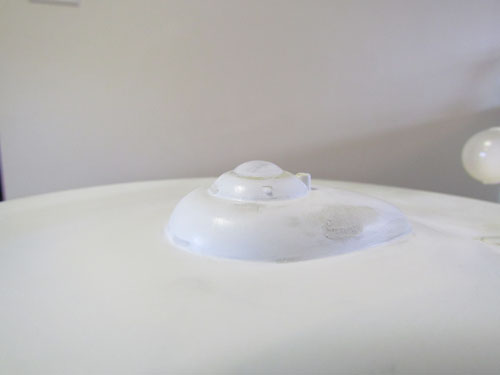
I started by removing the bridge and B/C deck structure from the top of the saucer. I replaced it with a part from Don’s Light & Magic (DLM), which I lengthened by 4 mm.
I re-shaped the Linear Accelerator using a razor saw and various files.
A new bridge dome was made using a spare nacelle dome from a Polar Lights 1/1000 TOS Enterprise kit.
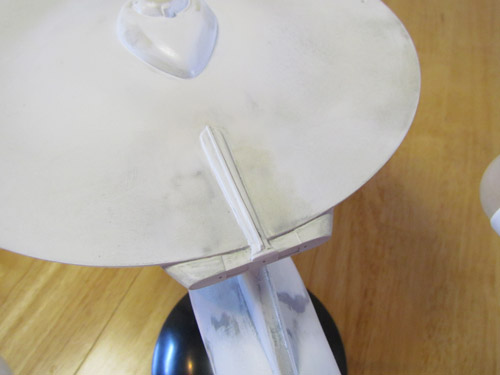
The bottom of the saucer proved to be a bit of a challenge. I glued strips of 1 mm styrene inside the saucer’s edge so I would have enough plastic to re-shape the outer edge’s contour.
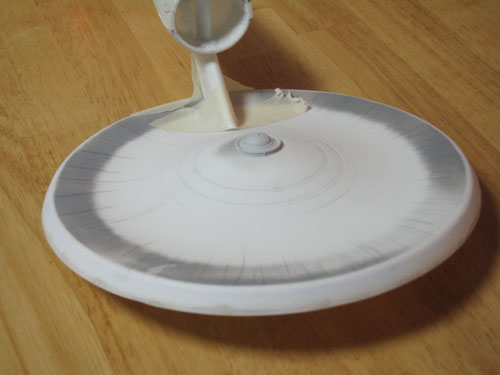
This was done using a razor saw, sanding sticks and lots of sanding. The 3 raised circular lines on the cone were removed and filled in as well as the 3 dimples by melting bits of plastic with liquid cement. The stepped area along the outer edge was removed and I added styrene sheet on the inside center of the cone and sanded down the raised area where the planetary censor attaches. The rest of the work involved sanding the bottom until it was even which seemed to go on forever. To scribe the 3 rings into the cone I used a compass cutter.
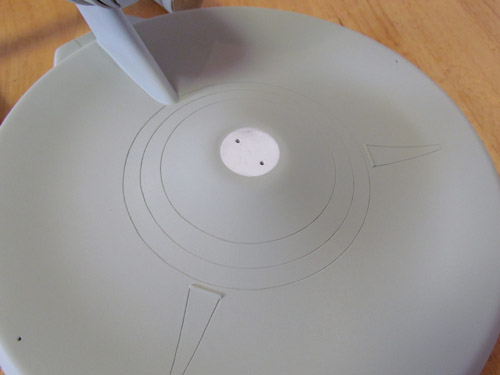
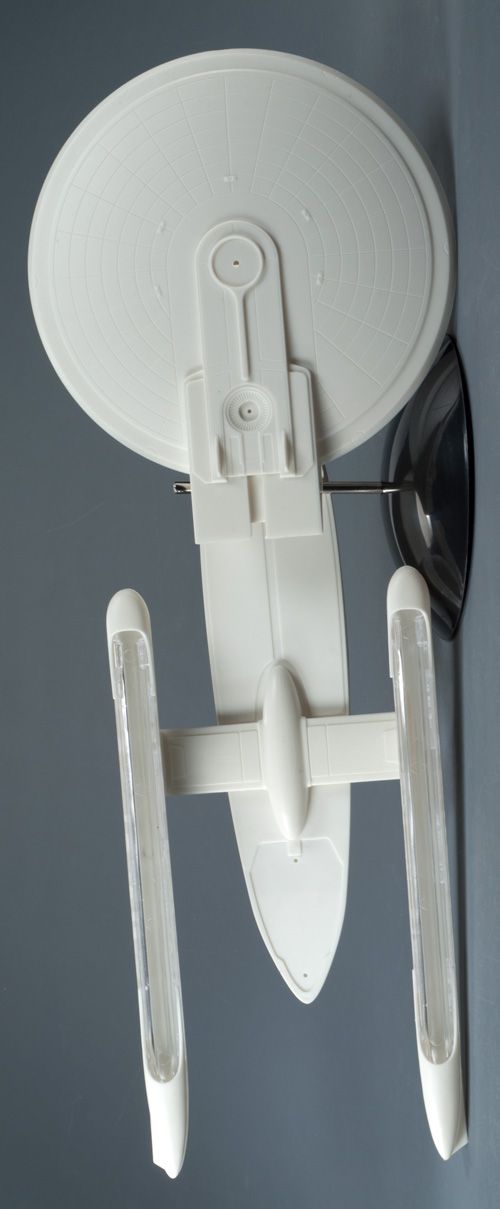
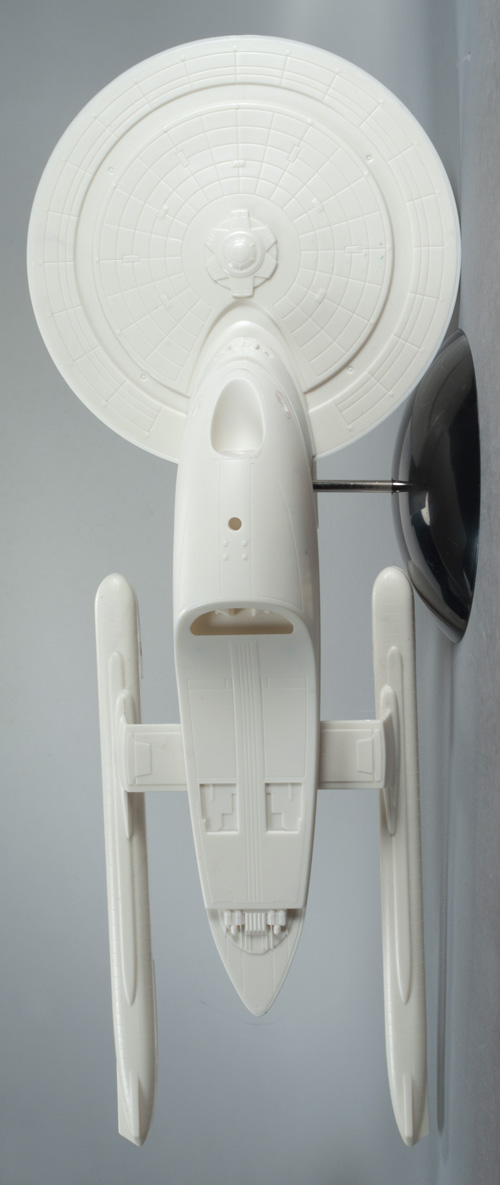
The above pic shows the completed work on the bottom of the saucer with the ‘triangles’ scribed in. For the navigation lights I used pieces of clear sprue from a Polar Lights 1/1000 TOS Enterprise kit. They are made to go in like pegs when the model is finished
The kit’s saucer does make an excellent platform to add details and modifications. The overall shape of the saucer is somewhat close to the studio model and just takes a bit of elbow grease to start looking the part. From the time I started my research this seemed like the most logical part to start on for the build.
In my next installment I’ll cover the secondary hull, nacelles, nacelle pylons, bussard domes and the base…
Michael Scarola
AMT Modern Muscle Car Madness!
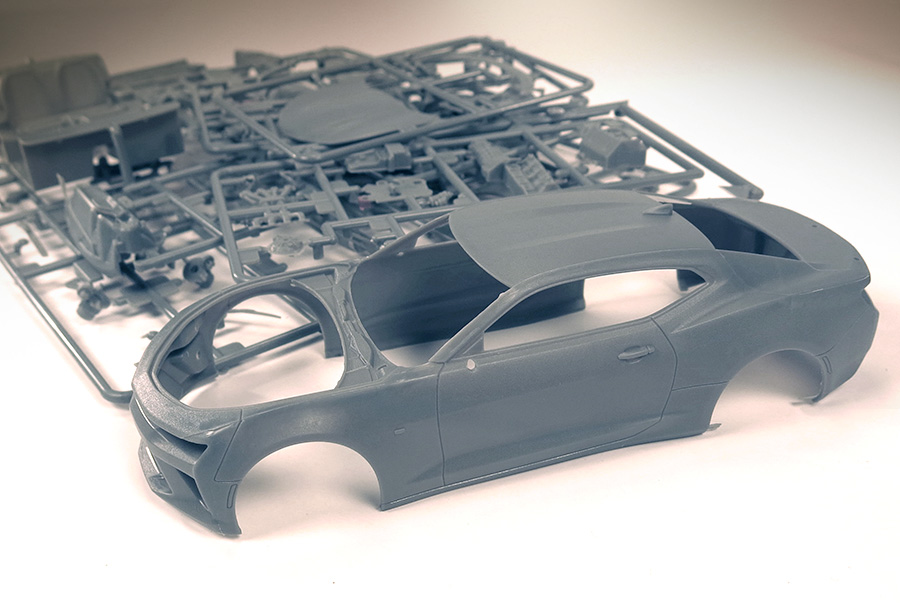
Look what arrived at our offices: First test shots of our newly-tooled AMT 2016 Chevy Camaro SS. There’s still plenty to be done before it’s release, but for now we’re reviewing the test shots for fit and other factors to make sure the final kit is great!
Sneak Peek! AMT Double Dirt Bikes • 1/25 Parts Pack
Here’s a quick photo, sent by our production facility. It’s a pre-production sample of the upcoming AMT “Double Dirt Bikes” parts pack. (AMTPP014/24, June release.) It features a pair of 1/25 scale motorcycles which originated in certain MPC Dodge Pickup and Van kits during the 1970s. While under normal circumstances, I really try to avoid re-branding items, all our parts packs thus far have been done under AMT. So I followed suit on this one.
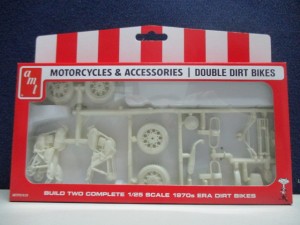
The production parts will be molded in silver, making it easy to build these without the need for a lot of painting, if desired. The die-cut viewing window of the packaging will be slightly different and the custom PVC blister that holds the parts will be black. Overall, final presentation will be greatly improved!
The parts build into nice looking replicas for the scale. Now you won’t have to scrounge parts or pilfer vintage kits to enhance your next diorama or custom off-road build project with a sidekick dirt bike!
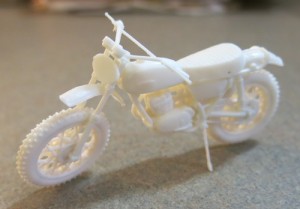
Grab the glue, it’s all you…
Star Trek Model Kits: U.S.S. Excelsior update
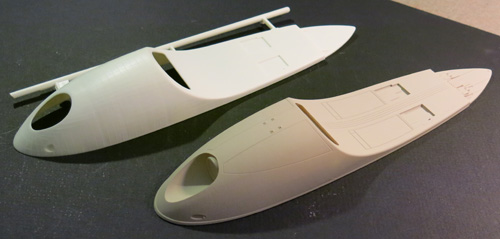
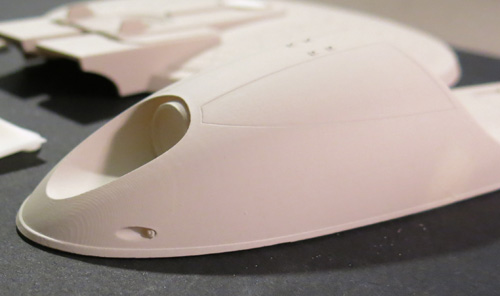
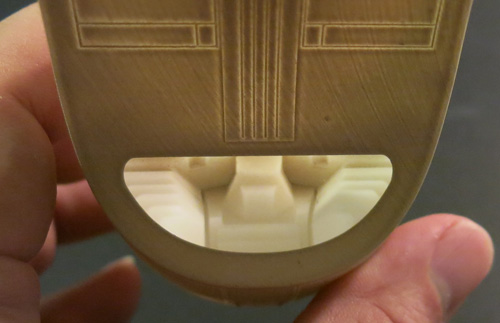
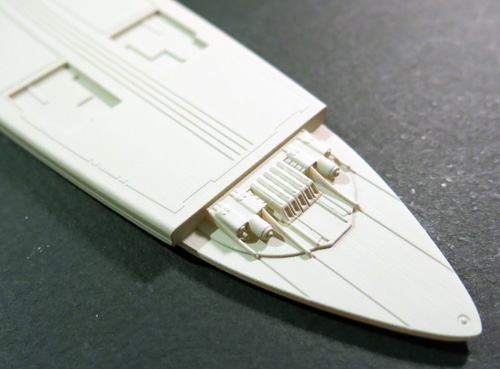
This time I’m coming back around to the Star Trek U.S.S. Excelsior model kit that should be coming by summertime. I received the first test shots a couple weeks ago and they look pretty good for the most part. There are always bugs to work out of course. The main thing about this particular set is the rough surface texture left from the RP that was used to make the electrodes that cut the tooling. Most of that work will be done by hand at the factory. The staff over there will need to take special care not to impact the nice delicate engraved panel lines we have on parts of the lower hull.
We made quite a few improvements on this version compared to the old AMT kit you might remember. In the end over half the kit was retooled including the entire lower hull. We used Gary Kerr’s notes and research on the aft weapon array and interior detail to get extremely close to the look of the filming miniature.
The parts are subject to licensor review.

The Inside Scoop on AMT’s 1929 Ford Model A “Mod Rod” Reissue
I’ve heard through the grapevine there’s been some speculation on what will, and will not be included in our upcoming release of AMT’s 1929 Model A Ford Roadster double kit. For those unaware, the two original “Mod Rod” releases, post the first issue, still included the parts to build Barris’ Ala Kart. However, the later Street Rods issues saw some parts modified and many others deleted. No more Kart. Then, in the AMT-Matchbox days, the rather “visually-unappealing” A-Venger was issued, suffering more original part deletions and further changes to others. This is pretty much how it stayed until RC2 reissued the kit with some parts gates reopened.
Before confirming what’s included in the upcoming reissue, I wanted to mention: as you can imagine, there are two camps regarding the original Ala Kart from the double kit vs. the retooled version. If the Ala Kart specifically was ever to be reissued, one group insists the original is better, i.e., it’d be more desirable to retool its missing parts. The other group feels that while the new tool has a few shortcomings, it’s the better candidate for rework to improve scaling and accuracy. This argument is the reason why the Mod Rod reissue will not contain ALL the parts to build the original Ala Kart kit. In other words, I haven’t decided which, if either approach to take. However, rest assured the upcoming Mod Rod issue will still delight you!
After a lot of consideration, I made the decision to retool what was necessary to re-release the yellow Mod Rod shown on that release’s box art. As such, the Ala Kart’s front axle and front suspension unit had to be recreated. I opted to leave the existing/modified (Kart) front suspension unit as it was (sans front springs) , so that it could still be used by those wanting to build the A-Venger version.
The Ala Kart wheels and ’32 Ford grille shell also needed to be retooled. The photo below shows images of the 3D models of all the retooled parts.
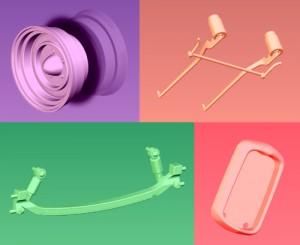
We’ve reopened every possible part gate in the tooling and have added part numbers to those without one. Even the Kart’s pickup bed will be back in the kit. But some key pieces, such as the Kart nose/radiator and the clear insert that goes into its chrome grille are gone from their respective tooling. The injector tube pieces for the Kart motor’s intake setup are also no longer in the primary tool.
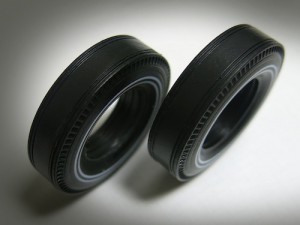
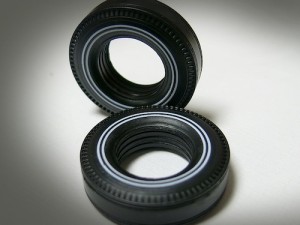
It goes without saying that we are very excited about what IS in this value-added kit. You’ll be able to build two complete cars once again, including the original old-timey racer with it’s hopped-up four-banger motor. As we had acquired the original yellow Mod Rod box painting a couple years back, we’ve decided to make the kit available as part of the Original Art™ Series. It’ll be molded in white and have the large format box with a bonus print of the painting, suitable for remembering the heyday of modeling. The kit will also be available molded in yellow, in our standard packaging as well. Both kits include exactly the same parts and even feature two drag slick options – our new skinny “pie crusts” with Firestone lettering that will knock your socks off; and also a set of Goodyear Blue Streaks that look very similar to what’s shown on the Mod Rod box painting.
The planned release for this kit is in May, just in time for late-spring kit bashing season!
AMT, MPC Cars & Trucks: The Devil Is In The Details
OK, all you car and truck modelers: I’ve been taking some heat, both internally and also from emails coming in. No, not about suicide chicken wings, but regarding our blog and Facebook pages; being “limited” to sci-fi subject matter. I cannot contest this. So, I’m going to try and improve on the situation once and for all, with some posts for those of you who like things that run on gasoline as opposed to dilithium crystals. I commend Jamie to no end for the time and effort he finds and puts into his sci-fi and figural posts. He’s done an incredible job.
Star Trek Models: U.S.S. Excelsior new part preview
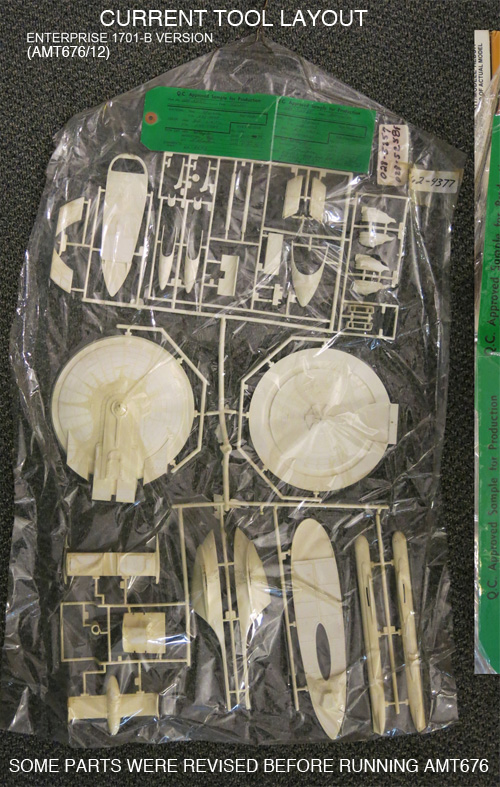
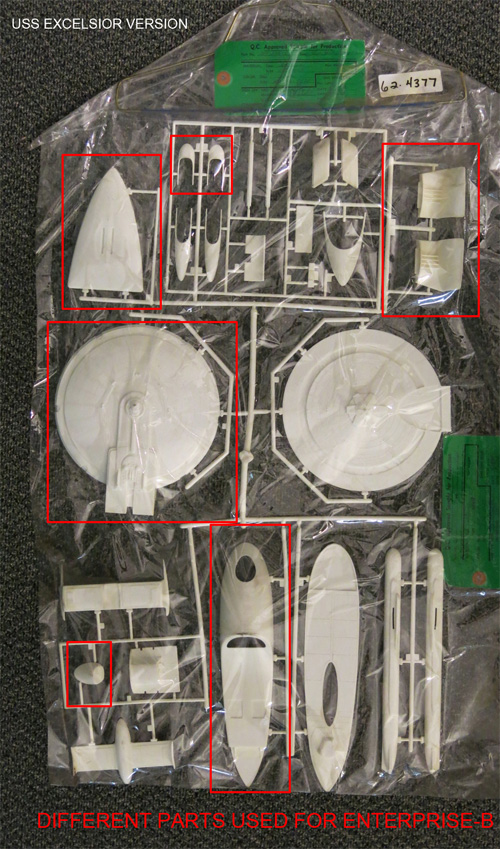
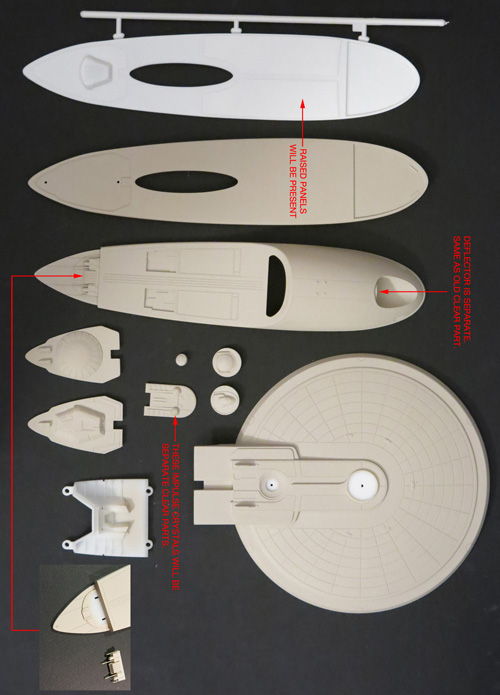
At long last, here is the promised sneak peek at the new parts that have been brewing to create our upcoming release of the U.S.S. Excelsior from Star Trek. The short history on the old AMT tooling is that the inserts that are needed to transform the U.S.S. Enterprise-B kit into the Excelsior have been lost. So we have had to recreate the missing parts. Like most of our work on new Star trek kits, the CAD work was done by Angelo Bastianelli. If you never picked up our reissue of the Enterprise-B a few years back, we made a few corrections on that one. Most significantly, we completely redid the lower saucer and curved the back wall of the neck. Some might ask if we are just recreating the parts from the old Excelsior kit. You know us by now. We approach these kits like the Six Million Dollar Man. We make them better than they were before, better stronger, faster… Okay, maybe just better, but you get the point.
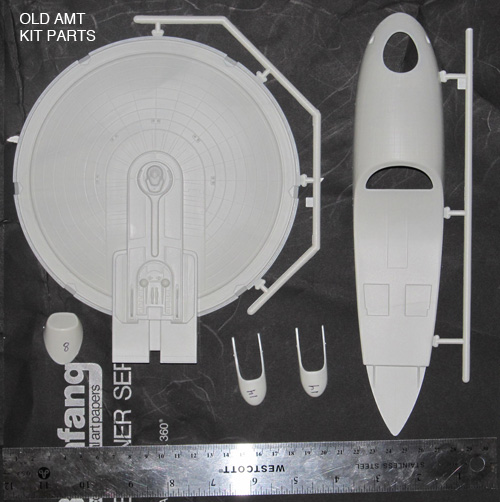
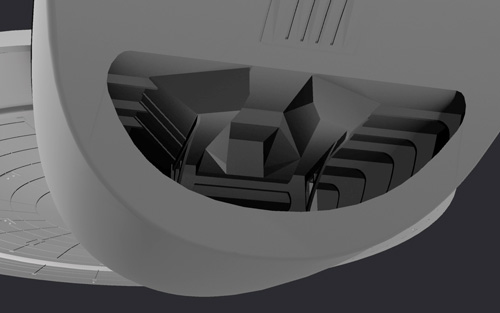
With this edition, we examined the shape of the lower hull carefully, but found that the shape of the old part was proportionally accurate. Without necessarily meaning to, the new one is relatively close to the shape of the old one. We’ve decided to implement a slide mold this time though so the deflector trench will no longer be a separate part. That also allows us to get the weapon details a little better on the sides of the hull. We are completely redoing the inner “gut” detail of the hull based on Gary Kerr’s research into the model kit parts used when the filming miniature was built. A few compromises were made to allow us to inject the part with minimal fuss, but few will pick up on the differences. The look of the “whalebone” is more accurate now with that detail being split between the inner bay part and the outer hull part.
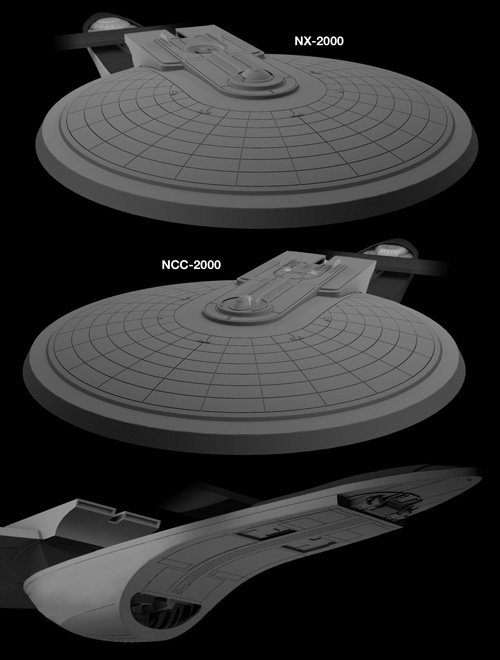
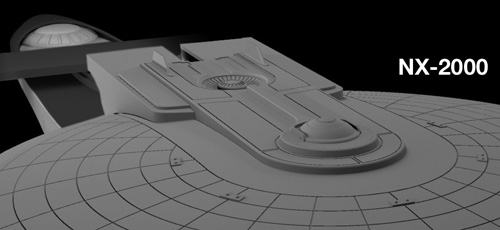
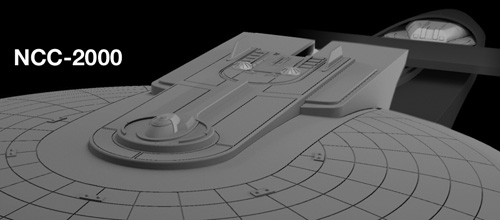
We had to recreate the top of the saucer as well and this was probably the most significant undertaking. The old part was kind of soft on details, so we made sure this one is up to snuff and a substantial upgrade will be the ability to use parts to build the ship as either the NX-2000 as shown in STAR TREK III: The Search For Spock or as the NCC-2000 as commanded by Sulu in STAR TREK VI: The Undiscovered Country. That means the bridge dome, impulse crystals and hangar bay will all come with swap-able parts. Speaking of impulse crystals, they will come as clear parts regardless of which version you choose.
Here are a whack of photos to take a gander at. I’m sure you’ll pick up on some of the other fun details and features I haven’t mentioned. Right now, it looks like the kit will be out in May.
For those hungry for more Eagle updates. I hope to have another post about that out next week.