Recommended Sites


Posts Tagged ‘Round 2’
Defying The Dark
Lighting a Mini “U.S.S. Defiant”
by E. James Small
Round 2 have begun doing a few things differently lately, and the difference is clear to see.
Let’s look at the newest re-release of the Star Trek Deep Space Nine kit. The entire model is now molded in clear plastic, allowing for the adventurous modeler to light up the whole thing more easily rather than having to bother with the tedious job of drilling hundreds of holes and installing fiddly fiber optics. The same thing was also recently done with the Star Trek Enterprise D kit.
For an example of how casting the kit in clear is advantageous, let’s show you how to shed some light into something that most people might consider impossible, the newly tooled and diminutive 3 inch “Defiant” model that comes with the DS9 kit. Remember you can light up the entire station using the methods shown here too.
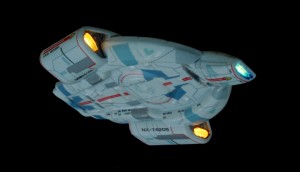
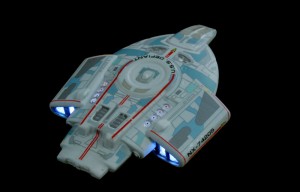
Using five 3mm LED’s, the tiny ship can be fully lit with relative ease, and it’s easy to make a stand to both support the model “in flight” and serve as a power supply.
The photos here pretty much show it all. Note that, using files, you can even sculpt and sand down LED’s to fit your needs, such as in cramped areas. Just as long as you don’t sand through to the metal bits inside the solid epoxy case, you can modify LEDs to the shape and size you need and install them in areas where they would not normally fit. Plus, because LED’s stay cool, you don’t need to worry about them damaging the model.
First, the kit is test assembled and examined to see where you can install the LED’s. The Defiant’s engine and bussard scoops are glued in place, being careful to test to make sure the top of the body can be installed correctly afterwards.
Next choose the LED’s to use for the model. I decided to use “warm white” 3mm LED’s for the bussard scoops and front sensor area, and regular (cool) white for the engines in the rear. Use whatever you think is best. Upon reflection I suppose I should have used a cool white or blue LED for the front sensor area since it is supposed to be blue, but it still worked out.
Hint: Stick with white, blue and green LED’s for most of your projects because they work rather happily on 3 volts, generated by two regular 1.5 volt dry cells connected in series. They can be tinted with transparent paints if you want different colours. The new pink and purple LED’s also work using 3 volts. But red, orange and yellow LED’s work at around 2 volts (one cell won’t light them up but two will burn them out!), necessitating the use of resistors which is more complex for the average modeler who may not be familiar with electronics. Please see my other article on lighting the K-7 space station here on the Round 2 Workbench for more details in using and soldering LED’s.
The most time consuming part is next… Practice installing each LED in place within the model, file down both the LED and the inside of the model as necessary until the LEDs fit in place and the hull fits together properly.
When you are satisfied with fit, choose some very thin insulated wire (such as telephone wire) and solder the LED’s together paying particular attention to polarity. You will need to plan it carefully and trim the LED’s leads accordingly.
Hint: Don’t solder the parts inside the model. Test fit, get the correct positions then solder the parts together, holding them with alligator clips and clamps outside the model to avoid damaging the plastic. Just keep test fitting often, and also keep testing the circuit as you go to make sure your polarity is correct and your LED’s aren’t damaged.
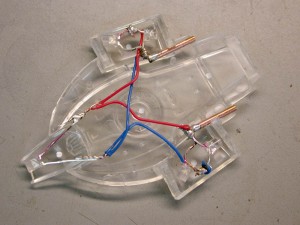
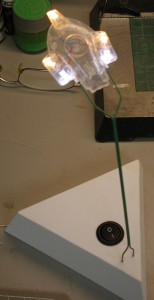
Next, you can use narrow brass or copper tube (available from K&S metals at your hobby shop) as a receptacle for the stand mount which you will make from Plastruct’s plastic coated steel wire (made in two sizes), also available at your hobby shop. Choose sizes that will allow the stripped wire to slide easily but firmly into the hollow tube. This wire will act as support for the model as well as carry electrical current to the LED’s. The plastic insulation on the wire will allow you to glue it together and prevent short circuits. The tiny tubes will allow you to remove the model from the stand any time you wish. Solder the LED’s to these tubes with one for the positive leads, the other for the negative. You will need to drill holes and cut channels into the interior of the model to accept the tubes. See Fig. 1.
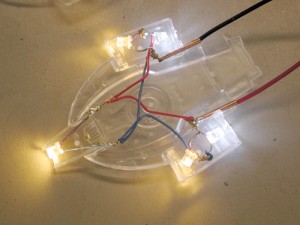
When you are satisfied with your internal assembly, make sure you fully test it by plugging in some wires from your battery pack before gluing the hull together, sealing it up forever. See Fig. 2.
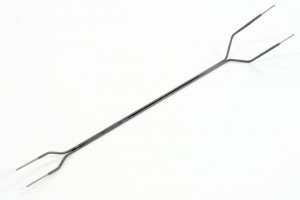
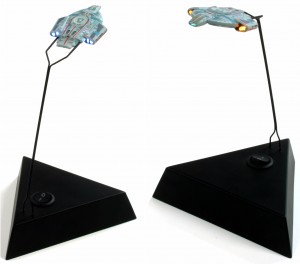
Now is a good time to make your stand. First, make your support by stripping and preparing the plastic coated wire, bend it into the shape shown and make sure the stripped ends fit into the model snugly but easily without strain on any parts as in Fig. 3
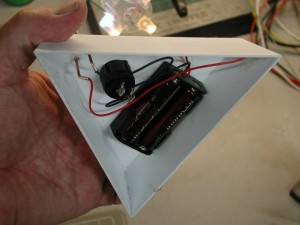
The stand shown in these pictures was scratch built from sheet plastic, but you can make one out of just about any kind of box you want. A switch is installed as well as a battery pack to hold two dry cells and two tubes, the same as the ones installed in the model, are used to plug the support wires into. See Fig.4.
Imagine what you’d have to go through to light this little fella up if it were molded in opaque material!
When you are satisfied everything can be mounted in place and the hull can be glued together, test everything (Fig. 5) then go ahead and finish the model as usual but with the following exceptions:
1: Mask off the areas you want to light up, OR be prepared to scrape paint off those areas when the model is finished. Liquid masking film is handy for this operation. Note the stand you made can be used to hold the model when spraying it as well as keep paint from getting into the inside of the tube!
2: Spray the entire model’s outer surface with white primer and when dry, follow up with dark gray primer. The white will help the light bounce around more inside the model to light up other things like windows, the gray primer will help keep the light from leaking through the hull colour, as most other paints are not entirely light-tight. Continually test the lighting while priming to make sure the model’s hull is sealed. Silver also makes for a great light blocking alternative as well, just make sure you can paint over the silver with your hull colour. Some silver paints don’t take well to being re coated with another colour.
When that is done, finish and decorate the model as desired. Install the batteries, plug in the stand, throw the switch and… (Fig 6)… ENGAGE!
Get yours now from the Autoworldstore.com
http://www.autoworldstore.com/SearchResults.asp?Search=AMT751&Submit=Search
Drag Racing’s Legendary past is a classic story in any scale
In any sport there is period of time you can look at and pinpoint the moment when the sport hit the big time. For drag racing, it was the late 1960s into the mid 1970s. That was when the sport experienced the perfect combination of extraordinary technological breakthroughs, record-breaking speeds, ground-breaking designs and a collection of legendary characters who were always ready to push the limits. It was that intoxicating mixture which took drag racing from a regional sport to one that captured the imagination of the nation.
In the late 1960s, model kit building was an extremely popular hobby. Millions of model kits were manufactured each year to keep up with the demand. Model Products Corporation (MPC), a fledgling model kit company based in Michigan, took notice of America’s attention to drag racing and began to produce 1:25 scale model kits of these cars. Everything from funny cars and rail dragsters to pro stockers and gassers lined store shelves. Names like “Grumpy Jenkins,” “Mr. Norm” and “Dyno Don” adorned the packaging. AMT, Monogram and Revell also produced drag racing models kits, but by the 1980s, model building began to wane and the tooling for most of these models was put into storage.
Today, vintage drag racing subject matter has become extremely popular in model kit and die cast circles. Many famous cars have been produced over the years, but it wasn’t until May of 2012 when Round 2, LLC announced the launch of their “Legends of the Quarter Mile” program that things really heated up. The Legends line was conceived to put a spotlight on the famous names and cars that put drag racing on the national map. Because of the diverse brands and categories under the Round 2 umbrella, “Legends” 1:18 scale die-cast replicas and 1:64 scale slot cars and drag sets are manufactured under the Auto World brand. Vintage model kits are also being reintroduced in 1:25 scale under the MPC and AMT brands.
The release of Harry Schmidt’s Blue Max Mustang Funny Car as a 1:18 scale replica signaled the beginning of a wildly successful program that has captured accolades from racing fans and hobbyists alike. Several original teams and drivers have contacted Round 2, asking to have their cars immortalized in this exciting series!
It was well before the first release, when work began to reintroduce several of the most popular drag racing model kits ever made under the “Legends” line. Some had been unavailable for decades and had been commanding big money on the collector market. The original tooling had to be scrutinized and in many cases, parts recreated. The artwork used to produce the decals in the original kits was long gone. Archival photos and other reference material was used to freshly replicate all the logos, badging and other markings in creating new, more detailed and accurate decal sheets. It was a challenge to find several of the original drivers. Some had moved on to other businesses and others had unfortunately passed away.
Late in 2012, Round 2’s MPC brand reissued Arnie Beswick’s “The Super Judge” GTO and Connie Kalitta’s Bounty Hunter Funny Car model kits in the Legends of the Quarter Mile program. These deluxe 1:25 kits are available for the first time in decades and have additional extras added, like the additional window parts in the Beswick GTO molded in clear orange, replicating the real car’s tinted backlight. You’ll notice the attention to detail with the kits’ extremely popular pad-printed tire lettering and a connection to the past with the vintage box artwork.
The latest Legends model kits include a special edition of AMT’s Ohio George Montgomery 1933 Willys Gasser and Carl Casper’s famed Young American front engine rail dragster, complete with bonus items and packaging that will delight any modeler or kit collector. For the Young American, Round 2 worked with Carl Casper himself to acquire a fantastic photo of the 1:1 car doing a wild pre-run burnout, to use on the packaging. It was a photo taken only seconds after the original one was used on the original release of the kit back in the 1970s. MPC’s team turned another photo Carl provided into a bonus card to include in the kit, featuring the specs of the car and a list of famous wins.
For the latest Legends of the Quarter Mile news, updates and offers, check out www.autoworldhobby.com/Legends. Get Legends of the Quarter Mile products at hobby stores, racing and die-cast related stores and www.autoworldstore.com.
Let the Kat out of the box!
What could be better in the winter months than enjoying time at your modeling workbench, jammin’ on your latest and greatest build? Finding a Katch the Kat version of AMT’s upcoming “Sock It To Me” 1962 Chevrolet Corvette kit, that’s what! The Kats are at it again, getting ready to reissue a perennial favorite kit, in the most desirable format ever seen in its history: SOCK IT TO ME! Back in the day, the original AMT Kats cleverly created issues of select kits named after popular catch phrases of the time. The “Sock It To Me” ’62 ‘Vette oozed additional coolness, with it’s psychedelic “airbrushed and pinstriped” box artwork and fluorescent orange lettering.
The FOUR different mod car illustrations on the box made you want to build one, or more, “real bad!” As a special bonus, inside the kit was a bonus Sock It To Me bonus sticker, printed with day-glo ink. The model could be built as a sporty stock replica, but also included a myriad of performance parts to create several different inspiring custom and racing variants: a blown quarter miler, a DOUBLE-blown salt flats rocket, or a totally mod custom with mind-blowing pinstripe and flame decals! Dig? Dig!! When the Kats decided to reissue the kit in the SITM packaging, they went all out, making sure it was just as sweet as the original… even better! They’ve included pad-printed “pie crust” M&H Racemaster slicks along with “wide whitewall” Firestone Deluxe Champion tires. They even restored the vintage slotted Astro mags back to their original appearance by adding back the textured center sections, for the ultimate in retro realism. The super-colorful decal sheet has been completely recreated from scratch, and we think you’ll agree, they are beautifully brighter than the originals! The Kats like the feature-packed ’62 Vette kit so much, they’ve decided to include it in the exclusive “Katch the Kat” program. Just like the Meyers Manx and Grandpa Munsters’ Drag-U-La, one in every twelve Sock It To Me ’62 Vette kits is molded in a special metallic color. Every metallic kit includes a confirmation card inside the box to let you know you’ve found something special! This time, and in keeping with the groovy box art, the metallic color is far-out orange! But every kit, whether it’s molded in white or metallic orange, includes a reproduction bonus “Sock It To Me” sticker, just like the original. It’s fabulous fun – only from the Kats at AMT!
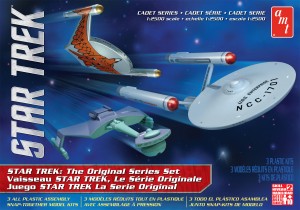
Star Trek: The Original Series Cadet Series 3-ship set
This iconic set of three 1:2500 Scale Star Trek models is a great way to pass the
snowy winter days. It includes three mini snap kits, featuring the U.S.S.
Enterprise along with the newly tooled Romulan Bird-of-Prey and Klingon D7
Battle Cruiser. Molded in silver and green the Romulan Bird-of-Prey and Klingon
D7 Battle Cruiser have never before available at this scale. These simple snap
assembly kits are great for beginners and include detailed decal sheets
featuring all three ships’ markings.
Round 2 Model Kits: DO… YOU… WANT… TO…PLAY… A… GAME…?

This may not turn into “Global Thermal Nuclear War” (well at least I hope it doesn’t), but I always like to post about things I’m kind of jazzed about when I’m working on Round 2 model kits. Usually when there is a lull in posts, it is because I’m busy working on a package or instruction sheet. Both are major time hogs but generally aren’t much to talk about. So when inspiration hits, I always try to write something out real quick.
Anyways, I’ve been working on some decals this week that have been pretty fun. Rather than come right out with it, I figured I’d make a game out of it. (Michael, our new creative director LOVES games. I hope he is proud of me.) So, the pic shows what I’ve been up to. I’ll give you twenty guesses as to what it is. Whoever correctly guesses first is the winner. I’ll send the winner a proof of the decal sheet when it arrives.
UPDATE: OUR WINNER… CHIANGKAISHECKY
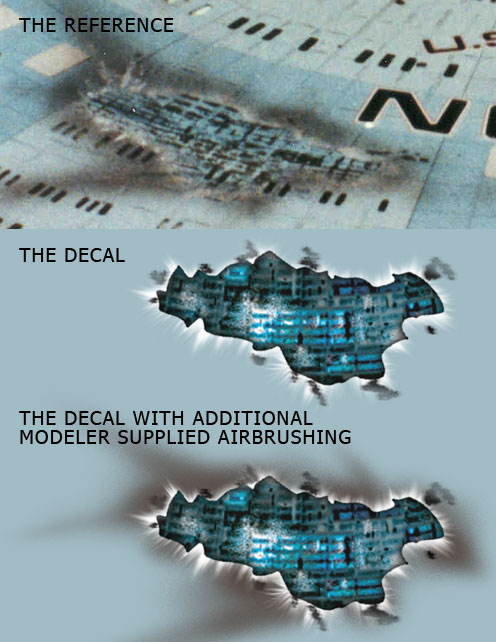
I knew it wouldn’t take long but I figured I would have to drop at least one hint. We are bringing the U.S.S. Enterprise NCC-1701-C back out by the end of the year and it will feature a nice size decal sheet featuring ALL NEW battle damage decals based on the original filming model. When I first started figuring out how much I would be able to include, I discovered that the ship was pockmarked with relatively small spots of damage. Once I had a map established, I discovered that if I concentrated on the hull opening itself but not include the black burn marks, I would be able to include every spot I could detect in the reference I had on hand. I figured most modelers could handle the little bit of freehand airbrushing that would be needed to complete the look. Even without the additional airbrushing, they look pretty good on their own. I’m showing one of the decals below along with the reference shot and how it will look with a little airbrushing.
Besides revised Enterprise-C registry markings, U.S.S. Yamaguchi registries will also be included. Unfortunately, it doesn’t look like I will have room on the sheet for the U.S.S. Excalibur registries. The sheet size is determined by the bottom of the box and it looks like it will be pretty well packed. We will have a product page up our website soon.
Star Trek Model Kits: The Great Debate
We made a promise not to discuss the development of our 1:350 TOS Enterprise Star Trek model kit outside of our 1701CLUB updates. This blog post won’t talk about it directly but it does address a significant concern among modelers that seems to have turned into a great debate. This post won’t be about what we will do or what we won’t do, but explains the kinds of things that we have to keep in mind when making decisions about our new kits.
Two words seem to strike fear into the hearts of model builders everywhere… GRID LINES. So, let’s ask the question. Why in the universe would we consider adding such a detail to a hyper-accurate model kit? I don’t have to remind modelers that until we came along, no AMT Enterprise model was ever built without a modeler having to slave over meticulously sanding the stupid things off the saucer… Wait, none of them were ever built without doing that…? Well maybe as kids we never removed them. There was no way to accomplish that at that age and get it to look right. With time, our skills improved and we found ways of improving things as best we could and every build any of us ever did came out looking great… Didn’t it? Well, maybe there were some cases where incredible effort was put forth but some builds weren’t quite as nice as the next. Is that all on the modeler? Or is the manufacturer responsible to some extent? How many kits were made back in the day with saggy nacelles? If it wasn’t one thing, it was another.
So here’s the quandary, do we appeal to a core demographic of the really amazing modelers out there and leave something like the top of a saucer smooth or should we consider adding VERY fine engraved lines that would really help out everyone else to make their build look as accurate as they can manage? What if we could do lines so fine that when viewed from an arms length look like they’re drawn on…
Let’s break it down further…
REASONS AGAINST:
1) it is not accurate to the filming model. The lines were drawn on with a pencil, not engraved.
2) Talented modelers are capable of drawing the lines on themselves.
3) … well… See reasons 1 & 2, I guess.
4) SEE REASONS 1 & 2! (Expletives mercifully deleted)
REASONS FOR:
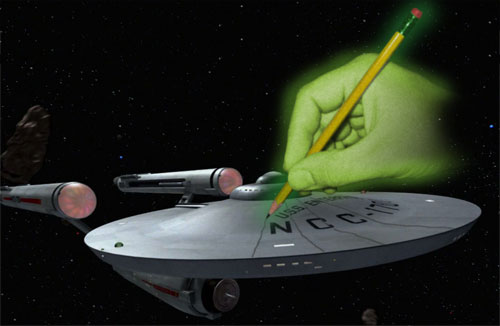
1) The model kit should represent the TOS U.S.S. Enterprise… as in the one with Captain Kirk standing on the bridge and Scotty in the back screaming that he needs more time. The ship has a deflector grid on the saucer that falls between metal plating resulting in narrow valleys on the surface of the hull. (Or did Apollo’s green hand draw them on with a giant space pencil?). The filming model had some other wonky stuff that we wouldn’t want to copy exactly either. So, we aren’t completely beholden to the filming model, our mission is to create a representation of Matt Jeffries’ design in support of what was shown onscreen.
2) If handled correctly, the engraved lines would look just like penciled on lines.
3) Drawing concentric circles on a 14” curved saucer is not an easy task for anyone. More often than not, most modelers will struggle with it.
4) Star Trek has a wide appeal beyond the modeling market. Tons of Star Trek fans would be interested in building such a kit even if they aren’t modelers or even artists. If engineered well and thought through, the kit should allow them to be able to build an accurate representation of the ship for themselves.
5) If we don’t keep in mind that any kit could be someone’s first kit, we as model kit manufacturers wouldn’t be doing our due diligence.
6) Most modelers who really work over the details of a build to achieve their vision of perfection have the skill to eliminate the lines without much trouble. Or at least they would not have nearly as much trouble removing them, as another modeler would have with drawing them on.
All this is considered without a firm decision in mind at this point. We’ll see how it goes. 1701CLUB members will be the first to find out the answer.